Lenoxx Healthy Choice AF1200 User manual

Category
Small kitchen appliances
Type
User manual

Lenoxx Healthy Choice AF1200 air fryer offers a healthier way to cook your favorite foods with little to no oil. With its 12L capacity and 18 pre-set cooking programs, you can air fry, grill, roast, bake, dehydrate, and reheat a variety of ingredients. It comes with a rolling cage, rotisserie fork, mesh rack, mesh basket, cage tongs, drip tray, and mesh tray, allowing you to cook multiple dishes simultaneously. The fully-digital display provides easy control over time and temperature settings. Safety features include overheating protection and automatic shut-off.

Lenoxx Healthy Choice AF1200 air fryer offers a healthier way to cook your favorite foods with little to no oil. With its 12L capacity and 18 pre-set cooking programs, you can air fry, grill, roast, bake, dehydrate, and reheat a variety of ingredients. It comes with a rolling cage, rotisserie fork, mesh rack, mesh basket, cage tongs, drip tray, and mesh tray, allowing you to cook multiple dishes simultaneously. The fully-digital display provides easy control over time and temperature settings. Safety features include overheating protection and automatic shut-off.

Model No: AF1200
Batch no: PR3835
This appliance is intended for household use only.
Please read the manual and relevant notes carefully before using.
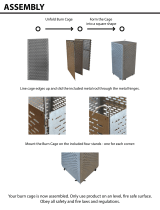
The illustrations used in the manual are to illustrate the operation method and product
structure of the product. Where there is a small difference between the physical item and
the illustrations, please take the physical as the standard.
ABOUT THE PRODUCT:
Your personal chef has arrived and is equipped and ready to prepare meals for your entire
family.
Whatever the occasion the 12 Litre Digital Air Fryer has got you covered. Loaded with a
rolling cage, rotisserie fork, mesh rack, mesh basket, cage tongs, drip tray and mesh (or third
level) tray, this air fryer is packed and ready to make meals that will take your cooking to the
next level (in just a fraction of the time!).
Better yet, this cutting-edge, circulating ‘turbo air’ technology cooks your food with
minimum oil, while still providing maximum taste. Simply add your ingredients into its huge
12 litre capacity and wait as the air fryer circulates ‘superheated’ air up to 200°C. Watch as
your food grills, roasts, fries or bakes its way to perfection behind our secure, retro glass
viewing window which is also removable for cleaning. Enjoy three layers of rack levels so
you can simultaneously cook meals and sides.
This 12 Litre Digital Air Fryer gives you the tools to cook your way to a healthier life
offering a low-fat, low-calorie, fast-cooking alternative that does not sacrifice taste or
quality. The fully-digitised display offers easy, modern pre-sets to help you find the
corresponding cooking program. With an impressive 18 in-built cooking programs, you can
choose from chips, steak, fish, shrimp, pizza, defrost, wings, cake, vegetable, cookie,
chicken, bake, rotisserie, dehydrator, reheat, sausage, nuts and lamb. You can even set your
own time up to 90 minutes and temperature between 65°C 200°C as you cook a variety of
meals. The dehydrate cooking program offers a time setting of 24 hours and temperature
range of 30°C 80°C. The defrost cooking program offers a time setting between 5 90
minutes and temperature range of 30°C 80°C.
With a rotisserie 360° food rotating option, you can enjoy crispy chips and even roasted
nuts all cooked to perfection. Healthy eating doesn’t have to be boring pave your own
path with a new way to prepare delicious food, at just the turn of a switch.
IMPORTANT SAFEGUARDS:
When using electrical air fryers, basic safety precautions should always be followed,
including the following:
1. Read instructions carefully before use.
2. Remove and safely disregard any packaging material and labels before using this product
for the first time. Ensure children and babies do not play with plastic bags or any packaging
materials.
3. Before use, check that your local voltage corresponds with the specifications shown on
the appliance nameplate located under the appliance.
4. Always operate the appliance on a horizontal surface which is level, stable and non-
combustible. Do not operate the appliance on or near combustible materials such as
tablecloths or curtains.
5. Do not place the appliance on or near a hot gas or electric burner, or in a heated oven.
6. Never connect this appliance to an external timer or separate remote-control system.
7. Never use this appliance with an extension cord or power board. Ensure it is plugged into
a dedicated power point and without any other appliances on the same outlet.
8. Do not turn on the power until the appliance and parts are in place as required. Make
sure the door is closed before plugging in and switching on the power.
9. To protect against electric shock, do not immerse the cord, plug, or appliance in water or
any other liquid. Do not expose the appliance to dripping or splashing and ensure that no
objects filled with liquids such as vases are placed on the appliance. Do not put any water or
other liquid into the main housing of the appliance through the vents. Do not rinse it under
the tap.
10. Do not touch the appliance, power cord or power plug with wet hands.
11. Unplug from the outlet when not in use and before cleaning. Allow the appliance to cool
down (if relevant) before putting on or taking off the parts, and before cleaning.
12. The appliance does not contain any serviceable parts inside. Do not attempt to open
and repair the unit yourself. All components should only be serviced by a qualified
technician.
13. Do not use the appliance if the plug, power cable or unit itself are damaged. If the power
cord is damaged, you must have it replaced at a service centre with qualified persons in
order to avoid a hazard.
14. Do not use the appliance for anything other than the intended use. It is for household
use only. It is not to be used outdoors or for commercial purposes.
15. Close supervision is necessary when any appliance is used near children. Keep the
appliance and power cord out of reach of children when it is in operation or during the
cooling process.
16. This appliance is intended to be used in household and similar applications such as:
- staff kitchen areas in shops, offices and other working environments;
- farm houses;
- by clients in hotels, motels and other residential type environments;
- bed and breakfast type environments
17. This air fryer should be operated on a separate electrical power point from other
operating appliances. If the power point is overloaded with other appliances, this air fryer
may not work properly.
18. Extreme caution must be used when moving an air fryer containing hot food.
19. Leave enough open space from other objects while in use. Do not block air intakes or
exhausts.
20. Do not place the appliance against a wall or against other appliances. Leave at least 5
inches of free space on the back and sides and above the appliance. Do not place anything
on top of the appliance.
21. When the appliance is in operation, air is released through the air outlet vent. Keep your
hands and face at a safe distance from the air outlet vent.
22. Do not touch the hot surfaces. The appliances outer surfaces may become hot during
use. The rolling cage and rotisserie stick will be hot. Wear oven mitts or use the cage tongs
to remove it. Wear oven mitts when handling the mesh rack, mesh basket, mesh tray and
drip tray.
23. Do not cover the air fryer while in use.
24. Do not let the cord hang over the edge of the table or counter.
25. Do not unplug the air fryer by pulling on the cord.
26. This appliance is not designed to be used by people (including children) with a physical,
sensory or mental impairment, or people without knowledge or experience, unless they are
supervised or given prior instructions concerning the use of the appliance by someone
responsible for their safety. Children must be supervised to ensure that they do not play
with the appliance.
27. Do not leave the appliance operating while unattended.
28. The appliance may emit smoke during it’s first use. It is not defective, and the smoke will
burn off within a few minutes.
29. Should the appliance emit black smoke, un-plug it immediately. Wait for the smoke to
stop before removing the air fryers contents.
SHORT CORD INSTRUCTIONS:
Do not use with an extension cord. A short power supply cord is provided to reduce the risks
resulting from being entangled in or tripping over a long cord.
OVERHEATING PROTECTION:
Should the inner temperature control system fail, the overheating protection system will be
activated, and the unit will not function. Should this happen, unplug the power cord. Allow
time for the unit to cool completely before restarting or storing.
ELECTRIC POWER:
If the electrical circuit is overloaded with other appliances, your unit may not operate
properly. It should be operated on a dedicated electrical circuit (power point).
AUTOMATIC SHUT-OFF:
The appliance has a built-in shut-off device that will automatically shut down the unit when
the timer LED reaches zero. You can manually switch off the appliance by selecting the
Power Button. The fan will continue running for about 30 seconds to cool down the unit.
PREPARATION FOR USE:
Before using the air fryer for the first time:
Warning: when using for the first time, the air fryer may emit slight odour which is not
harmful and will disappear after a few minutes. This is because a protective oil was
applied to protect parts from possible friction in transport.
Carefully unpack the air fryer and remove all the packing materials.
Place the air fryer on a flat, heat-resistant non-flammable surface.
Use a soft sponge and soapy water to remove any dust on the surface that may happen
during packing and transport. Allow the air fryer to dry before use.
PRODUCT USE AND ACCESSORIES:
* Choose an accessory to use for different cooking styles.
Note: Only one rotisserie stick is provided for use with the rolling cage and rotisserie fork.
A. ROLLING CAGE:
Great for fries, roasted nuts, popcorn and other snacks.
Use one of the included screws to secure the baking cage to the rotisserie stick at the
indentation point on the rotisserie stick.
Twist the screw to secure the baking cage to the rotisserie stick
(1) (2)
(3) (4) (5)
B. ROTISSERIE STICK, FORK AND SCREWS:
Use for roasts or a whole chicken.
Force the shaft length ways through the meat and centre.
Slide the forks onto the shaft from either end into the meat. Then lock into place with the
screws. There is an indentation point on the shaft for a screw. Ensure the other screw is
fitted tightly to the stick.
You can adjust the screws closer to the middle if needed, but never outwards towards the
ends.
Ensure that the roast meat or chicken are not too large and are able to rotate freely inside
the air fryer.
Tie up the chicken or other roast meat with cooking string to hold it tightly around the
rotisserie stick.
(1) (2) (3)
(4) (5) (6)
C. MESH RACK; D. MESH BASKET; E. MESH TRAY:
Each of the above can be used for a wide range of foods. Each can slide into the air fryer.
Ideal for multi-level cooking.
Note: Please use your own oven mitts to remove the mesh rack, mesh basket and mesh tray
after the cooking is complete.
F. DRIP TRAY:
Put the drip tray into the air fryer as per the directions below:
Note: Please use your own oven mitts to remove the drip tray after the cooking is complete.
G. CAGE TONGS:
Use to remove cooked roasts or chicken which have been cooked using the rotisserie. Also
for removal of the rolling cage.
Place under the rotisserie shaft and then lift gently.
Note:
Please always keep the drip tray in the lowest layer inside the air fryer for gathering oil
from fried food.
The ingredients inside may increase in size during the cooking process, ensure that the
heated volume of food will not touch the inside walls of the air fryer.
Only when the door is closed, the air fryer will operate.
USING THE AIR FRYER:
CONTROL PANEL:
1. Power/Start–Stop Button - Once the Unit is plugged in, the buzzer will sound, and the
screen will light up and then go off. The Power Button will remain illuminated.
Press the power button to turn the screen on.
Pressing the Power button a second time will activate the cooking process at the default
temperature of 200 ° C and time of 15 mins.
Pressing the Power Button at any time during the cooking process will shut down the Unit,
causing the screen to go off immediately. The fan will continue running for 30 secs. to cool
down the unit.
2. Menu – Press this button to choose the initial function that you will use.
3. Rotation Button - Select this button when cooking anything using the Rotisserie Mode.
Function can be used with any preset. The icon will blink while in use.
4. Temperature Control Button Press this button and then press or to raise or lower
cooking temperature by 5 ° C intervals ranging from 65 ° C to 200 ° C.
Dehydration ranges from 30 ° C to 80 ° C. Defrost ranges from 30 ° C to 80 °.
5. Time Control Button - Press this button and then press or to set the cooking time
from 1 min. to 90 mins. In dehydrator mode, the time uses 30-min. intervals and an operating
time of 1–24 hrs. In defrost mode, the time range can be set between 5 – 90 minutes.
6. Internal Light - Selecting this button will help you check cooking progress while Unit is
in operation.
NOTE: Opening the door during the cooking process will pause the Unit. Internal light will
illuminate if doors open.
7. Raise time or temperature
8. Lower time or temperature
9. Function indicator. Press menu button to choose one of functions from below.
PRESET COOKING TIMES AND TEMPERATURES:
Chips/Fries
200°C
15 mins
Use the rolling cage on the rotisserie stick
Steak/Chops
180°C
25 mins
Fish
165°C
15 mins
Shrimp
160°C
12 mins
Pizza
180°C
15 mins
Defrost
50°C
30 mins
Wings
180°C
15 mins
Cake
160°C
25 mins
Vegetable
160°C
10 mins
Cookie
160°C
25 mins
Chicken (pieces)
185°C
40 mins
Bake
160°C
30 mins
Rotisserie
190°C
30 mins
Use the rotisserie stick
Dehydrate
30°C
2 hours
Can be set for between 1 and 24 hours
Reheat
115°C
12 mins
Sausage
200°C
15 mins
Nuts
160°C
20 mins
Lamb
180°C
25 mins
COOKING WITH THE AIR FRYER:
1. Place the ingredients on a rack, on one of the rotisserie fork, or in the rolling cage.
2. Place the ingredients and chosen accessory into the unit and shut the door. Plug the power
cord into a 220-240V dedicated outlet.
3. Press the Power Button once.
4. Select a preset function or manually set the temperature and then the time.
5. Press the Power Button to begin the cooking cycle immediately once the desired cooking
time and temperature have been selected.
MANUALLY SETTING THE TEMPERATURE OR THE TIME:
Temperature Control Button Press this button and then press or to raise or lower
cooking temperature by 5 ° C intervals ranging from 65 ° C to 200 ° C.
Dehydration ranges from 30 ° C to 80 ° C. Defrost ranges from 30 ° C to 80 ° C.
Time Control Button - Press this button and then press or to set the cooking time
from 1 min. to 90 mins. in all modes except when dehydrating, which uses 30-min. intervals
and an operating time of 1–24 hrs. In defrost mode, the time range can be set between 5 – 90
minutes.
COOKING CHART:
Some additional info on a range of foods which get great results using the air fryer.
FOOD ITEM
TIME
TEMP
COMMENTS
Thin frozen fries
15 16 mins
200 Degrees
Thick frozen fries
15 20 mins
200 Degrees
Homemade fries
10 16 mins
200 Degrees
Add ½ tbsp. oil
Homemade potato
wedges
18 22 mins
180 Degrees
Add ½ tbsp. oil
Homemade potato
cubes
12 18 mins
180 Degrees
Add ½ tbsp. oil
Hash browns
15 18 mins
180 Degrees
Potato Gratin
15 18 mins
200 Degrees
Steak
8 12 mins
180 Degrees
Hamburger
7 14 mins
180 Degrees
Sausage roll
13 15 mins
200 Degrees
Chicken drumsticks
18 22 mins
180 Degrees
Chicken breast
10 15 mins
180 Degrees
Spring rolls
15 20 mins
200 Degrees
Use oven ready
Frozen chicken
nuggets
10 15 mins
200 Degrees
Use oven ready
Fish fingers
6 10 mins
200 Degrees
Use oven ready
Mozzarella sticks
8 10 mins
180 Degrees
Use oven ready
Stuffed vegetables
10 mins
160 Degrees
Cake
20 25 mins
160 Degrees
Use baking tin
Quiche
20 22 mins
180 Degrees
Use baking tin/oven
dish
Muffins
15 18 mins
200 Degrees
Use baking tin
Sweet snacks
20 mins
160 Degrees
Use baking tin/oven
dish
Frozen onion rings
15 mins
200 Degrees
MAKING HOME MADE FRIES:
For the best results, we advise to use pre-baked fries. If you want to make home-made fries,
follow the steps below:
1. Peel the potatoes and cut them into sticks.
2. Soak the potato sticks in a bowl of water for at least 30 minutes, take them out and
dry them with kitchen paper.
3. Pour 1/2 tablespoon of olive oil in a bowl, put the sticks on top and mix until the sticks
are coated with oil.
4. Remove the sticks from the bowl with your fingers or a kitchen utensil so that excess oil
stays behind in the bowl. Put the sticks in the rolling cage.
5. Fit the rolling cage inside the air fryer.
6. Cook the fries for 10 – 16 mins at 200 Degrees.
ROTISSERIE:
When the rotisserie stick is fitted inside the slots in the middle of the air fryer, pressing
the ROTISSERIE button will rotate the rotisserie stick.
The rotisserie fork is a great way to cook a roast chicken inside the air fryer as it allows
even circulation and thorough cooking.
Fitting the rolling cage onto the rotisserie stick is a great way to cook hot chips, popcorn
chicken and other smaller fried type of foods.
Press the ROTISSERIE button to activate the rotation of the rotisserie stick/rolling cage.
Press the ROTISSERIE button to stop the rotation.
Note: The total weight of a chicken/meat cooked using the rotisserie stick should not exceed
1.2 kg, as the rotation will scrape the drip tray in the bottom of the air fryer. Please use the
mesh basket if cooking a large chicken. Bind the legs and wings of the chicken with cooking
string.
TIPS:
Foods that are smaller in size usually require a slightly shorter cooking time than larger ones.
Large quantities of food only require a slightly longer cooking time than smaller quantities.
Flipping or turning smaller sized foods halfway through the cooking process ensures that all
the pieces are evenly fried.
Misting a bit of vegetable oil on fresh potatoes is suggested for a crispier result. When adding
a little oil, do so just before cooking.
Snacks normally cooked in an oven can also be cooked in the air fryer.
Use premade dough to prepare filled snacks quickly and easily. Premade dough also requires
a shorter cooking time than homemade dough.
Use premade dough to prepare filled snacks quickly and easily. Premade dough also requires
a shorter cooking time than homemade dough.
Place an oven safe baking tin or dish (not included) inside the air fryer when baking a cake
or a quiche. A tin or dish is also suggested when cooking fragile or filled foods.
TROUBLESHOOTING:
Problem
Solution
The air fryer does
not work
Put the mains plug in an earthed wall
socket.
The ingredients fried
with the air fryer are
not done.
Use smaller batches for more even cooking.
Increase the cooking temperature.
Increase the cooking time.
The ingredients are
fried unevenly in
the air fryer.
Turn the ingredients during cooking.
Fried snacks are not
crispy when they come
out of the air fryer
Use oven snacks or lightly brush some oil
onto the snacks for a crispier result.
Chips and fries are not
cooked evenly.
Soak the potato sticks in a bowl of water
for at least 30 minutes; take them out and
dry them with kitchen paper.
Use fresh potatoes and make sure they
stay firm during frying.
Fresh potato fries are not
crispy when they come
out of the air fryer.
Make sure you dry the potato sticks
properly before you coat them with oil.
Cut the potato into thinner sticks for a
crispier result.
Add slightly more oil for a crispier result.
White smoke comes out
of the appliance.
Pay attention that the temperature
is well-controlled to be under 180, when
you fry greasy ingredients in the air fryer.
Wipe down the inside of the air fryer to
remove excessive oil.
Clean each accessory after use.
FREQUENTLY ASKED QUESTIONS:
1. Can I prepare foods other than fried dishes with my Air Fryer?
You can prepare a variety of dishes, including steaks, chops, burgers, and baked goods.
2. Is the Air Fryer Oven good for making or reheating soups and sauces?
Never cook or reheat liquids in the Air Fryer Oven.
3. What do I do if the Unit shuts down while cooking?
As a safety feature, the Air Fryer Oven has an Auto Shut-Off device that prevents damage from
overheating. Unplug and allow the Unit to cool down. Plug back in and restart with the Power
Button.
4. Does the Unit need time to heat up?
Preheating is needed when you are cooking from a cold start, add 3 mins. to the cook time to
compensate.
5. Is it possible to shut off the Unit at any time?
Press the Power Button once or open the door.
6. Can I check the food during the cooking process?
You can remove the Round Basket at any time while cooking is in progress. During this time,
you can flip the contents on the mesh racks/trays if needed to ensure even cooking. Time and
temperature will resume where you left off.
7. Is the Air Fryer Oven dishwasher safe?
Only the accessories are dishwasher safe. The Unit itself containing the heating coil and
electronics should never be submersed in liquid of any kind or cleaned with anything more
than a hot, moist cloth or nonabrasive sponge with a small amount of mild detergent.
8. What happens if the Unit still does not work after I have tried all the troubleshooting
suggestions?
Please contact our customer service.
CLEANING AND MAINTENANCE:
Note: Unplug the air fryer and allow it to cool down completely before handling, cleaning or
storing.
Wash in warm soapy water after use: mesh basket/rack/tray, drip tray, rolling cage,
rotisserie stick, forks, screws, cage tong.
The mesh basket/rack/tray, drip tray, rolling cage, rotisserie stick, forks, screws, cage tong
are also dishwasher safe.
The inside of the air fryer can be cleaned with hot water, a mild detergent and a non-
abrasive sponge.
Wipe the air fryers outer housing body with a soft damp cloth. Do not use detergents or
cleaners.
To clean the door:
Open the door of the air fryer to a 45 degree angle.
The door can then be slid out upwards and washed in warm soapy water.
The door is not dishwasher safe.
Do not immerse the power cord, plug or the air fryer housing body in water or any other
liquids as it may result in damage, fire, electric shock or injury.
STORING:
Allow the air fryer to cool down completely before storing. Store the air fryer in an upright
position in a dry location. Do not place any heavy items on top of the air fryer during storage
as this may result in possible damage to the air fryer.
TECHNICAL SPECIFICATIONS:
Voltage:
220240V
Power:
1500W
Frequency:
50 Hz
Temperature Range:
65 - 200°C
Time Setting Range:
1 - 90 min
Defrost Temperature Range:
30 - 80°C
Defrost Time Setting Range
5 90 min
Dehydrate Temperature Range:
30 - 80°C
Dehydrate Time Setting Range:
1 - 24 hours
Capacity:
12 litre inner chamber
  • Page 1 1
  • Page 2 2
  • Page 3 3
  • Page 4 4
  • Page 5 5
  • Page 6 6
  • Page 7 7
  • Page 8 8
  • Page 9 9
  • Page 10 10
  • Page 11 11
  • Page 12 12
  • Page 13 13
  • Page 14 14
  • Page 15 15
  • Page 16 16
  • Page 17 17
  • Page 18 18

Lenoxx Healthy Choice AF1200 User manual

Category
Small kitchen appliances
Type
User manual

Lenoxx Healthy Choice AF1200 air fryer offers a healthier way to cook your favorite foods with little to no oil. With its 12L capacity and 18 pre-set cooking programs, you can air fry, grill, roast, bake, dehydrate, and reheat a variety of ingredients. It comes with a rolling cage, rotisserie fork, mesh rack, mesh basket, cage tongs, drip tray, and mesh tray, allowing you to cook multiple dishes simultaneously. The fully-digital display provides easy control over time and temperature settings. Safety features include overheating protection and automatic shut-off.

Ask a question and I''ll find the answer in the document

Finding information in a document is now easier with AI