Page is loading ...

INSTRUCTION SHEET
Model H5749
LASER GUIDE
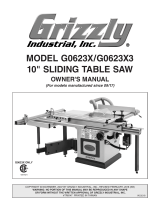
Figure 1. Model H5749 Laser Guide.
Figure 2. Electrical wiring.
To install the laser guide on the Model G0524
Rip Saw:
1. Disconnect the Model G0524 Rip Saw
from the power source!
2. Attach the steel arm to the head casting with
the (4) M8-1.25 x 25 cap screws, (4) 8mm
flat washers, and (4) M8 lock washers.
Note—The mounting location and drill
pattern for the steel arm are shown on the
parts diagram. The holes must be drilled and
tapped to accept M8-1.25 threads.
3. Mount the laser bracket to the top of the steel
arm with the (2) M6-1 x 16 cap screws and
(2) 6mm flat washers.
4. Place the laser clamp around the laser and
secure the assembly to the laser bracket with
the (2) M6-1 x 35 cap screws.
5. Attach the black power box to the rip saw
with the (2) M5-8 x 8 Phillips head screws.
Note—Make sure the loose end of the green
ground wire is secured between the head of
the Phillips screw and the black power box.
6. Route the power wires from the power box
through the side of the saw base and into the
electrical panel compartment.
7. Connect the R1 and T1 power wires to their
respective R1 and T1 locations on the main
terminal at the electrical panel.
8. Feed the laser power wire through the
access holes on the steel arm, and plug the
power wire into the back of the power box.
9. Cut a board, turn the saw OFF, place the
board against the fence, and finally, adjust
the laser beam along the freshly cut edge.
Laser
Power Box
Laser
Bracket
Laser
Clamp
INVENTORY QTY
• Steel Arm ....................................................1
• Laser Bracket ..............................................1
• Laser Clamp ................................................1
• Laser............................................................1
• Power Box ..................................................1
• Cap Screws M8-1.25 x 25 ..........................4
• Flat Washers 8mm ......................................4
• Lock Washers 8mm ....................................4
• Cap Screws M6-1 x 16 ................................2
• Flat Washers 6mm ......................................2
• Cap Screws M6-1 x 35 ................................2
• Phillips Head Screws M5-.8 x 8 ..................2
Steel Arm
Placement
DO NOT look into the end of the laser.
Serious eye damage will occur.

706
707
713
712
704
714
702
701
703
708
711
709
710
705
705-3
705-1
705-1
705-2
705-4
702-1
702-2
COPYRIGHT © NOVEMBER 2003 BY GRIZZLY INDUSTRIAL, INC.
WARNING: NO PORTION OF THIS MANUAL MAY BE REPRODUCED IN ANY SHAPE
OR FORM WITHOUT THE WRITTEN APPROVAL OF GRIZZLY INDUSTRIAL, INC.
#5902 PRINTED IN TAIWAN
701 PSB48M CAP SCREW M6-1.0 X 35
702 PH5749702 LASER CLAMP ASSEMBLY
702-1 PH5749702-1 LASER CLAMP (TOP)
702-2 PH5749702-2 LASER CLAMP (BOTTOM)
703 PH5749703 LASER
704 PSB01M CAP SCREW M6-1.0 X 16
705 PH5749705 LASER BRACKET ASSEMBLY
705-1 PSB18M CAP SCREW M4-0.7 X 8
705-2 PW05M FLAT WASHER 4MM
705-3 PH5749705-3 LASER BRACKET (TOP)
REF PART # DESCRIPTION
705-4 PH5749705-4 LASER BRACKET (BOTTOM)
706 PH5749706 STEEL ARM
707 PSB31M CAP SCREW M8-1.25 X 25
708 PS05M PHLP HD SCR M5-0.8 X 8
709 PH5749709 POWER BOX
710 PH5749710 FUSE T1AL250V
711 PH5749711 FUSE COVER
712 PLW04M LOCK WASHER 8MM
713 PW01M FLAT WASHER 8MM
714 PW03M FLAT WASHER 6MM
REF PART # DESCRIPTION
Hole Pattern For
Arm Attachment
55mm
60mm
30mm
30mm
/