INSTALLATION & MAINTENANCE MANUAL
These instructions should be read carefully and retained after installation by the end user for future reference
and maintenance.
These instructions should be used to aid installation of the following product:
TPR14LED
SAFETY
• This product must be installed in accordance with the latest edition of the IEE Wiring Regulations
(BS7671) and current Building Regulations. If in any doubt, consult a qualified electrician
• Please isolate mains prior to installation or maintenance
• Check the total load on the circuit (including when this luminaire is fitted) does not exceed the rating
of the circuit cable, fuse or circuit breaker
• Please note the IP (Ingress Protection) rating of this product when deciding the location for
installation
• This product is Class II double insulated
• This product is IP65 rated
INSTALLATION
Note - If this product is being used in conjunction with an external PIR or sensor, please confirm with the
manufacturer of the sensors that they are compatible with LED luminaires.
• Provide power to the required point of installation (refer to BS7671 for correct cabling methods).
Suitable IP rated junction boxes should be used where required
• Remove the diffuser by unfastening the three screws on the front
• Open the hinged LED plate by releasing the tab labelled “OPEN” (see Fig. 1)
Fig. 1
• Drill the fixing holes in the rear of the fitting. Mark the location of the fixing holes and drill ensuring not
to infringe with any gas/water pipes or electrical cables
• Feed the mains cable through the rubber grommet to retain IP rating, or alternatively, drill out one of
the two 20mm drilling guides on the sides of the fitting (see Fig. 2)
Fig. 2
• Secure the baseplate to the surface using the fixings provided
• Connect the luminaire to the mains supply ensuring the correct polarity is observed: L - Live (brown),
N - Neutral (blue)
• Close the hinged gear tray until the tab clicks into position
• Secure the baseplate to the surface using the fixings provided
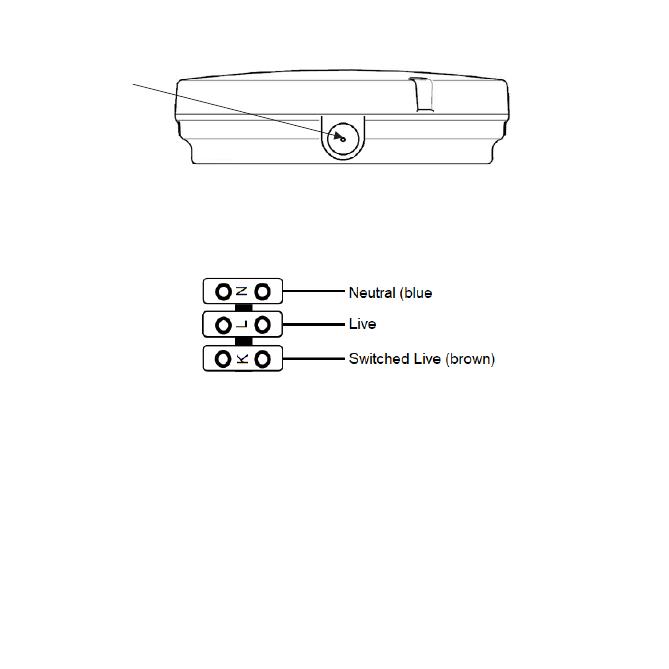
• Connect the luminaire to the mains supply ensuring the correct polarity is observed:
L – Live, K – Switched Live (brown), N - Neutral (blue) (see Fig. 3)
Fig. 2
Fig. 3
• Connect the battery to the socket on the emergency inverter
• Close the hinged gear tray until the tab clicks into position
• Reattach the diffuser and secure with the three screws, ensuring the seal is in place and not
damaged
• Switch on and check for correct operation ensuring the green indicator LED is illuminated
• We recommend, on commissioning the installation, a minimum charge period of 24 hours
before carrying out an emergency duration test
• If the batteries have been left in a discharged state for an extended period, we recommend
one or more charge and discharge cycles are completed which should help to restore the
battery capacity
WARNING
This product must be disconnected from the circuit if subjected to any high voltage or insulation
resistance testing. Irreparable damage will occur if this instruction is not followed.
GENERAL
This product contains a light source of energy efficiency class E to Regulation (EU) No 2019/2015.
This product contains an LED light source which can be replaced by the end user and a control gear
which can be replaced by a professional.
Clean with a soft dry cloth only, do not use aggressive cleaning products or solvents which may
damage the product.
Do not use any source of high-pressure washers to maintain or clean this luminaire.
Installing in areas where the temperature consistently drops below 0°C may shorten the battery life.
This product is non-dimmable.
This product should be dismantled for disposal when it reaches the end of its life. Please see website
for dismantling instructions.
This product should be recycled in the correct manner when it reaches the end of its life. Check local
authorities for where facilities exist.
The batteries in this luminaire are Nickel Cadmium and must be disposed of correctly. Please contact
the local authorities for the disposal of this toxic waste.
WARRANTY
This product has a warranty of 3 years (excluding battery) from date of purchase. Failure to install this
product in accordance with the current edition of the IEE Wiring Regulations (BS7671), improper use,
or removal of the batch code will invalidate the warranty. If this product should fail within its warranty
period, it should be returned to the place of purchase for a free of charge replacement. ML Accessories
• Connect the battery to the socket on the emergency inverter
• Close the hinged gear tray until the tab clicks into position
• Reattach the diffuser and secure with the three screws, ensuring the seal is in place
and not damaged
• Switch on and check for correct operation ensuring the green indicator LED is illuminated
• We recommend, on commissioning the installation, a minimum charge period of 24
hours before carrying out an emergency duration test
• If the batteries have been left in a discharged state for an extended period, we
• recommend one or more charge and discharge cycles are completed which should help
to restore the battery capacity
Fig. 3


