Fresh-Aire UV UV 247 24 Volt Germicidal UV Light User manual

Type
User manual

This manual is also suitable for

Fresh-Aire UV FRESH-AIRE UV UV 247 24 Volt Germicidal UV Light is designed to reduce biological contamination inside the air handling system, leading to reduced system maintenance and improved indoor air quality. It can be installed in various locations within the air system, such as the supply-side duct, return-side duct, at the blower, or across the top of coils. The UV lamp emits germicidal ultraviolet light that helps kill mold, bacteria, and viruses, improving the overall air quality in the building.

Fresh-Aire UV FRESH-AIRE UV UV 247 24 Volt Germicidal UV Light is designed to reduce biological contamination inside the air handling system, leading to reduced system maintenance and improved indoor air quality. It can be installed in various locations within the air system, such as the supply-side duct, return-side duct, at the blower, or across the top of coils. The UV lamp emits germicidal ultraviolet light that helps kill mold, bacteria, and viruses, improving the overall air quality in the building.

A
B
C D
E
F
G
H
WARNING
UV247 is installed inside the air handling system to
reduce biological contamination for reduced system
maintenance and improved indoor air quality.
4 Coil A plate Installation
1. Snap the Magnetic Bracket apart by
bending.
2. Drill a 1” hole in the "A"-plate then
attach the smaller piece of the bracket
using the Self-Tapping Screws.
3. Insert the UV lamp into the hole then
use the Plastic Nuts to attach the UV
lamp to the Magnetic Bracket as
shown.
1.
2.
3.
US patent #7,704,463
1
Parts Included
A UV Lamp
B Power Supply
C UV Warning Sticker
D Magnetic Bracket
E Self-Tapping Screws
F Sight Glass
G Tap-in Connector
H Plastic Nuts
IMPORTANT!
Only qualified technicians should install this product
Install in accordance with relevant building codes
Read instructions carefully including safety warnings
3 Air Handler Interior Surface Installation
1. Determine the optimal position
for placement of the UV lamp.
2. Use a utility knife to cut a slit in the insulation
on the interior surface.
3. Place the Magnetic Bracket directly on the
metal surface or remove the magnet and hard-
mount the bracket using the Self-Tapping
Screws provided. Use foil tape to close the cut
in the insulation.
4. Use plastic Quick-Nuts to attach the
UV lamp to the Magnetic Bracket as shown.
2.
3.
4.
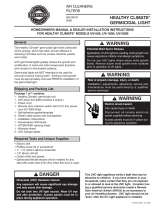
UV247 Mounting Options
2 Installation Notes
Before installing UV247 it is necessary to determine the
optimal mounting location inside the air system. First, look
for the area with the heaviest mold growth. Also consider
a location that will allow the germicidal UV light to
shine on the greatest surface area. For enhanced anti-
microbial eect 2 or more lamps can be installed in
dierent parts of the air system.
Some typical mounting locations:
A Supply-side duct D Coil face
B At the blower E Coil “A plate
C Across top of coils F Return-side duct
A
B
C
D
D
E
F
Important: some materials inside the air system (including
lter media, ex duct, wiring etc.) may not be UV light resistant.
Use the optional UV shield (part #TUV-SHIELD-LPC) or cover
the materials with reective tape.
WARNING
PROTECT EYES FROM UV LIGHT
TURN OFF UNIT OR DISCONNECT
BEFORE SERVICING
24 VOLT GERMICIDAL UV LIGHT
UV247-MAN 080322
5 Power Supply Installation
IMPORTANT! Check which power supply is included with your UV247
before connecting to power. Turn o main power source before installation.
1. Find a suitable location for the Power Supply inside the
control panel of the air handler. Install using the Self-
Tapping Screws.
2. Use the wiring diagrams below to connect to power.
8 Lamp Replacement
The germicidal UV lamp in UV247 needs to be replaced periodically. Note: UV lamps will
continue to emit visible light but lose germicidal eectiveness over time.
UV Lamp
(Part # UV24L, UV24L-OS)
CAUTION!
UV lamps contain small amounts of mercury - dispose of lamps in accordance with local
environmental regulations. For more information visit www.lamprecycle.org
Note: Use of replacement UV lamps other than Part # UV24L, UV24L-OS voids warranty.
A
7 Sight Glass Installation
1. Find a suitable location on the outside
of the duct-work near the UV Lamp
installation and apply the warning/lamp
replacement sticker.
2. Drill a ½” hole through the orange circle
on the sticker. Press the UV safety viewport
into hole.
3. Turn on the power and use the sight glass
to conrm that the UV Lamp is operating.
IMPORTANT
Turn o main power source before installation.
IMPORTANT! Must be wired to constant power - do not connect to blower relay.
24 VAC
POWER SUPPLY
UV LAMP
BLACK
RED
COMMON / BLUE
HOT / RED
24 VAC TRANSFORMER
6 UV Lamp Connection
1. When all the other components are properly installed connect the UV Lamp
cable to the Power supply cable.
2. Make sure the clips are aligned and then push the connectors rmly together.
A tight connection ensures a proper seal.
IMPORTANT!
Systems with high 24 VAC loads may require the installation of a separate 24 VAC
transformer to power the UV light.
Always use a separate 24 VAC transformer with communicating air systems.
Draws 16 VA, may need to do load calculation: Volts under load X Amps under load.
Lamp Power Supply
UV247 Power Supply
24 VAC
  • Page 1 1
  • Page 2 2

Fresh-Aire UV UV 247 24 Volt Germicidal UV Light User manual

Type
User manual
This manual is also suitable for

Fresh-Aire UV FRESH-AIRE UV UV 247 24 Volt Germicidal UV Light is designed to reduce biological contamination inside the air handling system, leading to reduced system maintenance and improved indoor air quality. It can be installed in various locations within the air system, such as the supply-side duct, return-side duct, at the blower, or across the top of coils. The UV lamp emits germicidal ultraviolet light that helps kill mold, bacteria, and viruses, improving the overall air quality in the building.

Ask a question and I''ll find the answer in the document

Finding information in a document is now easier with AI