Page is loading ...

ASSEMBLY INSTRUCTIONS
STORAGEMASTER® Heavy-Duty Rolling Work Benches - Models 53 - 59 &
Model 62 WAR WAGON® Rolling Work Bench
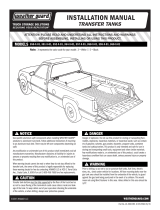
Door Handle
5/16-18 Whiz
Lock Nut
Push Handle
5/16-18 x 3/4"
Truss Head Bolt
Hole Plugs
TOOLS REQUIRED
· Rubber Mallet
· 1/2" Socket (3/8" drive)
· 3/8" Medium Extension
· 3/8" Ratchet Wrench
· Screwdriver, common
· Screwdriver, phillips
PARTS LIST
· Work Bench Cabinet
· Handle Kit
5/16-18 x 3/4"
Truss Head Bolt
IMPORTANT
BEFORE YOU BEGIN
Read these instructions and
warnings completely before
installation.
Figure 1. Assembly View
WARNING
Black door knob must be
latched in the closed position
when moving this product, so
doors and drawers do not
open on inclines, which can
cause serious personal injury
or property damage.
62 HANDLE KIT
1 - Push Handle
6 - Door Handles
14 - 5/16-18 x 3/4" Bolt, Truss Hd.
12 - 5/16-18 Hex Whiz Nut
2 - Hole Plugs
2 - Lift Knob
DANGER
55-59 HANDLE KIT
1 - Push Handle
2 - Door Handles
6 - 5/16-18 x 3/4" Bolt, Truss Hd.
4 - 5/16-18 Hex Whiz Nut
2 - Hole Plugs
1 - Lift Knob
Caster Brakes are not suitable for
keeping units in place when trans-
porting. Secure by another method.
Do not use casters on rough or un-
even surfaces. Do not tow caster
mounted boxes.
Do not put fuels, flammables, explosives or hazardous materials
inside these products.
Gasoline, solvents, gun powder or other munitions, dynamite,
propane, acetylene or other such products can explode if stored
inside these products.
Use these products ONLY for storing and transporting electric or
hand tools and equipment, and other similar materials.
Failure to follow these warnings or modification or other uses of
these products could result in death, serious injury or property
damage.
CAUTION
Part No. 14-0046 REV. K ECN 5285 03/13

2
ASSEMBLY INSTRUCTIONS
1. Remove the handle kit from the
cabinet. Attach the Door Handles (Fig-
ure 1.). Insert one Hole Plug into each
end of the Push Handle then attach
the handle to the end with the swivel
casters.
2. Thread the black lift knob into the
bottom of the slot in door centerpost.
3. WATCHMAN® III Lock System -
IMPORTANT: Carefully follow the
separate instructions (see inside of
door) which will guide you to a proper
lock installation.
4. Remove the tape from the swivel
casters. Using a mechanical lifting de-
vice, raise the cabinet slightly, then
knock the honeycomb blocks off of the
cabinet bottom using a rubber mallet.
Drawer Installation
Two types of drawer and drawer
slides are available for Models 55 &
57. The upper three positions will re-
ceive three 1" drawers or one 1" and
one 2-1/2" drawer, both with regular
duty slides. The six lower positions will
receive 2-1/2", 6", or 9-1/2" 12 gauge
drawers with heavy-duty slides.
Upper Drawer Installation
(three upper positions)
Take one slide (Figure 2.) and insert
the clips (Inset) into the front and rear
notches of the drawer support panel.
Push the slide to the rear and down.
Secure slide with a screw through end
access hole in the slide.
#6 x 1/2"
Screw
Figure 2. Upper Drawer Slide Installation
Figure 3. Installing Lower Drawers
FRONT VIEW
CABINET MEMBER
DRAWER MEMBER
CABINET MEMBER
SIDE VIEW
Rear
Front
RETENTION LUG

3
Lower Drawer Installation
(six lower positions)
1. Take one heavy duty slide and in-
sert rear clip into desired rear notch,
and lower front clip into front notch
(See Figure 3.).
2. To install a drawer, simply insert the
drawer slide into the cabinet slide and
close the drawer completely. The
mechanism will automatically latch.
DRAWER REMOVAL
To remove a drawer, pull the drawer
out until it stops. Notice the locking le-
vers located inside the track that is at-
tached to the drawer. Lift the left lever
(A) while pressing down on the right
lever (B) (See Figure 4.). Pull the
drawer clear on the slides.
Figure 4. Drawer Removal
CAUTION
Pull out only one drawer at a
time to avoid sudden tipping
of product which could cause
serious personal injury or
property damage. For optimal
weight distribution of unit,
install larger drawers in lower
positions of unit.
DRAWER SLIDE REMOVAL
(CABINET MEMBER)
Upper Drawer Slides - remove the
screw from the slide that holds it to the
inner panel. Lift the slide up, then pull
forwards.
Lower Drawer Slides (HD) - twist the
top of the slide inward while lifting and
pulling forward.
DRAWER ARRANGEMENTS
Figure your drawer arrangement from
the table below:
1" deep drawer requires 1 notch
2-1/2" deep drawer requires 2 notches
2-1/2" deep (HD) drawer req. 1 notch
6" deep (HD) drawer req. 2 notches
9-1/2" deep (HD) drawer req. 3 notches
You can assemble any combination of
(HD) drawers as long as you do not
use any more than six notches.
WEIGHT CAPACITIES
The following weights are the load
ratings for the drawers:
1" 97 lbs.
2-1/2" 94 lbs.
2-1/2" (H.D.) 180 lbs.
6" (H.D.) 172 lbs.
9-1/2" (H.D.) 166 lbs.

4
KNAACK LLC LIMITED WARRANTY FOR KNAACK
®
PRODUCTS
The following limited warranty applies to all KNAACK
®
branded products for the warranty period set forth below. If you have any questions or
need assistance regarding the warranty of your product, please call our customer service department: (800) 456-7865, 8:00 am - 4:30 pm CST.
KNAACK
®
Products - Limited Warranty
Knaack LLC, located at 420 E. Terra Cotta Avenue, Crystal Lake, IL 60014 ("Manufacturer") warrants to the original purchaser only, subject
to the exclusions described below, that its KNAACK
®
branded products (each a "KNAACK
®
Product") will be free from defects in material and
workmanship for a period of three (3) years from the date of purchase. This limited warranty terminates if the original purchaser transfers the
KNAACK
®
Product to any other person.
What is Not Covered
This limited warranty does not extend to and expressly excludes:
• Losses or damages to the KNAACK
®
Product which are expected to occur during the normal course of its use, including without limitation,
normal wear and tear, (as determined by the Manufacturer in its sole and absolute discretion), cosmetic rust, scratches, dents or comparable
and reasonable expected losses or damages.
• Losses or damages to the KNAACK
®
Product resulting from conditions beyond the Manufacturer's control including without limitation, misuse,
accident, abuse, neglect, negligence (other than Manufacturer's), overloading, unauthorized modification or alteration, use beyond rated
capacity, or failure to install, maintain, assemble, mount or apply the KNAACK
®
Product in accordance with the Manufacturer's written
instructions or guidelines as provided by Manufacturer to the original purchaser.
• Damage to the contents of the KNAACK
®
Product.
What We Will Do to Correct Problems
If a claim made during the Warranty Period is covered under this limited warranty, the Manufacturer or its authorized representative or local
authorized dealer will, at the Manufacturer's sole option, (a) repair the defective portion of the KNAACK
®
Product or (b) replace the entire
KNAACK
®
Product, or (c) a refund equal to the purchase price paid for the KNAACK
®
Product or a credit to be used toward the purchase of new
KNAACK
®
Product. THE SOLE AND EXCLUSIVE REMEDY FOR BREACH OF THIS LIMITED WARRANTY SHALL BE LIMITED TO REPAIR,
CORRECTION OR REPLACEMENT OF THE KNAACK
®
PRODUCT, OR REFUND OR CREDIT OF THE PURCHASE PRICE.
No Other Express Warranty Applies
This limited warranty is the sole and exclusive warranty provided to original purchasers of a KNAACK
®
Product identified above. No employee,
agent, dealer, or other person is authorized to alter this limited warranty or make any other warranty on behalf of the Manufacturer. The terms of
this limited warranty shall not be modified by the Manufacturer, the original owner, or their respective successors or assigns.
How to Notify Us
The original purchaser must promptly notify the Manufacturer upon its discovery that the KNAACK
®
Product contains a defect in materials or
workmanship by calling the following number: (800) 456-7865. Notification must be made during the warranty period. In order for a warranty
claim to be processed, a copy of the original sales receipt must be provided to the Manufacturer or at Manufacturer's instruction, to its
authorized representative or local authorized dealer. The Manufacturer will determine, in its sole and absolute discretion whether the claim
is covered or subject to the limitations or exclusions described in this limited warranty. The original purchaser may be asked to contact
Manufacturer's authorized representative or local authorized dealer for further instructions on how to obtain the remedies available to it under
this limited warranty. Repairs or modifications made to the KNAACK
®
Product by other than the Manufacturer, its authorized representative or
local authorized dealer will nullify this limited warranty. Coverage under this limited warranty is conditioned at all times upon the original
purchaser's compliance with these required notification and repair procedures.
Limitation of Liability
TO THE EXTENT PERMITTED BY LAW, IN NO EVENT SHALL THE MANUFACTURER BE LIABLE FOR ANY INCIDENTAL, SPECIAL,
INDIRECT, OR CONSEQUENTIAL DAMAGES, INCLUDING ANY ECONOMIC LOSS, WHETHER RESULTING FROM NONPERFORMANCE,
USE, MISUSE OR INABILITY TO USE THE KNAACK
®
PRODUCT OR THE MANUFACTURER'S NEGLIGENCE. SELLER SHALL NOT BE
LIABLE FOR DAMAGES CAUSED BY DELAY IN PERFORMANCE AND IN NO EVENT, REGARDLESS OF THE FORM OF THE CLAIM
OR CAUSE OF ACTION (WHETHER BASED IN CONTRACT, INFRINGEMENT, NEGLIGENCE, STRICT LIABILITY, OTHER TORT OR
OTHERWISE), SHALL MANUFACTURER'S LIABILITY TO BUYER AND/OR ITS CUSTOMERS EXCEED THE PRICE PAID BY THE ORIGINAL
OWNER FOR THE KNAACK
®
PRODUCT. The term "consequential damages" shall include, but not be limited to, loss of anticipated profits,
business interruption, loss of use or revenue, cost of capital or loss or damage to property or equipment.
Some states do not allow the exclusion or limitation of incidental or consequential damages, so the above limitation may not apply to you.
This limited warranty gives you specific legal rights, and you may also have other rights which vary from State to State.
Knaack LLC
ATTN: Warranty Claims
420 E. Terra Cotta Avenue Crystal Lake, IL 60014
www.knaack.com
If you have any questions, please call toll free at 1-800-456-7865.
©2013
Knaack LLC
Part No. 14-0046 REV. K ECN 5285 03/13
/