1
www.studio-e-design.net installation guide studio e
INSTALLATION GUIDE
TAbLE Of CONTENTS:
These instructions are provided as a general guideline for the installation of Studio E glass tile;
some installations require a more detailed specication. An experienced, professional tile in-
staller, who is familiar with the following procedures, should perform the work. Please read and
understand these instructions before beginning any work.
Material Inspection
Recommended Applications
Substrate Preparation
Installation Materials
Cutting
Drilling
Substrate Variation
(installing next to thicker tiles)
Installation Instructions
Cleaning and Maintenance
2
3
4
6
8
11
12
15
19

2
studio e installation guide
www.studio-e-design.net
3
www.studio-e-design.net installation guide studio e
MATErIAL INSpECTION
The owner or owner’s representative is responsible for determining the acceptability of the prod-
uct prior to installation. Due to the handmade, artistic nature of our products, variation in color,
shade, tone and size is normal. In many cases, there will also be folds, wrinkles and bubbles in
the glass. These surface characteristics are inherent to our cast glass manufacturing process
and should be expected. Upon delivery of your order, open and inspect each box of tile.
For mounted mosaics, verify sheet-to-sheet color consistency by rst comparing each sheet to
one another from the backside. Next, compare the face of the sheets by laying them adjacent to
one another and comparing the visible portion (edge) of the mosaic tiles.
For un-mounted liners and decos, inspect and blend the entire order.
Due to color and other variations inherent to this product, materials ordered separately may not
match. All materials to be installed in one location should be ordered together.
No adjustments will be made after installation.
rECOMMENDED AppLICATIONS
The following chart is a general guideline listing Edgewater glass tile products, by color/blend
name, cross-referenced with typical tile applications. Use this chart to determine which product
is appropriate for your installation.
NOTE: Edgewater liners are intended for wall use
Abalone
Black Sand
Del Mar
Dune
Dusk
Outer Banks
Silver Strand
Stone Steps
Summerland
Sunset Cliffs
Interior Exterior Interior Exterior
All
Residential
Light
Residential
Heavy
Residential
Light
Commercial
Color/Blend
WALLS FLOORSSHOWERS
SUBMERGED
FLOOR USAGE LEVEL
Walls Floors
FLOOR USAGE DEFINITIONS
Light Residential: Residential interior ooring areas subject to soft-soled footwear or normal trafc without heavy dirt or
exterior access. Some examples would be: bathrooms and bedrooms.
Residential: Residential ooring areas subject to soft-soled footwear or normal footwear trafc with small amounts of abra-
sive soil. Some examples would be: living and dining rooms.
Heavy Residential: Residential ooring areas subject to normal footwear trafc with occasional amounts of abrasive soil.
Some examples would be: halls, entryways, kitchens and corridors.
Light Commercial: Non-industrial, commercial ooring areas subject to normal footwear trafc with occasional amounts of
abrasive soil. Some examples would be: boutique showrooms and corporate ofce spaces.

4
studio e installation guide
www.studio-e-design.net
5
www.studio-e-design.net installation guide studio e
SUbSTrATE prEpArATION
The performance of a properly installed thin-set tile application is dependant upon the durability
and dimensional stability of the substrate to which it is bonded. In general, there are four types
of acceptable substrates for glass tile. They are:
• Concrete - Cured a minimum of 28 days, may require additional surface preparation
• Cement Mortar - Cured a minimum of 7 days
Walls - Two-coat cement mortar bed reinforced with 2.5lb galvanized metal lath
Floors - Wire reinforced cement mortar bed over membrane or bonded cement mortar bed
• Cement Backerboard (CBU) - Durrock, Fiberock, Hardibacker, PermaBase, Wonderboard
• Drywall - Dry locations only
An installation’s substructure, location and substrate type (i.e. cement backerboard or concrete)
will inuence the details of how the substrate should be prepared.
These various substrate preparation methods are detailed in The Tile Council of North America’s
“2008 TCA Handbook For Ceramic Tile Installation” and are organized by alphanumeric des-
ignation (i.e. B415-07). Use the following chart to identify which TCA Method is appropriate for
your installation and refer to the handbook for details.
NOTE: The “TCA Handbook For Ceramic Tile Installation” is available for purchase at www.Tile-USA.com.
FLOORS
INTERIOR EXTERIOR
Wood Sub-Floor
Concrete
(Slab on Grade)
Concrete
(Elevated or Post-Tensioned)
F144-07
N/A
N/A
N/A
F113-07
N/A
N/A
F101-07*
F102-07*
F121-07*
N/A
N/A
N/A
N/A
F102-07
N/A
F145-07
F141-07
F111-07
F112-07
N/A
CBU Mortar Concrete CBU Mortar Concrete
WALLS
INTERIOR EXTERIOR
Wood Studs
Metal Studs
Solid Backing
(Masonry)
W243-07
W243-07
N/A
W231-07
W241-07
W221-07
W231-07
W241-07
W201-07
W244E-07
W244E-07
N/A
N/A
N/A
N/A
W244C-07
W244F-07
W244C-07
W244F-07
N/A
CBU Mortar Drywall CBU Mortar Drywall
SPECIALTY
Bathtub Walls**
Shower Receptor**
Floors/Walls
Steam Shower
Receptor Floors/Walls
Swimming Pools
B412-07
B415-07
SR614-07
N/A
B411-07
B414-07
SR613-07
P601-07
CBU Mortar
Unacceptable Substrates
• Single-oat mortar bed walls (i.e. cement mortar beds, which do not employ cured scratch coats)
• Cement mortar beds reinforced with metal lath less than 2.5 lb per square yard (i.e. chicken wire)
• Wood Products such as plywood, luan, MDF, pressboard and composites
Substrate Requirements
• Shower receptor oors require the waterproong below the mortar bed be sloped ¼" per foot
towards the drain and unobstructed weep holes per TCA B414-07 and B415-07.
• Cement mortar beds must be cured a minimum of 7 days prior to glass tile installation.
• Cement backerboard (CBU) joints must be treated with mesh-tape and thin-set per the CBU
manufacturer’s recommendations.
• Solid blocking for anchoring xtures, such as shower doors and towel bars, must be installed
prior to installing the tile substrate.
Pool Installations
The following information relates to the installation of Studio E glass tile over concrete tanks in
pool applications. For the preparation of pool substrates, follow the “2008 TCA Handbook For
Ceramic Tile Installation” method P601-07 (mortar bed method).
Pool Requirements
• Based on the soil report, pool tanks must be engineered and constructed to support a glass
tile installation.
• Pool tank must be reinforced concrete
• Make concrete tank watertight with a cementitious sealer. (See list of waterproong mem-
branes on page 7)
• Cement mortar beds must be cured a minimum of 7 days prior to glass tile installation.
• The ideal working temperature for most thin-set and grout products is between 50° and 90°F.
Exterior installations must be protected from direct sunlight and wind.
• Install movement provisions according to TCA EJ171-07. A exible sealant, recommended
for submerged applications, is required between the tile and the decking or coping, at all
inside corners and every 12'-16' on center in the tile eld.
• All submerged applications must be cured a minimum of 21 days prior to submersion or
heavy water use.
*
This method is not recommended for freeze-thaw applications.
**
Wood or metal studs.

6
studio e installation guide
www.studio-e-design.net
7
www.studio-e-design.net installation guide studio e
INSTALLATION MATErIALS
Due to the translucent nature of glass tile, the color of the adhesive will affect the appearance
of the installed glass tile. We recommend the use of specic white thin-sets, some mixed with a
specic latex admix (see list below). All submerged applications must be cured a minimum of 21
days prior to submersion or heavy water use.
When mixing thin-set or grout:
1. measure liquid and powder per the manufacturer’s recommendations,
2. machine mix at a maximum of 300rpm,
3. allow the thin-set or grout to slake (sit) 10-15 minutes,
4. re-mix (repeat step 2) and do not add more liquid or powder.
Acceptable Thin-Sets (white)
• CUSTOM BUILDING PRODUCTS: FlexBond Fortied Thin-Set Mortar
• CUSTOM BUILDING PRODUCTS: Glass Tile Thin-Set Mortar
• CUSTOM BUILDING PRODUCTS: MegaFlex Crack Prevention Mortar
• CUSTOM BUILDING PRODUCTS: MegaLite Crack Prevention Mortar
• DURABOND: D70 ProFlex High Performance Extremely Flexible Mortar
• FLEXTILE: 52 Versatile Floor Mortar
• HYDROMENT: ReFlex Ultra-Premium Latex Modied Thin-Set mortar
• LATICRETE: 254 Platinum Multipurpose Thin-Set Mortar
• MAPEI: Adesilex P10 mixed with Keraply Mortar Additive.
• MAPEI: Kerabond Premium Dry-Set Mortar mixed with Keralastic Mortar Additive.
• TEC(H.B. FULLER): Super Flex Premium Performance Universal Latex-Modied Thin-Set Mortar.
Unacceptable Adhesives
• Organic adhesive (mastic) - due to yellowing and low bond strengths
• Epoxy - due to low exibility
Movement Joints
Movement joints are essential for the success of most tile installations. Follow movement joint
recommendation EJ 171-07 in the “2008 TCA Handbook For Ceramic tile Installation”. Move-
ment joint requirements will vary depending on substrata, climate and size of installation. An
architect or design professional should be consulted when specifying the exact number and
location of each movement joint. Conrm suitability of sealant for your installation with the sealant
manufacturer.
Flexible Joint Fillers (Sealants)
CUSTOM BUILDING PRODUCTS: Polyblend Ceramic Tile Caulk
HYDROMENT: Chem-Calk 900 One-Part Urethane Sealant
LATICRETE: Latasil 100% Silicone Sealant
SIKAFLEX: 1A or 2C Polyurethane-based Sealant
Acceptable Grouts
We recommend grouting Studio E glass tile with a cement-based sanded grout. When installed
with standard grouting technique, sanded grout will not scratch Studio E glass tile. Blue, green
and red grouts may not be appropriate for submerged applications; consult the grout manufac-
turer for specic use recommendations.
• CUSTOM BUILDING PRODUCTS: Polyblend Sanded Grout
• CUSTOM BUILDING PRODUCTS: Prism SureColor Grout
• DURABOND: Fortied Tile Grout (FTG) Sanded
• FLEXTILE: 600 Polymer Sanded Grout
• HYDROMENT: Sanded Ceramic Tile Grout (CTG)
• LATICRETE: PermaColor Grout
• LATICRETE: 1500 Sanded Grout
• MAPEI: Keracolor Sanded Grout
• MAPEI: Ultracolor Plus Grout
• TEC (H.B. FULLER): AccuColor Premium Sanded Tile Grout
• TEC (H.B. FULLER): AccuColor XT Sanded
Unacceptable Grouts
• Epoxy Grout - due to low exibility and degradation from ultraviolet light (sunlight)
• Non-Sanded Grout - due to shrinkage
Anti-Facture/Waterproong Membranes
There are a wide variety of anti-fracture and waterproong membranes available for use in tile
installations. Each membrane product will vary in type, application and performance; consult the
membrane manufacturer for specic recommendations. The following is a brief list of common
membrane materials:
• AQUAFIN: 1K and 2K/M - Cementitious Waterproong System
• CUSTOM BUILDING PRODUCTS: RedGard Waterproong and Crack Prevention membrane
• HYDROMENT: Gold Anti-Fracture and Waterproong Membrane
• LATICRETE: Hydro Ban
• MAPEI: AquaDefense
• TEC: HydraFlex Waterproong Crack Isolation Membrane
• XYPEX: Concentrate

8
studio e installation guide
www.studio-e-design.net
9
www.studio-e-design.net installation guide studio e
Step 1
Cover the saw tray with a piece of ¼" cement board
cut to a size that covers the entire tray. This will
provide a continuous surface that supports the sheet
during cutting and prevent mosaic pieces from falling
into the tray’s cutting channel.
Step 3
Cut another piece of ¼" cement board to a square
size that is larger than a sheet of mosaics. Apply a
strip of self-adhesive, compressible, foam weather-
strip to one edge of the cement board.
Step 2
Adjust the blade height so the blade cuts through ½"
of the cement board thickness.
Step 4
With the saw turned off, place the mosaic sheet on
the cement board covered saw tray (paper side up)
and align the cut.
Step 5
Place the second piece of cement board on top of
the mosaic sheet. Cover the portion of sheet that is
to be installed (keeper) with the weather-strip side
down and against the blade. The board will protect the
mounting paper from saw over-spray.
Step 6
Place downward pressure on the top layer of cement
board, turn the saw on and slowly proceed cutting.
The downward pressure should be sufcient to com-
press the weather-strip, preventing water from owing
under the board, and to stabilize the mosaic tiles
during cutting.
CUTTING
Studio E glass tile can be cut to meet jobsite dimensions with the use of a high-quality wet tile
saw equipped with a continuous, smooth-rim, diamond glass tile blade, such as:
• Alpha Professional Tools - Vetro
• daltool - Glass Tile Blade
• Husqvarna - Supelok Glass+
• MK Diamond - MK 215GL
Because Edgewater mosaics are paper-face mounted with water-soluble glue, wet cutting mount-
ed mosaics can present unique challenges. The following photos document a process, which can
be used to facilitate wet cutting while minimizing water contact with the mounting paper. To view a
video demonstration of wet and dry cutting paper-faced mosaics, please visit www.studio-e-design.net.
ALWAYS USE SAFETY EQUIPMENT WHEN CUTTING OR DRILLING GLASS TILE

10
studio e installation guide
www.studio-e-design.net
11
www.studio-e-design.net installation guide studio e
DrILLING
Studio E glass tile can be drilled using a wet core diamond bit and a water swivel (central water feed).
Solid blocking for anchoring xtures, such as shower doors and towel bars, must be installed
prior to installing the tile substrate. The diameter of all drilled holes must be large enough to al-
low the fastener to pass through the glass tile and substrate without making contact.
Step 1
Attach the water swivel (central water feed) and wet
core diamond bit to the drill. Connect the water swivel
to a water source and adjust the water ow to a slow
trickle. Constant, slow water ow will reducing chip-
ping by cooling and lubricating the drill bit.
Step 2
Using a template to stabilize the drill bit, begin slowly
drilling with light pressure.
Step 3
Gradually increase drilling speed and maintain steady
pressure until the desired depth is achieved.
Mosaic tiles may also be removed from the sheet and wet cut individually or cut by hand using
glass mosaic nippers. (See photos)
NOTES
• The above process should keep the mounting paper relatively dry during cutting. However, if a sheet becomes saturated
during cutting, quickly lay it on a at surface and allow it to completely dry before handling.
• For best results, towel dry the weather-strip between cuts.
• Replace the weather-strip when it no longer recovers its original shape after compression.
• To maintain cut quality, periodically dress the diamond blade with a dressing stone.
• To smooth cut tile edges, use a #120 lapidary stone (tile rub stone), PVA polishing pads or 220 silicon carbide sandpaper.
Step 7
Once cutting is complete, turn the saw off, carefully
remove the top layer of cement board and quickly
towel dry the mounting paper.
Step 8
Towel dry the back of the tile and install the sheet as
normal.

12
studio e installation guide
www.studio-e-design.net
13
www.studio-e-design.net installation guide studio e
SUbSTrATE VArIATIONS (installing next to thicker tiles)
When installing Edgewater glass tile adjacent to thicker materials, with the intention of the two
tiles nishing in the same plane (ush), the substrate must be brought up to a level such that
the tile can be installed with the recommended amount of setting material. This should be ac-
complished in one of three ways depending on the amount of variation between the uninstalled
glass tile and installed surrounding material.
Use one of the recommended thin-sets (page 6) and
a notch trowel to apply a layer of thin-set. Use a notch
trowel size that renders the desired substrate depth
once the notches have been attened.
Without removing any thin-set, atten the thin-set
notches. This step should yield a smooth consistent
setting bed of uniform depth. Cure for a minimum of
48 hours.
After the attened layer of thin-set has cured for a
minimum of 48 hours, install and grout the tile per the
instructions on pages 15-18.
After the installed cement board layer has cured for a
minimum of 24 hours, install and grout the tile per the
instructions on pages 15-18.
Use one of the recommend thin-sets (page 6) to
install a piece of ¼" or ½" cement board. Use a notch
trowel size and cement board thickness that will
render the desired substrate depth. Cure a minimum
of 24 hours.

14
studio e installation guide
www.studio-e-design.net
15
www.studio-e-design.net installation guide studio e
After the cement mortar bed has cured a minimum of
7 days, install and grout the tile per the instructions on
pages 15-18.
Apply a thin layer (bond-coat) of one of the recom-
mended thin-sets (page 6).
While the bond-coat is still tacky, apply a cement mor-
tar bed (sand & cement mixture per ANSI A108.1B).
Screed the cement mortar bed to the desired sub-
strate depth and cure a minimum of 7 days.
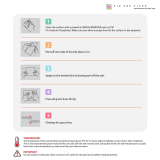
Step 3
Use the at side of the trowel to atten the notches
and achieve a smooth, consistent thin-set setting bed.
Step 4
Apply mosaic sheets to the thin-set setting bed (paper
side towards you) with light, even pressure.
INSTALLATION INSTrUCTIONS
Step 1
To initiate the bond coat, use the at side of a trowel
and rmly apply thin-set to the substrate.
Step 2
To establish the proper depth of the setting bed, use
a
1
⁄4" x
1
⁄4" square notch trowel to apply additional thin-
set and comb full notches in one direction.

16
studio e installation guide
www.studio-e-design.net
17
www.studio-e-design.net installation guide studio e
Step 5
Prior to setting each additional sheet, check the
thin-set for skinning (slight drying). If skinning occurs,
remove the thin-set and repeat steps 2 and 3. Apply
subsequent sheets so the joints line up and a consis-
tent eld is maintained.
Step 7a
For liners and decos, wipe the back of each piece with
a clean, dry cloth.
Step 7b
Back-butter each piece with a thin layer of thin-set
and apply it to the thin-set setting bed. Space a mini-
mum of
1
⁄8".
Step 6
To achieve the attest possible surface, lightly tap the
sheets with a wooden beating block and a nish ham-
mer. To unify sheet transitions, tap from one sheet to
the next.
Step 8
After 15-30 minutes, (oors can be removed sooner)
lightly wet the paper. Keep the paper wet by wiping
with a damp sponge several times over a 5-10 minute
period. After the paper has absorbed the water, the
glue will release.
Step 10
Straighten individual mosaic tiles prior to nal set
with the goal of creating a consistent overall eld of
mosaics. To eliminate the sheet pattern, pay particular
attention to the transitions between sheets.
Step 9
Peel the paper from the tile starting at the corner.
Removing the paper while the setting material is still
fresh allows for individual tile adjustment and re-
inspection of color consistency.
Step 11
After 48 hours, use water and a nylon scrub brush to
remove residual glue from the tile. Clean rinse and
towel dry.

18
studio e installation guide
www.studio-e-design.net
19
www.studio-e-design.net installation guide studio e
Step 14
For nal removal of grout haze, polish with a clean,
soft cloth.
NOTE
Step 12
Apply grout with a rubber grout oat, forcing grout into
joints until full.
Step 13
Allow grout joints to set-up (rm) and smooth nish
with a damp sponge. After 2 hours remove grout haze
with a lightly damp sponge.
CLEANING AND MAINTENANCE
Proper care and maintenance is crucial to the long-term appearance and performance of any
tile installation. The following information outlines the products and techniques recommended
for the cleaning and sealing of Studio E glass tile and are general in nature. For heavy soil and
stains that are not removed by the processes in this document, please consult a tile cleaning
and restoration specialist.
NOTE: Always wear personal protection equipment and protect surrounding surfaces and
nishes when using cleaning or sealing products. Test all cleaning/sealing products in an incon-
spicuous area for desired effect.
New Installations
For the removal of light cement-based grout haze or light construction dirt:
• Cure the installation a minimum of 24 hours after grouting.
• Remove loose dirt by vacuuming or sweeping.
• Prepare a cleaning solution of warm water and liquid dish soap or pH neutral cleaner.
• Thoroughly clean with the solution and a nylon scrub brush or nylon scrub pad (3M white).
• Thoroughly rinse with clean water and towel dry.
For the removal of stubborn cement-based grout or thin-set haze:
• Cure the installation a minimum of 10 days after grouting.
• Remove loose dirt by vacuuming or sweeping.
• Thoroughly pre-soak with clean water.
• Prepare a cleaning solution of Sulfamic Acid Cleaner per the manufacturer’s directions.
• Following the Sulfamic Acid manufacturer’s directions, clean with the solution and a nylon
scrub brush or nylon scrub pad (3M white).
• Thoroughly rinse with clean water and towel dry.
Sealer Application
Sealers are benecial for grout and natural stone; however they will not penetrate the impervious
glass tile. To prevent sealer smears, remove unabsorbed sealer by bufng the installation with a
clean, dry cloth. Change bufng cloth often and DO NOT allow the sealer to dry on the surface
of the tile.
NOTE: Consult the grout manufacturer for specic grout sealing recommendations. Always test
sealers in an inconspicuous area for desired effect.
General Maintenance
The key to successfully maintaining any tile installation is regular, proper maintenance. Any food
or other spills (i.e. coffee, wine & citrus) should be wiped up immediately. For regular cleaning
use a nylon scrub brush or 3m White nylon scrub pad and a solution of warm water and a pH
neutral soap (liquid dish soap or daily-use stone cleaner). Clean rinse and towel dry.
NOTE: Harsh cleaning chemicals and abrasives can damage tile, stone, grout and grout sealers.
See Cleaning and Maintenance
(page 19) for recommendations on
cleaning new installations and the
removal of stubborn grout haze.

20
studio e installation guide
www.studio-e-design.net
Showers
For regular cleaning use a nylon scrub brush or 3m White nylon scrub pad and a solution of
warm water and a pH neutral soap (liquid dish soap or daily-use stone cleaner). Clean rinse and
towel dry.
For the removal of soap scum build-up in showers use DESCUM Soap Scum Remover & Reno-
vator per the manufacturer’s instructions.
Pools And Water Features
Maintaining proper water balance is critical for the prevention of mineral scale build-up in pools
and water features. Water balance is calculated via the Langelier Saturation Index (LSI). The
water’s LSI is a numeric expression of the water’s balance and takes into consideration several
factors (i.e. total alkalinity, calcium hardness, etc…). When water is balanced the LSI equals
zero and variation between +0.5 and -0.5 is considered acceptable. LSI readings greater than
+0.5 may lead to water cloudiness and accelerated scaling (mineral deposits). LSI readings less
than -0.5 may lead to corrosion of cement-based materials (i.e. concrete, plaster & grout) and
metal surfaces.
For general pool and spa maintenance and the prevention of build-up, scrub the installation
with a nylon bristle scrub brush or a 3M White nylon scrub pad. Scrubbing should be part of the
regular, weekly, pool maintenance program.
To remove light mineral scale, the installation may also be cleaned with Descale-it Pool & Spa
Cleaner or a solution of Sulfamic acid. Always follow the chemical manufacturer’s instructions
for safety and use. A standard practice when using acidic cleaners is to rinse and neutralize the
surface of the tile, immediately after cleaning, with a solution of baking soda and water (1lb: 3
gallons).
If the mineral scale is not removed through the above methods, media blasting may be neces-
sary. There are pool tile-cleaning specialists who use portable media blasting equipment to
clean pool tile. They use an array of blasting media ranging from sand (aggressive) to baking
soda (mild). In our experience, baking soda (sodium bicarbonate) blasting media is aggressive
enough to remove scale but will cause minimal damage to the tile. As with all cleaning proce-
dures, this process should be tested in an inconspicuous area to ensure the results will not
damage the tile surface and meet your expectations.
/