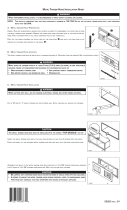
TRANSITION* KIT INSTALLATION INSTRUCTIONS
NOTE: THIS KIT IS ONLY COMPATIBLE WITH UNITS PRODUCING A MAXIMUM OF 110 CFM. DO NOT USE THIS KIT WITH A UNIT PRODUCING MORE THAN
110 CFM.
1. CONNECTING INSULATED DUCTS TO TANDEM
®
TRANSITION
1.1 CONNECTING 5” OR 6” DUCTS
1. For each duct, pull back the insulation to expose the interior flexible duct.
2. Connect the interior flexible duct to the smaller part of the Tandem transition (5’’ oval) using a tie wrap.
NOTE: If you are using a 6’’ diameter insulated duct, use the bigger part of the Tandem transition (6’’ oval).
3. Pull the insulation over the joint. Pull the vapor barrier over the insulation.
4. Apply duct tape gently to the joint in order to make an airtight seal. See figures below.
VJ0025
VJ0022
VJ0023
VJ0024
1
3
2
4
EXHAUST AIR TO OUTSIDE
DUCT
ON TOP
1.2 CONNECTING 4” DUCTS
NOTE: To connect 4” insulated flexible ducts to the 5” oval ends of the
Tandem
®
transition (Exhaust air to outside and Fresh air from
outdoors), first connect an adapter (not included) to the
Tandem
®
transition as follows.
1. For each duct, slightly squeeze a section of 4” round metal duct, at least
8” long, to insert it into the oval opening of the Tandem
®
transition and push
it all the way in.
2. Using silicon, seal the joint between the outside of the metal duct and the Tandem
®
transition, and allow silicon to dry
completely. See figure below.
3. Pull back the insulation to expose the interior flexible duct.
4. Pull the interior flexible duct over the adapter all the way to the silicon joint and secure using a tie wrap.
5. Pull the insulation and vapor barrier over the joint, making sure that no part is left without insulation.
6. Apply duct tape gently to the joint in order to make an airtight seal.
VJ0118A
VJ0119
3. LOCATING THE DUAL EXTERIOR HOOD
The dual exterior hood must be installed at a minimum distance of 18 inches (457 mm) from the ground.
See illustration beside.
VD0083A
18”
(457 mm)
4. CONNECTING THE TANDEM TRANSITION TO THE DUAL EXTERIOR HOOD
4.1 Using a reciprocating saw, cut a 6’’ diameter hole in the exterior wall and
insert the Tandem transition through this hole.
VD0084
EXHAUST AIR TO OUTSIDE DUCT
CAUTION
The Tandem transition must be inserted in such way that the EXHAUST AIR TO
OUTSIDE duct will be located on the top.
VD0085
4.2 Join the end of the Tandem transition to the rear of the exterior backplate.
Secure with 2 Xmas tree pins and seal properly with duct tape.
CAUTION
The exterior backplate must be installed with the word "TOP" pointing
upwards.
4.3 Lean the exterior backplate to the exterior wall. Using 4 no. 8 x 1½” screws, fix it to the
wall. Seal the outline with caulking.
VD0086
4.4 Snap the assembled exterior hood on its backplate and secure with 2 provided screws
(no. 8 x 3/4” long).
VD0087
SCREW
XMAS TREE PIN
06021 rev. 03
Make sure this hood is at least 6 feet (1.8 m) away (or more, as per applicable building codes or standards)
from sources of contamination such as:
• High efficiency furnace vent. • Any exhaust from a combustion source.
• Gas meter exhaust, gas barbecue-grill. • Garbage bin.
WARNING
!
VJ0121
2. ASSEMBLING THE DUAL EXTERIOR HOOD*
The exterior dual hood is coming in separate parts. Using 2 no. 8 x 3/4”
screws, assemble the top metal screen and the plastic grille to the dual
exterior hood. Then, slide the bottom metal screen at the bottom of the
dual exterior hood. See illustration.
VO0024
VJ0023
VJ0024
*Patented