Page is loading ...

TOOLS AND SUPPLIES
These tools and supplies are needed or
recommended:
Large sponge Basin or bucket
Phillips head screwdriver
Scraper/Putty Knife Hacksaw
Tape measure Adjustable wrench
Wax ring gasket (if not included)
Newspaper or drop cloth Ink marker
or pencil Setting compound Level
Toilet seat (if not included)
3/8” I.P.S. water supply and shut-off
valve (if new installation)
INSTALLING YOUR NEW TOILET
1.
If this is a new bathroom, install a 3/8"
I.P.S. water supply and shut-off valve.
(Refer to the rough-in for your specfic
model).
2
.
Before installing new wax gasket,
TEMPORARILY install flange
T-bolts, set toilet, and place discs and
nuts onto bolts. Mark bolt length needed
for bolt cap clearance. Remove toilet and
pre-cut the bolts to length.
3
.
Carefully
turn the toilet
bowl upside
down onto a
thick layer of
newspaper
to protect the
finish.
Place a new
wax gasket on
toilet outlet. A
bead of setting
compound
may be applied to the base if desired.
4
.
Install two flange T-bolts in the floor
flange.
SETTING THE BOWL
1.
Carefully lower toilet
so the T-bolts will pro-
trude through holes in
base. (May require help
to align).
2
.
Apply full
body weight to rim of
bowl for proper gasket
seal.
3
.
Place discs (bevel
side up) and nuts onto T-bolts and tighten
nut.
D
O
NOT OVERTIGHTEN
as breaking
or chipping of china may result.
4
.
Press bolt caps onto discs.
WATER CONNECTION
1
.
Before connecting the water supply, fl-
ush the line into a bucket to remove any
debris.
2
.
Place the coupling nut, friction
washer and universal washer onto the
plain end of supply tube as shown.
NOTE: The same universal washer will be
used to make the anged slip-joint con-
nection for a 1/2" O.D. supply.
3
.
Temporarily make connection to tank
supply shank, fin-
ger-tight. Mark at
shut-off valve the
tube length need-
ed and add 1/4".
(This will insert
down into shut-off
valve).
4
.
Remove
supply tube and cut
to length including
the extra 1/4".
Remove any burrs from inside the cut
end. Slip compression nut and ring (fer-
rule) onto the shut-off valve end of the
tubing.
5
.
Connect supply tube to supply
shank once more and finger-
tighten.Tubing may be pushed up into
tank supply to allow the extra 1/4" to be
inserted into shut-off valve.
6
.
Tighten
both the coupling nut at the tank and the
compression nut at the shut-off valve.
Make sure float valve does not rotate
while tightening the coupling nut.
7
.
Turn
on water supply and shut-off valve. Check
for leaks. An additional tightening adjust-
ment on leaking connections normally will
stop the leak.
TANK COVER
The self-adhesive
pads, installed as
shown, will cushion the
contact and prevent
rocking.
INSTALLATION IS
COMPLETE
ADJUSTMENTS
WATER LEVEL IN
TANK
After installation is completed, turn on the
water supply and let the
tank fill. Be sure that the
refill tube is inserted into
the overflow pipe
a
bove
the filled tank water
level.
Submerge the float cup
under the water for 30
seconds. Adjust the
water by turning the
water level adjustment rod by hand or
with a Phillips or slotted screwdriver. Turn
the adjustment rod clockwise to raise the
water level or counter-clockwise to lower
the water level. Flush the toilet. The toilet
tank should fill to the water line marked
on the flush valve.
I
mportant Note:
When flushed, only a por-
tion of the water in the tank will transfer to
the bowl. This is normal operation for a
low consumption toilet. After the flush is
complete, the TITAN will have approxi-
mately 5” of water remaining in the tank.
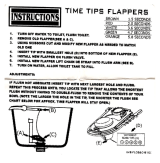
FLAPPER ADJUSTMENTS
The length of the chain that connects the
lever arm to the flapper may need to be
adjusted. (Move the hook to another link)
a)
Too much
slack may not permit the
flapper to lift far enough to properly acti-
vate the flush valve.
b)
Not enough
slack in the chain may
keep the flapper from closing properly.
TO REMOVE FLAPPER:
1.
Remove the beaded chain from the
holding slot on the hook or remove the
hook itself from the lever arm.
2
.
Place fin-
ger tips under the flapper arms near the
hinge pins. Slip the rubber flapper arm
over the ends
of the hinge
pin to remove
one side at a
time.
3
.
The
flapper can
now be lifted
and removed.
TO REMOVE FLUSH VALVE:
4.
To remove flush vlave, use a Phillips
head screwdriver to loosen the two
screws visible inside once the flapper is
removed.
TROUBLESHOOTING
POOR FLUSH possible causes:
- Shut-off valve is not fully open.
- Water level in tank is too low.
(See Adjustments- Water Level in Tank)
- Water level in bowl too low (refill tube
blocked or not installed into top of over-fl-
ow tube) (See Adjustments)
- Flapper not lifting and activating flush.
(See Adjustments - Flapper Adjustment)
- Floor outlet obstructed
- Flush lever operation hindered
- Bowl rim holes blocked
FLOAT VALVE DOES NOT FULLY
SHUT OFF
- Flapper may be defective or warped.
- Float cup may be lodged against tank wall
- Flapper may not be closing completely
due to obstruction or the chain being too
tight. (See Adjustments- Flapper Adjustment)
- Water level may be too high. (See
Adjustments - Water Level in Tank)
CARE & CLEANING
Everyday cleaning of china products
may be accomplished by using an anti-
bacterial liquid dishwashing soap and
water. For stubborn stains, use AJAX® or
Comet® sparingly. Read and follow all
label directions. In all cases, rinse thor-
oughly with plenty of water and dry the
fixture. In areas with hard water, a buildup
of mineral deposits or lime may make the
finish ofthe product appear dull. To
remove lime buildup on vitreous china
products, KRC-7® liquid cleaner may be
used. Read and follow all label directions.
In all cases, rinse thoroughly with plenty
of water and dry the fixture.
In-tank cleaners can damage the rubber,
metal and/or plastic components of tank
parts causing leaks and hindering toilet
performance. To clean bowls, use TOILET
BOWL CLEANERS THAT ARE APPLIED
TO THE TOILET BOWL and a nylon brush
when necessary. Use of a metal brush will
create metal marks in the bowl.
REPAIR PARTS
To obtain repair parts, contact
Customer Service at 1-800-442-1902 (US)
or 1-800-387-0369 (Canada).
Installation Instructions
WAX
GASKET
TOILET
OUTLET
UNIVERSAL
WASHER
FRICTION
WASHER
COUPLING
NUT
COMPRESSION
NUT
FERRULE
1/2" SHUT-OFF
VALVE
SUPPLY
TUBE
SUPPLY
SHANK
BOLT C
AP
NUT
BEVELE
D
DISC
BOLT
Counter-
clockwise
to lower
water level
Clock-
wise
to
raise
water
level
FC-105-0707
IMPORTANT! USE OF ANY TOILET
CLEANERS THAT ARE APPLIED IN
THE TOILET TANK VOIDS THE
WARRANTY.
Read all instructions before installation begins - Save these instructions
SELF
ADHESIVE
PADS
Floor Bolts
1.6 Gallon
One Piece Toilet
www.americanstandard-us.com
www.craneplumbing.com
www.eljer.com
/