Sony ZS-D10 Operating instructions

Category
Car media receivers
Type
Operating instructions

Sony ZS-D10: Your Guide to Versatile Entertainment

Discover a world of entertainment with the Sony ZS-D10, a compact and versatile audio system designed to elevate your listening experience. With its sleek design and powerful sound, the ZS-D10 offers a wide range of features to cater to your music, radio, and external audio device needs.

© 2003 Sony Corporation
Operating Instructions
Betjeningsvejledning
Personal
Audio
System
ZS-D10
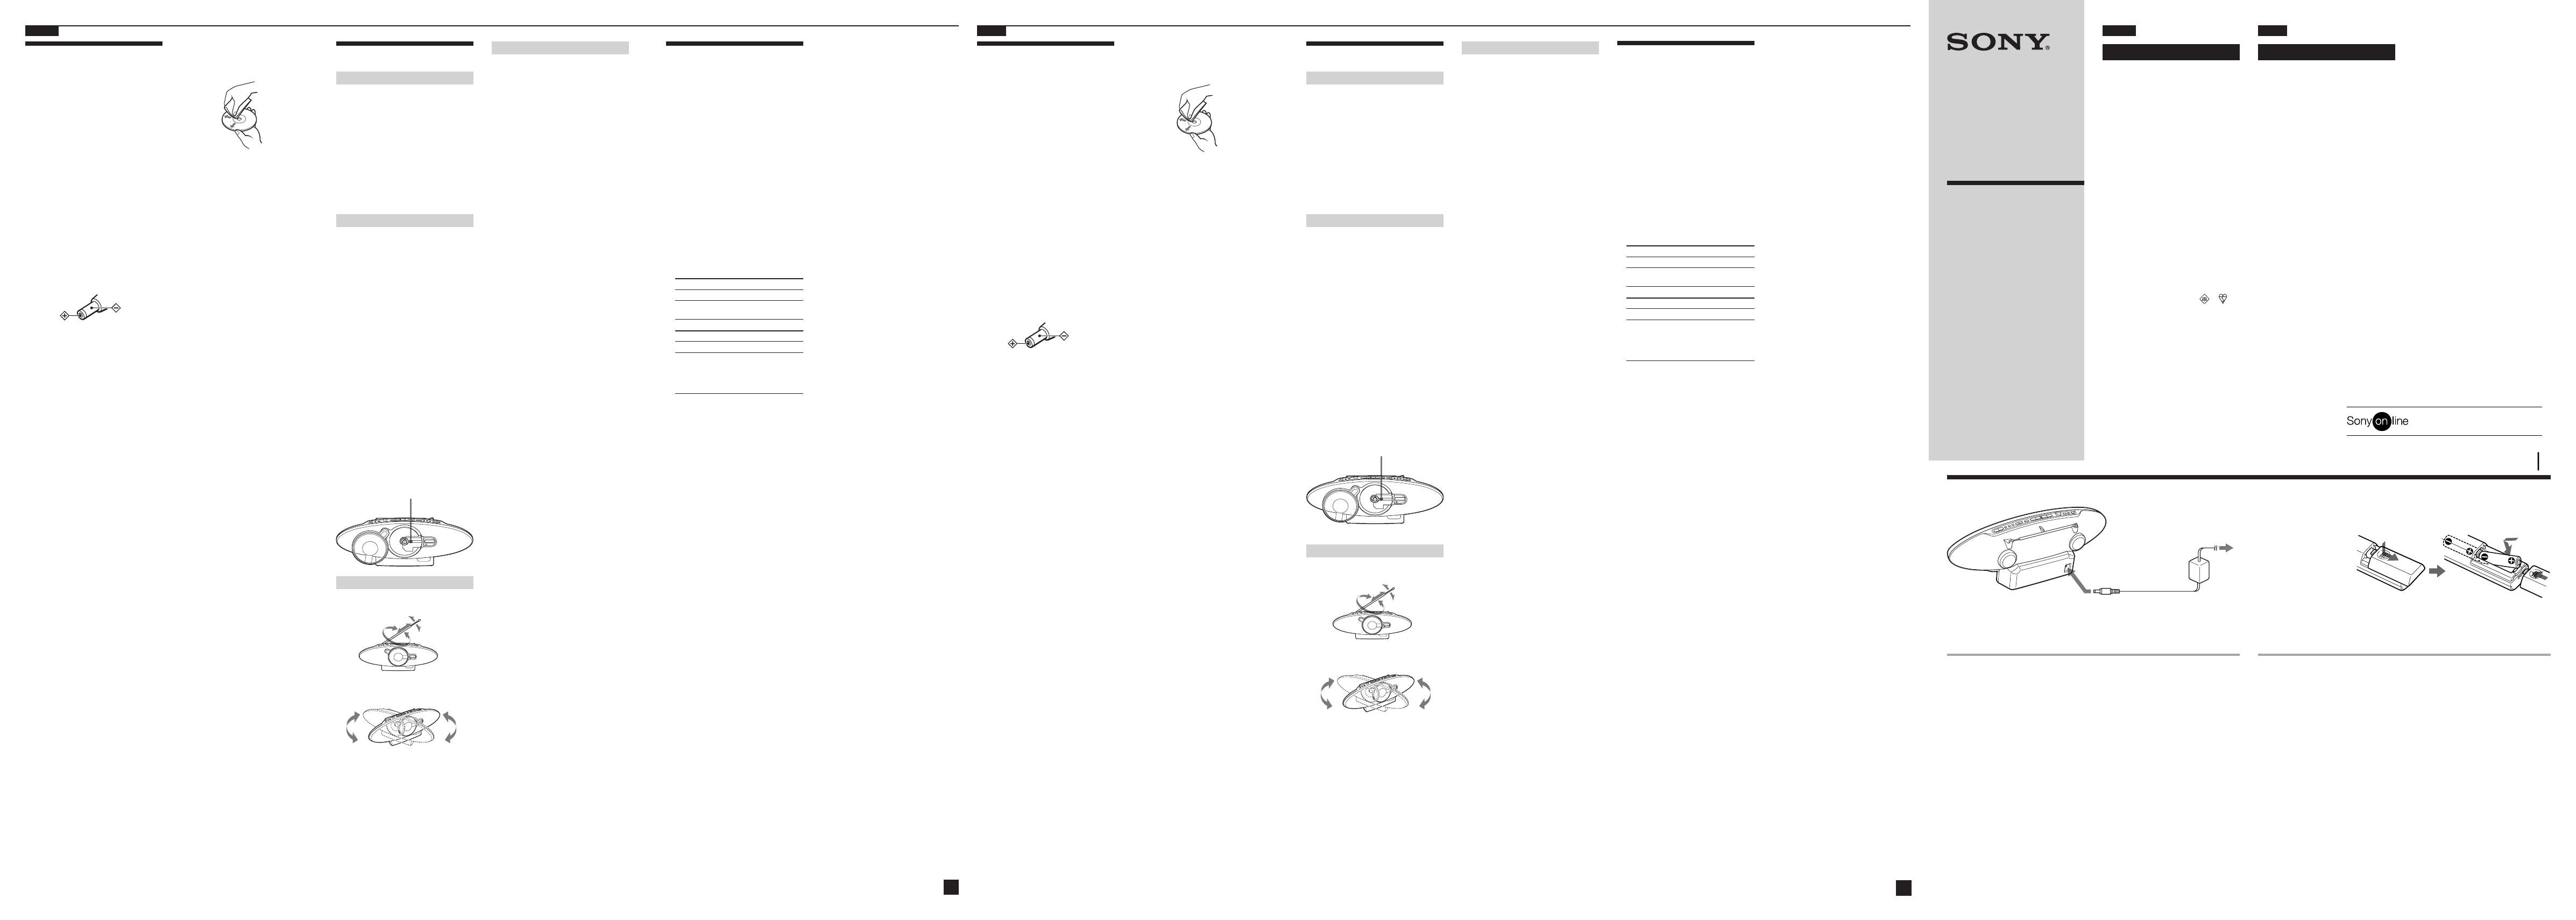
Power Sources/Strømkilder
1 to DC IN 10V
til DC IN 10V
2 to the mains
til lysnettet
A B
English
WARNING
To prevent fire or shock hazard, do
not expose the player to rain or
moisture.
To avoid electrical shock, do not open
the cabinet. Refer servicing to
qualified personnel only.
WARNING
Do not install the appliance in a confined space,
such as a bookcase or built-in cabinet.
To prevent fire or shock hazard, do not place
objects filled with liquids, such as vases, on the
appliance.
Notice for customers in the United
Kingdom
A moulded plug complying with BS 1363 is
fitted to this equipment for your safety and
convenience.
Should the fuse in the plug supplied need to be
replaced, same rating fuse approved by ASTA or
BSI to BS 1362, (i.e. marked with
or
mark) must be used.
If the plug supplied with this equipment has a
detachable fuse cover, be sure to attach the fuse
cover after you change the fuse. Never use the
plug without the fuse cover. If you should lose
the fuse cover, please contact your nearest Sony
service station.
For customers in Australia
The supply cord of the AC power adaptor cannot
be replaced; if the cord is damaged, the AC
power adaptor should be discarded.
Dansk
ADVARSEL
ndlad at udsætte afspilleren for regn
eller fugt, for at undgå fare for brand
eller elektriske stød.
For at undgå elektrisk stød, må
kabinettet ikke åbnes. Overlad alt
reparationsarbejde til fagkyndige.
ADVARSEL
Anbring ikke enheden på en snæver plads, f.eks.
i en bogreol eller et indbygget skab.
For at undgå fare for brand eller stød må der
ikke anbringes væskefyldte genstande, f.eks.
vaser, på enheden.
Connect the AC power adaptor A.
Preparing the remote B
Insert two R03 (size AAA) batteries (not supplied).
Replacing batteries
With normal use, the batteries should last for about six months. When the remote no longer
operates the player, replace two batteries with new ones.
English
Precautions
On safety
As the laser beam used in the CD player
section is harmful to the eyes, do not
attempt to disassemble the casing. Refer
servicing to qualified personnel only.
Should any solid object or liquid fall into
the player, unplug the player, and have it
checked by qualified personnel before
operating it any further.
Discs with non-standard shapes (e.g.,
heart, square, star) cannot be played on
this player. Attempting to do so may
damage the player. Do not use such discs.
Cleaning the cabinet
Clean the cabinet, panel and controls with
a soft cloth slightly moistened with a mild
detergent solution. Do not use any type of
abrasive pad, scouring powder, or solvent,
such as alcohol or benzine.
On power sources
For AC operation, use the supplied AC
power adaptor; do not use any other type.
The player is not disconnected from the
AC power source (mains) as long as it is
connected to the mains, even if the player
itself has been turned off.
When the batteries are not to be used,
remove them to avoid damage that can be
caused by battery leakage or corrosion.
The nameplate indicating operating
voltage, etc. is located at the rear.
On placement
Do not leave the player in a location near
heat sources, or in a place subject to direct
sunlight, excessive dust or mechanical
shock.
Do not place the player on an inclined or
unstable place.
Do not place anything within 10 mm of
the side of the cabinet. The ventilation
holes must be unobstructed for the player
to operate properly and prolong the life of
its components.
If the player is left in a car parked in the
sun, be sure to choose a location in the car
where the player will not be subjected to
the direct rays of the sun.
Since a strong magnet is used for the
speakers, keep personal credit cards using
magnetic coding or spring-wound watches
away from the player to prevent possible
damage from the magnet.
On operation
If the player is brought directly from a
cold to a warm location, or is placed in a
very damp room, moisture may condense
on the lenses inside the CD player section.
Should this occur, the player will not
operate properly. In this case, remove the
CD and wait about an hour for the
moisture to evaporate.
Troubleshooting
General
The power does not come on.
Connect the AC power adaptor to the mains
securely.
There is no audio.
Make sure the function you want to use
appears in the display window.
Adjust the volume.
Unplug the headphones when listening
through speakers.
Noise is heard.
Someone is using a portable telephone or
other equipment that emits radio waves near
the player. tMove the portable telephone,
etc., away from the player.
CD Player
The CD does not play or “no dISC”
lights in the display even when a CD
is in place.
Place the CD with the label surface facing
you.
Make sure that the CD compartment is closed.
Clean the CD.
Take out the CD and leave the CD
compartment open for about an hour to dry
moisture condensation.
Make sure “Cd” appears in the display.
The CD-R/CD-RW was not finalized. Finalize
the CD-R/CD-RW with the recording device.
There is a problem with the quality of the CD-
R/CD-RW, recording device or application
software.
The sound drops out.
Noise is heard.
Reduce the volume.
Clean the CD, or replace it if the CD is badly
damaged.
Place the player in a location free from
vibration.
Clean the lens with a commercially available
blower.
The sound may drop out or noise may be
heard when using poor quality CD-Rs/CD-
RWs or if there is a problem with the
recording device or application software.
Radio
Reception is poor.
Reorient the aerial to improve FM reception.
Reorient the player itself to improve AM or
MW/LW reception.
The audio is weak or has poor quality.
Move the player away from the TV.
If you are using the remote while listening to
AM or MW/LW radio, noise may be heard.
This is unavoidable.
The picture of your TV becomes
unstable.
If you are listening to an FM program near the
TV with an indoor aerial, move the player
away from the TV.
Notes on CDs
Before playing, clean the CD with a
cleaning cloth. Wipe the CD from the
center out.
Do not use solvents such as benzine,
thinner, commercially available cleaners
or anti-static spray intended for vinyl LPs.
Do not expose the CD to direct sunlight or
heat sources such as hot air ducts, nor
leave it in a car parked in direct sunlight as
there can be a considerable rise in
temperature inside the car.
Do not stick paper or sticker on the CD,
nor scratch the surface of the CD.
After playing, store the CD in its case.
If there is a scratch, dirt or fingerprints on the
CD, it may cause tracking error.
About CD-Rs/CD-RWs
This player can play CD-Rs/CD-RWs
recorded in the CD-DA format*, but
playback capability may vary depending on
the quality of the disc and the condition of
the recording device.
* CD-DA is the abbreviation for Compact
Disc Digital Audio. It is a recording
standard used for Audio CDs.
Music discs encoded with copyright
protection technologies
This product is designed to play back discs
that conform to the Compact Disc (CD)
standard. Recently, various music discs
encoded with copyright protection
technologies are marketed by some record
companies. Please be aware that among
those discs, there are some that do note
conform to the CD standard and may not by
playable by this product.
If you have any questions or problems
concerning your player, please consult your
nearest Sony dealer.
Remote
The remote does not function.
Replace the battery in the remote with new
one if it is weak.
Make sure that you are pointing the remote at
the remote sensor on the player.
Remove any obstacles in the path of the
remote and the player.
Make sure the remote sensor is not exposed to
strong light such as direct sunlight or
fluorescent lamp light.
Move closer to the player when using the
remote.
After trying the above remedies, if you still have
problems, unplug the AC power adaptor. After
all the indications in the display disappear, plug
the AC power adaptor again. If the problem
persists, please consult your nearest Sony dealer.
Specifications
CD player section
System
Compact disc digital audio system
Laser diode properties
Material: GaAlAs
Wave length: 780 nm
Emission duration: Continuous
Laser output: Less than 44.6 µW
(This output is the value measured at a distance
of about 200 mm from the objective lens surface
on the optical pick-up block with 7 mm
aperture.)
Spindle speed
200 r/min (rpm) to 500 r/min (rpm)
(CLV)
Number of channels
2
Frequency response
20 - 20 000 Hz +1/–2 dB
Wow and flutter
Below measurable limit
Radio section
Frequency range
European model
FM 87.5 - 108 MHz
MW 531 - 1 611 kHz (9 kHz step)
530 - 1 610 kHz (10 kHz step)
LW 153 - 279 kHz
Other models
FM 87.5 - 108 MHz
AM Australian model:
531 - 1 611 kHz
Other models:
531 - 1 611 kHz (9 kHz step)
530 - 1 610 kHz (10 kHz step)
IF
FM: 10.7 MHz
AM/MW/LW: 450 kHz
Aerials
FM: Telescopic aerial
AM/MW/LW: Built-in ferrite bar aerial
General
Speaker
Main speaker: 8 cm ( 3
1
4
in.) dia., 6 , cone
type (2)
Input
LINE IN jack (stereo minijack):
Minimum input level 330 mV
Outputs
Headphones jack (stereo minijack):
For 16 - 68 impedance headphones
OPTICAL DIGITAL OUT (CD) (optical output
connector):
Wavelength 630 - 690 nm
Maximum power output
11 W
Power requirements
For Personal Audio System:
DC IN 10V jack accepts: Supplied AC power
adaptor for use with:
240 V AC, 50 Hz (Australian model)
230 V AC, 50 Hz (Other models)
For remote control:
3 V DC, 2 R03 (size AAA) batteries
Dimensions
Approx. 530 × 195 × 127 mm (w/h/d)
(20
7
8
× 7
3
4
× 5 inches)
(incl. projecting parts)
Mass
Approx. 2.5 kg (5 lb. 8 oz)
Supplied accessories
AC power adaptor (1)
Remote control (1)
Design and specifications are subject to change
without notice.
Optional accessories
Sony MDR headphone series
Tilslut lysnetadapteren A.
Klargøre fjernbetjeningen B
Isæt to R03 (størrelse AAA) batterier (medfølger ikke).
Udskiftning af batterier
Ved normal brug bør batterierne holde i ca. seks måneder. Når fjernbetjeningen ikke længere
virker, skal de to batterier udskiftes med nye.
Dansk
Forholdsregler
Om sikkerhed
Laserstrålen i cd-afspillerdelen er skadelig
for øjnene. Forsøg derfor ikke at skille
kabinettet ad. Overlad alt
reparationsarbejde til faguddannede.
Hvis der kommer en genstand eller væske
ind i afspilleren, skal den afbrydes og
kontrolleres af faguddannede, inden den
bruges igen.
Diske som ikke er af standardform (f.eks.
hjerte, firkantet, stjerne), kan ikke afspilles
på afspilleren. Hvis du forsøger af afspille
dem, kan det beskadige afspilleren. Brug
ikke den type diske.
Rengøring af kabinettet
Rengør kabinettet, panelet og knapperne
med en blød klud, der er let fugtet med et
mildt rensemiddel. Brug ikke nogen form
for slibemiddel, skurepulver eller
opløsningsmidler, f.eks. sprit eller
rensebenzin.
Om strømkilder
Hvis afspilleren skal bruges med
vekselstrøm, skal du bruge den
medfølgende lysnetadapter; brug ikke en
anden type.
Afspilleren er ikke afbrudt fra
vekselstrømskilden (lysnettet), så længe
den er tilsluttet lysnettet, heller ikke hvis
afspilleren er slukket.
Hvis batterierne ikke skal anvendes, skal
de tages ud for at undgå skade, der kan
forårsages af utætte batterier eller tæring.
Navnepladen, der angiver driftspænding
m.m., er placeret på bagsiden.
Om placering
Lad ikke afspilleren stå i nærheden af
varmekilder, eller på et sted hvor den
udsættes for direkte sol, støv eller
mekaniske stød.
Anbring ikke afspilleren på skrå eller på et
ustabilt sted.
Anbring ikke noget mindre end 10 mm fra
kabinettets sider. For at afspilleren kan
fungere korrekt, og for at dens levetid
bliver så lang som muligt, må
ventilationshullerne ikke spærres.
Hvis afspilleren efterlades i en bil parkeret
i solen, skal du sørge for at anbringe den
på et sted i bilen, hvor den ikke udsættes
for direkte solstråler.
Der er en stærk magnet i højttalerne.
Kreditkort med magnetisk kodning og
fjederoptrukne armbåndsure må derfor
ikke komme i nærheden af afspilleren, så
eventuel beskadigelse fra magneten
undgås.
Om betjening
Hvis afspilleren bringes direkte fra kolde
til varme omgivelser, eller placeres i et
meget fugtigt rum, kan der dannes fugt på
linserne inden i cd-afspillerdelen. Skulle
dette ske, kan afspilleren ikke fungere
ordentligt. Tag cd’en ud og vent i omkring
en time, indtil fugten er fordampet.
Fejlfinding
Generelt
Strømmen tændes ikke.
Sæt lysnetladapteren godt fast i en
lysnetstikkontakt.
Der er ingen lyd.
Sørg for, at den funktion, du vil bruge, vises
på displayvinduet.
Juster lydstyrken.
Afbryd hovedtelefonerne når du lytter via
højttalere.
Der høres støj.
Der bruges en mobiltelefon eller andet udstyr,
der udsender radiobølger, i nærheden af
afspilleren. t Flyt mobiltelefonen el.lign.
væk fra afspilleren.
Cd-afspiller
Cd’en afspilles ikke, eller “no dISC”
tændes på displayet, selv om der er
isat en cd.
Læg cd’en med etiketsiden mod dig.
Sørg for, at cd-rummet er lukket.
Rens cd’en.
Tag cd’en ud og lad cd-rummet stå åbent i ca.
en time, indtil kondensvandet er fordampet.
Sørg for, at “Cd” vises på displayet.
Cd-r/cd-rw’en var ikke afsluttet. Afslut cd-r/
cd-rw’en med optageudstyret.
Der er problemer med cd-r/cd-rw’ens kvalitet,
optageudstyret eller applikationssoftwaren.
Lyden falder bort.
Der høres støj.
Sænk lydstyrken.
Rens cd’en, eller udskift den, hvis den er
svært beskadiget.
Anbring afspilleren på et sted uden rystelser.
Rens linsen med en almindelig blæser.
Lyden kan falde bort, eller der kan høres støj,
når der bruges cd-r/cd-rw’ere af dårlig
kvalitet, eller hvis der er problemer med
optageudstyret eller applikationssoftwaren.
Radio
Modtagelsen er dårlig.
Flyt antennen for at forbedre FM-modtagelse..
Flyt afspilleren for at forbedre AM eller MW/
LW-modtagelse.
Lyden er svag eller af dårlig kvalitet.
Flyt afspilleren væk fra tv’et.
Hvis du bruger fjernbetjeningen, mens du
lytter til AM- eller MW/LW-radio, vil du
muligvis høre støj. Det kan ikke undgås.
Billedet på dit tv bliver ustabilt.
Hvis du lytter til et FM-program i nærheden af
et tv med en indendørs antenne, skal
afspilleren flyttes væk fra tv’et.
Bemærkninger om cd’ere
Rens cd’en med en rengøringsklud inden
afspilning. Tør cd’en af fra midten og
udad.
Brug ikke opløsningsmidler, f.eks. benzen,
fortynder, rengøringsmidler, der fås i
almindelig handel, eller antistatisk spray
beregnet til vinyl LP’er.
Udsæt ikke cd’en for direkte sollys eller
varmekilder, f.eks. ventilationskanaler, og
efterlad den ikke i en bil parkeret direkte i
solen, hvor der kan opstå betydelige
temperaturstigninger.
Undgå at klistre papir eller mærkater på
cd’en, og pas på ikke at ridse dens
overflade.
Opbevar cd’en i dens etui efter afspilning.
Hvis der er ridser, snavs eller fingeraftryk på
cd’en, kan det forårsage sporingsfejl.
Om cd-r/cd-rw’ere
Afspilleren kan afspille cd-r/cd-rw’ere
optaget i CD-DA-format*, men
afspilningsevnen kan variere, afhængigt af
diskens kvalitet og optageudstyrets tilstand.
* CD-DA er en forkortelse for Compact
Disc Digital Audio. Det er en
optagestandard, der bruges til audio-
cd’ere.
Musikdiske kodet med teknologi til
ophavsretsbeskyttelse
Dette produkt er udformet til afspilning af
diske, der opfylder Compact Disc (cd) -
standarden. I den senere tid er diverse
musikdiske kodet med teknologi til
ophavsretsbeskyttelse blevet udsendt af
nogle musikselskaber. Bemærk, at ikke alle
disse diske opfylder cd-standarden. og derfor
ikke altid kan afspilles på denne cd-afspiller.
Henvend dig til nærmeste Sony-forhandler
hvis du har nogen spørgsmål om eller
problemer med din afspiller.
Fjernbetjening
Fjernbetjeningen fungerer ikke.
Udskift batteriet i fjernbetjeningen med et nyt,
hvis det er svagt.
Sørg for at pege fjernbetjeningen mod
afspillerens fotocelle til fjernbetjening.
Fjern eventuelle forhindringer mellem
fjernbetjeningen og afspilleren.
Sørg for ikke at udsætte afspillerens fotocelle
til fjernbetjening for stærkt lys, f.eks. direkte
sollys eller lys fra en fluorescerende lampe.
Gå tættere på afspilleren når du bruger
fjernbetjeningen.
Hvis der stadig er problemer, når du har prøvet
ovenstående løsningsforslag, skal
lysnetadapteren afbrydes. Sæt lysnetadapteren til
igen, efter alle indikationerne på displayet er
forsvundet. Henvend dig til nærmeste Sony-
forhandler, hvis problemet ikke kan løses.
Specifikationer
Cd-afspiller
System
Compactdisk digitalt audioanlæg
Laserdiode-egenskaber
Materiale: GaAlAs
Bølgelængde: 780 nm
Emissionsvarighed: Vedvarende
Laserudgang: mindre end 44.6 µW
(Denne udgang er værdien målt ved en afstand
på 200 mm fra objektivlinsens overflade på den
optiske pick-up blok med 7 mm åbning.)
Taphastighed
200 omdrejn./min. til 500 omdrejn./min.
(CLV)
Antal kanaler 2
Frekvensreaktion 20 - 20.000 Hz +1/–2 dB
Wow og flutter Under målelig grænse
Radio
Frekvensområde
Europæisk model
FM 87,5 - 108 MHz
MW 531 - 1 611 kHz (i trin på 9 kHz)
530 - 1 610 kHz (i trin på 10 kHz)
LW 153 - 279 kHz
Andre modeller
FM 87,5 - 108 MHz
AM Australsk model:
531 - 1 611 kHz
Andre modeller:
531 - 1 611 kHz (intervalo de 9 kHz)
530 - 1 610 kHz (intervalo de 10 kHz)
Mellemfrekvens
FM: 10,7 MHz
AM/MW/LW: 450 kHz
Antenner
FM: Udskydelig antenne
AM/MW/LW: Indbygget ferrit-stavantenne
Generelt
Højttaler
Hovedhøjttaler: 8 cm (
4
“) dia., 6 , membran
type (2)
Indgang
LINE IN-jackstik (stereo-minijackstik):
Minimalt indgangsniveau 330 mV
Udgange
Hovedtelefon-jackstik (stereo-minijackstik):
Til hovedtelefoner med 16 - 68 impedans
OPTICAL DIGITAL OUT (CD)
(optisk udgangs stikforbindelse):
Bølgelængde: 630 - 690 nm
Maksimal udgangseffekt
11 W
Strømkrav
Til Personal Audio System:
DC IN 10V jackstik accepterer:
Medfølgende lysnet adapter til brug med:
240 V vekselstrøm, 50 Hz (australsk model)
230 V vekselstrøm, 50 Hz (andre modeller)
Til fjernbetjening:
3 V jævnstrøm, 2 R03 (størrelse AAA) batterier
Mål
Ca. 530 × 195 × 127 mm (b/h/d) (inkl.
fremspring)
Vægt
Ca. 2,5 kg
Medfølgende tilbehør
Lysnetadapter (1)
Fjernbetjening (1)
Design og specifikationer kan ændres uden
forudgående varsel.
Ekstra tilbehør
Sony hovedtelefoner serie MDR
Lens
Polarity of the plug
Stikkets polaritet
Linse
Sony Corporation Printed in Sweden
http://www.sony-europe.com
P872enda.p65 3-02-25, 10.001
Location of controls/Knappernes placering
Total track number
Samlet antal spor
Programmed track
Programmeret spor
Playing order
Afspilningsrækkefølge
CD
Total playing time
Samlet afspilningstid
Display
Remote Control
Fjernbetjening
FUNCTION
BAND
OPERATE
(POWER)
VOL +*, –
x
PRESET +, –
.,>
SLEEP
*The button has a tactile dot.
*Knappen har en berøringsprik.
To turn on/off the power
European model: Press OPERATE.
Other models: Press POWER.
To adjust the volume
Press VOLUME +, – (VOL +, – on the remote).
To listen through headphones
Connect the headphones to the i (headphones) jack.
To turn off the blue light of the CD compartment lid
When the player is turned on, the blue light of the CD compartment lid lights. To turn the light
off, press and hold MODE for about 4 seconds.
To turn the light on again, press and hold MODE for about 4 seconds.
Adjusting the audio emphasis
You can adjust the audio emphasis of the sound you are listening to.
To reinforce the bass sound
Press MEGA BASS.
“MEGA BASS” appears in the display.
To return to normal sound, press the button again.
Sådan slås strømmen til/fra
Europæisk model: Tryk på OPERATE.
Andre modeller: Tryk på POWER.
Sådan justeres lydstyrken
Tryk på VOLUME +, – (VOL +, – på fjernbetjeningen).
Sådan lyttes gennem hovedtelefoner
Tilslut hovedtelefonerne til i (hovedtelefoner) -jackstikket.
Sådan slås det blå lys på låget til cd-rummet fra
Når afspilleren tændes, slås det blå lys på låget til cd-rummet til. For at slå lyset fra skal du
trykke på og holde MODE i ca. 4 sekunder.
For at tænde lyset igen skal du trykke på og holde MODE i ca. 4 sekunder.
Justering af lydbetoningen
Du kan justere betoningen af den lyd, du lytter til.
Sådan forstærkes baslyden
Tryk på MEGA BASS.
“MEGA BASS” vises på displayet.
For at vende tilbage til normal lyd skal du trykke på knappen igen.
Listening to the radio
1 Press OPERATE (or POWER) to turn on the player.
2 Press RADIO•BAND•AUTO PRESET until the band you want appears in the
display.
Each time you press the button, the indication changes as follows:
European model: “FM” t “MW” t “LW”
Other models: “FM” t “AM”.
3 Hold down TUNE + or – until the frequency digits begin to change in the
display.
The player automatically scans the radio frequencies and stops when it finds a
clear station.
If you can't tune in a station, press the button repeatedly to change the frequency
step by step.
Tip
If the FM broadcast is noisy, press MODE until “Mono” appears in the display and the radio will play in
monaural.
Changing the AM/MW tuning interval (excluding for Australian model)
The AM/MW tuning interval is preset to 9 kHz at the factory.
If you need to change the AM/MW tuning interval, do the following:
1 Press RADIO•BAND•AUTO PRESET until “AM” or “MW” is displayed.
2 Press MEMORY/DISPLAY/ENTER for 2 seconds.
3 Press RADIO•BAND•AUTO PRESET for 2 seconds.
“AM 9” “MW 9” or “AM 10” “MW 10” appears.
4 Press TUNE + or – to select “AM 9” “MW 9” for 9 kHz interval or “AM 10” “MW 10”
for 10 kHz interval.
5 Press MEMORY/DISPLAY/ENTER.
After changing the tuning interval, you need to reset your preset AM/MW radio stations.
Presetting radio stations
You can store radio stations into the player’s memory. You can preset up to 40 radio stations
(European model), 20 for FM and 10 for MW and LW in any order or 30 radio stations (other
models), 20 for FM and 10 for AM in any order,.
1 Press OPERATE (or POWER) to turn on the player.
2 Press RADIO•BAND•AUTO PRESET to select the band.
3 Hold down MEMORY/DISPLAY/ENTER for 2 seconds until “AUTO” flashes
in the display.
4 Press MEMORY/DISPLAY/ENTER.
The stations are stored in memory from the lower frequencies to the higher ones.
If a station cannot be preset automatically
You need to preset a station with a weak signal manually.
1 Press OPERATE (or POWER) to turn on the player.
2 Press RADIO•BAND•AUTO PRESET to select the band.
3 Tune in a station you want.
4 Hold down MEMORY/DISPLAY/ENTER for 2 seconds until the preset number flashes in
the display.
5 Press PRESET + or – until the preset number you want for the station flashes in the display.
6 Press MEMORY/DISPLAY/ENTER.
The new station replaces the old one.
Tip
The preset radio stations remain in memory even if you unplug the AC power adaptor.
Playing preset radio stations
1
Press OPERATE (or POWER) to turn on the player.
2 Press RADIO•BAND•AUTO PRESET to select the band.
3 Press PRESET + or – to tune in the stored station.
Connecting optional components
You can record a CD on a MiniDisc and enjoy the sound from other components, such as
portable MD, CD player and TV, VCR through the speakers of this player.
Be sure to turn off the power of each component before making connections. For details, refer to
the instructions of the component to be connected.
Recording a CD on a MiniDisc recorder and DAT recorder
1
Open the jack cover of the OPTICAL DIGITAL OUT (CD) jack of this player
and connect the jack with the digital input jack of MiniDisc and DAT using the
digital connecting cable * (not supplied).
* Select a connecting cable depending on the type of the digital input jack of the recorder to be
connected. For details, refer to the instruction manual of the component to be connected. The
OPTICAL DIGITAL OUT (CD) jack of this unit is square-shaped jack.
The type of the jack Model number of
of the component the connecting cable
to be connected
Optical miniplug POC-5AB
(MiniDisc recorder, etc.)
L-type 7-pin connector POC-DA12P
(DAT recorder, etc.)
Square-shaped optical POC-10A
connector (MiniDisc
recorder, DAT recorder, etc.)
2 Turn on the power of this player and the connected component.
3 Make the connected component ready for recording.
4 Press u to start playing a CD on this player.
Listening to the sound from the connected components
1
Connect the LINE IN jack of this player with the line output jack or headphones
jack of other component using the audio connecting cable* (not supplied).
* For Minidisc recorder: a cable with a stereo-mini plug on both ends.
* For TV, VCR: a cable with a stereo-mini plug on one end and tow phono plugs on the other end.
2 Press LINE to display “LInE”.
3 Play the optional component connected to the LINE IN jack of the player.
Note
Connect the cords firmly to avoid any malfunction.
Falling asleep to music
1 Play the music source you want.
2 Press SLEEP.
3 Press SLEEP to select the minutes until the player goes off automatically.
Each time you press the button, the indication changes as follows: “60” t
“90” t “120” t “OFF” t “10” t “20” t “30”.
To cancel the sleep function
Press OPERATE (or POWER) to turn off the power.
Tip
The blue light of the CD compartment lid goes off while the sleeping timer is on.
English
Playing a CD
1 Press OPERATE (or POWER) to turn on the player.
2 Press OPEN to load a CD in the CD compartment.
3 Close the CD compartment by hand.
4 Press u.
The player plays all the tracks once.
To
stop playback
pause playback
go to the next track
go back to the previous track
remove the CD
locate a point while listening
to the sound
locate a point while observing
the display
Using the display
To check the total track number and playing time
Press MEMORY/DISPLAY/ENTER in stop mode (see fig. C).
To check the remaining time
Press MEMORY/DISPLAY/ENTER repeatedly while playing a CD. The display changes as
follows:
t the current track number and playing time
r
the current track number and the remaining time on the current track*
r
the number of tracks left and remaining time on the CD
* For a track whose number is more than 20, the remaining time appears as “- -:- -” in the display.
Selecting the play mode
Press MODE until “REP 1” “REP ALL” “SHUF” “SHUF REP” “PGM” “PGM REP” appears in
the display. Then proceed as follows:
To Select
repeat a single track “REP 1”
repeat all tracks “REP ALL”
shuffle play “SHUF”
repeat tracks “SHUF REP”
in random order
programme play “PGM”
repeat programmed tracks “PGM REP”
To cancel selected play mode
Press MODE until the selected mode disappears from the display.
To check the programmed track and playing order in the display
To check the order of tracks before play, press MEMORY/DISPLAY/ENTER.
Every time you press the button, the track number appears in the programmed order.
To change the current programme
Press x once if the CD is stopped and twice if the CD is playing. The current programme will be
erased. Then create a new programme following the programming procedure.
Tip
You can play the same programme again, since the programme is saved until you open the CD
compartment.
Lytte til radioen
1 Tryk på OPERATE (eller POWER) for at tænde for afspilleren.
2 Tryk på RADIO•BAND•AUTO PRESET, indtil det ønskede bånd vises på
displayet.
Hver gang du trykker på knappen, skifter båndet som følger:
Europæisk model: “FM” t “MW” t “LW”
Andre modeller: “FM” t “AM”.
3 Hold TUNE + eller – nede, indtil frekvenstallene begynder at ændre sig på
displayet.
Afspilleren afsøger automatisk radiofrekvenserne, og standser når den finder en
tydelig station.
Hvis du ikke kan stille ind på en station, skal du trykke gentagne gange på
knappen, så frekvensen ændres trin for trin.
Tip
Tryk på MODE indtil “Mono” vises på displayet, hvis der er støj på FM-udsendelsen. Radioen afspiller
herefter i mono.
Ændring af AM/MW-indstillingsintervallet (australsk model undtaget)
AM/MW-indstillingsintervallet er fabriksforvalgt til 9 kHz.
Hvis du vil ændre AM/MW-indstillingsintervallet, skal du gøre følgende:
1 Tryk på RADIO•BAND•AUTO PRESET, indtil “AM” eller “MW” vises.
2 Tryk på MEMORY/DISPLAY/ENTER i 2 sekunder.
3 Tryk på RADIO•BAND•AUTO PRESET i 2 sekunder.
“AM 9” “MW 9” eller “AM 10” “MW 10” vises.
4 Tryk på TUNE + eller – for at vælge “AM 9” “MW 9” for interval på 9 kHz eller “AM
10” “MW 10” for interval på 10 kHz.
5 Tryk på MEMORY/DISPLAY/ENTER.
Efter ændringen af indstillingsintervallet skal du indstille dine forvalgte AM/MW-
radiostationer igen.
Forvalg af radiostationer
Du kan gemme radiostationer i afspillerens hukommelse. Du kan forvælge op til 40
radiostationer (europæisk model), 20 for FM og 10 for MW og LW i vilkårlig rækkefølge, eller
30 radiostationer (andre modeller), 20 for FM og 10 for AM i vilkårlig rækkefølge.
1 Tryk på OPERATE (eller POWER) for at tænde for afspilleren.
2 Tryk på RADIO•BAND•AUTO PRESET for at vælge båndet.
3 Hold MEMORY/DISPLAY/ENTER nede i 2 sekunder, indtil “AUTO” blinker
på displayet.
4 Tryk på MEMORY/DISPLAY/ENTER.
Stationerne gemmes i hukommelsen fra de lave frekvenser til de højere.
Hvis en station ikke kan forvælges automatisk
En station med et svagt signal skal forvælges manuelt.
1 Tryk på OPERATE (eller POWER) for at tænde for afspilleren.
2 Tryk på RADIO•BAND•AUTO PRESET for at vælge båndet.
3 Stil ind på den ønskede station.
4 Hold MEMORY/DISPLAY/ENTER nede i 2 sekunder, indtil forvalgsnummeret blinker på
displayet.
5 Tryk på PRESET + eller – indtil det forvalgte nummer, du vil bruge til stationen, blinker på
displayet.
6 Tryk på MEMORY/DISPLAY/ENTER.
Den gamle station udskiftes med den nye.
Tip
De forvalgte radiostationer bibeholdes i hukommelsen, selv om du afbryder lysnetadapteren.
Afspilning af forvalgte radiostationer
1
Tryk på OPERATE (eller POWER) for at tænde for afspilleren.
2 Tryk på RADIO•BAND•AUTO PRESET for at vælge båndet.
3 Tryk på PRESET + eller – for at stille ind på den gemte station.
Tilslutning af ekstra komponenter
Du kan optage en cd på en MiniDisc, og benytte afspillerens højttalere til at høre lyden fra andre
komponenter, f.eks. en bærbar md, cd-afspiller og tv eller videobåndoptager.
Sørg for at slå strømmen til hver komponent fra, inden du laver tilslutning. Se vejledningerne til
den komponent, der skal tilsluttes for nærmere oplysninger.
Optage en cd på en MiniDisc-optager og DAT-optager
1
Åbn jackstikdækslet på denne afspillers OPTICAL DIGITAL OUT (CD) -
jackstik, og forbind jackstikket til det digitale indgangsjackstik på MiniDisc’en
eller DAT’en med brug af det digitale tilslutningskabel* (medfølger ikke).
* Vælg et tilslutningskabel afhængigt af den digitale indgangsjackstik-type på den optager, der skal
tilsluttes. Se vejledningen til den komponent, der skal tilsluttes for nærmere oplysninger. Denne
afspillers OPTICAL DIGITAL OUT (CD) -jackstik er firkantet.
Jackstik-type Modelnummer for
for den komponent tilslutningskablet
der skal tilsluttes
Optisk ministik POC-5AB
(MiniDisc-optager el.lign.)
7-bens stikforbindelse type L POC-DA12P
(DAT-optager el.lign.)
Firkantet optisk POC-10A
stikforbindelse (MiniDisc-
optager, DAT-optager el.lign.)
2 Slå strømmen til på denne afspiller og den tilsluttede komponent.
3 Gør den tilsluttede komponent klar til optagelse.
4 Tryk på u for at begynde afspilning af en cd på denne afspiller.
Lytte til lyden fra de tilsluttede komponenter
1
Forbind denne afspillers LINE IN-jackstik til linje-udgangsjackstikket eller
hovedtelefonjackstikket på en anden komponent med brug af
audiotilslutningskablet* (medfølger ikke).
* For MiniDisc-optager: et kabel med stereo-ministik på begge ender.
* For tv eller videobåndoptager: et kabel med et stereo-ministik i den ene ende og to phonostik i
den anden ende.
2 Tryk på LINE, så “LInE” vises.
3 Afspil den ekstra komponent, der er tilsluttet afspillerens LINE IN-jackstik.
Bemærk
Sæt ledningerne godt fast, så funktionsfejl undgås.
Falde i søvn til musik
1 Afspil den ønskede musikkilde.
2 Tryk på SLEEP.
3 Tryk på SLEEP for at vælge antal minutter indtil afspilleren slukkes automatisk.
Hver gang du trykker på knappen, ændres indikationen som følger: “60” t “90”
t “120” t “OFF” t “10” t “20” t “30”.
Afbryde sleep-funktionen
Tryk på OPERATE (eller POWER) for at slå strømmen fra.
Tip
Det blå lys på låget til cd-rummet går ud, mens søvn-tidsafbryderen er slået til.
OPERATE
(POWER)
Then do this
Press . or > to select the track that you
want to repeat, then press u.
Press u.
Press u.
Press u.
Press . or > then press MEMORY/
DISPLAY/ENTER for the tracks you want to
programme in the order you want up to 20 tracks
(see fig. D). Then press u.
Press . or > then press MEMORY/
DISPLAY/ENTER for the tracks you want to
programme in the order you want up to 20 tracks.
Then press u.
LINE
OPEN
LINE IN
OPTICAL DIGITAL OUT (CD)
TUNE –, +
MODE
x
u*
RADIO
BAND
AUTO PRESET
Display
Remote sensor
Fotocelle til fjernbetjening
., >
PRESET –, +
VOLUME –, +*
MEMORY
DISPLAY
ENTER
MEGA BASS
OPERATION indicator
OPERATION-indikator
Loading a CD
Isætte en cd
With the labeled side facing you
Med etiketsiden vendende mod dig
i
u
Press
x
u
Press the button again to resume play after pause.
>
.
OPEN
> (forward) or . (backward) while playing until you
find the point
> (forward) or . (backward) in pause until you find
the point
Gør derefter som følger
Tryk på . eller > for at vælge det spor, du
vil gentage, og tryk derefter på u.
Tryk på u.
Tryk på u.
Tryk på u.
Tryk på . eller >, og tryk derefter på
MEMORY/DISPLAY/ENTER for de spor, du vil
programmere, i den ønskede rækkefølge, op til 20
spor (se fig. D). Tryk derefter på u.
Tryk på . eller >, og tryk derefter på
MEMORY/DISPLAY/ENTER for de spor, du vil
programmere, i den ønskede rækkefølge, op til 20
spor. Tryk derefter på u.
Dansk
Afspille en cd
1 Tryk på OPERATE (eller POWER) for at tænde for afspilleren.
2 Tryk på OPEN for at sætte en cd i cd-rummet.
3 Luk cd-rummet manuelt.
4 Tryk på u.
Alle sporene afspilles en gang.
For at
standse afspilning
holde pause i afspilning
gå til det næste spor
gå tilbage til det foregående spor
tage cd’en ud
finde et punkt, mens du lytter
til lyden
finde et punkt, mens du ser på
til displayet
Brug af displayet
Sådan kontrolleres det samlede antal spor og afspilningstid
Tryk på MEMORY/DISPLAY/ENTER i stop-indstilling (se fig. C).
Sådan kontrolleres den resterende tid
Tryk gentagne gange på MEMORY/DISPLAY/ENTER, mens der afspilles en cd. Displayet
skifter som følger:
t det aktuelle spornummer og afspilningstid
r
det aktuelle spornummer og den resterende tid på det aktuelle spor*
r
antal resterende spor og resterende tid på cd’en
* For et spor, hvis nummer er over 20, vises den resterende tid som “- -:- -” på displayet.
Valg af afspilningsindstilling
Tryk på MODE, indtil “REP 1” “REP ALL” “SHUF” “SHUF REP” “PGM” “PGM REP” vises
på displayet. Gå derefter videre som følger:
For at Vælg
gentage et enkelt spor “REP 1”
gentage alle spor “REP ALL”
blandet afspilning “SHUF”
gentage sporene “SHUF REP”
i vilkårlig rækkefølge
programafspilning “PGM”
gentage programmerede spor “PGM REP”
Sådan annulleres den valgte afspilningsindstilling
Tryk på MODE, indtil den valgte indstilling forsvinder fra displayet.
Sådan kontrolleres rækkefølge for programmerede spor og afspilning på displayet
For at kontrollere rækkefølgen af spor inden afspilning skal du trykke på MEMORY/DISPLAY/
ENTER.
Hver gang du trykker på knappen, vises spornummeret i den programmerede rækkefølge.
Ændring af det aktuelle program
Tryk en gang på x, hvis cd’en er standset, og to gange hvis cd’en afspilles. Det aktuelle
program slettes. Lav derefter et nyt program ved at følge programmeringsproceduren.
Tip
Du kan afspille det samme program igen, da programmet gemmes, indtil du åbner cd-rummet.
Tryk på
x
u
Tryk på knappen igen for at fortsætte afspilningen efter pause.
>
.
OPEN
> (fremad) eller . (bagud) under afspilning, indtil
du finder punktet.
> (fremad) eller . (bagud) under pause, indtil du
finder punktet.
P872enda.p65 3-02-25, 10.002
  • Page 1 1
  • Page 2 2

Sony ZS-D10 Operating instructions

Category
Car media receivers
Type
Operating instructions

Sony ZS-D10: Your Guide to Versatile Entertainment

Discover a world of entertainment with the Sony ZS-D10, a compact and versatile audio system designed to elevate your listening experience. With its sleek design and powerful sound, the ZS-D10 offers a wide range of features to cater to your music, radio, and external audio device needs.

Ask a question and I''ll find the answer in the document

Finding information in a document is now easier with AI

in other languages