Page is loading ...

6 LITRE
PRESSURE COOKER
Note: Keep text aligned left,
to center of page.
If needed text can be move
up or down
Instruction Manual
Recipe Guide


Table of Contents
Product Safety .................................................................................................................................................2-3
Electrical Safety .............................................................................................................................................. 3-4
Features ........................................................................................................................................................... 5-6
Introduction to Pressure Cooking .................................................................................................................... 7
Before First Use .................................................................................................................................................. 7
Using Your Pressure Cooker ..........................................................................................................................7-8
The Delay Function ............................................................................................................................................. 9
Warm/Cancel Functions ..................................................................................................................................... 9
To Remove the Lid .............................................................................................................................................. 9
One Touch Digital Functions ...................................................................................................................... 10 -11
Cooking Times ............................................................................................................................................. 12-13
Hints and Tips for Pressure Cooking ........................................................................................................ 13-14
Care and Cleaning ............................................................................................................................................ 14
Storing Instructions .......................................................................................................................................... 14
Servicing ............................................................................................................................................................ 14
Guarantee .......................................................................................................................................................... 15
Recipes ..........................................................................................................................................................16-25
INTRODUCTION
Thank you for purchasing this product.
You may already be familiar with using a similar product, but do please take the time to read these instructions –
they have been written to ensure you get the very best from your purchase.
Safety is Important
To ensure your safety and the safety of others, please ensure you read the Product Safety and Electrical Safety
information before you operate this product. Please pay particular attention to any warnings and cautions
contained within these instructions. Keep these instructions in a safe place for future reference.
What can you expect from the Bella Pressure Cooker?
This fantastic unit is one pot cooking and it saves time by cooking up to 70% faster than conventional cooking.
At the touch of a button you can create delicious meals in a fraction of the time than on the stove top or
in a slow cooker. The pre-programmed settings mean that you simply select a function and away you go,
you don’t have to worry about pressure levels as the unit does it all for you. Instead of using lots of pots
and pans, all the preparation is carried out in one pot, you can brown meat and caramalise vegetables,
it’s not only easier but saves on washing up!
Due to our policy of continuous improvement, the actual product may differ slightly from the one illustrated
in this booklet.

2
PRODUCT SAFETY
Read this manual thoroughly before rst use, even if you are familiar with this type
of product. The safety precautions enclosed herein reduce the risk of re, electric
shock and injury when correctly adhered to. Keep the manual in a safe place for future
reference. If applicable, pass these instructions on to the next owner of the appliance.
Always follow basic safety precautions and accident prevention measures when using
an electrical appliance, including the following:
WARNING: TO REDUCE THE RISK OF FIRE, ELECTRICAL SHOCK, OR INJURY:
READ ALL INSTRUCTIONS CAREFULLY BEFORE USING YOUR APPLIANCE.
1. Ensure the unit is used on a stable, level and heat-resistant surface out of the reach
of children. If necessary place a chopping board or heat resistant mat underneath
the Pressure Cooker during use.
2. Always attach the connector end of the power cord into the appliance before
inserting the plug into the wall socket.
3. Do not touch the hot surfaces of the Pressure Cooker, use the handles only. Use
oven gloves or a cloth when opening the lid or handling the inner cooking pot as
steam will escape.
4. This appliance can be used by children aged from 8 years and above and persons
with reduced physical, sensory or mental capabilities or lack of experience or
knowledge if they have been given supervision or instruction concerning use of
the appliance in a safe way and understand the hazards involved. Children shall
not play with the appliance. Cleaning and user maintenance shall not be made by
children without supervision.
5. Do not operate the appliance with a damaged cord or plug, or after the appliance
malfunctions or has been damaged in any manner. Take it to a qualied service
technician for investigation.
6. Do not let the cord hang over the edge of the table or counter.
7. Do not use this Pressure Cooker on or near a hot plate. Do not position it under
hanging kitchen cabinets as steam from the pressure release may cause damage.
8. Always check the silicone sealing ring is correctly positioned before use.
9. Before placing the removable cooking pot into the unit, ensure the pot base and
the internal heating plate are clean and free of any food debris.
10. Do not place food or liquid directly into the base of the unit. Only the removable
cooking pot is designed to contain food or liquid.
11. Never obstruct the pressure release valve.
12. Always check the pressure release valve to ensure it is not clogged before use.
13. NEVER ATTEMPT TO OPEN THE LID WHEN THE UNIT IS UNDER PRESSURE.
Do not open the unit until the pressure has been released. If the lid is difcult
to rotate do not force it as the unit is still under pressure and it can be hazardous
if forced. See the instructions on how to remove the lid on page 9.
14. Never operate the Pressure Cooker without food or liquid in the removable cooking
pot. Do not ll the pot over 4/5 full. When cooking foods that expand or foam such
as dried vegetables, legumes, beans and grains do not ll the pot over ½ full.
If overlling occurs it may block the pressure release valve and cause a build-up
of pressure.
15. This Pressure Cooker cooks under pressure, improper use may result in scalding.
Follow the “Using your Pressure Cooker” instructions on page 8 and make sure
the lid is closed properly before operating.
16. Be aware that certain foods can foam, froth and splutter which can block the
pressure release valve, these foods include apple sauce, cranberries, pearl barley,

3
oatmeal and other cereals, noodles, pasta and rhubarb. Extra care should be taken
when cooking anything containing these.
17. Do not touch the pressure release valve when in use. Only turn to release
the pressure after the unit has nished cooking.
18. Ensure there is sufcient water in the removable cooking pot when steaming;
it should reach the minimum 1/5 mark at least.
19. Do not use the Pressure Cooker for Deep Frying.
20. Do not use metal utensils as they will scratch the premium non-stick coating
on the removable cooking pot. Use heat resistant plastic utensils or use
a wooden spoon.
21. Do not move the appliance when in use.
22. Always keep your hands and face away from the pressure release valve,
when releasing the pressure.
23. Use extreme caution when removing the lid after cooking. Always tilt the lid away
from you, so that any steam does not come into contact with your face.
24. To protect against electric shock, do not immerse the Pressure Cooker, base unit,
power cord or plug into water or any other liquid.
25. Unplug from the mains socket using dry hands when not in use and before
cleaning. Allow to cool before putting on or taking off parts.
Do not use the appliance for other than its intended use, this is for HOUSEHOLD USE
ONLY.
ELECTRICAL SAFETY
WARNINGS!
• Read these instructions thoroughly before using this appliance or connecting it to
the mains supply.
• A 13 amp BS1362 ASTA approved fuse must be tted.
• This appliance must be earthed.
• There are no user-serviceable parts inside this appliance.
• Always refer servicing to qualied service personnel.
• The mains lead of this product is not replaceable by the user. If the mains
lead is damaged, do not use until the appliance has been inspected and approved
by a qualied electrician.
• Do not allow this product to be exposed to rain or moisture during use or storage.
Before switching on, make sure that the voltage of your electricity supply is the same
as that indicated on the product rating plate. Connecting it to any other power source
may cause damage.
This product may be tted with a non-rewireable plug. If it is necessary to change
the fuse in the plug, the fuse cover must be retted. If the fuse cover becomes lost or
damaged, the plug must not be used until a suitable replacement is obtained. If the
plug has to be changed because it is not suitable for your socket, or due to damage,
it should be cut off and a replacement tted, following the wiring instructions shown.
The old plug must be disposed of safely because inserting it into a 13 amp socket could
cause an electrical hazard.

4
ELECTRICAL SAFETY
The wires in the power cable of this product are coloured in accordance with
the following code:
Blue = Neutral, Brown = Live, Green/Yellow = Earth
If the markings on the terminals of your plug do not correspond to the colours of
the wires in the power cable, proceed as follows:
• The wire which is coloured Blue must be connected to the terminal which is marked N
or coloured Black.
• The wire which is coloured Brown must be connected to the terminal which is marked
L or coloured Red.
• The wire which is coloured Green/Yellow must be connected to the terminal which
is marked with the earth symbol ( ) or coloured Green.
Note: keep illustration
callouts aligned
2
1
5
6
7
8
9
10
11
14

5
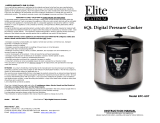
Features
Figure 1
2
1. Lid
2. Lid Handle
3. Pressure Release Valve
4. Floating Safety Valve
5. Inner Aluminum Plate
with Silicone Washer and Metal Peg
6. Clear Silicone Sealing Ring
7. Removable Cooking Pot
8. Base Handles
9. Condensation Collector
10. Base Unit
11. Control Panel
12. Heating Plate (inside)
13. Power Cord
14. Measuring Cup
15. Rice Spoon
16. Steaming Rack
4
3
1
5
6
7
8
9
10
12
13
16
15
11
14

6
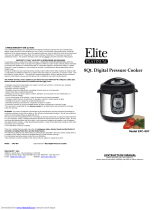
Control Panel
20. LED Display
21. Increase/Decrease time button
22. Delay Timer
23. Warm/Cancel
24. Sauté/Browning
25. Pressure Cook/Slow Cook
26. Soup/Stew
27. Meat/Chicken
28. Rice/Risotto/Steam
Underside of the lid
17. Floating Valve with Sealing Ring
18. Pressure Release Valve Cover
19. Centre Post
20
19 18 17
21
22
24
25
26
27
28
23
Figure 1 (cont’d)

7
Introduction to Pressure Cooking
Discover the secrets of pressure cooking with this wonderful pressure cooker that will help you cook faster,
healthier and tastier meals with unbelievable speed and ease. This pressure cooker offers 11 cooking settings with
the touch of a button. Slow cook all day long or whip up a quick delicious meal, this pressure cooker is the perfect
sous-chef. No more tough cuts of meat that take hours to cook, only delicious succulent meat with the nutrients
and avours locked in.
Before First Use
1. Remove all labels and tags from the product. Carefully unpack your pressure cooker; remove all packaging
materials from the parts and accessories.
2. Remove the lid by turning the handle clockwise to the UNLOCK position and lifting the lid off theunit.
3. Wash the cooking pot and all accessories that will come into contact with food in hot soapy water with
a sponge or dishcloth. DO NOT use a scouring pad or any abrasive materials as this could damage the
product. Rinse the cooking pot, accessories and lid thoroughly and dry.
4. Avoid leaving the lid fully immersed in water as it will take a long time to drain and dry.
5. Attach the condensation collector by sliding it into place (see Figure 2).
Slide in
6. Ensure that the well dried cooking pot is sitting at in the base unit with proper contact.
7. Never lift the pressure cooker using the lid handle, always use base handles.
NOTE: DO NOT IMMERSE THE MAIN COOKING UNIT IN WATER!
Using Your Pressure Cooker
Cooking under pressure raises the temperature of the liquid and steam inside to well above boiling point and
results in food being cooked up to 70% faster. This method of cooking retains more vitamins and minerals and
enhances natural avours. It also means that less energy is used because cook times are so quick saving you
both time and money.
NOTE: Place the base on a dry, level, heat resistant surface, away from the edge of the work surface.
Do not use the appliance on the oor or under hanging wall cabinets. Small amounts of steam will escape from
the pressure release valve while heating and sometimes during the cooking cycle. This is perfectly normal.
1. Place the dry and clean cooking pot into the base unit and ensure that it is seated properly on
the heating plate.
2. Check that silicone sealing ring is securely placed around the aluminum plate and the aluminum plate
is attached to the housing lid with the metal peg facing outwards. If the plate is not correctly tted the
lid will not close properly and the unit will not be able to build up pressure, so ensure it all assembles
correctly (see Figure 3).
Silicone
sealing ring
Aluminum
plate
Figure 2
Figure 3

8
3. If you are sautéing or browning food rst before cooking, add some oil or butter
to the cooking pot and select either option make sure you do this with the lid OFF.
When you have nished browning press the cancel option.
4. Place the remaining ingredients to be cooked in the cooking pot and add liquid
according to your recipe. Make sure that amount of food and liquid combined
reaches the minimum mark on the inside of the cooking pot, but never more than
the 4/5 mark on the cooking pot as the food needs space to boil and bubble (see
g. 4). When cooking food that expands such as rice, dried beans, grains and
legumes, do not ll more than the 3/5 mark on the cooking pot.
5. Secure the lid to the appliance. Place the lid on the appliance in the “UNLOCK”
position, then turn the lid anti-clockwise to the “LOCK” position (see Figure 5).
Ensure that the lid ts tightly, you will hear a click once correctly inplace.
6. Once the lid is closed securely, attach the power cord to the base of the unit then plug
the cord into power socket. Use the CONTROL PANEL to choose the appropriate food
type and adjust the default cooking time using the +/- button to suit the recipe that you
are cooking.
7. Set the pressure release valve to the PRESSURE setting as shown (see gure 6).
8. The pressure cooker will take a few minutes to build up pressure, during this time
the LED panel will circle round. Once the required pressure is reached the time will
become xed and begin to countdown. The unit is now cooking under pressure.
The LED panel may circle around during the cooking time, do not be alarmed the
unit is simply maintaining pressure.
9. During initial use, you may notice a slight odour due to the burning off of
manufacturing residue. This is completely normal, it does not affect the food
being cooked and will disappear after a few uses.
NOTE: If the silicone sealing ring is cracked or broken do NOT use it in the
pressure cooker. Contact Customer Services and replace with a new sealing ring
and assemble on aluminum inner plate as shown in Figure 3.
Figure 4
1/5 full
Minimum
4/5 full
Maximum
3/5 full
Maximum
WHEN USING FOOD
THAT
WILL EXPAND
Figure 6
Pressure
release
Pressure
Figure 5
Unlock
position
Lock
position

9
The Delay Function
• Before selecting the cooking function press the DELAY TIMER button to delay the start of the cooking time.
The delay timer can be adjusted up to a maximum delay time of 2 hours. Continue to press the button until
the desired time delay is reached. The amount of time until the unit begins cooking will be displayed on
the screen.
• Once the delay time has been selected use the CONTROL PANEL to choose the desired cooking setting
(i.e. rice, soup, chicken etc) and adjust the cooking time using the +/- button. It will ash then automatically
switch to the delay time. The delay time will start to count down and cooking will begin once the delay time
has elapsed.
N.B Do not leave perishable foods such as meat, poultry, sh, cheese and dairy products at room temperature
for longer than 2 hours.
• Please note that once the cooking time has counted down, the time may not be adjusted. If more or less
cooking time is required. The cooking process must be cancelled and the timing must be reset to the
required/desired time.
• During set up and while cooking, the WARM/CANCEL button can be pressed to cancel cooking at any time.
Warm/Cancel Functions
Once the cooking process is complete, the Pressure Cooker will beep and move automatically to the WARM
function this is shown by a “bb” on the LED display. This function is used to keep cooked food warm up to
24 hours, however for maximum avour the recommended hold time for food is no longer than 6 hours.
This function is also to stop or cancel the current function.
NOTE: It is not recommended to use the WARM function for extended periods when cooking sh or
chicken dishes.
To Remove the Lid
When the pressure cooking cycle has nished, the unit automatically switches to WARM. At this point you may
choose to release the pressure in two ways. The oating pressure safety valve will not go down until pressure is
released and you will not be able to open the lid.
1. Natural Pressure Release – This is recommended for anything with large amounts of liquid e.g. soups
and stocks it will prevent the liquid inside from boiling over and blocking the pressure release valve.
Following pressure cooking, allow the unit to remain on the WARM function. The pressure will begin
to drop inside this can take from 12 minutes to 30 minutes depending on the amount of liquid inside.
The lid can only be removed with the pressure has gone down.
2. Quick Pressure Release - Following pressure cooking, the cooker will beep, this indicates that the cooking
time has nished. Press the Cancel Button to stop the WARM function and turn the Pressure Release Valve
to the “Pressure Release” position using an oven mitt (see Fig 6).
Hot Steam will be released. DO NOT put your hands or face near the unit when turning the valve.
The lid will only open once all the pressure has been released. Turn the lid clockwise and unlock.
When removing the lid, tilt the lid away from you, this way the steam is directed away from you to avoid
being scalded by the escaping steam. Use oven mitts when removing the inner cooking pot.
Only use non-stick utensils to serve from the cooking pot as any hard utensils made from stainless steel
or similar materials could damage the non-stick surface of the inner cooking pot.

10
One Touch Digital Functions
For your convenience the pressure cooker has 11 pre-set options with default cook times. Based on your recipe
you can choose any one of these settings Sauté, Browning, Pressure Cook, Slow Cook, Soup, Stew, Meat,
Chicken, Rice, Risotto/Steam and Warm. Every button has 2 settings and a corresponding pair of lights next to it.
To select a setting simply press the button and the corresponding light will indicate the selected setting
(see Figure 7). You can adjust the cook time by pressing the + or – buttons. When the time has been selected
the LED will ash until the unit builds up pressure. When the pressure is at the correct level inside the cooking
time till start to countdown.
2X1X
Sauté
This is great for caramelizing vegetables which adds more avour to your dishes, simply place a little oil or butter
in the base of the cooking pot and add your onions, carrots etc. Cooking will soften them and add a delicious
avour, you can also warm spices to release their avour. This setting is also perfect to reduce and thicken any
remaining liquid at the end of cooking time as there is no evaporation during pressure cooking so you need to
add less liquid. Sometimes excess liquid may need thickening you can either add a cornour and water mixture
or simply bubble it for 10 minutes to reduce the liquid.
Browning
As meat will not brown during the pressure cooking process it is recommended to brown meat before so that
this not only tastes better but the nished dish will look better. By browning meat, such as lamb, it will reduce
the amount of fat present in the nal meal and will also add a richer avour. Use this setting for browning meat,
chicken or game. Ensure you cut them into even sized pieces so they cook evenly. Add oil or butter to the base of
the pot and sear the meat. If you have a lot of meat you may have to brown in batches this will maintain a high
heat and ensure the meat is browned rather than stewed.
Pressure Cook
This setting is for general pressure cooking. Anything can be cooked on this setting that isn’t included in one of
the one touch digital options. Just adjust the time according to your recipe.
Slow Cook
This is for long slow cooking up to 12 hours. It is NOT cooked under pressure. This is ideal if you need to be out
the house all day and want to eat as soon as you come home. Use this setting as you would a slow cooker, so
any recipes suitable for a slow cooker would be good for this setting. Remember this is low and slow, so cheap
cuts of meat are better. Save your premium cuts for super fast cooking using a pressure setting.
Soup
Ideal for soups and stocks, just ensure that you do not overll the cooking pot and make sure you use the
NATURAL PRESSURE RELEASE when removing the lid for safety following the instructions detailed on page 9.
Stew
This is great for Meat Ragu, Chilli Con Carne, Casseroles and even pie llings like Steak and Ale.
Meat
This is great for larger pieces of meat, such a lamb shanks, pork shoulder, ribs, brisket, gammon etc. Brown them
rst using the browning option then simply select this setting and adjust your time to suit your recipe.
Figure 7

11
Chicken
This setting is great for cooking a whole chicken for a delicious pot roast, then pop it under a pre-heated grill to
crisp up the skin if you prefer it golden. You can also cook chicken legs, thighs, drumsticks and llets.
Rice
Cook perfect uffy rice on this setting. You can add spices or herbs during cooking and add salt if required.
Also a drizzle of oil helps to reduce the foam (see Hints and Tips for cooking guidelines).
Risotto/Steam
Make delicious creamy risotto on this setting in a fraction of
the time without the need to keep stirring. Simply sauté the
grains of rice in some butter or oil until they turn opaque
then add the liquid.
To steam simply add sufcient water to the cooking pot to
come to the 1/5 level on measuring scale inside the cooking
pot. Place the steam rack into the pot, it will t inside the
pot on the ridge above the water (see Fig. 8). Add the food
to be steamed on top of the rack cutting vegetables into
even pieces and place the lid on top of the unit and turn the
pressure release value to the pressure setting. Select the
steam function and adjust the time accordingly. If you wish
to steam larger items such as puddings, you will need to
place a trivet in the bottom of the cooker for the pudding
bowl to sit on.
Warm
The unit automatically switches to keep warm as soon as the cooking has nished. This is great if not everybody
is eating at the same time. This can be cancelled at any point by pressing the button again to cancel the function.
This setting can also be used to keep food warm that has NOT been cooked in the pressure cooker. It can be used
as a food warmer to keep already cooked food hot. This is especially good if you are having a party and need to
keep a big pot of Chilli Con Carne hot for your guests. Using this function it is not recommended to keep food
warm for more than 6 hours as this will affect the taste and texture of the food.
Function Default Cooking Time
Sauté Stay ON (30 min.)
Browning Stay ON (30 min.)
Pressure Cook 30 min (Max 99 min.)
Slow Cook 4 h (Max 12 hrs.)
Soup 20 min.
Stew 30 min.
Meat 60 min.
Chicken 45 min.
Rice 10 min.
Risotto/Steam 25 min.
Warm Stay ON
Figure 8

12
Cooking Times
Cooking Rice
White rice (Basmati, Long Grain) takes 3 minutes to cook and uses the fully absorption method. The rice will be
slightly sticker than rice cooked on the stove top. Use the marking on the pot as a guide i.e 2, 4, 6 cups. Fill the
water in the pot FIRST to the level required and then add the corresponding cup of rice.
Level on cooking pot Cups of rice Oil tbsp. quantity Yield (cups) when cooked
2 2 1 6
4 4 1 12
6 6 2 18
8 8 2 24
Set the time to 3 minutes and use the NATURAL PRESSURE RELEASE METHOD. During this time the rice will
absorb the steam and will be dry not wet. Cooking wholegrain/brown rice is very different. It needs to be cooked
in lots of water and then drained. Only cook a maximum of 2 CUPS grain/brown rice in 6.5 cups of water.
Rice type Cooking time
Aborio/ Paella Sauté rice in butter/oil until opaque. Add liquid. Cook for 6-8 minutes. Use the
Quick Release.
Brown Rice Cook under pressure for 10 minutes. Use Natural Pressure Release for at least 10
minutes then quick release.
Wild Rice Cook under pressure for 20 minutes. Use Natural Pressure Release for at least 10
minutes then quick release.
Cooking Vegetables
When steaming vegetables, chop them up into even size pieces so they cook evenly. Remember most vegetables
take a few minutes to cook. Add boiling water to the pot this will bring the unit up to pressure much quicker.
Always use the quick steam release to avoid overcooking.
Vegetables Cooking Times
Artichokes 4 medium/large 7 to 9 minutes
Asparagus whole 1 minutes
Beans, Green cut into 2-inch lengths 1 to 2 minutes
Beans, runner cut into 1- inch slices 2 minutes
Beetroot , medium-large 24 to 26 minutes
Broccoli, cut into large orets 2 to 3 minutes
Cauliower, cut into large orets 2 to 3 minutes
Carrots, cut into 2-inch lengths 8 minutes
Carrots, ½-inch slices 2 to 3 minutes
Corn on the cob, 2 ears 4 minutes
Courgette, cut into ½-inch slices 1 to 3 minutes
Greens, cabbage, kale, cut into 1-inch strips 1-2 minutes
Onions, baby peeled 2 to 4 minutes
Parsnips, peeled, cut into 2-inch pieces 3 to 4 minutes
Parsnips, ½-inch slices 1 to 2 minutes
Potatoes White, medium quartered 5 to 7 minutes
Potatoes Sweet, 2-inch cubes 5 to 6 minutes
Squash Butternut, peeled & sliced 3 to 4 minutes

13
Cooking Meat and Poultry
Food Cooking Time (in minutes)
Chicken
Whole 1.5kg 25-30
Breast llets 6-8
Thigh and leg bone in 15
Thigh boneless 10
Beef
Brisket 55
Oxtail 40-45
Shin 40-50
Stewing 15
Steak Mince 10-15
Lamb
Leg 35-40
Shanks 60
Shoulder, cubed 25
Stewing, cubed 15
Pork
Chops 10 (brown rst)
Shoulder 60-70
Leg, cubed 30
Hints and Tips for Pressure Cooking
• It really is worth sautéing vegetables, browning meat and warming spices before pressure cooking.
It may take a little longer to prepare but the end result will be worth it. It adds depth of avour to the
nished result.
• The amount of liquid required when pressure cooking is much less than traditional methods as there is
no evaporation during cooking. Any excess liquid at the end of cooking can be thickened or reduced using
the Sauté function or simply use a cornour/water mixture to thicken any remaining liquid.
• Hot liquid/food will come to pressure quicker than cold liquid/food.
• Pressure cooking allows less tender cuts of meat to be cooked quickly and achieve a tender juicy result.
Beef Lamb Pork Chicken
Shin, Chuck and Blade
(Braising Steak) Brisket,
Silverside and Oxtail.
Shanks, Shoulder, Breast,
Scrag and Middle neck.
Diced leg, Shoulder,
Spare ribs and Belly.
Drumsticks, Thighs on the
bone or Fillets and Legs.
• When preparing vegetables they should be cut into even-sized pieces to ensure even cooking.
• Vegetables can be cooked from frozen very easily, they may take slightly longer than if they were thawed,
just make sure they are piping hot before eating.
• It is not recommended to cook meat, sh, poultry or game from frozen. It is recommended to thaw it rst
as thawed food can either be marinated or browned rst which will add heaps of avour. Also frozen meat
will release the fat into the cooking liquid which will result in a fatty sauce. Thawed meat that is browned
rst will release fat which can be poured away before cooking. If meat, sh, poultry or game is cooked
from frozen the cooking time will be longer and the use of a thermometer is essential to ensure that
the internal temperature of the product has reached AT LEAST 75°C, if it is not, continue to cook until
it is reached.
• When pot roasting meat, add sliced vegetables on the base of the pot such as thickly sliced onions, carrots
or celery. Sit the meat on top of these and the avours from the vegetables will enrich any sauce or gravy.
Simply strain the liquid through a sieve and thicken and serve with your pot roast.

14
• When cooking dried beans and peas, soak them for a minimum of 3 hours in boiling water rst or
overnight, this will ensure that they remain intact and do not split. Or you can use the quick soak
method which is to pre-cook them in the pressure cooker before adding to your recipe for further cooking.
Simply rinse and pick out any broken or discolored beans, for every 1 cup of beans add 4 cups of water
and a teaspoon of salt to the cooking pot, this prevents the beans from splitting. Add a good drizzle of
oil and cook for 4 minutes under pressure. Release the pressure carefully as beans foam. Drain and rinse
lightly then use in your recipe that calls for pre-soaked beans. Remember do not ll more than half full
as beans foam.
• To adapt your own recipes, the general rule is that cooking time will be at least 1⁄3 to 1/2 of the traditional
cooking time. Reduce your cooking liquid by at least half – it may be trial and error at rst with your
recipe to get it right. You may wish to add vegetables and canned pulses at the end of cooking to avoid
overcooking.
Care and Cleaning
1. Unplug and let the unit cool down before cleaning.
2. Clean the base unit with a soft damp cloth. DO NOT IMMERSE THE BASE INTO WATER OR
ANY OTHER LIQUID.
3. Wash the removable cooking pot in hot soapy water, using a sponge or washing up brush. Rinse and
dry thoroughly.
4. Wipe the heating plate with a soft damp cloth and dry thoroughly.
5. Remove the condensation collector from the side of the unit, empty and wash thoroughly and let it dry,
and replace it back into the original position on the Pressure Cooker.
6. Remove the sealing ring assembly from inside the lid by pulling on the metal peg. Carefully remove the
clear silicone sealing ring from the inner aluminum plate and wash and dry thoroughly.
7. Remove the Pressure Release Valve by pulling it up and off and rinse with warm water and dry, replace it
into position (see g. 9).
8. Rinse the upper and underside of the lid with warm water and remove the Pressure Release Valve Cover
by twisting and pulling off. Dry thoroughly and replace the Pressure Release Valve Cover by clipping it
back into place (see g. 10).
9. Replace the sealing ring assembly onto the lid making sure the MAKE SURE THE METAL PEG ON THE
INNER STEEL PLATE FACES OUT. Push this onto the centre post on the lid (see Fig. 3).
10. Replace the cooking pot back into the unit. Store the unit with the lid loosely on top of the pressure cooker
to prevent aromas, moulds and odours.
Storing instructions
1. Be sure all parts are clean and dry before storing.
2. Store the pressure cooker with cooking pot inside the base unit; and the lid locked. Store assembled unit
in a clean dry place.
3. Never store the pressure cooker while it is hot or wet.
4. Never wrap cord tightly around the appliance; keep it loosely coiled.
Servicing
This appliance requires little maintenance. It contains no user serviceable parts. Do not try to repair it yourself.
Any servicing requiring disassembly other than cleaning, must be performed by a qualied electrician.
Figure 9
Figure 10

15
GUARANTEE
This product is guaranteed for twelve months from the date of original purchase.
Any defect that arises due to faulty materials or workmanship will either be replaced or
refunded where possible during this period by the dealer from whom you purchased
the unit.
The following conditions apply:
• The guarantee does not cover accidental damage, misuse, cabinet parts,
knobs or consumable items.
• The product must be correctly installed and operated in accordance with
the instructions contained in this manual.
• It must be used only for domestic purposes.
• The guarantee will be rendered invalid if the product is re-sold or has been
damaged by inexpert repair.
• Specications are subject to change without notice.
• The manufacturer disclaims any liability for the incidental or consequential
damages.
• The guarantee is in addition to, and does not diminish your statutory
or legal rights.
• Valid in the UK only.
Customer Helpline: 0345 467 6743
DISPOSAL INFORMATION
Waste electrical products should not be disposed of with household waste.
Please recycle where facilities exist. Check with your local authority for
recycling advice.
For technical queries, please contact:
MPL Home Ltd, IMEX, 575 - 599 Maxted Road, Hemel Hempstead, Herts, HP2 7DX

16
Recipes
Risotto with Butternut Squash, Sage and Chestnuts
Serves 4-6
Ingredients
• 60g butter
• 20 cooked chestnuts, chopped
• 16 sage leaves, shredded
• 1 onion
• 500g risotto rice
• 450g butternut squash, chopped
• 1400ml vegetable stock
• 50g Parmesan cheese
Method
1. Add the butter to the cooking pot and select SAUTÉ, add all the chopped chestnuts and half the
shredded sage, cook until the butter starts to brown slightly. Remove these with a slotted spoon
and set aside for now.
2. Add the onion to the cooking pot and sauté until softened; add the rice, butternut squash and the
remaining sage. Cook for a minute until the grains of rice start to turn opaque and then add the
stock. Cancel the Sauté setting.
3. Lock the lid into place and select the RISOTTO setting and set the timer for 8 minutes and cook
under pressure.
4. When the cooking time has nished, leave to rest for 5 minute before releasing the pressure.
5. Add most of the reserved cooked chopped chestnuts keeping a few back to garnish, and add a
handful of grated parmesan cheese.
6. Serve each portion with a few of the reserved chestnuts on top and a sprinkle of parmesan cheese.
Moroccan Lamb Shanks with Chickpeas
Serves 4-6
Ingredients
• 4 lamb shanks
• 2 tbsp. Harissa paste
• Salt and pepper
• 1-2 tbsp. oil
• 1 onion chopped
• 1 cinnamon stick
• 2 tsp. ground ginger
• 2 tsp. ground cumin
• 1/2 tsp. ground allspice
• 1/4 tsp. ground mixed spice
• 1 x 400g can chopped tomatoes
• 200ml chicken stock
• 1 tbsp. honey, plus a little extra
• Half a lemon
• 1 x 400g can chickpeas, drained
Serve with cous cous
Method
1. Rub the harissa paste into the lamb shanks and season them with salt and pepper.
2. Select the BROWNING option and heat the oil in the cooking pot, brown two lamb shanks at
a time on all sides remove when brown all over and set aside and repeat with the other two.
Remove these and keep them to the side for minute.
3. Select SAUTÉ and add the onion to the cooking pot and cook until softened, add the spices and
warm until fragrant. Add the tomatoes, stock and honey and add the lamb shanks back to the
cooking pot, coat the lamb in the sauce.
4. Attach the lid and secure, select MEAT and cook under pressure for 1 hour.
5. When the cooking time has nished, remove the lamb shanks and place them on a large serving
plate and keep them warm.
6. Add a squeeze of lemon juice, a drizzle of honey and add the chickpeas.
7. Select the SAUTÉ function and bring the liquid to a boil, simmer down until the sauce has thickened.
8. Pour the sauce over the lamb shanks and serve with cous cous.

17
Recipes
Asian Style Aromatic Pulled Pork
This is the perfect recipe for the pressure cooker; it produces meltingly tender meat in 70 minutes.
Fabulous for a party, simply prepare everything in advance and just let the pressure cooker do all the
work. The pork does benet from marinating in the spice rub overnight.
Serves 6-8
Ingredients
• 2.5 kg pork shoulder, remove rind and fat
Sauce
• 1-2 tbsp. vegetable oil
• 1 onion, peeled and sliced into thick rings
• 2 tbsp. light soy sauce
• 3 tbsp. hoisin sauce
• 2 tbsp. rice vinegar or cider vinegar
• 8 tbsp. water
• 1 tbsp. runny honey
Spice rub
• 1 tbsp. sugar
• 1 star anise
• 1 tsp. fennel seeds
• 1 tsp. Szechuan peppercorns
• 1 cinnamon stick
• 1 tsp. coriander seeds
• 1 tsp. ground ginger
• 1 tsp. garlic salt
• 2 cloves
Serve with tortilla wraps, strips of cucumber
and spring onion
Method
1. Remove the rind from the pork and remove as much fat using a sharp knife as you can. Cut the
pork into 4 large pieces, set aside for a minute.
2. Make the spice rub by blitzing the ingredients in a spice grinder or pounding with a pestle and
mortar, until you have a powder. Using your hands rub this into the pieces of pork then place in
a bowl and cover with cling lm. Marinate this overnight in the fridge if you can, if not as long as
possible.
3. When ready to cook, sear the pieces of pork in a little oil on the BROWNING function until brown
on all sides, remove from the pot for a minute. Cancel the browning function.
4. Add the onion in a layer on the bottom of the cooking pot and add the soy sauce, hoisin sauce,
rice/cider vinegar and water. Sit the pork on top and turn the meat over to coat it in the sauce.
5. Select the MEAT function and increase the time to 70 minutes, cook under pressure. When the
pork has nished cooking, release the pressure. Remove the pork from the pot and place on a
serving plate and spoon a little of the cooking liquid over it. Leave the meat to rest covered with
foil for 10-15 minutes.
6. While the meat is resting, bring the cooking liquid to the boil on the SAUTÉ function and add the
honey, leave this to reduce down to a thick consistency. Strain through a sieve if desired.
7. When ready to serve, shred the meat with two forks.
8. Serve the pulled pork piled onto a tortilla wrap with cucumber and spring onion strips and a good
drizzle of the sauce, roll up and eat.

18
Recipes
Celeriac and Stilton Soup
This soup is made using Celeriac which is a very underrated vegetable. The combination of the subtle
sweetness from the pear and the creaminess from the Stilton is a real winner.
Serves 4
Ingredients
• Knob of butter
• 1 large onion, peeled and quartered
• 500g celeriac, peeled and chopped
into small chunks
• 250g potatoes, peeled and chopped
• 1 ripe pear, peeled, cored and diced
• Few sprigs of thyme
• Sea salt and freshly ground black pepper
• 1 litre vegetable stock
• 125g Stilton, crumbled
Serve with crusty bread and a swirl of cream
Method
1. Add the butter to the cooking pot and select SAUTÉ, Add the onion and gently fry for 5-6 minutes
until softened.
2. Add the celeriac, potato, pear and thyme to the pan with some salt and pepper and add the
vegetable stock, switch to the SOUP setting and cook under pressure for 20 minutes. When
cooking has nished use the natural release method.
3. Remove the lid and take out any stalks from the thyme. Then blend until smooth using a hand
stick blender in the cooking pot, taking care not to scratch the base of the bowl.
4. Stir in half the Stilton and allow to gently melt in the soup.
5. Divide the soup between warm bowls and sprinkle the remaining Stilton over each portion
to serve.
6. Serve with a swirl of cream and some warm crusty bread.
/