Brother MFC-9420CN Quick setup guide
- Category
- Copiers
- Type
- Quick setup guide
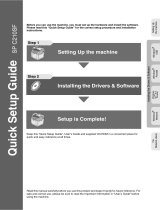
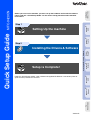
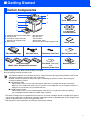
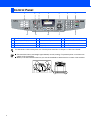
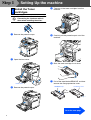
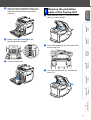
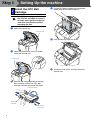
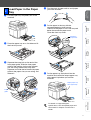
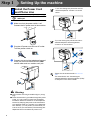
Brother MFC-9420CN is a multifunctional device that combines printing, copying, scanning, and faxing capabilities. It offers high-quality output with a resolution of up to 600 x 600 dpi, making it suitable for both home and office use. With its automatic document feeder, you can easily scan or copy multiple pages without the need for manual feeding. The MFC-9420CN also features a user-friendly control panel with a large LCD display, making it easy to navigate and select various functions.
Brother MFC-9420CN is a multifunctional device that combines printing, copying, scanning, and faxing capabilities. It offers high-quality output with a resolution of up to 600 x 600 dpi, making it suitable for both home and office use. With its automatic document feeder, you can easily scan or copy multiple pages without the need for manual feeding. The MFC-9420CN also features a user-friendly control panel with a large LCD display, making it easy to navigate and select various functions.


-
 1
1
-
 2
2
-
 3
3
-
 4
4
-
 5
5
-
 6
6
-
 7
7
-
 8
8
-
 9
9
-
 10
10
-
 11
11
-
 12
12
-
 13
13
-
 14
14
-
 15
15
-
 16
16
-
 17
17
-
 18
18
-
 19
19
-
 20
20
-
 21
21
-
 22
22
-
 23
23
-
 24
24
-
 25
25
-
 26
26
-
 27
27
-
 28
28
-
 29
29
-
 30
30
-
 31
31
-
 32
32
-
 33
33
-
 34
34
-
 35
35
-
 36
36
-
 37
37
-
 38
38
-
 39
39
-
 40
40


Brother MFC-9420CN Quick setup guide
- Category
- Copiers
- Type
- Quick setup guide
Brother MFC-9420CN is a multifunctional device that combines printing, copying, scanning, and faxing capabilities. It offers high-quality output with a resolution of up to 600 x 600 dpi, making it suitable for both home and office use. With its automatic document feeder, you can easily scan or copy multiple pages without the need for manual feeding. The MFC-9420CN also features a user-friendly control panel with a large LCD display, making it easy to navigate and select various functions.
Ask a question and I''ll find the answer in the document
Finding information in a document is now easier with AI
Related papers
-
Brother MFC-8810DW Quick Setup Manual
-
Brother MFC-8860DN Installation guide
-
Brother MFC-7420 User manual
-
Brother DCP-120c Quick setup guide
-
Brother MFC-9010CN Quick start guide
-
Brother MFC-8440 Quick setup guide
-
Brother BDL4231CS User manual
-
Brother MFC-9450CDN User manual
-
Brother MFC-9420CN User guide
-
Brother BRT-MFC-7840W - NETWORK READY Installation guide