Hisense MC55244DB Owner's manual
- Category
- Fridge-freezers
- Type
- Owner's manual

设计
批准
名称 使用说明书
首次使用型号
材料
页面规格
技术要求
1. 印刷颜色应均匀,且无毛边;
2. 图案和文字清晰,规范;
3. 未注明公差按GB/T 1804-m;
4. 制品应符合Q/HKB J 16001《零、部件及原材料
中有害化学物质含量规定》要求。
备注
审核
日期 图号/物料号
版本号
BCD-249B/HC2(E4)
80g双胶纸
A5大小黑白印刷
王霞 郭晴晴
白莉 2015-8-18 B08291235/1648449


Dear customer,
Before placing your new refrigerator/freezer into operation, please read these operating
instructions carefully. They contain important information for safe use, for installation and for
care of the appliance.
Please keep these operating instructions for future reference. Pass them on to possible new
owners of the appliance.
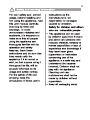
Notes which are important for your safety or for the proper functioning of the appliance are
stressed with a warning triangle and/or with signal words (Warning!, Caution!, Important! ).
Please observe the following carefully.
Supplementary information regarding operation and practical applications of the appliance
appear after this symbol.
Tips and notes concerning economical and environmentally sound use of the appliance are
marked with the cloverleaf.
The operating instructions contain instructions for the correction of possible malfunctions by
the user in the section “Troubleshooting” . If these instructions should not be sufficient,
contact your local Service Center .
Printed on paper manufactured with environmentally sound processes he who thinks
ecologically acts accordingly...
2

4
Contents
Important safety instructions -------------------------------------------------------
Remove transport packaging-----------------------------------------------------------
Installation -------------------------------------------------------------------------------------
Positioning ------------------------------------------------------------------------------------
Description of the appliance -----------------------------------------------------------
View of the appliance -----------------------------------------------------------------------------------
Reversing the door---------------------------------------------------------------------------------------
Starting up and temperature regulation--------------------------------------------
Interior Accessories------------------------------------------------------------------------
Cleaning and Care --------------------------------------------------------------------------
Energy Saving Tips--------------------------------------------------------------------------
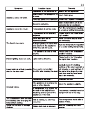
Troubleshooting ----------------------------------------------------------------------------
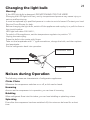
Changing the light bulb -------------------------------------------------------------------
14
15
20
20
21
23
Noises during Operation ----------------------------------------------------------------
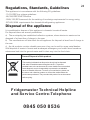
Regulations, Standards, Guidelines -----------------------------------------------
Disposal of the appliance --------------------------------------------------------------
23
24
24
Using Water Dispenser------------------------------------------------------- 16
Defrosting -------------------------------------------------------------------------------------- 19
11
11
11
10
10
10
3

4

5

6

7

8

9

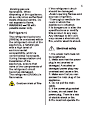
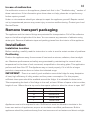
Remove transport packaging
tape on the left and right side of the door. You can remove any remnants of adhesive using
white spirit. Remove all adhesive tape and packing pieces from the interior of the appliance.
The appliance and the interior fittings are protected for transportation. Pull off the adhesive
Installation
Before installing, carefully read the instruction in order to avoid a certain number of problems.
Positioning
Position the appliance away from sources of heat such as stoves, radiators, direct sunlight
etc. Maximum performance and safety are guaranteed by maintaining the correct indoor
temperature for the class of unit concerned, as specified on the rating plate. This application
perform well from N to ST. The Appliance may not work properly if it is left for a longer
period at a temperature above or below the indicated range.
IMPORTANT! -There is a need of good ventilation around the fridge for easy dissipation
of heat, high efficiency of refrig eration and low power consumption. For this purpose,
sufficient clear space should be available around the fridge. It is advisable for there to be
75mm separating the back of the fridge to the wall, at least 100mm of space at its two sides,
height of over 100mm from its top and a clear space upfront to allow the doors to open 160.
Installation Location
Climate class Ambient temperature
SN to
10 C
+32 C
+
N
ST
T
to
16 C
+32 C
+
to
16 C
+38 C
+
to
16 C
+43 C
+
lower rear section of appliances, as poor air circulation can affect performance. Built-in
appliances should be positioned away from heat sources such as heaters and direct sunlight.
Appliances must not be exposed to rain. Sufficient air must be allowed to circulate in the
If a malfunction occurs on the appliance, please look first in the “ Troubleshooting ” section of
these instructions. If the information given there does not help, please do not perform any
further repairs yourself.
Under no circumstance should you attempt to repair the appliance yourself. Repairs carried
out by inexperienced persons may cause injury or serious malfunctioning. Contact your local
Service Center.
In case of malfunction 10

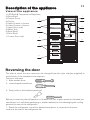
Description of the appliance
The side at which the door opens can be changed from the right side (as supplied) to
the left side, if the installation site requires.
Tools you will need
1、8mm socket driver
2、cross-shaped screwdriver
Reversing the door
3、Putty knife or thin-blade screwdriver
Before you start lay the refrigerator on its back in or der to gain access to the base,you
should rest it on soft foam packaging or similar material to avoid damaging the cooling
pipes at the rear of the refrigerator.
1. Stand the refrigerator, use a flat b laded screw driver to remove t h e 4 screw
covers at the rear of the refrigerator lid.
1
2
3
4
5
6
7
8
9
10
11
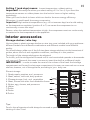
2.Glass Shelf
3.Crisper Cover
4.Crisper
5.Upper Drawer in freezer
6.Lower Drawer in freezer
7.Upper Door shelf
8.Water Tank
9.Small Shelf
10.Mini Shelf
11.Lower Door shelf
1.LED Bulb &mperature Regulator Te
View of the appliance
11

2. Unscrew and lift the lid from the rear and remove it, then lift the upper door and
place it on a padded surface to prevent it scratched.
3. Remove the upper hinge core, transfer it to left side and tighten securely, then put it
in a safe place.
4. Remove the two flange screw, then remove the middle hinge that hold the lower door
in place. Lift the lower door and place it on a padded surface to prevent scratching it.
5. Remove the hinge hole cover from the right holes as illustrated and transfer them to
the uncover hole at the left side.
12

6. Remove both adjustable feet and remove the bottom hinge bracket by unscrewing
the bolts.
7. Unscrew and remove the bottom hinge pin, turn the bracket over and replace it. Refit
the bracket fitting the bottom hinge pin. Replace both adjustable feet. Transfer the
lower door to the property position. Secure the doors level, make the bottom hinge pin
into the lower hole of the door, then tight the bolts.
8. Make the middle hinge reverse the direction 180 degree, then transfer it to the left
property position. Make the middle hinge pin in the upper hole of the lower door, then
tight the bolts. Transfer the upper door to the property position. Secure the doors level;
make the middle hinge pin into the lower hole of the upper door.
9. Replace the lid by fitting the upper hinge core into the upper doors hole, securing it
with the 4 screws. Replace the screw covers.
13

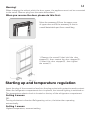
Warning!
When changing the side at which the door opens, the appliance must not be connected
to the mains. Remove plug from the mains beforehand.
When you reverse the door, please do this first:
Move the accessory B from the upper cover
of upper door and fit the accessory A that is
a small detachable part from a small bag.
1. Remove the screw(1) that hold the door
stopper(3) ,then remove the door stopper(3) .
2. Insert the door stopper(2) ,then tighten
the screw(1) .
Insert the plug of the connection lead into the plug socket with protective earth contact.
When the refrigerator compartment door is opened, the internal lighting is switched on.
The temperature selector knob is located on the top of the refrigerator compartment.
Setting 0 means:
Off.
Turning clockwise in direction Refrigerating unit on, the latter then operating
automatically.
Setting 1 means:
Highest temperature, warmest setting.
Starting up and temperature regulation
14

Setting 7 (end-stop) means: Lowest temperature, coldest setting.
Important! Normally we advise you select setting of 2 or 3 or 4, if you want the
temperature warmer or colder please turn the knob to lower or higher setting
accordingly.
When you turn the knob to lower which can lead to the more energy efficiency.
Otherwise, it would result the energy-consuming.
Important! High ambient temperatures (e.g. on hot summer days) and a cold setting
on the temperature regulator (position 6 to 7) can cause the compressor to run
continuously or even non-stop!
Reason: when the ambient temperature is high, the compressor must run continuously
to maintain the low temperature in the appliance.
Interior accessories
Storage shelves / wire tray
Various glass or plastic storage shelves or wire tray s are included with your appliance -
different models have different combinations and different models have different
quality.
You should always slide one of the full size glass storage shelves into the lowest set of
guides, above the fruit and vegetable containers, and keep it in this position.
The height of the storage shelves can be adjusted:
To do this, pull the storage shelf forward until it can be swiveled upwards or downwards
and removed. Please do the same in reverse to insert the shelf at a different height.
IMPORTANT! - in order to make the most of the volume of the fresh food storage
compartment and frozen-food storage compartment, the user can removed one or more
shelves, drawers, out of the appliance, according to your daily use.
Correct storage
1. Ready meals, pastries, and preserves
2. Meat, salami, cold cuts, dairy produce
3. Cheese storage, fruit, and vegetables
4. Meat, Cream and other food needed be frozen
5. Butter, egg, cheese, and preserves
6. Water
7.Drinks
8.Flasks
9.Drinks
Tips:
Food in the refrigerator should always be covered or packaged, to prevent drying and
tainting of other food.
1
2
3
4
5
6
7
8
9
15

The following are suited for packaging: Polyethylene airtight bags and wraps, Plastic
containers with lids; Special plastic covers with elastic, Aluminium foil.
Using Water Dispenser
This part can help you use the refrigerator with water
dispenser easily.
Before using
Before using the the refrigerator with water dispenser
for the first time , please hold the two sides of the
water tank part tightly , then lift it carefully .
Unscrew the head , clean it and the water tank .
For cleaning and assembling , please refer to the
following instructions .
warning!
When fitting on the water tank , please
ensure the head inserted into the hole
first , then hold the two sides of the
water tank tightly and fit it on the door .
After cleaning , please assemble the
parts including the head, water tank and
lids together, then fit them on the door.
Assembing
16

Small lid
Large lid
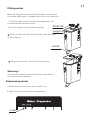
Before filling the water tank with water , ensure that
the water tank part is steady and in a correct position
Filling water
1. Fill with water up to 3L which is suggested ,and
not exceed the maximum limit .
You can fill water by the following ways.
Remove the small lid and fill water from the inlet
of the large lid .
Head
Warning!
Do not touch other parts when filling water,which
can cause water leakage.
Remove the cover ,then fill water directly .
1.Make the covers of the water tank fit on .
2.Close the door and check the dispenser
Dispensing water
Lock
17

Before dispensling the water , make
sure the lock device is on ”UNLOCK”.
When the
is unlikely receive water.
lock device is on ”LOCK”, it
Warning!
The lock is defined as “ child lock ”.
When the water dispenser is locked , do
not push the dispenser lever strongly,
which can damage the mechanism .
Dispenser lever
Suggested position
Warning!
Do not touch the impact pole without cup.
3.Receiving Water
Remove the water tank , lid , head
carefully,then wash them lightly in water,
after this you can choose between natural
drying and drying with dryer .
Water receiving containers must be correct
cups.
Cleaning
After using many times, the receiving
tank will store the water might be
dropped , and you must clean it with dry
towel regularly in order to avoid
overflow.
Receiving tank Water baffle
18

Defrosting
Why defrosting
Water contained in food or getting into air inside the fridge be opening doors may form
a layer pf frost inside. It will weaken the refrigeration when the frost is thick. While it is
more than 10mm thick, you should defrost.
Defrosting in fresh food storage compartment
It is automatically controlled by switching the temperature regulator on or off so that
there is no need of operation of defrosting. Water from defrosting will be drained into
an drip tray through a drain pipe at the back of the fridge automatically.
Defrosting in frozen-food storage compartment
Defrosting in freezer chamber is operated manually. Be fore defrosting, take the food
out; take the ice tray and drawers out or put them into the fresh food compartment
temporarily, then set the knob of the temperature regulator to position “0” (where the
compressor will stop working) and leave the door of the refrigerator open until ice and
frost dissolve thoroughly and accumulation at the bottom of the freezer chamber. Wipe
off the water with soft cloth. In t he case of speeding up the process of defrosting, you
may put a bowl of warm water (about 50℃) into the freezer chamber, and scrape away
the ice and frost with a defrosting spatula. After doing so, be sure to set the knob of the
temperature regulator to the original position.
It is not advisable to heat the freezer chamber directly with hot water or hair dryer while
defrosting to avoid deformation of the inner case. It is also not advisable to scrape off
ice and frost or separate food from the containers which have been congealed together
with the food with sharp tools or wooden bars, so as not to damage the inner casing or
the surface of the evaporator.
Warning! Switching off the appliance.
To switch off the appliance, turn the temperature regulator to position ”0” .
Important!
The fridge should be defrosted at least every one month. During the using process, if
the door was opened frequently or using the appliance in the extreme humidity, we
advise the user to defrost every two weeks.
If the appliance is not going to be used for an extended period:
Remove all refrigerated packages.
Switch off the appliance by turning the temperature regulator to position”0”.
Remove the mains plug or switch off or disconnect the electricity supply.
Clean thoroughly (see section: Cleaning and Care)
Leave the door open to avoid the build up of odors.
19
Page is loading ...
Page is loading ...
Page is loading ...
Page is loading ...
Page is loading ...
Page is loading ...
-
 1
1
-
 2
2
-
 3
3
-
 4
4
-
 5
5
-
 6
6
-
 7
7
-
 8
8
-
 9
9
-
 10
10
-
 11
11
-
 12
12
-
 13
13
-
 14
14
-
 15
15
-
 16
16
-
 17
17
-
 18
18
-
 19
19
-
 20
20
-
 21
21
-
 22
22
-
 23
23
-
 24
24
-
 25
25
-
 26
26


Hisense MC55244DB Owner's manual
- Category
- Fridge-freezers
- Type
- Owner's manual
Ask a question and I''ll find the answer in the document
Finding information in a document is now easier with AI
Related papers
-
Hisense RL170D4BC21 Under Counter Fridge User manual
-
Hisense RB335N4WG1 NF FFREEZER WTD SLV User manual
-
Hisense RB381N4WW1 FF WTD FFREEZER WHITE User manual
-
-
-
Hisense RB390N4WC1 User manual
-
-
-
-
Other documents
-
Fridgemaster MC55240MDB Fridge Freezer User manual
-
Morris T72307HM Instructions Manual
-
-
Zanussi ZRB836VW2 User manual
-
Electrolux ENA34305W User manual
-
-
-
-
-
Teka TS 130 User manual