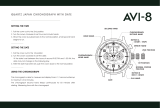
1. PULL crown to position C.
2. PRESS pusher A intermittently until the top eye hand is reset to 0.
3. PRESS pusher B intermittently until the middle and top eye hands is reset to 60.
NOTE: PRESSING and HOLDING either pusher A or B will cause the hands to continue
to move until the pusher is released.
1. PULL out the crown to B position.
2. PRESS pushers A and B simultaneously for three seconds.
3. RELEASE pushers, stopwatch hands will move 180 degrees.
4. PUSH crown in to A position.
1. PRESS pusher A to start timing.
2. PRESS pusher A to stop timing.
3. PRESS pusher B to reset.
1. PRESS pusher A to start timing.
2. PRESS pusher B to stop timing.
3. PRESS pusher A to stop timing of second event.
4. PRESS pusher B to view time of second event.
5. PRESS pusher B to reset.
1. PRESS pusher A to start timing.
2. PRESS pusher B to split.
3. PRESS pusher B to begin again.
4. PRESS pusher A to stop.
5. PRESS pusher B to reset.