Snapper 580752641 Owner's manual
- Category
- High-pressure cleaners
- Type
- Owner's manual

Operator'sManual
3100 PSI MAX
2.5 GPMMAX
PRESSUREWASHER
ModelNo. 580.752641
®
HOURS: IVlon.- Fri. 8 a.m. to5 p.m. (CT)
WARNING
Beforeusing this product, readthis
manualand follow all Safety Rules
and OperatingInstructions.
ADVERTENCIA
Antes deutilizar el producto, lea este
manualy siga todas las Reglasde
Seguridad eInstrucciones de Uso.
• Safety
• Assembly
• Operation
• Maintenance
• Parts
• Espafiol,p. 32
This pressure washer is rated in accordance to the Pressure Washer Manufacturers Association
(PWMA) standard PW101 (Testing and Rating Performance of Pressure Washers).
Esta iimpiadora a presi6n est_ ciasificada conforme a la norma PW101 (comprobaci6n y ciasificaci6n de rendimiento de limpiadoras
a presi6n) de la Asociaci6n defabricantes de bombas a presi6n (Pressure Washer Manufacturers Association, PWMA).
Sears, Roebuck and Co., Hoffman Estates, IL 60179 U.S.A.
visit ourwebsite:www.sears.com
Part No. 209811GS Draft - (03/31/2009)

WARRANTY.......................................... 2
REPAIRPROTECTIONAGREEMENT........................ 2
SAFETYRULES...................................... 3-5
FEATURESANDCONTROLS.............................. 6
ASSEMBLY........................................ 7-10
OPERATION....................................... 11-14
SPECIFICATIONS..................................... 15
MAINTENANCE.................................... 16-20
STORAGE........................................... 21
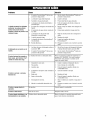
TROUBLESHOOTING.................................. 22
REPLACEMENTPARTS.............................. 23-27
EMISSIONCONTROLWARRANTY..................... 28-29
NOTES........................................... 30-31
ESPAKIOL......................................... 32-55
HOWTOORDERPARTS........................ BACKPAGE
SNAPPERFULLWARRANTY
If this Snapper product fails due to a defect in material or workmanship within two years from the date of purchase,return it
to anySearsstore or SearsParts & RepairService Centerinthe United Statesfor free repair (or replacementif repair proves
impossible).
This warranty appliesfor only 90 days from the dateof purchase if this product is ever usedfor commercial or rental
purposes.
Thiswarranty coversONLYdefectsin material andworkmanship.Searswill NOTpayfor:
• Expendableitems that canwear out from normal usewithin the warranty period, suchas spray guns, hoses, nozzle
extensions, nozzles,filters andspark plugs.
• Repairsnecessarybecauseof accident, or failure to operateor maintain the product according to all supplied instructions.
• Preventivemaintenance,or repairs necessarydue to improper fuel mixture, contaminated or stalefuel.
This warranty givesyou specific legal rights, andyou may also haveother rights which vary from stateto state.
Sears, Roebuck and Co., Hoffman Estates, IL 60179
Congratulations onmaking a smart purchase.
Your new pressure washer is designedand manufactured for
years of dependableoperation. But like all products, it may
require repair from time to time. That's when having a Repair
Protection Agreement cansaveyou money and aggravation.
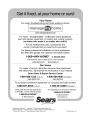
Here'swhat the RepairProtectionAgreement*includes:
• Expertservice by our 10,000 professional repair
specialists
• Unlimited serviceand no chargefor parts and labor on
all covered repairs
• Product replacement up to $1500 if your covered
product can't befixed
• Discountof10% from regular priceof serviceand related
installed parts not covered by the agreement;also, 10%
off regular price of preventivemaintenancecheck
• Fasthelp byphone-we call it Rapid Resolution- phone
support from a Sears representative.Think of us as a
"talking owner's manual".
Onceyou purchasethe RepairProtection Agreement,a
simple phone call is all it takes for you to schedule service.
You cancall anytimeday or night, or schedule aservice
appointment online.
The Repair ProtectionAgreement is a risk-free purchase. If
you cancelfor any reasonduring the product warranty
period,we will provide a full refund.Or, a prorated refund
anytime after the product warranty periodexpires. Purchase
your RepairProtectionAgreement today!
Somelimitations and exclusionsapply. Forpricesand
additionalinformationin the U.S.A. call 1-800-827-6655.
* Coveragein Canadavaries onsome items. Forfull
details, call SearsCanadaat 1-800-361-6665.
SearsInstallation Service
ForSearsprofessional installation of home appliances,
garagedoor openers, water heaters,and other major home
items, in the U.S.A.or Canadacall 1-800-4-MY-HOME®.
© 2009

Readthis manual carefullyand becomefamiliar
with yourpressurewasher. Knowits applications,
its limitations,and anyhazardsinvolved.
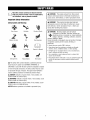
Important Safety Information
Safety Symbolsand Meanings
ToxicFumes Kickback
2 %
SlipperySurface Fall
ElectricalShock
FluidInjection
Fire
Explosion Operator'sManual
MovingParts
FlyingObjects Hot Surface
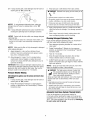
,A Thesafety alert symbol indicatesa potential personal
injury hazard.A signal word (DANGER,WARNING,or
CAUTION)is usedwith the alertsymbol to designatea degree
or levelof hazardseriousness.A safety symbol may be used
to representthe typeof hazard.Thesignal word NOTICEis
usedto address practicesnot relatedto personalinjury.
_i, DANGERindicates ahazardwhich, if not avoided, will
result in death or serious injury.
_i, WARNINGindicates ahazardwhich, if not avoided,could
result in death or serious injury.
_i, CAUTIONindicates ahazardwhich, if not avoided,could
result in minor or moderate injury.
flOTICEaddresspractices not relatedto personal injury.
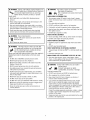
_i, WARNING The engineexhaust from this product
contains chemicals known to the Stateof California to
cause cancer,birth defects, or other reproductiveharm.
_i, WARNING This product contains lead and lead
compounds, known to the State of Californiato cause
birth defectsor other reproductive harm. Washyour
handsafter handling this product.
_i, WARNING Runningenginegives off carbon
/_j/_,__ monoxide, an odorless, colorless, poison gas.
-_ Breathing carbon monoxide can cause
headache,
Ill
fatigue, dizziness,vomiting, confusion, seizures,
nausea,fainting or death.
Some chemicals or detergents may be harmful if inhaled
or ingested, causing severe nausea,fainting, or
poisoning.
• OperatepressurewasherONLYoutdoors.
• Keepexhaustgasfromenteringaconfinedareathrough
windows,doors,ventilationintakes,orotheropenings.
• DONOTstartor runengineindoorsor in anenclosedarea,
evenif windowsanddoorsareopen.
• Usearespiratorormaskwheneverthereisa chancethat
vaporsmaybeinhaled.
• Readallinstructionswith masksoyouarecertainthemaskwill
providethenecessaryprotectionagainstinhalingharmful
vapors.

_k WARNING Starter cord kickback(rapid retraction)can
result in bodily injury. Kickbackwill pull hand and
,_arm toward enginefaster thanyou can let go.
Broken bones,fractures, bruises, or sprains
could result.
• NEVERpull starter cord without first relieving spraygun
pressure.
• When starting engine, pull cord slowly until resistanceisfelt
andthen pull rapidly to avoid kickback.
• After eachstarting attempt, where enginefails to run, always
point spray gun in safe direction, pressred button and squeeze
spray gun trigger to releasehigh pressure.
• Firmly grasp spray gun with both hands when using high
pressure sprayto avoidinjury when spraygun kicks back.
A, WARNING Riskof electrocution.
"_,dh Contactwith power source can causeelectric
shock or burn.
• NEVERspraynearpowersource.
_k WARNING The high pressure stream of water that
this equipment produces can cut through skin
and its underlying tissues, leading to serious
injury and possible amputation.
Spray gun traps high water pressure, even when engine is
stopped and water is disconnected, which can cause
injury.
• DONOTallow CHILDRENto operate pressurewasher.
• NEVERrepair high pressure hose.Replaceit.
• NEVERrepair leaking connections with sealantof any kind.
Replaceo-ring or seal.
• NEVERconnect high pressure hoseto nozzleextension.
• Keephigh pressure hoseconnectedto pump and spraygun
while system is pressurized.
• ALWAYS point spray gun in safedirection, pressred button
andsqueezespray guntrigger to releasehigh pressure,every
time you stop engine.
• NEVERaim spray gun at people,animals, or plants.
• DO NOTsecure spraygun in open position.
• DO NOTleavespray gun unattendedwhile machine is running.
• NEVERuseaspray gun which does not haveatrigger lock or
trigger guardin placeand in working order.
• Always be certain spray gun, nozzlesandaccessoriesare
correctly attached.
_k WARNING Fuel and its vapors are extremely
flammable and explosive.
Fire or explosion can cause severe burns
or death.
WHENADDINGOR DRAININGFUEL
• Turn pressurewasher OFFand let it cool at least 2 minutes
before removing fuel cap. Loosencapslowly to relievepressure
in tank.
• Fill or drain fuel tank outdoors.
• DONOToverfill tank. Allow spacefor fuel expansion.
• If fuel spills, wait until it evaporatesbeforestarting engine.
• Keepfuel awayfrom sparks, open flames, pilot lights, heat,and
other ignition sources.
• DONOTlight a cigaretteor smoke.
WHENSTARTINGEQUIPMENT
• Ensurespark plug, muffler,fuel cap,and air cleanerarein place.
• DO NOTcrank enginewith spark plug removed.
WHENOPERATINGEQUIPMENT
• DONOTtip engine or equipment at anglewhich causesfuel to
spill.
• DONOTsprayflammable liquids.
WHENTRANSPORTINGOR REPAIRINGEQUIPMENT
• Transport/repair with fuel tank EMPTYor with fuel shutoff valve
OFF.
• Disconnectspark plug wire.
WHENSTORINGFUELOR EQUIPMENTWITH FUELIN TANK
• Store awayfrom furnaces, stoves,water heaters,clothes
dryers, or other appliancesthat havepilot light orother ignition
source becausethey can ignitefuel vapors.
_k WARNING Contact with muffler area can result in
serious burns.
_ _ Exhaust heat/gases can ignite
combustibles, structures or damage
fuel tank causing a fire.
• DO NOTtouch hot parts and AVOIDhot exhaust gases.
• Allow equipmentto cool beforetouching.
• Keepat least5 feet (152 cm) of clearanceon all sides of
pressure washer including overhead.
• It is aviolation of California Public Resource Code,Section
4442, to use or operate the engine on any forest-covered,
brush-covered, or grass-covered land unless the exhaust
system is equipped with aspark arrester, as defined in Section
4442, maintained in effective working order. Other statesor
federaljurisdictions may havesimilar laws.
Contactthe original equipment manufacturer, retailer, or dealer
to obtain a spark arrester designedfor the exhaust system
installed on this engine.
• Replacement parts must bethe sameand installed in the same
position asthe original parts.

_i, WARNING Use of pressure washer can create
puddles and slippery surfaces.
,_ Kickback from spray gun can cause you
to fall.
• Operatepressurewasher from a stable surface.
• Thecleaning areashould have adequateslopes and drainageto
reducethe possibility of a fall dueto slippery surfaces.
• Beextremely careful if you must usethe pressurewasherfrom
a ladder,scaffolding, or any other similar location.
• Firmly grasp spray gun with both hands when using high
pressure sprayto avoidinjury when spraygun kicks back.
_i, WARNING Unintentional sparking can result in fire or
_¢ electric shock.
WHENADJUSTINGOR MAKINGREPAIRSTO YOURPRESSURE
WASHER
• Disconnectthe spark plug wire from the spark plug and place
the wire where it cannot contact spark plug.
WHENTESTINGFORENGINESPARK
• Use approvedspark plug tester.
• DONOTcheckfor sparkwith spark plug removed.
_i, WARNING Starter and other rotating parts can
entangle hands, hair, clothing, or accessories.
• NEVERoperate pressurewasherwithout protective housing or
covers.
• DO NOTwear looseclothing, jewelry or anything that may be
caught in the starter or other rotating parts.
• Tie up long hair and removejewelry.
A WARNING Riskof eyeinjury.
Spray cansplash back or propel objects.
• Always wear indirect vented (chemicalsplash) safety goggles
markedto comply with ANSIZ87.1 when using or in vicinity of
this equipment.
• NEVERsubstitute safety glasses or dry-condition goggles for
indirect vented safetygoggles.
NOTICE High pressure spray may damagefragile items
including glass.
• DONOTpointspraygunatglasswhenusingMAX(0°) nozzle.
• NEVERaimspraygunatplants.
NOTICE Improper treatment of pressure washer can
damage it and shorten its life.
• If you have questions about intended use,ask dealer or contact
Sears.
• NEVERoperate units with broken or missing parts, or without
protective housing or covers.
• DO NOTby-pass any safetydevice on this machine.
• DONOTtamper with governed speed.
• DONOToperate pressure washer above rated pressure.
• DONOTmodify pressure washer in any way.
• Beforestarting pressure washer in cold weather,check all parts
of the equipment to besure icehas not formed there.
• NEVERmove machine by pulling on hoses. Use handle provided
on unit.
• Checkfuel system for leaksor signs of deterioration, such as
chafed or spongy hose,loose or missing clamps, or damaged
tank or cap. Correct all defects before operating pressure washer.
• This equipmentis designedto be usedwith Searsauthorized parts
ONLY.If equipment is used with parts that DONOTcomply with
minimum specifications, userassumesall risksand liabilities.

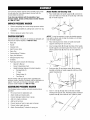
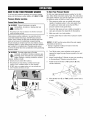
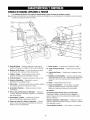
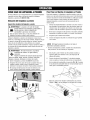
KNOWYOURPRESSUREWASHER
Readthe Operator'sManual andsafetyrules beforeoperatingyourpressure washer.
Comparethe illustrations with your pressurewasher to familiarizeyourself with the locations of various controls and
adjustments. Savethis manualfor future reference.
A- Spray Gun-- Controls the application of water onto
cleaning surfacewith trigger device. Includestrigger lock.
B- HighPressureHose-- Connectone end to water pump
and the other end to spray gun.
C- CleaningTank - Useto hold up to two gallons (7.6 I) of
pressurewasher safe detergent.
D - ChokeLever-- Preparesa cold engine for starting.
E- Fuel Valve-- Usedto turn fuel supply on and off to
engine.
F - Air Filter -- Protects engine by filtering dust and debris
out of intakeair.
G - Recoil Starter-- Usedfor starting the engine manually.
H - StandardDetergentSiphoningTube/Filter-- Useto
siphon pressure washer safedetergents intothe low
pressure stream.
J - PrecisionSprayTM Selector-- Containssix different
setting for various applications.
K- ThrottleLever-- Sets engine in starting modefor recoil
starter andstops a running engine.
L- Water Inlet-- Connectionfor garden hose.
M - Oil Drain-- Drainengine oil here.
N- HighPressureOutlet-- Connectionfor high pressure
hose.
P - AutomaticCoolDownSystem-- Cycleswater through
pump when water reaches125°-155°F. Warm water will
discharge from pump onto ground. This system prevents
internal pump damage.
R- Pump-- Developshigh pressure.
S - Fuel Tank -- Filltank with regular unleadedfuel. Always
leaveroom for fuel expansion.
ItemsNot Shown:
IdentificationLabel (near rear of baseplate) -- Provides
model and serial number of pressurewasher. Pleasehave
these readilyavailableif calling for assistance.
Oil Fill -- Checkand add engine oil here.
Warning/OperatingInstructionsTag-- Identifies hazards
and proper procedureto start/stop pressurewasher.

Your pressure washer requires some assembly and is ready
for useonly after it has been properly servicedwith the
recommendedoil and fuel.
If you haveanyproblems with theassemblyofyour
pressurewasher, please call the pressurewasher helpline
at 1-800-317-7833.
UNPACKPRESSUREWASHER
1. Removeeverythingfrom carton except pressurewasher.
2. Opencarton completely by cutting eachcorner from top
to bottom.
3. Removepressure washer from carton.
CARTONCONTENTS
Checkall contents. If anyparts are missing or damaged,call
the pressure washer helplineat 1-800-317-7833
• Main Unit
• Handle
• CleaningTank
• High PressureHose
• Spray Gun
• PrecisionSprayTMSelector
• Spray GunWireform
• DetergentSiphon Hose
• Oil Bottle
• Parts Bag(which includes the following):
• Operator's Manual
• Owner's Registration Card
• HandleFasteningHardwareKit (whichincludes):
• CarriageBolts (2)
• "L" Bolt
• Plastic Knobs (4)
• TreeClips (4)
Becomefamiliar with eachpiece beforeassemblingthe
pressure washer Identify all contents with the illustration on
page 6 If any parts are missing or damaged, call the
pressure washer helpline at1-800-317-7833
ASSEMBLINGPRESSUREWASHER
Your Snapperpressure washer will needassembly before
operation:
1. Fill out and sendin registration card.
2. Attach handle and cleaningtank.
3. Connectdetergent siphon hoseto pump.
4. Add oil to enginecrankcase.
5. Add fuel to fuel tank.
6. Connectpressure hose to spray gun and pump.
7. Connectwater supply to pump.
8 Attach PrecisionSprayTMselector to spraygun
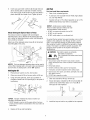
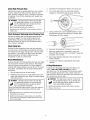
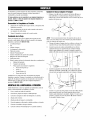
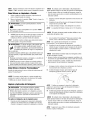
Attach Handle and Cleaning Tank
1. Placehandle(A) onto handlesupports (B) connectedto
main unit. Make sure holes (6) in handlealign with holes
(6) on handlesupports.
NOTICE It may be necessaryto move the handlesupports
from side to side in order to align the handleso it will slide
overthe handlesupports.
2. Placecleaning tank over holeson handle and handle
supports (viewingfrom rear of unit).
3. Insert carriage bolts (D) through top holesof the handle,
handlesupports andcleaningtank from front of unit and
attacha plastic knob (E) from rear of unit. Tighten by
hand.
.
Pushtree clips (F) into bottom holes (G) of cleaning
tank (H) and holes on handle supports until they sit flat
against cleaningtank
V
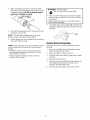
5. Insert "L" bolt (J) through holeon left side of handle
(viewing from front of unit). Hold bolt in placeand attach
a plastic knob (K) from insideof unit.Tighten by hand.

,
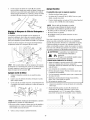
Insert spray gun holder wireform (A) through hole just
abovecleaningtank on right side of handle(viewing
from front of unit). Holdwireform in placeand attach a
plastic knob (B)from inside of unit. Tighten by hand.
Add Fuel
Fuelmustmeet theserequirements:
• Clean,fresh, unleadedgasoline.
• A minimum of 87 octane/87AKI (91 RON).High altitude
use, seeHigh Altitude.
• Gasolinewith up to 10% ethanol (gasohol) or up to 15%
MTBE(methyl tertiary butyl ether) is acceptable.
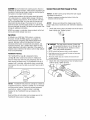
Attach Detergent Siphon Hose to Pump
The pressurewasher is equippedwith two detergent
siphoning hoses.One is attachedto the cleaning tank and
one is loosefor siphoning pressurewasher safe detergents
from a bottle or container.
Attach one of the detergent siphon hoses (6) to the barbed
hosefitting (D) on the pump.
NOTICE Onlyone detergent siphoning hosecan be used at
a time. Whencleaningtank is not used, make sure detergent
shut-off valve on cleaning tank is in the "Off" position.
Add Engine Oil
1. Placepressure washer on a flat, levelsurface.
2. Cleanarea around oil fill and remove yellow oil fill cap.
3. Using oil funnel (optional), slowly pour contents of
provided oil bottle into oil fill opening (E) to the point of
overflowing.
NOTICE Improper treatment of pressure washer can
damage it and shorten its life.
• DO NOTattempt to crank or start the engine beforeit has been
properly servicedwith the recommended oil. This may result in an
enginefailure.
4. Replaceoil fill cap and fully tighten.
NOTICE Avoid pressurewasher damage.
Failureto follow Operator's Manualfor fuel
recommendationsvoids warranty.
• DONOTuseunapprovedgasolinesuchasE85.
• DONOTmixoil in gasoline.
• DONOTmodifyengineto runonalternatefuels.
To protect the fuel system from gum formation, mix in a fuel
stabilizerwhen adding fuel. See Storage.All fuel is not the
same.If you experiencestarting or performance problems
after using fuel, switch to a different fuel provider or change
brands. This engine is certified to operateon gasoline. The
emission control system for this engine is EM(Engine
Modifications).
_i, WARNING Fuel and its vapors are extremely
flammable and explosive.
Fire or explosion can cause severe burns
or death.
WHENADDING FUEL
• Turn pressurewasher OFFand let it cool at least 2 minutes
before removing fuel cap. Loosencapslowly to relievepressure
in tank.
• Fill fuel tank outdoors.
• DONOToverfill tank. Allow spacefor fuel expansion.
• If fuel spills, wait until it evaporatesbefore starting engine.
• Keepfuel awayfrom sparks, open flames, pilot lights, heat,and
other ignition sources.
• DONOTlight a cigaretteor smoke.
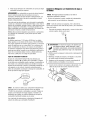
Cleanareaaround fuel fill cap, removecap.
2. Slowly add regular unleadedfuel (F) to fuel tank (G). Be
careful not to overfill. Allow about 1.5" (4 cm) (H) of
tank spacefor fuel expansion.
3. Install fuel cap and wait for any spilledfuel to evaporate.

CAUTION!Alcohol-blendedfuels (called gasohol, ethanolor
methanol) can attract moisture, which leadsto separation and
formation of acidsduring storage.Acidic gascan damagethe
fuel system of an enginewhile in storage.
Toavoidengineproblems,thefuel systemshouldbe treated
with afuel preserver or emptied beforestorageof 30 daysor
longer.If adding a fuel preserver,fill the fueltank with fresh
fuel. If only partially filled, air in the tank will promote fuel
deterioration during storage. If fuel preserver is not used,
drain thefuel tank,startthe engineand let it run untilthe fuel
linesand carburetorareempty. Usefresh fuel nextseason.See
Storagefor additionalinformation.
NEVERuseengine or carburetor cleanerproducts in the fuel
tank as permanent damagemay occur.
HighAltitude
At altitudes over 5,000 feet (1524 meters), a minimum
85 octane/ 85 AKI (89 RON)gasoline is acceptable.To
remain emissions compliant, high altitude adjustment is
required. Operationwithout this adjustment will cause
decreasedperformance, increasedfuel consumption, and
increased emissions. Seea qualified Searsdealerfor high
altitude adjustment information. Operationof the engineat
altitudes below 2,500 feet (762 meters) with the high altitude
kit is not recommended.
FreshStart® FuelCap
TheFreshStart® fuel cap(A) is designedto hold a
cartridge (B) which contains fuel preserver.Adding fuel
preserver helps keepfuel fresh and carburetors cleanfor
easierstarting all seasonlong. The FreshStart® fuel cap, if
equipped with a cartridge, automatically drips concentrated
fuel preserver into your fuel tank so you don't haveto addit
_ourself.
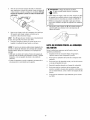
Connect Hose and Water Supply to Pump
NOTICE DONOTrun the pump without the water supply
connectedand turned on.
• Damageto equipmentresultingfromfailuretofollowthis
instructionwillvoidwarranty.
NOTICE Removeand discard the shipping caps from the
pump's high pressure outlet and water inlet beforeattaching
hoses.
1. Uncoil high pressure hoseand attachone end of hoseto
baseof spray gun. Tighten by hand.
%
_ILWABNINGThe high pressure stream of water that
this equipmentproduces can cut through skin
and its underlyingtissues, leadingto serious
injuryand possible amputation.
• NEVERconnecthigh pressurehoseto nozzleextension.
• Keephighpressurehoseconnectedto pumpandspraygun
whilesystemispressurized.
• Alwaysbecertainspraygun,nozzlesandaccessoriesare
correctlyattached.
2. Attach other end of high pressure hoseto high pressure
outlet on pump. Tighten by hand.
NOTICE FreshStart® fuel preserver cartridge is availableas
an optional accessory, retail item 7133386. It is not included
with the pressurewasher. Contact the original equipment
manufacturer, retailer,or dealer to obtain a cartridge
designedfor the FreshStart® fuel capinstalled on this
engine.
Readand follow all instructions andwarnings given in the
FreshStart® fuel preservercartridge package.

,
Beforeconnectinggarden hoseto water inlet, inspect
inlet screen.Cleanscreen (A) if it contains debris or have
it replacedif damaged.DONOTrunpressure washer if
inlet screenisdamagedor missing.
4. Run water through garden hosefor 30 seconds to flush
it of debris. Turn off water.
NOTICE DONOTsiphon standing water for the water
supply. UseONLYcold water (less than 100°F).
5. Connectgarden hose (not to exceed50 feet in length) to
water inlet. Tighten by hand.
NOTICE Using a One Way Valve(vacuum breakeror check
valve) at pump inlet can causepump or inlet connector
damage.
• ThereMUSTbeatleasttenfeetof unrestrictedgardenhose
betweenthepressurewasherinletandanydevice,suchasa
vacuumbreakeror checkvalve.
• Damageto equipment resulting from failure to follow this
instruction will void warranty.
_i, WARNING Riskof eyeinjury.
Spray cansplash back or propel objects.
6.
• Always wear indirect vented (chemicalsplash) safety goggles
markedto comply with ANSIZ87.1 when using or in vicinity of
this equipment.
NEVERsubstitute safetyglasses or dry-condition goggles for
indirect vented safetygoggles.
Turn ON the water, press red button (B) on the gun and
squeeze the trigger to purge the pump system of air and
impurities.
Checklist Before Starting Engine
Reviewthe unit to ensureyou haveperformed all of the
following:
1. Besure to readSafetyRules and Operationsections
before using the pressure washer.
2. Makesure handleis in placeand secure.
3. Checkthat oil has beenadded to proper levelin engine
crankcase.
4. Add proper fuel to fuel tank.
5. Checkfor proper hoseconnections (high pressure and
water supply) and that there are no kinks, cuts, or
damageto the high pressure hose.
6. Provide proper water supply (not to exceed100°F).
10

HOWTO USEYOURPRESSUREWASHER
If you haveanyproblems operating your pressure washer,
pleasecallthe pressure washer helpline at 1-800-317-7833.
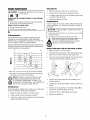
Pressure Washer Location
PressureWasherClearance
_i, WARNING Exhaustheat/gases can ignite
combustibles, structures or damagefuel tank
causing a fire.
• Keepat least5 ft. (152 cm) clearanceon all sides of pressure
washer including overhead.
Placepressure washer outdoors in an area that will not
accumulate deadlyexhaustgas. DONOTplacepressure
washer where exhaustgas (A) could accumulate and enter
inside or be drawn into a potentially occupied building.
Ensureexhaustgas is kept awayfrom anywindows, doors,
ventilation intakes, or other openingsthat can allow exhaust
gasto collect in aconfined area. Prevailingwinds and air
currents should betaken into considerationwhen positioning
_ressurewasher.
_i, WARNING Runningenginegives off carbon
monoxide,an odorless, colorless, poisonous gas.
_ Breathingcarbon monoxide headache,
cancause
fatigue, dizziness,vomiting, confusion, seizures,
nausea,fainting or death.
• OperatepressurewasherONLYoutdoors.
• Keepexhaustgasfromenteringaconfinedareathrough
windows,doors,ventilationintakes,or otheropenings.
• DONOTstartorrunengineindoorsor in anenclosedarea,
evenifwindowsanddoorsareopen.
To Start Your Pressure Washer
To start your engine-powered pressurewasherfor the first
time, follow these instructions step-by-step.This information
alsoapplies wheneveryou start the engine after you havelet
the pressurewasher sit idle for at leasta day.
1. Placepressurewasher near an outside water source
capableof supplying water at a flow rate greaterthan
3.5 gallons per minute and no less than 20 PSI at
pressurewasher end of garden hose.
2. Checkthat high pressure hose is tightly connectedto
spray gun and pump. SeeAssemblyfor illustrations.
3. Makesure unit is in a levelposition.
4. Connectgarden hoseto water inlet on pressurewasher
pump.
NOTICE DONOTrun the pump without the watersupply
connectedand turned on.
• Damageto equipmentresultingfromfailureto followthis
instructionwill voidwarranty.
5. Turn ONthe water, pressred button on the gun and
squeezethe trigger to purgethe pump system of air and
impurities.
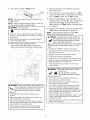
6. Attach PrecisionSprayTM Selector to spray gun according
to PrecisionSprayTM Selector instruction sheet.
7. Rotatefuel shut-off valveto "On" position (B) (fully
counter-clockwise).
.
Move throttle lever (C)to "Fast" position, shown here as
a rabbit.
11

9. Move choke lever(B) to "Choke" position.
NOTICE Fora warm engine, be surethe choke lever is in
the "Run" position.
NOTICE Beforestarting the pressure washer,be sure you
are wearing safety goggles asdescribed below.
_i, WARNIN6 Riskof eyeinjury.
Spraycan splash backor propel objects.
• Always wear indirect vented (chemicalsplash) safety goggles
markedto comply with ANSIZ87.1 when using or in vicinity of
this equipment.
• NEVERsubstitute safety glasses or dry-condition goggles for
indirect vented safetygoggles.
0. Whenstarting engine, position yourself as
recommended, grasp handle and pull recoil starter
lightly until you feelsome resistance,then pull briskly.
_i, WARNIN6 Starter cord kickback (rapid retraction) can
result in bodily injury. Kickback will pull hand and
_,_ arm toward engine faster than you can let go.
v-
Broken bones, fractures, bruises, or sprains
could result.
• NEVERpull starter cord without first relieving spraygun
pressure.
• When starting engine, pull cord slowly until resistanceisfelt
andthen pull rapidly to avoid kickback.
• After eachstarting attempt, where enginefails to run, always
point spray gun in safe direction, pressred button and squeeze
spray gun trigger to releasehigh pressure.
• Firmly grasp spray gun with both hands when using high
pressure sprayto avoidinjury when spraygun kicks back.
11. Return recoil starter slowly. DONOTlet rope "snap
back"against starter.
12. When engine starts, slowly move choke leverto "Run"
position, as engine warms. If engine falters, move choke
leverto "Choke" position, then to "Run" position.
13. After eachstarting attempt, where engine fails to run,
alwayspoint gun in safe direction, press red button and
squeezespray gun trigger to releasehigh pressure.
Move choke leverto "Choke" position, and repeatsteps
10 through 12.
14. If enginefails to start after six pulls, move choke leverto
"Run" position, and repeatsteps 10 through 12.
NOTICE Always keepthethrottle leverin the "Fast"
3osition when operating the pressure washer.
_i, WARNIN6 The high pressure stream of water that
this equipment produces can cut through skin
and its underlying tissues, leading to serious
injury and possible amputation.
Spray gun traps high water pressure, even when engine is
stopped and water is disconnected, which can cause
injury.
• DONOTallow CHILDRENto operatepressure washer.
• Keephigh pressure hoseconnectedto pump and spraygun
while system is pressurized.
• NEVERaim spraygun at people,animals, or plants.
• DO NOTsecure spray gun in open position.
• DO NOTleavespray gun unattendedwhile machine is running.
• NEVERuse aspray gun which does not have a trigger lock or
trigger guard in place and in working order.
• Always be certain spray gun, nozzlesandaccessoriesare
correctly attached.
_i, WARNIN6 Contact with muffler area can result in
serious burns.
heat/gases can ignite
Exhaust
combustibles, structures or damage
fuel tank causing a fire.
• DO NOTtouch hot parts and AVOIDhot exhaust gases.
• Allow equipmentto cool beforetouching.
• Keepat least5 feet (152 cm) of clearanceon all sides of
pressure washer including overhead.
• It isa violation of California Public ResourceCode,Section
4442, to use or operate theengine on any forest-covered,
brush-covered, or grass-covered land unlessthe exhaust
system is equippedwith a spark arrester,as defined in Section
4442, maintained ineffective working order. Otherstates or
federaljurisdictions may havesimilar laws.
Contactthe original equipment manufacturer,retailer, or dealer
to obtain a sparkarrester designed for the exhaustsystem
installed onthis engine.
• Replacementparts must bethe same and installed in the same
position as the original parts.
12

How to Stop Your Pressure Washer
1. Releasespray gun trigger and let engine idle for two
minutes.
2. Move throttle to SLOWposition, then STOPposition.
_i, WARNING Backfire,fire or engine damagecould
occur.
• DONOTstop engine by moving choke control to "Choke"
position (J",l).
3. ALWAYSpoint spray gun in a safe direction, press red
button and squeezespray gun trigger to releaseretained
high water pressure.
NOTICE Spraygun traps high water pressure, evenwhen
engine is stopped and water is disconnected.
_i, WARNING The high pressure stream of water that
this equipment produces cancut through skin
and its underlying tissues, leadingto serious
injury and possible amputation.
Spraygun traps high water pressure,evenwhen engine is
stopped and water is disconnected, which can cause
injury.
• Keephighpressurehoseconnectedto pumpandspraygun
whilesystemispressurized.
• ALWAYSpointsprayguninsafedirection,pressredbutton
andsqueezesprayguntriggerto releasehighpressure,every
timeyoustopengine.
How to Use PrecisionSprayTM Selector
Refer to the PrecisionSprayTM Selector instruction sheetfor
proper use.
NOTICE Product damagewill occur if the gun trigger is
squeezedwhile the Selectoris in-between nozzlesettings.
• NEVERturntheSelectorwhilespraying.
Cleaning and Applying Detergent
_i, CAUTION Chemicals can cause bodily injury, and/or
property damage.
• NEVERusecaustic liquid with pressure washer.
• Use ONLYpressure washer safe detergents/soaps. Follow all
manufacturers instructions.
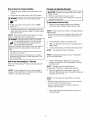
Toapplydetergentfollowthesesteps:
1. Attach one of the detergent siphon hoses following
instructionsAttach DetergentSiphon Hose to Pump.
NOTICE Contact with the hot muffler can damage detergent
siphoning tube.
• When inserting the siphon into a detergent solution bottle, route
the tube so asto keepit from inadvertently contacting the hot
muffler.
2. Preparedetergent solution as required by job.
3. Make sure detergent shut-off valve on cleaningtank is in
"Off" position.
4. If using cleaningtank, pour detergent into cleaningtank.
NOTICE The cleaningtank holds two gallons.
NOTICE Cleaningtank damagemay occur if not drained
prior to removing handle.
5. Rotate PrecisionSprayTM Selector to a low pressure
position, asdescribed in the PrecisionSprayTM Selector
instuction sheet.
NOTICE Detergentcannot be applied with the
PrecisionSprayTM Selector in a high pressure position.
6. Make sure garden hoseis connectedto water inlet.
Checkthat high pressure hoseis connected to spray gun
and pump. Turn on water.
NOTICE You must attach all hoses before you start the
engine.
• Starting the engine without all the hosesconnected andwithout
the water turned ONwill damagethe pump.
• Damageto equipment resulting from failure to follow this
instruction will void warranty.
7. Start enginefollowing instructions How to Start Your
Pressure Washer.
13

8A.Ifusingcleaningtank,rotatedetergentshut-offvalveon
cleaningtankto"On"position(A).
NOTICE If using detergent siphoning hose, make sure
detergent shut-off valveon cleaningtank is in the "Off"
position.
8B. If using detergent siphoning hose, placesmall filter end
of detergentsiphoning tube into detergent container.
NOTICE Contactwith the hot muffler candamagedetergent
siphoning tube.
• Wheninsertingthesiphonintoa detergentsolutionbottle,route
thetubesoasto keepit from inadvertentlycontactingthehot
muffler.
NOTICE Make surethe filter is fully submerged in detergent
while applying detergent.
9. Apply detergent to a dry surface, starting at lower
portion of areato be washedand work upward, using
long, even,overlapping strokes.
10. Allow detergent to "soakin" for 3-5 minutes before
washing and rinsing. Reapplyas neededto prevent
surfacefrom drying. DONOTallow detergentto dry on
(prevents streaking).
IMPORTANT:When using the detergent siphoning hose, you
must flush the detergent siphoning system after eachuse by
placing the filter into a bucketof cleanwater, then runthe
pressure washer in low pressure for 1-2 minutes.
PressureWasherRinsing
Afterdetergentisapplied,scourthesurfaceandrinseitclean
asfollows:
1. If using cleaningtank, rotate detergent shut-off valve on
cleaningtank to "Off" position.
2. Rotate PrecisionSprayTM Selector to a high pressure
position, asdescribed in the PrecisionSprayTM Selector
instruction sheet.
3. Keep spray gun a safe distance from spray surface.
_i, WARNIN6 Kickback from spray gun can cause you to
fall.
• Operatepressure washer from a stable surface.
• Beextremely careful if you must usethe pressure washer from
a ladder,scaffolding, or any other similar location.
• Firmly grasp spray gun with both hands when using high
pressure spray to avoid injury when spray gun kicks back.
4. Apply a high pressure spray to a small areaand then
checkthe surfacefor damage.If no damage,proceedto
step 5.
5. Start at top of areato be rinsed, working down with
sameoverlapping strokes usedfor cleaning.
Cleaning Detergent Siphoning Tube
If you usedthe detergent siphoning tube, you must flush it
with cleanwater beforestopping the engine.
1. Placedetergent siphoning tube/filter in a bucketfull of
cleanwater.
2. RotatePrecisionSprayTM Selectorto a low pressure
position, as described in the PrecisionSprayTM Selector
instruction sheet.
3. Flushfor 1-2 minutes.
4. Shut off engine following instructions How to Stop
Pressure Washerand turn off water supply.
5. ALWAYSpoint spray gun in a safe direction push red
button and squeezespray gun trigger to releaseretained
high water pressure.
NOTICE Spray gun traps high water pressure,evenwhen
engine is stopped and water is disconnected.
_i, WARNIN6 The high pressure stream of water that
this equipment produces can cut through skin
and its underlying tissues, leading to serious
injury and possible amputation.
Spray gun traps high water pressure,evenwhen engine is
stopped and water is disconnected, which can cause
injury.
• Keephighpressurehoseconnectedto pumpandspraygun
whilesystemispressurized.
• ALWAYSpointspraygunin safedirection,pressredbutton
andsqueezesprayguntriggerto releasehighpressure,every
timeyoustopengine.
Automatic Cool Down System (Thermal Relief)
If you run the engine on your pressure washer for
3-5 minutes without pressing the trigger on the spray gun,
circulating water in the pump can reachtemperatures above
125°F.The systemengagesto cool the pump by discharging
the warmwater ontothe ground.
14

ENGINETECHNICALINFORMATION
This is a single cylinder, overheadvalve (OHV), air cooled
engine. It is a low emissions engine.
In the State of California, Model 120000 enginesare certified
by the California Air Resources Boardto meet emissions
standardsfor 125 hours. Such certification does not grant
the purchaser, owner or operator of this engine any
additional warranties with respectto the performanceor
operational life of this engine.Theengine is warranted solely
according to the product and emissions warranties stated
elsewherein this manual.
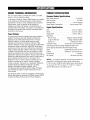
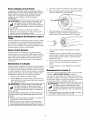
Power Ratings
Thegross power rating for individual gas enginemodels is
labeled in accordancewith SAE(Society of Automotive
Engineers)codeJ1940 (Small Engine Power & Torque
Rating Procedure), and rating performance has been
obtained and corrected in accordancewith SAEJ1995
(Revision 2002-05). Torquevalues are derived at 3060 RPM;
horsepower values are derived at 3600 RPIVI.Actual gross
engine power will be lower and is affected by, among other
things, ambientoperating conditions and engine-to-engine
variability. Givenboth the wide arrayof products onwhich
enginesare placed andthe variety of environmental issues
applicableto operatingthe equipment,the gas engine will not
developthe ratedgross power when used in a given pieceof
power equipment (actual "on-site"or net power). This
difference is due to a variety of factors including, but not
limited to, accessories(air cleaner, exhaust, charging,
cooling, carburetor, fuel pump, etc.), application limitations,
ambient operating conditions (temperature, humidity,
altitude), and engine-to-enginevariability. Dueto
manufacturing and capacity limitations, Briggs & Stratton
may substitute an engine of higher ratedpower for this
Seriesengine.
This pressurewasher is rated in accordanceto the Pressure
Washer ManufacturersAssociation (PWIVIA)standard PW101
(Testing and Rating Performanceof PressureWashers).
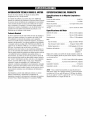
PRODUCTSPECIFICATIONS
Pressure Washer Specifications
Max Outlet Pressure ....................... 3,100 PSI
Max Flow Rate............................. 2.5 GPM
DetergentMix ........................ Use asdirected
Water SupplyTemperature .......... Not to exceed100°F
Engine Specifications
Bore ................................ 2.672 in. (68mm)
Stroke .............................. 2.204 in. (56mm)
Displacement ........................ 12.48in. (206cc)
SparkPlug
ResistorType:............... Briggs & Stratton 491055
Long Life Platinum: ............ Briggs & Stratton 5066
SetGapTo: ...................... 0.030inch (0.76mm)
ArmatureAir Gap:........... 0.010-0.014in.(0.25-0.36mm)
Valveclearancewithvalvespringsinstalledandpiston1/4in.
(6 mm)pasttopdeadcenter(checkwhenengineiscold).
Intake.................... 0.004-0.006in.(0.10-0.15mm)
Exhaust .................. 0.009-0.011in.(0.23-0.28mm)
FuelCapacity............................... 1.6Quarts
0il Capacity........................ 20 Ounces(0.6 liter)
NOTICE For practical operation, the engine load should not
exceed85% of ratedpower. Enginepower will decrease
3-1/2% for each1,000 feet(300 meters) above sealeveland
1% for each 10° F(5.6° C) above77° F(25° C).It should
operatesatisfactorily at an angle up to 15°.
15

OWNER'SRESPONSIBILITIES
Follow the hourly or calendarintervals, whichever occurs
first. More frequent service is required when operating in
adverseconditions noted below.
• Changeengine oil
• Check/clean water inletscreen'
• Checkhigh pressure hose
• Checkdetergentsiphoning hoses/tank
• Checkspray gun and assembly for leaks
• Cleandebris
• Checkengineoil level
:iI:iI:iI:iI:iI:iI:iI:iI:iI:iI:iI:iI:iI:iI:iI:iI:iI:iI:iI:iI
• Service engineair cleaner2
• Changeengine oil2
• Inspect muffler and spark arrester
• Service spark plug
• Cleancooling systeW
Clean if clogged. Replace if perforated or torn.
2Service more often under dirty or dusty conditions.
General Recommendations
Regularmaintenancewill improve the performanceand
extendthe life of the pressurewasher. Seeany Searsor
other qualified service dealerfor service.
Thepressure washer warranty does not coveritems that
havebeensubjected to operator abuseor negligence.To
receivefull valuefrom the warranty, the operator must
maintain pressurewasher as instructed in this manual
including properstorage asdetailed in Storage.
Someadjustments will needto be made periodically to
properly maintainyour pressurewasher.
All service and adjustments should be madeat least once
eachseason.Follow the requirementsin the Maintenance
Schedulechart above.
NOTICE Oncea yearyou should clean or replacethe spark
plug and replacethe air filter. A new spark plug and clean air
filter assure proper fuel-air mixture and helpyour engine run
better and last longer.
Pump Oil
DONOTattempt anyoil maintenanceon this pump. The
pump is pre-lubricated and sealedfrom the factory, requiring
no additional maintenancefor the life of the pump.
Emissions Control
Maintenance,replacement,or repair ofthe emissions
controldevicesand systemsmay be performedby any non-
roadenginerepair establishmentor individual. However,
to obtain "no charge" emissions control service, the work
must be performed by a factory authorizeddealer. Seethe
Emissions Warranty.
BeforeEachUse
1. Checkengine oil level.
2. Cleandebris.
3. Checkdetergent siphoning hoses/cleaning tank for
damage.
4. Checkwater inlet screenfor damage.
5. Checkhigh pressure hose for leaks.
6. Checkspray gun for leaks.
7. Purge pump of air and contaminants.
PRESSUREWASHERMAINTENANCE
Clean Debris
Daily or before use, cleanaccumulateddebris from pressure
washer. Keeplinkage,spring and controls clean. Keeparea
around and behind muffler free from any combustible debris.
Inspect cooling air slots and openings on the pressure
washer. Theseopenings must bekept clean and
unobstructed.
Pressurewasher parts should be kept cleanto reducethe
risk of overheating and ignition of accumulated debris.
• Usea damp cloth to wipe exterior surfaces clean.
NOTICE Improper treatment of pressurewasher can
damageit and shorten its life.
• DONOTinsertanyobjectsthroughcoolingslots.
• Usea soft bristle brush to loosencaked on dirt, oil, etc.
• Usea vacuumcleanerto pick up loosedirt anddebris.
Check and Clean Inlet Screen
Examinegarden hoseinlet screen. Cleanif it is clogged or
replaceif it is torn.
16

Check High Pressure Hose
High pressure hosescan developleaks from wear, kinking,
or abuse. Inspect hosebefore eachuse. Checkfor cuts,
leaks,abrasions, bulging of cover,or damageor movement
of couplings. If any of these conditions exist, replacehose
immediately.
_k WARNING The high pressure stream of water that
this equipment produces cancut through skin
and its underlying tissues, leadingto serious
injury and possible amputation.
• NEVERrepairhighpressurehose.Replaceit.
• ReplacementhoseratingMUSTexceedmaximumpressure
ratingof unit.
Check Detergent Siphoning Hoses/Cleaning Tank
Examinethe cleaningtank and detergent siphoning hoses
and clean if clogged. The hoseshould fit tightly on the
barbed fitting of the pump anddetergent shut-off valve.
Examinethe hoses for leaks or tears. Replacethe tank or
hoses if either is damaged.
Check Spray Gun
Examinethe hose connection to the spray gun and make
sure it is secure.Test thetrigger by pressing the red button
and making sure the trigger "springs back" into placewhen
you releaseit. You should not be able to press the trigger
without pressing the red button. Replacespray gun
immediately if it fails any of these tests.
Nozzle Maintenance
A pulsing sensationfelt while squeezingthe spray gun trigger
may be causedby excessivepump pressure.Theprincipal
causeof excessivepump pressure is a nozzleclogged or
restricted with foreign materials, such asdirt, etc. To correct
the problem, immediately cleanthe nozzlefollowing these
instructions:
1. Shut off engine and turn off water supply.
2. ALWAYSpoint spray gun in a safe direction, press red
button and squeezespray gun trigger to releaseretained
high water pressure.
_k WARNING The high pressure stream of water that
this equipment produces cancut through skin
and its underlying tissues, leadingto serious
injury and possible amputation.
Spraygun traps high water pressure,evenwhen engine is
stopped and water is disconnected, which can cause
injury.
• Keephighpressurehoseconnectedto pumpandspraygun
whilesystemispressurized.
• ALWAYSpointsprayguninsafedirection,pressredbutton
andsqueezesprayguntriggerto releasehighpressure,every
timeyoustopengine.
3. Disconnect PrecisionSprayTM Selector from spray gun.
4. Usea small paperclip to free any foreign material
clogging or restricting the high pressure nozzles(A).
5. Using a garden hose, removeadditional debris by back
flushing water through PrecisionSprayTM Selector. Back
flush between30 to 60 seconds.
6. ReconnectPrecisionSprai MSelectorto spray gun.
7. Makesure garden hoseis connectedto water inlet.
Checkthat high pressure hose is connectedto spray gun
and pump. Turn on water.
8. Start engine following instructions How to Start Your
Pressure Washer.
9. Test pressure washer byoperating with eachnozzle
selection.
O-Ring Maintenance
Purchasean O-Ring RepairKit atyour local Searsor by
calling 1-800-4-1VIY-HOIVIE(469-4663) or online at
www.sears.com. It is not includedwith the pressure washer.
This kit includes replacemento-rings, rubber washer and
water inlet filter. Referto the instruction sheet provided in the
kit to serviceyour unit's o-rings.
_k WARNING The high pressure stream of water that
this equipment produces can cut through skin
and its underlying tissues, leading to serious
injury and possible amputation.
• NEVERrepairleakingconnectionswithsealantofanykind.
Replaceo-ringor seal.
17

ENGINEMAINTENANCE
_i, WARNING Unintentionalsparking can result in fire or
_¢ electric shock.
WHENADJUSTINGORMAKINGREPAIRSTOYOURPRESSURE
WASHER
• Disconnectthesparkplugwirefromthesparkplugandplace
thewirewhereit cannotcontactsparkplug.
WHENTESTINGFORENGINESPARK
• Useapprovedsparkplugtester.
• DONOTcheckfor sparkwith sparkplugremoved.
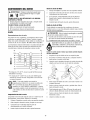
Oil
OilRecommendations
We recommendthe useof Briggs & Stratton Warranty
Certified oils for best performance. Otherhigh-quality
detergent oils are acceptableif classified for serviceSF, SG,
SH, SJ or higher. DONOTuse specialadditives.
Outdoor temperatures determine the proper oil viscosity for
the engine. Usethe chart to select the best viscosity for the
outdoor temperature rangeexpected.
oF
104 -- _ ,
86
6850@_mw_
32 o
14
-4
-22
oC
• 40
__ 30
__ 20
10
-10
-20
-30
* Below40°F(4°C)theuseofSAE30 will resultin hardstarting.
** Above80°F(27°C)the useof 10W30maycauseincreasedoil
consumption.Oheckoil levelmorefrequently.
O OTICE Synthetic oil meeting ILSACGF-2,API
certification mark and API servicesymbol with
"SJ/CF ENERGYCONSERVING"or higher, is an
acceptableoil at all temperatures. Useof synthetic oil
does not alter requiredoil change intervals.
CheckingOilLevel
Oil level should be checked prior to eachuseor at least every
8 hours of operation. Keepoil levelmaintained.
1. Make sure pressure washer is on a levelsurface.
2. Removeoil fill cap and wipe cleanwith cloth.
3. Verify oil is at the point of overflowing at oil fill opening.
Replaceand tighten oil fill cap.
AddingEngineOil
1. Makesure pressurewasher is on a levelsurface.
2. Checkoil levelasdescribed in CheckingOil Level
3. If needed,slowly pour oil into oil fill opening to the point
of overflowing at oil fill cap.
4. Replaceand tighten oil fill cap.
ChangingEngineOil
If you are using your pressure washer under extremely dirty
or dusty conditions, or in extremely hot weather,changeoil
more often.
_i, CAUTION Avoid prolonged or repeatedskin contact
with usedmotor oil.
• Usedmotoroil hasbeenshownto causeskincancerin certain
laboratoryanimals.
• Thoroughlywashexposedareaswith soapandwater.
KEEPOUTOFREACHOFCHILDREN.DON'T
POLLUTE.CONSERVERESOURCES.RETURN
USEDOILTOCOLLECTIONCENTERS.
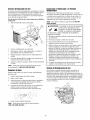
Changeoilwhileengineisstillwarmfromrunning,asfollows:
Makesure unit is on a levelsurface..
2.
.
Disconnectthe spark plug wire from the spark plug and
placethe wire where it cannot contact spark plug.
Cleanareaaround oil drain plug (A). Theoil drain plug is
located at baseof engine, opposite carburetor.
.
5.
6.
7.
8.
Removeoil drain plug and drain oil completely into a
suitable container.
Reinstalloil drain plug and tighten securely. Removeoil
fill cap.
Slowly pour oil (about 20 oz.) into oil fill opening (B) to
the point of overflowing (6) at oil fill cap.
Reinstalloil fill cap. Fingertighten cap securely.
Wipe up any spilled oil.
18

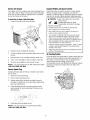
Service Air Cleaner
Your enginewill not run properly and may be damaged ifyou
run it with a dirty air cleaner.Service more often if operating
under dirty or dusty conditions. Replacementsare available
at your local Searsservicecenter.
Toservicetheair cleaner,followthesesteps:
1. Loosen screw (A) and tilt cover (B) down.
2. Carefully removecartridge (6) assembly.
3. To cleancartridge, gently tap pleatedpaper side on a flat
surface.
4. Reinstall cleanor new cartridge assembly insidecover.
5. Insert cover's tabs (D) into slots in bottom of base(E).
6. Tilt cover up and tighten screw securely to base.
NOTICE You can purchasenew air filter elementsby calling
1-800-4-MY-HOME(469-4663).
Service Spark Plug
Changingthe spark plug will helpyour engine to start easier
and run better.
1. Cleanarea around spark plug.
2. Removeand inspect spark plug.
3. Replacespark plug if electrodesare pitted, burned or
porcelain is cracked. Usethe recommendedreplacement
plug. See Specifications.
4. Checkelectrode gap with wire feeler gaugeand reset
spark plug gap to recommendedgap if necessary (see
Specifications).
Inspect Muffler and Spark Arrester
Inspectthe muffler for cracks,corrosion,or other damage.
Removethespark arrester,if equipped,and inspectfor
damageor carbonblockage.If replacementparts are required,
makesureto useonly original equipment replacementparts.
_i, WARNING Contact with muffler area can result in
serious burns.
Exhaust heat/gases can ignite
combustibles, structures or damage
fuel tank causing a fire.
• DO NOTtouch hot parts and AVOIDhot exhaust gases.
• Allow equipmentto cool beforetouching.
• Keepat least5 feet (152 cm) of clearanceon all sides of
pressure washer including overhead.
• It isa violation of California Public ResourceCode,Section
4442, to use or operate theengine on any forest-covered,
brush-covered, or grass-covered land unlessthe exhaust
system is equippedwith a spark arrester,as defined in Section
4442, maintained ineffective working order. Otherstates or
federaljurisdictions may havesimilar laws.
Contactthe original equipment manufacturer,retailer, or dealer
to obtain a sparkarrester designed for the exhaustsystem
installed onthis engine.
• Replacementparts must bethe same and installed in the same
position as the original parts.
Air Cooling System
Overtime debris may accumulate in cylinder cooling fins and
cannot be observed without partial engine disassembly. For
this reason,we recommendyou havean qualified Sears
servicedealer cleanthe cooling system (F) per
recommendedintervals (see MaintenanceSchedule). Equally
important is to keeptop of enginefree from debris. See
CleanDebris.
5. Install spark plug and tighten firmly.
NOTICE You can purchasea newspark plug by calling
1-800-4-MY-H01VIE(469-4663).
19

AFTEREACHUSE
Water should not remain in the unit for long periods of time.
Sedimentsor minerals candeposit on pump parts and
"freeze" pump action. Followthese proceduresafter every
use:
1. Flushdetergent system by turning its detergent shut-off
valve to "Off" position and run pressure washer with
PrecisionSprayTM Selector in a low pressure position.
Flushfor one to two minutes.
2. Shut off engine,turn off water supply, point gun in a
safe direction, press red button and squeezetrigger to
relievetrapped pressure and let engine cool.
_i, WARNING The high pressure stream of water that
this equipment produces cancut through skin
and its underlying tissues, leadingto serious
injury and possible amputation.
Spraygun traps high water pressure,evenwhen engine is
stopped and water is disconnected, which can cause
injury.
• Keephighpressurehoseconnectedto pumpandspraygun
whilesystemispressurized.
• ALWAYSpointsprayguninsafedirection,pressredbutton
andsqueezesprayguntriggerto releasehighpressure,every
timeyoustopengine.
3. Disconnect hosefrom spray gun and high pressure
outlet on pump. Drainwater from hose, gun, and spray
tip extension.Usea rag to wipe off the hose.
4. Empty pump of all pumped liquids by pulling recoil
handle about 6 times. This should remove most liquid in
pump.
5. Coil high pressure hoseon hook provided on handle.
6. Store unit in a clean,dry area.
7. If storing for more than 30 days seeLong TermStorage
on next page.
_i, WARNING Fueland its vapors are extremely
flammable and explosive.
Fireor explosion can causesevere burns
or death.
WHENSTORINGFUELOREQUIPMENTWITHFUELINTANK
• Storeawayfrom furnaces,stoves,waterheaters,clothes
dryers,or otherappliancesthathavepilotlightor other
ignitionsourcebecausetheycanignitefuelvapors.
2O
Page is loading ...
Page is loading ...
Page is loading ...
Page is loading ...
Page is loading ...
Page is loading ...
Page is loading ...
Page is loading ...
Page is loading ...
Page is loading ...
Page is loading ...
Page is loading ...
Page is loading ...
Page is loading ...
Page is loading ...
Page is loading ...
Page is loading ...
Page is loading ...
Page is loading ...
Page is loading ...
Page is loading ...
Page is loading ...
Page is loading ...
Page is loading ...
Page is loading ...
Page is loading ...
Page is loading ...
Page is loading ...
Page is loading ...
Page is loading ...
Page is loading ...
Page is loading ...
Page is loading ...
Page is loading ...
Page is loading ...
Page is loading ...
-
 1
1
-
 2
2
-
 3
3
-
 4
4
-
 5
5
-
 6
6
-
 7
7
-
 8
8
-
 9
9
-
 10
10
-
 11
11
-
 12
12
-
 13
13
-
 14
14
-
 15
15
-
 16
16
-
 17
17
-
 18
18
-
 19
19
-
 20
20
-
 21
21
-
 22
22
-
 23
23
-
 24
24
-
 25
25
-
 26
26
-
 27
27
-
 28
28
-
 29
29
-
 30
30
-
 31
31
-
 32
32
-
 33
33
-
 34
34
-
 35
35
-
 36
36
-
 37
37
-
 38
38
-
 39
39
-
 40
40
-
 41
41
-
 42
42
-
 43
43
-
 44
44
-
 45
45
-
 46
46
-
 47
47
-
 48
48
-
 49
49
-
 50
50
-
 51
51
-
 52
52
-
 53
53
-
 54
54
-
 55
55
-
 56
56


Snapper 580752641 Owner's manual
- Category
- High-pressure cleaners
- Type
- Owner's manual
Ask a question and I''ll find the answer in the document
Finding information in a document is now easier with AI
in other languages
Related papers
Other documents
-
Craftsman 580.752242 Owner's manual
-
Craftsman 580.752192 Owner's manual
-
-
-
-
-
-
-
-
Briggs & Stratton 020477-00 Owner's manual