Marantz PM7005 Owner's manual
- Category
- Audio amplifiers
- Type
- Owner's manual
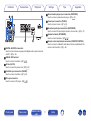
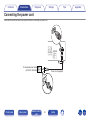
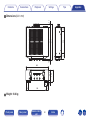
The Marantz PM7005 lets you enjoy top-quality audio playback from its built-in D/A converter, supporting DSD files and PCM signals up to 192 kHz/24 bit via USB connection. With remote control compatibility for Marantz CD players and network audio players, you can control multiple devices with ease. Experience clear and precise sound with its CD direct buffer amplifier, large capacity block condenser, and all-discrete current-feedback amplifier. Connect headphones to the dedicated jack and immerse yourself in your favorite tunes without disturbing others.
The Marantz PM7005 lets you enjoy top-quality audio playback from its built-in D/A converter, supporting DSD files and PCM signals up to 192 kHz/24 bit via USB connection. With remote control compatibility for Marantz CD players and network audio players, you can control multiple devices with ease. Experience clear and precise sound with its CD direct buffer amplifier, large capacity block condenser, and all-discrete current-feedback amplifier. Connect headphones to the dedicated jack and immerse yourself in your favorite tunes without disturbing others.


-
 1
1
-
 2
2
-
 3
3
-
 4
4
-
 5
5
-
 6
6
-
 7
7
-
 8
8
-
 9
9
-
 10
10
-
 11
11
-
 12
12
-
 13
13
-
 14
14
-
 15
15
-
 16
16
-
 17
17
-
 18
18
-
 19
19
-
 20
20
-
 21
21
-
 22
22
-
 23
23
-
 24
24
-
 25
25
-
 26
26
-
 27
27
-
 28
28
-
 29
29
-
 30
30
-
 31
31
-
 32
32
-
 33
33
-
 34
34
-
 35
35
-
 36
36
-
 37
37
-
 38
38
-
 39
39
-
 40
40
-
 41
41
-
 42
42
-
 43
43
-
 44
44
-
 45
45
-
 46
46
-
 47
47
-
 48
48
-
 49
49
-
 50
50
-
 51
51
-
 52
52


Marantz PM7005 Owner's manual
- Category
- Audio amplifiers
- Type
- Owner's manual
The Marantz PM7005 lets you enjoy top-quality audio playback from its built-in D/A converter, supporting DSD files and PCM signals up to 192 kHz/24 bit via USB connection. With remote control compatibility for Marantz CD players and network audio players, you can control multiple devices with ease. Experience clear and precise sound with its CD direct buffer amplifier, large capacity block condenser, and all-discrete current-feedback amplifier. Connect headphones to the dedicated jack and immerse yourself in your favorite tunes without disturbing others.
Ask a question and I''ll find the answer in the document
Finding information in a document is now easier with AI
Related papers
-
Marantz PM8006 User guide
-
Marantz ND8006 User manual
-
Marantz NA8005 Owner's manual
-
Marantz SR6011 Owner's manual
-
Marantz SR7010 Owner's manual
-
-
Marantz SA8005 Owner's manual
-
Marantz Network SACD Player SACD 30n User guide
-
Marantz SR5015 AV Surround Receiver Owner's manual
-
Marantz SR7012 User guide
Other documents
-
Denon PMA-800NE Owner's manual
-
-
Denon AVR-X4100W Owner's manual
-
-
Denon AVR-X5200W User guide
-
-
Denon PMA-150H Owner's manual
-
Denon AVR-X3500H Owner's manual
-
Denon AVR-X4500H Owner's manual
-
Denon AVR-X6300H Owner's manual