Craftsman 358797930 Owner's manual
- Category
- Air blowers/dryers
- Type
- Owner's manual

!...........
: IMPORTANT MANUAL Do Not 1'hrow=:Away
operator,s
manual
MODEL NO.
358.797930-22.2cc
358.797970-22,2cc
358.796921-28.0cc
358.796982-28.0cc
_I_WARNING:
Read the Operator's Ma_al
and follow a!l Warnings and
Safety Instructions. Failure to
do so can result in serious
injury.
Always Wear Eye Protection During Operation
SEAR6/ CRRFTSM RN®
GAS POWER BLOWER
2 Cycle Engine
Fuel Mix 16:1
*.Assembly * Maintenance
* Operation * Repair Parts
i ull
(DSears, Roebuck and Co., 1988
530-067355-2-23888

ONE YEAR LIMITED WARRANTY ON CRAFTSMAN POWER BLOWER " '
ForOne Yearfrom dat_ ofpurchase, when this Power Blower is maintained, lubricated, and tuned up according to theoperating
and maintenance instructions in theoperator's manual, Sears will repair free of charge any defect in material or workma,_hip.
This warranty excludes blower pipes, spark plug, andair cleaner; which areexpendable partsand become worn during normal use.
If thisPower Blower is used for commercial or rental purposes, this warranty applies for only90 days from thedate of purchase.
WARRANTY SERVICE IS AVAILABLEBYCONTACTING THE NEARF__t'SEARS SF.,RVICECENTER/DEP_NT
IN THE UNITED STATES. This warranty applies only while this product is in use in the United States.
This warranty gives you specific legal rights, and you may also have other rights which vary from stateto state.
SEARS, ROEBUCK AND CO./DEPT. 698!731A/SEARS TOWER CHICACK3,II. 60684
TABLE OF CONTENTS
WARNINGS AND SAFETY INSTRUCTIONS ......... 3
KNOW YOUR BLOWER ......................... 4
ASSEMBLY ..... "...... . ........................... 4
ENGINE INFORMATION ........................ 5
A;Fue!ing Your Engine ......................... 5
B.Pre43peration Checks ,, .................... 6
C, Starting Instructions ........................ 6
D.Carburetor Adjustments ........................ 7
USING YOUR TOOL AS A BLOWER ............ .:., 9
A, Operating Instructions ...................... 9
: ' B, Operating Tips ........................... 9
GENERAL MAINTENANCE ..................... 10
A. Air Filter ................................ t0
B, Fuel Tank ............................... 10
C. Starter Rope ............................ 10
D. Storage ............................... 11
E, Trouble Shooting Chart .................... 12
ACCESSORIES ............................. 12
REPAIR PARTS LIST ....................... 13-17
QUICK REFERENCE PAGE .................. 19
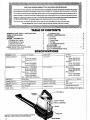
SPECIFICATIONS
E'_IGINE TYPE: ......... MUFFLER:
DISPLACEMEN]2 VELOCITY
1 2 Cycle A!,r,Cooled
22.2cc.:
M0_e1358797930
Model 358.797970
280cc-
Model 358.796982
Model 358,796921
............Operating -- 7500-8200-'
AIR VOLUME:
ENGINE RPM:
Lo Tone
135 mph-
Model 358.797930
Model 358.797970
t50 mph-
Model 358.796982
.Model 358:796921
320cu.ft.tmin,-
Model 358797930
Model 358.797970
Operating -- 7300-7900
Model 358:796982
Model 358.796921
Idle_3800-4600-Atl Models
• Model 358.797930
Model 358,797970
340 cu:ft,/min.-
Model 358.796982
Model 358,796921
IGNI_TION: : .........
CARBURETOR:
ONIOFF SWITCH:
STARTER:
FUEL TANK:
Solid State ......
All Position-Diaphragm
Positive Toggle Switch
Auto Rewind :
13.5 fl. oz.
SPARK PLUG: .......
SPARK PLUG GAP:
MODULE"AIR GAP:
LUBRICATION
CJ-8 (Cat. No. 71-36403)
.025"
.010"-.014"
Gasoline/Oil Mixture-
See "Fueling Your,,E,,ngine"
STARTER
HANDLE
SWITCH
/
MANUFACTURED UNDER THE FOLLOWING U.S. PATENT
4,674,146; U,S.AND FOREIGN PATENTS PENDING.
. •
HANDLE

II I IIIIII I[IIL fill I IIII
WARNINGS AND SAFETY INSTRUCTIONS
I llllIIIIIIIIIllllI I II IIIIIll
Failure to follow all Safety Rules end Precautions can result in serious injury.
A. KNOW YOUR UNIT
1. Read your Operator's Manual carefully until you
completely understandand canfollowall wamings
and safety Instructions before operating the tool.
2. Restrict your tool to users who understand and
follow all warnings and safety Instructions in this
manual.
B. PLAN AHEAD
1. Always wear eye protection to prevent
rocks or debris from being blown or
ricochetingintoeyesand face whichcan
resultin blindness and/or other serious
injury.
2. Always wear a respirator or tacemask when
working with the blower in dusty environments.
3. Dress safely in long pants. Do not wear loose
clothing,jewelry,shortpantsorsandals;orgobarefoot.
4. Do not operate the tool when you are tired, ill,or
upset; or ifyou areunder the influence of alcohol,
drugs, or medication.
5. Keep children, bystanders andanimais away from
the workarea, a minimum of30 feet when starting
or operating theengine.
6. Inspect thearea beforestartingthe tool. Removeall
debris and hardorsharpobjects such asrocks, glass,
wire, etc. that can ricochet, be thrown or otherwise
cause injury or damage during operation.
C. HANDLE FUEL WITH CAUTION
1. Eliminate all sources of sparks or flame (including
smoking,open flames,or workthatcan causesparks)
intheareas wherefuel ismixed,poured,or stored_
2. Mix and pour fuel in an outdoor area; store fuel in
a cool, dry, well-ventitatedplece; and use an
approved, marked container for allfuel purposes.
3. Do not smoke while handling fuel or while
operating the unit.
4. Donot fillthefueltankwhiletheengine isrunning.
5, Wipe up all spills before starting the engine.
6. Moveat least10feet awayfrom fuel andfueling site
before starting the engine,
D, OPERATE YOUR UNIT SAFELY
1. Stop the engine before opening the vacuum inlet
door. The engine mustbe stopped and the impeller
blades no longer turning to avoid serious injury
from the rotatingblades.
2. Inspect the entire tool before each use for worn,
loose,missing ordamagedparts.Donotuseuntilthe
toolisinproperworkingorder.
3. Keep the outside surfaces free of oil and fuel.
4. Never startor runtheengine inside a closed room
or building. Breathingexhaustfumescan kill.
5. Do not set the tool on any surface except a clean,
hardarea tostartthe engine or while the engine is
running. Debrissuchasgravel,sand,dust,grass,etc.
could be pickedup bythe air intake and thrownout
throughthedischargeopening,damagingthetool,pro-
perty or causing seriousinjuryto bystandersor the
operator.
6. Avoid dangerous environments. Do not use in
unventilatedareasorwhereexplosivevaporsorcarbon
monoxidebuildupcouldbepresent.
7. Do not overreech orusefromunstablesurfacessuch
as ladders,trees,steep slopes,rooftops, etc.Keepfirm
footingand balanceat alltimes.
8. Neverplace objectsinsidetheblowertubes;always
direct the blowing debris away from people,
animals, glass, and solid objects such as trees,
automobiles,walls,etc.Theforceofaircan causerocks,
dirt, orsticks tobe thrown or toricochet which can hurt
peopleoranimals, breakglassor cause otherdamage.
9. Never place any object inthe air intake opening as
thiscouldrestrictproper airflow andcausedamage to
the tool.
10. Never run the engine without the proper equip-
mentattached. When usedasa blower,alwaysinstall
a blowertube.
11. Never use for spreading or misting chemicals, fer-
tilizers or any other substances which may con-
tain toxic material.
12. Use only for jobs explained in this manual.
E. MAINTAIN YOUR UNIT PROPERLY
1. Have all maintenance otherthanthe recommended
procedures described in the Operator's Manual
pe=formed by your Sears Service Center.
2. Disconnect spark plug before performing
maintenance exceptforcarburetoradjustment.
3. Use only genuine replacement parts as recom-
mended bySeam toavoidcreating a hazard and/or
voiding your warranty.
4. Check air intake openings and blower tubes fre-
quently, always with the engine stopped and
spark plug disconnected. Keep vents and tubes
free of debris which can accumulate and restrict
proper air flow.
5. Empty the fuel tank before storing the tool. Use up
fuel left inthe carburetor bystarting the engine and
letting the engine run until it stops.
6. Do not usaanyaccessory orattachment otherthan
those recommended by Sears for use with your
tool.
7. Do not store the tool or fuel ina closed area where
fuel vaporscanreach sparksor an openflame from
hotwater heaters, electric motorsor switches, fur-
Races, etc.
8. Store in a dry area out ofthe reach of children.
SPECIAL NOTICE ......... ....... _
Forusers on U.S.Forest Landand in thestates of California, Maine; _O_on and_shington. AllU.S.ForestLandand
thestatesofCalifornia(PublicResourcesCodes4442 and4443), Oregonand Washingtonrequire,bylaw,thatcertaininter-
nalcombustionenginasoperatedonforest, brushand/orgrass-coveredareasbeequippedwitha sparkarrestor,maintained
ineffectiveworking order,ortheenginebe constructed,equippedand maintained forthepreventionoffire.Checkwithyour
stateorlocalauthoritiesforregulationspertaining totheserequirements.Failuretofollow theserequirementsarea violation
ofthe law.This unit isnotfactory-equipped with aspark arrestor. Iftheseitemsarerequired inyour area,askyourdealer
to installPart#530-069207.
3
I
*i
I

ii i,, IIIM,,II i iiiiii i i
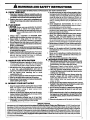
KNOW YOUR BLOWER
iii iii iiii i
A. INTRODUCTION
Your blower is a high performance product designed for
tough jobs.
Special Features Include:
• Top handle for one-handed operation
• Direct Drive
• Vibration-Dampened Handle
• Weight - 11.5Ibs.
• Convenient Upright Storage
• Rear Assist Handle for vematile operation
• AvailableGutter Attachment Kit #71-79992(optional
accessory)
• For Model 358.796982 and 358.796921, Vacuum
capability is included (See accompanying
manual).
KEY NO.
I
5 3
3
4
4
B, UNPACKING INSTRUCTIONS
1. Remove contents from the carton if you have notdone
so.
2. Check parts against the Carton Contents List.
3. Examine parts for damage. Do not use damaged parts.
4. Notify your Sears Store immediately ff apart is missing
or damaged.
NOTE: Itisnormal to hear the fuel filter rattle inan empty
fuel tank.
CARTON CONTENTS QTY.
Engine Assembly 1
Blower Tube 1
Nozzle Concentrator 1
(Models 358.797930,
358.796982 & 358.797970)
Nozzle Diffuser 1
(Model 358.796921)
8 oz. 2-cycle Engine Oil
Operator's Manual 1
(Not Shown) 1
1
MODEL 358.796921 SHOWN
111111111111111111111111111111] iiiiiiiiiiiiiiiiiiiiiiiiiiiii iii iiiiiiiiiiiiiii iii i iiiiiiiiiiiiii
ASSEMBLY
i 1111111111 11 i 11111111
A. PREPARATION
Your Operator's Manual has been developed to help
you assemble the unit and to understand its safe opera-
tion. It is important that you read your manual com-
pletely to become familiar with the tool before you begin
assembly.
1. READ YOUR OPERATOR'S MANUAL(S).
2; No tools are required to assemble Model No.
.........358.796921, A flathead screwdriver is required for
Model No. 358.797930, 358.797970, and
358.796982.
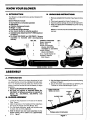
B. BLOWER ASSEMBLY
1. Locatethe two projections on the side of the Blower
Tube. Figure 1.
2. Align the grooves 0nthe Nozzle'_ith the _roie_tions
and push the Nozzle onto the Blower Tube.
3. Turnthe Nozzle clockwise _ until the parts snap
in place and are firmly tightened.
4..Slide the blower tube and nozzle assembly into the
engine housing until it bottoms out (approximately
2-1/2"). Figure 1.
5. Alignthe blowertube assemblySothe nozzle ispointing
as shown in Figure 1.
6. Secure the blower tube assembly by tightening the
T-handle or screw until hand-tight. Figure 1.
(TUBES SHOWN FOR
MODEL 358.796921 )
_TUBE
_HANDLE
OR
SCREW
NORMALANGLEOFDISCHARGE
Figure 1
i
r
i

III IIIIII I
ENGINE INFORMATION
I
J
1
A. FUELING YOUR ENGINE
1. FUEL SAFETY
a. Use only recommended fuel mixtures.
b. Mix and pour fuel outdoors and where there are
no sparks or flames.
c. Use a container approved for fuel.
d. Do not smoke or allow smoking near fuel or the
tool or while using the tool.
e. Wipe up all fuel spills before starting engine,
f. Move at least 10 feet away from fueling site
before starting engine.
.
h.
Stop engine before removing fuel cap.
Empty the fuel tank before storing the tool.
Use up fuel left in the carburetor by starting
the engine and letting the engine run until
it stops.
Store tool and fuel in an area where fuel
vapors cannot reach sparks or open flames
from water heaters, electric motors or swit-
ches, furnaces, etc.
2. FUEL MIXTURE
e Your toot is powered by a two-cycle engine
which requires a fuel mixture of regular
unleaded gasoline and a high quality engine oil
specially made for 2-cycte, air cooled engines.
The internal design ofthe 2-cycle engine requires
lubricationofmoving parts. Lubricationis provided
whenthe recommended mixture ofgasolineandoil
isused.
• Gasoline must be clean and fresh. Aftera short
periodoftime,gasolinewillchemicallybreak down
and form compounds thatcause hardstartingand
damage in 2-cycleengines.
• The correct measure of gasoline to oil is very
important. Toomuch oil in the mixture willfoul the
spark plug.
ICAUTION:I TOOlittle oilwill cause the engine to
overheat and seize,
• Always mix the fuel thoroughly in a container
sincegasolineand oildonotreadilycombine.Donot
mixgasolineand oildirectlyin thefuel tank.
3. USE THE FOLLOWING ONLY:
(16 parts gasoline to I part oil)
-p
4. DO NOT USE:
• BIA OIL (Boating Institute of America) --
-- Does not have proper additives for air-cooled,
2-cycleengines and can causeenginedamage.
• AUTOMOTIVE OIL-
- Does not have proper additives for 2-cycle
engines and cancause damage.
5. HOW TO MIX FUEL AND FILL TANK
a. Pour l/2ofthe regularunleadedgasolineto beused
intoan approved, marked container. Do not mix
gasoline and oil directly inthe fuel tank.
b. Add entire measure of engine oil.
c. Cover container tightly and shake for one minute.
d. Slowly remove fuel container cover.
e. Addremainder of gasoline.
f. Cover container tightly and shake again.
h. Slowlyremovethefuelcap.Referto"Specifications"
for fuel cap location.
i. Fillthetank usinga spoutor funnel.
j. Reinstallthe fuel cap securely.
, , 5
I
I
i

i ii i iiiiii
B. PRE-OPERATION CHECKS
iiii1!11111111
Before operating your unit, always:
1. ,_, CHECK OVER WARNINGS AND SAFETY
INSTRUCTIONS in this Operator's Manual. Make
certainyoucompletelyunderstandand followeachone.
2. ,,, CHECK THE AIR FILTER.
Clean the filter ifdirtybeforeoperating the tool. For
location,see the "Air Filter"section:
I II I I J IIIII1_1[ I IIIIII II I I
3. CHECK THE UNIT FOR LOOSE BOLTS, NUTS,
OR FITTINGS.
Tighten, repairor replace partsas necessary.Youwill
need a Phillipsscrewdriverand a slottedscrewdriver.
Useonlygenuinereplacementpartsas recommended
by Sears.
4. CHECK THE FUEL TANK.
Fill with a clean, fresh fuel mixture according to
instructionsinfuel mixturesection, thispage.
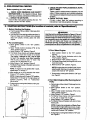
C. STARTING INSTRUCTIONS (For location of controls, refer to _Specifications._
1. Before Starting the Engine:
a. Fuelthe engine.Moveat least10feetawayfrom
the fueling site.
b, Hold the tool inthe starting position as shown in
Figure 2. Make sure the blower end is directed
away from people, animals, glass and solid
objects.
2. For a Cold Engine:
a. Move Ignition Switch to the "On" position.
Figure3.
b. Move Throttle Control clockwise_ to the
"Fast" position.Figure4.
c. MoveChoke to"ON" position. Figure5.
d. Pull Starter Rope sharply untilengine attempts
to run, but no more than 8 pulls on full choke.
The engine "attempts to run" may be hard
to hear. The operator must listen carefully.
After 8 pulis, proceed to step "e" even if the
engine has not attempted to run.
e. Move Choketo "half" position.Figure5.
f. PutlStarterRopesharptyuntilengineruns,butno
morethan 5 pulls.
NOTE: If engine has not started after 5 pulls,
repeat steps"a" through "f"
g. Allow engine to run for 5 seconds, then move
Choke to "Off" position.Figure5.
NOTE: IfenginedieswithChokeat"Off" position,
repeat steps"e" through"g." tfengine does not
operate properly, refer to "Carburetor
Adjustments."
h. Tostopengine,moveIgnitionSwitchto"Off" posi-
tion. Figure3.
STARTING F -_
POSITION
AWARNING
Hold the tool for starting as shown in Figure 2. Do not
set the tool on anysurface except a clean, hardarea to
start the engine or while the engine isrunning. Debris
such as gravel, sand, dust, grass, etc. could be picked
up by the air intake and thrown out through the
discharge opening, damaging the tool or property or
causing serious injury to bystanders or the operator.
3. For a Warm Engine:
ailMove Ignition Switch to the "On" position.
Figure3.
b. Move Throttle Control clockwise _ to the
"Fast" position.Figure4.
c. Move Choke to"Half" position. Figure5.
d. PullStarterRopesharplyuntilengineruns,butno
morethan 5 pulls.
e. MoveChoke to"Off" position.Figure5.
f.
NOTE: Ifenginedoesnotrunafter 5 pulls, itispro-
bably flooded.Waita few minutesand repeatpro-
cedure with Chokeat "Off" position.
Tostopengine,move Ignition Switch to"Off" posi-
tion. Figure3. '
4, For Awarm Engine (After Running Outof
Fuel;)
a. Refuelengine.Moveatleast10feetawayfromthe
fuelingsite.
b. Move Ignition Switch to the "On" position.
Figure3.
c. Move Throttle Control clockwise _ to the
"Fast" position. Figure4.
d. MoveChoketo "On" position. Figure5.
e. PullStarter Rope sharply until engine attempts
to run, but no more than 5 pulls.
f. MoveChoketo "Off" position. Figure5.
g. PullStarter Ropeuntilengine runs,butno more
than 5 pulls.
NOTE: Ifengine hasnotstarted,pull StarterRope
5 more pulls.Ifengine stilldoes notrun, it ispro-
bablyflooded. Waitafew rainutesandrepeatpro-
cedure withChoke at "Off" position.
h. Tostopengine,moveIgnitionSwitchto"Off" posi-
tion. Figure3.
6 Figure 2

IGNITION SWITCH
ON
OFF
THROTTLE CONTROL
Figure 3 Figure 4
IIII II I II I IIIIIlU IIII II
CHOKE KNOB
/ (HALF
/
/ POSITION)
OFF ]
Figure 5
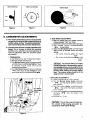
D. CARBURETOR ADJUSTMENTS
91) r Poor engine performance can be a result of other
causes such as dirty air filter, carbon build-up on
muffler outlets, etc. See "Trouble Shooting Chart"
before proceeding with carburetor adjustments.
• The'carburetor has been carefully adjusted at the
factow. Due to changes in altitude and operating
conditions,yourcarburetor may requireadjusting.To
make the adjustment follow the procedure below
very carefully,
1.PREPARATION
a.) Use fresh fuel mix. See "Fueling Your Engine:'
b.)Remove air filter. See Figure 8.
c,) TurnMixture Screw (Figure 6)clockwise
until fully closed, butdo not overtighten. Figure
6. Unscrew mixture screw one full turn
counterclockwise _ .
d.)Turn Idle Speed Screw (Figure 6) clockwise
until it stops, do not ovetighten. Open
screw three full turns counterclockwise 4[-=_.
Figure 6
IDLE SPEED
ADJUSTMENI
SCREW
/
2. IDLE SPEED ADJUSTMENT
a.) Start the engine and turn throttle control to
halfwaybetween "Fast" and "Slow".
b.) Operatetheunitfor 3minutestowarmupengine.
c.) Turn throttle control counterclockwise
41--,,, toslowsetting.
d.) Adjustthe Idle Speed Screw untilthe engine
idles as slow as possible without the engine
stalling.
Turn screw clockwise _ if the engine
stalls.
-- Turnscrew counterclockwise _ to slow
engine
down,
ICAUTION: t The mixture setting is a highly
critical adjustment. Ifset incorrectly, perma-
nent damage will occur tothe engine. Donot
operate engine at fast throttle for prolonged
periods while making the mixture adjust-
ment. The mixture screw should be in the
range of 3/4 to 1-1/4turns open.
3. MIXTURE ADJUSTMENT:
a.) Adjust throttle knob to "Fast" position.
b.) Turn the Mixture Screw slowly clockwise
until the engine speed is reduced.
Note position.
c.) Turn the screw slowly counterclockwise
. Stop when the engine just begins
to run roughly,
d.) Turn the screw slowly the minimum amount
clockwise _ until the engine runs
smoothly.
e.)Reinstall A_f Fdter.
[CAUTION:t The air filter must be fitted into
the corners of thehousing and under the
center tab to avoid engine damage.
7

ii i,,i I,,III,IIII]IIIHUUIIIIIIIIIII I II II I IIIII I I II I
NOTES
8

iii i i i lU iiii i i i iiiii i ii I i iiii
USING YOUR TOOL AS A BLOWER
A. OPERATING INSTRUCTIONS
1. Read your Operator's Manual. Make certain you
completely understand and can followall warningsand
safety instructions, before operating the tool.
2 Always wear eye protection to prevent rocks or
debris from being blown or ricocheting into eyes
and face which can result inblindness and/or other
serious injury.
3. Always weara respirator or facemask when work-
ing in dusty environments.
4 Dress safely in long pants. Do not wear loose
clothing, jewelry,short pants or sandals; or go barefoot.
5. Check the tool before operation. Look for worn,
loose, missing or damaged parts. Do not use until the
tool is in proper working order.
6. Inspect the area before starting tool. Remove alt
debris and hard objects such as rocks, glass, wire, etc.
that can ricochet, be blownor otherwise cause damage
during operation.
_,WARNING
Hold the tool for starting as shown in Figure 2. Do not
set the tool on any surface except a clean, hard area to
start the engine or while the engine is running. Debris
such as gravel, sand, dust, grass, etc. could be picked
up by the air intake and thrown out through the
discharge opening, damaging the tool or property or
causing serious injury to bystanders or the operator.
7. Keep children, bystanders, and animals safely
,
10.
Use the correct operating position ( Figure 7). Do
notoverreach or use from unstable surfaces such as
ladders, trees, steep slopes, rooftops,etc. Keep firm
footing and balance at all times.
Never place objects inside the blower tubes; always
direct the blowing debris away from people,
animals, glass, and solid objects such as trees,
automobiles,walls,etc.The force ofaircancauserocks,
dirt, or sticks tobe thrownorto ricochet whichmay hurt
people or animals, breakglass, or cause other damage.
ALWAYS USE
PROTECTION
TOP
HANDLE
CONTROL
PANEL
TO THE_
REAR
USE RESPIRATOR
OR FACEMASK
FOR DUSTY
ENVIRONMENTS
OPERATION
WITH TOP
HANDLE AND
.
away. Before starting theengine and during operation,
make certain people and animals are away from the
work area -a minimum of 30 feet.
Check air intake opening and blower tubes fre-
quently, always with the engine stopped and
spark plug disconnected. Keep vents and dis-
charge tubes free of debris which can accumulate
and restrict proper air flow.
B. OPERATING TIPS
1 Always work going away from solid objects such as
walls, large stones, automobiles and fences.
2 Clean spaces with corners by starting in corners
REAR ASSIST
HANDLE
Figure 7
WARNING
Always wear eye protection to prevent rocks ordebris
from being blown or ricocheting intothe eyes and face
which can result in blindness or serious injury.
and moving outward to straight areas topreventan
accumulation ofdebris which could fly intoface
3. Be careful when working near plants. The force of
the air coulddamage tender plants.
4. Direct air flow by adjusting the nozzle position
down or to the side.
5. Vary or reduce the air flow by setting the throttle
knob at any position from "Fast" to "Slow:'
6.
Usethe assist handle located on the bottom of the
unit below the control panel when working above
the waist or when a two-handed grip is desired.
Refer to "Specifications" drawing, and Figure 7.
7. Uses For YourBlower:
a. Sweeping debris or grass clippings from driveways,
sidewalks, patios, park, parking lots, barns,
stadiums, etc.
b. Gathering grass clippings, strawor leaves intopiles.
c. Fastdrying wet, outdoor areas such as a patio.
d. Removing debris from corners, around joints and
between bricks.
e. Blowing light snow from driveways, sidewalks or
patios.
9

I I I I I III II II IIII I IIII
GENERAL MAINTENANCE
iiiiiiiiiiiiiiiiiiiiiiiiiiiiiiiiiiiiiiiiiiiiiiiiiiiiiiiiiiiiiiiiiiii
A. AIR FILTER
A dirty air filter decreases engine performance and
increases fuel consumption.
Clean the Air Filter:
• Frequently,
• Always clean after 5 tanks of fuel or 5 hours of
operation, whichever is less.
Follow these steps:
1. Remove the air filter (located above the control
panel; see Figure8 ).
2. Wash in soap and water.
I CAUTION:I Do not clean filter in gasoline or
other flammable solvent to avoid creating a fire
hazard.
3. Squeeze filterdr,/.
4. Adda small amountofoiltocoat thefilter.
NOTE: Avoid soakingthe filterwith oil.
5. Squeeze out excessoil.
6. Replace the air filter.
!CAUTION: JThe air filter must be fitted into the
corners of the housing and under the center tabto
avoid engine damage.
B. FUEL TANK
Never use gasoline that is more than 2 months old
in a fuel mixture. Gasoline begins tobreak downafter
a short,period of time and will form compounds that
cause hard starting and damage in 2-cycle engines.
1. Inspect the unit for fuel leaks each time it is used.
Repair or replaceparts as necessary.
2, Using a fuel mix orgasoline over2 months old will
cause the engine to be difficult or impossible to
start.
° 3. Drain all fuel from the unit or allow unit to run
out of fuel before storing.
C. STARTER ROPE
• Repair the starter rope if the rope breaks.
AWARNING
Always waar eye protection when servicing
the starter rope. The recoil sp,r'mg,focated
beneath the pulley, ts under tension. Ifthe
spring pops out, serious Injury can result.
10
Figure 8
FAN HOUSING
REMOVE
SCREWS
SPARK PLUG WtRE
Figure 9

e
To repair or replace:
1. Disconnect the spark plug wire and remove the 6
screwsfrom the fan housing. Figure9.
2. Separate the fan housing completely frQm the
shroud.
_WARNING
Avoid contact with the grounding tab wire in the fan
housing (Figu re10) when removing or reinstalling the
starter ropepulley. Contact with the grounding tabwire
can result in serious injury.
,4,
H •
5.
.
,
9.
10.
7.
11.
12.
13.
14.
If the starter ropeis notbroken, release thespring
.tension by pulting about i0 inches ofropefrom the
pulleyand catchingthe ropeinthenotchasshown.
Figure 10.With the rope inthe notch, letthe pulley
unwind slowlyuntilitstopsturning.Ifthe ropeis
broken,remove the broken piece.
NOTE: The tension on the starter spring will be
released ifthe ropeisbroken.
Remove screwand pulleyvery carefully.Figure 10°.
The recoil spring which lies beneath the pulley
must stay in the housing, flat against the bot- _
tom. Ifthe spring isdisturbed, itwill require con-
siderable time and effort to reinstall. Twistthe
putleygentlycounterclockwise _ asyoupull
up torelease thespring.
Moveawayfrom thefueltankandmelttheend ofthe
ropetogo intothe pulley.
Allow the melted end todrip once; then whilethe
rope isstillhot,pullthe melted end through alclean
rag toobtaina smooth,pointedend.
Insertone end ofthe rope through the handle and
secure with a knot.Leave3/16" pigtailbehind knot.
Figure 12 (inset).
Insert rope through the rope exit hole into the
insideofthe fan housing.
Guide rope insidethe pulley,then through topside
pulley holeby pushingthe rope from the underside
holewith a small round object such.as a Phillips
screwdriver. See Inset, Figure11.
Wrap ropecounterclockwise _ around
pulley ratchet and tuck looseend back under rope
leavinga 1/4to3/8 inch tailnexttothe ridge_Figure " .
11.Pulltightly.
Wind all but about 12 inches of the rope clock-
wise _ around the pulley.
Replace pulley in the housing. Be sure the pulley is
all the way down and the spring issecured.
Replace and tighten pulley screw. Figure 10.
Hold the 12inch slack in the rope andcatch rope in
puljey notch. Figure 12.
15. Holdthe rope taut and make3completeturnsofthe
pulley clockwise _ to place tension on the
pulley. Hold the putiey to retain tension.
16, Align pulley notch with rope exit hole,pull starter han-
dle tothe full extent ofthe rope and allow the rope to
slowly wind around the pulley.
17. Reinstall the fan housing.
UNDERSIDE
HOLE
Figure 10
RIDGE
Figure 11
Figure 12
D. STORAGE
1. Clean the tool before storing. Payparticular atten-
tion tothe air intake area,keeping itfree ofdebris.Use
a mild detergent and sponge to clean the plastic
surfaces.
2. Empty the fuel tank before storing the tool.
Use upfuelleft in the carburetor by starting
the engine and letting the engine run until
it stops.
3. Do not store the tool or fuel in aclosed area where
fuel vaporscan reach sparks or an open flame from
hot water heaters, electric motors or switches, fur-
naces, etc.
4, Store in a dry area out of reach of children.
11

iiiiiiiiii i i iiiiiiii i i iii i IIIIHIIIIIIII III I I
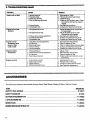
E. TROUBLE SHOOTING CHART
TROUBLE
Engine will not start
Engine will not idle ............
properly
Engine will not
accelerate, lacks
power or dies
under a load
J
Engine smokes
excessively
CAUSE
1. Ignitionswitchoff,
2, Fuel tankempty.
3. Spark plugnotfiring,
4. Fuel notreachingcarburetor.
5. Engine flooded,
6. Compressionlow.
1. Idlingspeed settoo low.
2. Idle speed settoo high.
,
4.
5.
1.
2.
3.
4.
5.
1.
2.
3.
Mixturescrewrequiresadjustment, 3.
Crankshaftsealsworn. 4.
Compressionlow, 5.
, ,,, ........... i , ,J,, 4,,,,,,,,....... I "
Carburetor requiresadjustment. 1.
Airfilter dirty. 2.
Spark plug fouled. 3.
Carbon build-up. 4.
Lowcornpression. 5.
Choke partially on. 1.
Mixture screw requires adjustment. 2.
Air filter dirty. 3.
REMEDY
1. Move switchto "Start".
2. Filltank withcorrectfuel mixture.
3. Installnew plug.
4. Check fordirtyfuel filter; clean. Check
for kinkedor splitfuel line; repairor
replace.
5. See Starting Instructions,
6. ContactyourSears ServiceCenter.
t. Adjustidlespeed screwclockwiseto
increasespeed.
2. Adjustidlespeed screwcounter-
clockwisetoreduce speed.
See CarburetorAdjustments.
ContactyourSears ServiceCenter.
ContactyourSears Service Center.
See CarburetorAdjustments.
Clean or replaceair filter.
Clean or replace sparkplug and regap.
ContactyourSears Service Center,
ContactyourSears Service Center.
Adjust choke.
See Carburetor Adjustments.
Clean or replace air filter.
Engine runs hot
4. Fuel mixture incorrect,
...........,,,,,,,,
1. Fuel mixture incorrect.
2. Spark plug incorrect.
3. Carbon build-up.
4. Mixture screw set too low.
4. Empty fuel tankand refillwith correct
fuel mixture.
1, See FuelingYourUnit,
2. Replace with correct ptug.
3. Contact you Sears Service Center
4. See Carburetor Adjustments,
i1 rllllllllllllllllllllllllllll 111 I [11111111111111111111111111111I]1 IIIHIIIIIIIII
ACCESSORIES
iiiiiiiiii iiiiiiiiiiii i i ii 11111111111
i i ii i
The following accessories are available through Sears Retail Stores, Catalog Outlets or Service Centers.
ITEM STOCK NO.
SAFETY FACE SHIELD .................................................. 9-18613
SAFETY GOGGLES ............................................................ 9.1859
GUTTER ATTACHMENT KIT ................................................... 71.79992
2-CYCLE ENGINE OIL ........................................................ 71.365S5
SPARK PLUG .............................................................. 71.36403
ENGINE SHOULDER SlrRAP KIT ................................................. 7145783
12

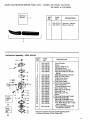
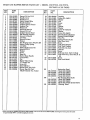
SEARS GAS BLOWER PdEPAIR PARTS LIST -MODEL 358.797930, 358.797970,
• 358.796921 & 358.796982
I
Operator's
Manual
--1
I
2
KEY PART DESCRIPTION
NO. NO. :
t
2
530'067355
530-069271
Operator's Manual
Blower Tube Kit
Carburetor Assembly - #530-035196
' 3 ¸ 5
Carb.
Repair 9 --0
Kit
I
28
I Carb.
Gasket
Kit
I
29
26
7
18
g_Y PART DESCRIPTION
NO. NO.
1
3
4
5
7
,
9
11
12
13
14
15
18
19
20
21
22
23
24
25
26
27
28
29
530-035197
530:035015
i_530-035132
530-035156
530-035138
530-032000
530-035198
530-035162
530-035017
530-035191
530-035164
530-035166
530-035178
530-035007
530-035106
530-035139
530-035031
530-035028
530-035016
530-035151
530-035014
530-035003
530-035021
530-035199
530-035186
Valve Throttle
Screw
Throttle Shaft Ass'y.
Idle Speed Screw
Throttle Return Spring
High Speed Mixture Needle
Spring
HighSpeed Mixture Needle
* Plug-5!16 Dia. Welch
Pump Cover Screw
Fuel Pump Cover
+ *Fuel Pump Gasket
+ *Fuel Pump Diaphragm
Fuel Inlet Screen
Throttle Retainer Ring
*Inlet Needle Valve
* Metering Lever Spring
* Metering Lever
* Metering Lever Pin
* Screw
+ *Metering Diaphragm Gasket
+ *Metering Diaphragm
Metering Diaphragm Cover
Metering Cover Screw Ass'y.
Carb. Kwik Repair Kit (+ Indi-
cates Contents)
Carb. Gasket/Diaphragm Kit
(*Indicates Contents)
*Indicates Contents of Carb. Gasket!Diaphragm Kit
+ Indicates Contents of Carb. Repair Kit
I3

s_S o_s_ o_" -_
/
\

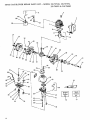
SEA_RS GAS BLOWER REPAIR PARTS LIST - MODEL 358,797930, 358.797970,
358.796921 & 358.796982
KEY PART
NO. NO.
1 530-015635
2 530-094212
3 530-010827
4 530-027157
5 530-026994
6 530-015343
7 530-026163
8 530-015629
9 530-015628
10 530-015561
11 530-015342
12 530-032091*
13 530-015700
14 530-024371
15 530-015687
16 530-015685
17 530-069224
18 530-042023
19 530-026780
20 530-069200
21 530-015479
22 530-015123
23 530-015544
24 530-069232
25 530-026735
26 530-027175
27 530-015197
28 530-094222
29 530-069252
30 530-015636
31 530-026776
32 530-010824*
33 530-069269
*Whenremovingor installin
KEY PART
DESCRIPTION NO. NO.
Screw #10-14x11/16 34
Handle Cover 35
Handle Ass'y. 36
Static Ground Wire 37
Handle Isolator 38
Isolator Spacer (Front) 39
Isolator Cup 40
Washer #8 41
Screw #8-32x7/16 42
Screw #12-11x2 43
Isolator Spacer (Rear) 44
Ball Bearing (Shroud) 45
Screw #10-24x5/8 46
Air Filter 47
Screw #10-24xl 48
Washer 49
Fan Housing (Incl.//16,23 & 26) 50
Starter Pulley Spring 51
Air Baffle 52
Pulley Replacement IZit 53
Screw #10-3/4 54
Washer 55
Screw 56
Rope Kit 57
Starter Rope Handle
Ground Wire
Nut
Blower Tube Clamp
"T" Handle Kit
Screw #10
Heat Deflector
Shroud (Incl. #12 & 45)
Blower Hsg. Kit (Incl.
#36,46-49,55 & Vac. Tubes)
59
60
101
102
103
530-094215
530-015661
530-015382
530-001543
530-015367
530-015644
530-015441
530-015626
530-015632
530-015682
530-015168
530-001516
530-015667
530-015647
530-015672
530-094241
530-015638
530-015637
530-026781
530-010897
530-069247 ! Line Kit
530-015495 ! Screw
530-010729
530-010815
530-015683
5302027350
530-027902
530-027896
530-027897
530-029005
!
530-026762
530-027448
530-027288
530-026925
DESCPJPTION
Impeller
Screw #10-14x3/4
Washer
Nut
Screw
Nut
Washer
Washer
Screw #1/4-20x7/8
Washer
Screw #10-24x5/8
Shroud Bearing Retainer
Spring-Tension (Right)
Pivot Pin
Spring-Tension (Left)
Inlet Door Ass'y.
Screw
Fuel Tank Retainer
Fuel Tank Cushion
Fuel Pick-Up Ass'y
Fuel Cap Ass'y. (Incl. O-Ring)
Fuel Tank Ass'y. (Incl. #53, 54 &
56)
Screw
Fuel Tank Shield
Instruction Decal
Model 358.796982
Modd358.796921
Modd358.797930
Model 358.797970
Fan Housing Decal(Left)
Model 358.796982
Model 358.796921
Model 358.797930&358.797970
Warning Dec_
;the bearing (#530-032091), the area of the shroud (//530-010824) receiving the bearing must be heated
to approximately300° F. to avoiddamaging the shroud.
15

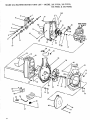
SEARS GAS BLOWER REPAIR PARTS LIST - MODEL 358.797930, 358.797970,
358.796921 & 358.796982
66
14
16
18
30
59
58
57
56
29
55
47
22
13
22
_50
48
52
53
54
21 20 27
26
12
72
74
16

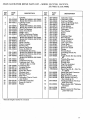
SEARS GAS BLOWER R_PAIR PARTS LIST - MODEL 358.797930, 358.797970,
358.796921 & 358.796982
KEY PART
NO. NO.
m
530-012192
530-012168
2 580-019111
3
530-026681
530-026413
4 530-015162
5 530-015239
7 530-069245
9 530-024903
10
530-069203
530-010753
11 530-069242
12 530-012145
13 530-094243
14 530-626605
15 530-023817
16 530-015004
18
530-010853
530-027273
19 530-032092
20 530-015351
21 530-032029
22 530-010757
23 530-019059
26 530-001717
27 530-015126
28 530-015369
29 530-039111
30 530-015127
31 530-024438
32 530-019108
33 530-019105
34 530-015241
35 530-023367
DESCRIPTION
Cylinder
Model 358.796982 & 358.796921
Model 358.797930 & 358.797970
Cylinder Gasket
Piston Ring
Model 358.796982 & 358.796921
Model 358.797930 & 358.797970
Wrist Pin Retainer
Screw #1/4-20x3/4
Muffler Ass'y.
Muffler Attachment Spring
Piston Kit (Incl. #3,4 & Pin)
Model 358.796982 & 358.796921
Model 358.797930 & 358.797970
KEY PART
NO. NO.
,,,,,,
36 530-026818
37 530-019157
38 530-026981
39 530-010875
40 530-026797
41 530-026772
42 530-015674
43 530-035196
44 530-015254
45 530-015673
46 530-015630
47 530-015654
48 530-015147
49 530-015407
DESCRIPTION
,,,,, , ,,
Carburetor Case
Carburetor Gasket
Fuel Line Fitting
Fuel Line & Fitting Ass'y.
Choke Guide Plate
Choke Shutter
Screw #10-24x7/8
Carburetor
Wave Washer
Spacer
Screw
Retaining Ring
Wave Washer
Screw #8-32x5/16
Shaft Kit
Shaft Coupling
Plastic Coupling
Flywheel Nut
Starter Dog Spring
Screw #8-32x5/16
Crankshaft & Rod Ass'y.
Model 358.796982 & 358.796921
Model 358.797930 & 358.797970
Wrist Pin Bearing
Model 358.796982 & 358.796921
50 530-026773
52 530-026764
53 530-023807
54 530-015675
55 530-015660
56 530-015658
57 530-015614
58 530-023575
59 530-024569
60 530-069204
Choke Actuator
Carb. Case Cover
Choke Knob
Screw #8-18x5/8
Screw #10-14x3/8
Washer
Throttle Knob
Grounding Switch Nut
Washer
Toggle Switch Kit (Incl. #58 &
59)
Washer
Crankshaft Bearing
Crankcase Ass'y. (Incl.
#21,23 & Qty. 4 of 28)
Crankcase Seal
Coupling Washer
Flywheel Key
Screw #10-24x5/8
Flywheel Ass'y.
Flywheel Washer
Reed Valve
* Carburetor Case to Crank-
case Gasket
* Carburetor Case Seal
Screw #6-19x5/16
Washer
61 530-026771
62 530-026951
63 530-026829
64 530-024435
65 530-015128
66 530-039124
67 STD360946
68 530-003933
69 530-003934
70 530-039082
71 530-039103
72 530-030054
73 530-069219
74 530-015763
75 530-069207
Throttle Wire Ass'y.
Ignition Wire
Ground Wire
Plug Wire Grommet
Screw #8-32x3/4
Ignition Module
Spark Plug (CJ-8) - (Cat. No.
(71-36403)
Spark Plug Lead Connector
Spark Plug Boot
High Tension Lead Wire
High Tension Lead Ass'y.
(Incl. #68,69 & 70)
CrankcaseSeCant (NotSup-
pliedWith Unit)
Engine Gasket Kit(*Indicates
Contents)
Washer
Spark ArrestorKit (NotSup-
pliedwith Unit)
*Indicates Engine Gasket Kit Contents
17

NOTES
18

II I|111I I II
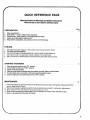
QUICK REFERENCE PAGE
Read and follow all Warnings and Safety Instructions.
Failure to do so can result in serious injury.
page
PREPARATION ................................................................................. 3
1. Wear eye protection.
2. Dress safely -- boots orsafetyshoes,long pants.
3. Check for worn,loose, missing, or damaged parts and repair.
4. Inspectand make safe the area to be cut.
5. Keep children,bystanders, and animals a minimum of30 feet away.
FUELING ................................................................................ 5
1. Eliminate all sources ofsparks or flame where fuel is mixed, poured or stored.
2. Use clean and fresh gasoline.
3. Use 16 parts regular unleaded gasoline to 1 part air-cooled, 2-cycle engine oil.
4. Mix and pour fue! in an approved, marked container in an outdoor area.
5. Move a minimum of 10feet away from fuel and fueling site before starting engine.
STARTING THE ENGINE ................................................................. 6
1. Move the ignition switch tothe "ON" position.
2. Move throttle control tothe "FAST" position.
3. Adjust choke appropriately.
4. Make sure the nozzle is directed away from people, animals, glass and solid objects.
5. Pullthe starter rope no more than 10times to avoid flooding the engine.
6. Stop the engine by moving the ignition to the "OFF" position.
MAINTENANCE ........................................................................ lo
1. Have all maintenance other than the recommended procedures described inthe Operator's Manual performed
byyour Sears Service Center.
2. Disconnect spark plug before performing maintenance except for carburetor adjustment.
3. Drain fuel from the unit before storing for 30 days or more.
4. Clean air filter frequently but always after 5 hours of operation or 5tanks of fuel, whichever is less.
5. Store in a dry place out ofthe reach of children.
19

i it ii lU
operator's
manual
MODEL NO.
358.797930-22.2cc
358.797970-22.2cc
358.796921-28.0cc
358,796982-28,0cc
How to Order
Repair Parts
SEARS SERVICE
IS AT YOUR SERVICE
The Model Number willbe found below the top handle with the Serial Number.
Always mention the Model Number when requesting service or repair parts for your
unit.
AIt parts listed herein may be ordered from any Sears Service Center
and most Sears Stores,
WHEN ORDERING REPAIR PARTS ALWAYS GIVE THE FOLLOWING
INFORMATION AS SHOWN iN THIS LIST.
1. The PARTNUMBER 3. The PART DESCRIPTION
2. The MODEL NUMBER 4.
358.797930-22.2cc
358.797970-22.2cc
358.796921-28,0cc
358.796982-28.0cc
The NAME OF iTEM --
GAS POWER BLOWER
if the parts you need are not stocked locally, your order will be elec-
tronically transmitted to a Sears Repair Parts Distribution Center for
handling.
When you buy merchandise from
Sears you get an extra something
that nobody else can offer Sears
Serwce
Across town or across the country,
Sears Service follows you, pro-
wdmg trustworthy, competent ser-
wce technicians using only Sears
specified factory Darts
Your Sears Merchandise takes on added value when you discover
that Sears has Service units throughout the country. Each is staffed
b_, Sears Trained, professional technicians using Sears approved
methods.
530-067355-2-23888
Sold by Sears, Roebuck and Co., Chicago, Ill. 60684 U.S.A.
PRINTEDINU.S.A.
-
 1
1
-
 2
2
-
 3
3
-
 4
4
-
 5
5
-
 6
6
-
 7
7
-
 8
8
-
 9
9
-
 10
10
-
 11
11
-
 12
12
-
 13
13
-
 14
14
-
 15
15
-
 16
16
-
 17
17
-
 18
18
-
 19
19
-
 20
20


Craftsman 358797930 Owner's manual
- Category
- Air blowers/dryers
- Type
- Owner's manual
Ask a question and I''ll find the answer in the document
Finding information in a document is now easier with AI
Related papers
-
Craftsman 358797950 User manual
-
-
-
-
-
-
-
-
Craftsman 358.79477 User manual
-
Other documents
-
Kenmore 41393 Owner's manual
-
Weed Eater 452 MVB Owner's manual
-
Poulan BVM200VS Owner's manual
-
-
 Poulan Pro BVM200VS User manual
-
-
-
-
Hasbro 81640 User manual
-
Toro Recoil Kit, Super Recycler Lawn Mower Installation guide
