Page is loading ...

i
<Request to Customers>
All parts of this watch, except for the band, are to be repaired only at CITIZEN.
This is because special technologies and equipment are required to perform repairs,
inspections and adjustments. Please make requests for repairs to the Citizen Service
Center when having your watch repaired.
<Demande pour les clients>
Toutes les réparations, sauf sur le bracelet, doivent être effectuées par CITIZEN.
C’est parce que la technologie spéciale et l’é quipement sont nécessaires pour la
ré paration, le contrôle et le réglage. Pour faire réparer la montre, adressez-vous
directement au service après-vente Citizen ou à votre revendeur.
<Solicitud a Clinetes>
A fin de mantener la calidad del reloj, todas las reparaciones en este reloj excepto
en la pulsera serán ralizadas en CITIZEN. Esto es porque las reparaciones,
inspecciones y ajustes, etc. requieren tecnologías y equipos especiales. Cuando
necesite una reparación, etc., solicítela al Centro de Servicio de Citizen, por favor.

1
English
To determine the movement number
Your watch features a case number engraved on the
case back (refer to figure to the right).
The first four characters of the case number
represent the movement caliber number of the
watch.
In the example on the right, “1234” is the movement
number.
Thank you for your purchase of this Citizen watch.
Before using the watch, read this instruction manual carefully to ensure
correct use.
After reading, be sure to store this manual in a safe place should it be
needed for future reference.
✳
The case has different features depending on the model.
Details of model specific features may not be outlined in this manual. See
http://www.citizenwatch.jp/support/default.htm
Engraving position example
The engraving position may differ
depending on watch model.

2
3
■ Important instructions are categorized and depicted in this manual as follows:
<Notes before use - Protective stickers>
Your watch may feature protective coverings.
If the watch is worn without first removing these stickers, perspiration or
moisture may enter the gaps between the protective stickers and the parts, which
may result in a skin rash and/or corrosion of the metal parts.
For this reason, please be sure to peel off the stickers before wearing the watch.
This manual may contain certain safety advisories. Your watch should be used
in accordance with these advisories at all times to ensure optimal enjoyment of
your watch and to prevent injury to yourself, other persons and/or damage to
property.
■ Safety advisories are categorized and depicted in this manual as follows:
Highly likely to cause death or serious injury
May cause serious injury or death
May or will cause minor or moderate injury or damage
Warning (caution) symbol followed by instructions that should be
followed and/or precautions that should be observed.
Warning (caution) symbol followed by prohibited use and/or
operation advisory.
Safety Precautions
Safety Precautions
DANGER
WARNING
CAUTION

4
5
◆
This watch receives radio signals transmitted in the USA and Germany for
specific timezones only.
◆
Eco Drive that converts light to the energy for driving the watch.
◆
City selection function that allows the watch to be set to the time and
date in any of the four cities in U.S.A. - New York, Chicago, Denver, Los
Angeles - and London.
◆
Alternate time zone that can be set in 15 minute increments (alternate
time zone is not radio controlled).
◆
Chronograph function that can measure time up to 59 minutes 59
seconds in 1-second steps.
◆
Alarm function that can be set based on a 24-hour clock.
◆
Perpetual calendar function that eliminates the need to correct the date
at the end of each month.
* Eco Drive is Citizen proprietary technology.
The followings must be done before using the watch:
●
Checking the power reserve
→
page 12
Check the charge level of the watch.
●
Selecting a time zone (city)
→
page 16
Select the city for which you want to indicate the time and date.
●
Checking the radio signal reception
→
page 14
Check the result of the radio signal reception.
Features Before using the watch

6
7
Component identication …………………………………………… 8
Checking the power reserve ……………………………………… 12
Checking the radio signal reception ……………………………… 14
Selecting a time zone (city) ………………………………………… 16
Notes on the radio signal reception ……………………………… 18
On-demand reception—manual signal reception activation …… 24
Using the alternate time mode …………………………………… 26
During the Daylight Saving Time season ………………………… 28
Using the chronograph function ………………………………… 32
Using the alarm ……………………………………………………… 34
Recharging your watch …………………………………………… 38
Adjusting the time/calendar manually …………………………… 42
Checking and correcting the current reference (0) position …… 46
Troubleshooting …………………………………………………… 50
Resetting the watch to the default settings ……………………… 54
Solar-powered watch handling precautions ……………………… 56
Water resistance …………………………………………………… 60
Precautions and usage limitations ………………………………… 63
Maintenance ………………………………………………………… 68
Information ………………………………………………………… 69
Specications ……………………………………………………… 70
Table of contents

8
9
* The illustrations in this instruction manual may differ from the actual appearance of your watch.
Component identification
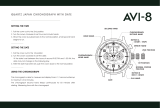
Component identification
H, M, L:
Reception level/
reception result
RX: Reception in progress
Day of week
ALM: Alarm mode
City selections
Chronograph
(minute)
A-TM: Alternate time
mode
Charge level
CHR: Chronograph
mode
●
Function hand
●
Mode hand
Hour hand
Tachymeter
NO: Reception
result
Second hand
ON/OFF
(alarm/daylight
savings time)
24 hour hand
Function hand
Upper right
button (B)
Minute hand
Crown
Date
Lower right
button (A)
Mode hand

10
11
Some models feature a screw down crown and/or screw down push button.
Locking the crown and/or button prevents accidental operation. These must
be unlocked prior to using certain features of your watch such as setting the
time or date.
Unlock Lock
Screw down
crown
Rotate the crown
counterclockwise
until it releases from
the case.
Push the crown in to
the case. With gentle
pressure towards the
case, rotate the crown
clockwise to secure it
to the case. Be sure to
tighten firmly.
Screw
down push
button
Rotate the
locking screw
counterclockwise, and
loosen until it stops.
Rotate the locking
screw clockwise,
and tighten firmly.
Component identificationComponent identification
●
How to use the screw down crown and screw down push button

12
13
Charge level Level 0 Level 1 Level 2 Level 3
Charge
indicator
(function
hand) position
Estimated
remaining
time to stop
Approx. 3 days
Approx.
3 to 30 days
Approx.
30 to 220 days
Approx.
220 to 310 days
Remark
The charge level
is insufficient.
Charge the battery
immediately.
The charge level
is not sufficient.
Charge the battery
wherever possible.
The charge level
is good. Use the
watch without
worrying about
the charge level.
The watch is fully
charged. Use the
watch without
worrying about
the charge level.
Checking the power reserve
Check the power reserve level as follows:
1. Ensure that the crown is in position
0
.
2.
Press and release the lower right button (A)
.
The function hand and the 2:00 sub dial
indicates the charge level (refer to table on
page 13)
3.
Press and release the lower right button (A)
to exit power reserve checking.
The watch will resume normal operation.
• The watch will resume normal operation
automatically after 10 seconds even without
pressing and releasing.
0 1 2
Button (A)
Checking the power reserve
Modes supporting this function:
[LAX] [DEN] [CHI] [NYC] [LON] [A-TM]
Note: the power reserve indicator does not move in a "smooth" linear fashion.
It will "jump" levels based on reserve power level.

14
15
To check result of previous radio reception time
update:
1. Ensure that the crown is in position
0
.
2. Press and release the button (A).
The second hand moves and indicates the
reception result.
• The relationships between the second hand
positions and the reception results are shown
on the next page.
3. Press and release the button (A) to exit.
The watch will resume normal operation.
• The watch will resume normal operation
automatically after 10 seconds even without
pressing the button.
0 1 2
Button (A)
Checking the radio signal reception
●
Second hand positions and reception results
L:
Radio reception
time updating was
successful with low
signal strength.
M:
Radio reception time
updating was successful with
medium signal strength .
H: Radio reception and time
updating was successful
with high signal strength
.
NO: Reception failed.
• To attempt reception again,
use the manual reception function.
→
from page 22
* "H", "M", and "L" indicates radio signal strength. They do not relate to the reception
performance of the watch.
* If you change the city shown after radio reception, the indication will reflect "NO".
Checking the radio signal reception
Modes supporting this function:
[LAX] [DEN] [CHI] [NYC] [LON]

16
17
To select a time zone (city):
1. Pull the crown out to position
1
.
The second hand moves to the 30 seconds position.
2. Rotate the crown to select the city.
•
Align the mode hand to any of LAX, DEN, CHI, NYC, and LON.
• Whenever you select a city, the watch indicates the
time and date in that city.
• To use the watch in a city other than the above five
cities, set the time using the alternate time mode
(A-TM).
→
pages 26 and 27
3. Pull the crown out to position
2
.
The second hand moves and indicates the current
daylight savings time setting.
• To change the daylight savings time setting, press
and release the upper right button (B) until a tone
signal sounds.
→
pages 28 to 31
4. Push the crown in to position
0
.
The watch resumes normal operation. (The current time is indicated.)
0 1 2
Button (B)
Example: Setting to
New York
●
Table of radio controlled time zones (city)
•
The cities listed in the table below may be abbreviated or spelled out, depending on the model.
• The signal station is changed depending on the selected city.
• When you use the watch in a place which is not shown in the table below, set the
time using the alternate time mode (A-TM).
• The time difference in the table below is based on the coordinated universal time (UTC).
• The stored setting for the presence of daylight savings radio signal is common to all
regions in each radio signal zone.
Indication City name Time difference Signal from...
LON London 0 Germany
NYC New York −5
U.S.A.
CHI Chicago −6
DEN Denver −7
LAX Los Angeles −8
* Transmitter
stations
→
pages 20 to 21
Selecting a time zone (city)
• The time in each city is calculated from the time difference from UTC.
• When the watch receives radio signal in a city or you correct the time of a city
manually, the times in all other cities are corrected accordingly based on the time
differences. (This also applies to A-TM.)
Selecting a time zone (city)

18
19
■
Receiving the radio signal
There are three ways to receive the radio signal.
This watch also incorporates a function to check last radio reception results.
→
pages 14 and 15
Reception method Explanations
Automatic reception
Receives the signal at 2:00 a.m. every day. If reception is unsuccessful,
the watch tries to receive at 3:00 a.m. and 4:00 a.m.
On demand
reception
Receive the signal manually when you want to adjust the time
and date.
→
page 24
Recovery automatic
reception
Receives the signal automatically after charging when the watch
stops due to insufficient charge.
• These reception operations take place only when the crown is in the closed
position
0 and the watch is not moved.
• When the watch is in a low power state (second hand moving in two
second intervals), radio reception will not be attempted.
• Radio signal reception cannot be deactivated.
• Even when this watch receives a radio signal successfully, the accuracy of
the displayed time will be dependent on the reception environment and
internal processing.
• If the watch is not able to receive the signal, it will operate normally within
an accuracy range of ±15 seconds per month.
■
During radio reception:
Remove the watch and place it on a stable surface
where it can receive the signal better, such as next to
a window.
• The reception antenna is located at the 6:00
position of the watch. Place the watch with the 6:00
position facing toward the station.
• While the watch is receiving radio signals (the second
hand indicates RX, H, M, or L), do not move the
watch as a successful update will not be achieved.
Notes on the radio signal reception
Modes supporting this function:
[LAX] [DEN] [CHI] [NYC] [LON]
Notes on the radio signal reception

20
21
■
Note on the radio signal
This watch receives the radio signal from the two signal stations located in
U.S.A. or Germany and automatically adjusts the time and date.
The receivable signal stations are listed as follows:
Signal stations Kind of the radio signal
Fort Collins station, Denver, Colorado State, U.S.A. WWVB
Mainflingen station, southeast Frankfurt, Germany DCF77
Notes on the radio signal reception
●
Station locations and reception ranges
Radio signal in U.S.A.
Radius of approximately
3,000 km
Fort Collins station
Radio signal in Germany
Radius of approximately
1,500 km
Mainflingen station
* The distance values below are given only for information purpose. The actual reception
condition may differ depending on the environment and climate.
Notes on the radio signal reception

22
23
■
Poor reception areas
It may be difficult to receive the radio signal properly under certain
environmental conditions or in areas susceptible to radio noise.
• Extremely hot or cold locations
• Inside vehicles
• Near electrical equipment or
office appliances
• Near high-tension
electrical lines, railway
overhead wires or
communication facilities
• Inside reinforced concrete
buildings, between tall
buildings, mountains, or
underground
• Near mobile phones that
are in use
■
When signal reception is poor
Radio signal reception may be affected by the surrounding environment.
High-tension wires nearby or windows containing wire meshes make it
difficult to receive radio signal. In this case, you should find another suitable
place considering the location of the transmitter station in your region.
Then, place the watch at a window facing to the station and attempt manual
reception.
→
pages 24 and 25
If the window contains wire screens, open the window or change the
location of the watch.
Notes on the radio signal reception Notes on the radio signal reception

24
25
Manual reception updating may be attempted
at anytime. However results will vary based on
location, time of day, weather, etc.
0 1 2
Button (A)
• The watch will not start to receive if the second
hand is moving once every two seconds (this is the
insufficient charge warning). Fully charge the watch
before attempting on-demand reception.
• Not all areas can receive a signal. Be sure you are not
in such an area and confirm the city is selected for
your time zone.
→
pages 16 and 17
1. Push the crown in to position
0
.
2. Press and hold the lower right button (A)
for 2 seconds or more, then release.
The second hand points to RX, a tone will
sound, and the watch enters radio reception
mode. As soon as the reception level is
identified, the second hand points to either H,
M, or L.
→
Refer to the next page.
When the reception has finished, a tone sounds, and the second hand
restores the normal operation.
• It will take 2 to 15 minutes to finish reception.
■
To cancel manual reception updating
Press and hold the lower right button (A) for 2 seconds or more, then release.
This cancels manual reception updating and the watch resumes normal operation.
●
Second hand positions and reception results
RX: Reception
in progress
L:
Radio reception updating
was successful with low
signal strength.
M:
Radio reception updating was
successful with medium signal strength.
H:
Radio reception updating was
successful with high signal strength.
On-demand reception—manual signal reception activation
On-demand reception—manual signal reception activation
Modes supporting this function:
[LAX] [DEN] [CHI] [NYC] [LON]

26
27
The alternate time mode allows you to set the time in any region other than
the featured five cities in 15 minute increments.
• The alternate time mode (A-TM) is not radio controlled and operates as a
"normal" watch with accuracy of +/- 15 seconds per month.
■
Setting the alternate time
1. Pull the crown out to position
1
.
2. Rotate the crown to align the mode
hand to [A-TM].
The hour/minute/second hands indicate
the A-TM time currently set in memory.
3. Pull the crown out to position
2
.
The second hand moves to indicate the
current daylight savings time setting.
•
Pressing and releasing the upper right button (B)
will activate or deactivate the daylight savings
time setting (SMT) with a tone.
→
pages 28 to 31
0 1 2
4. To set the alternate time:
• Rotate the crown clockwise to advance the time in one hour increments.
• Rotate the crown counterclockwise to decrement the time in one hour increments.
• Pressing in releasing the lower right button (A) will advance the time in 15-minute
increments. Note: the time will not decrement in 15 minute increments.
• Be sure to set the correct AM or PM time by referring to the 24-hour indicator at the
10:00 subdial.
• The calendar is also changed to the corresponding date and day of the week.
• Rotating the crown quickly will engage the rapid advance feature. To cancel the
rapid advance feature, turn the crown one click.
5. Return the crown to position
0
to finish the setting.
■
Time differences that can be set in the alternate time mode
In the alternate time mode, you can set any time difference within the following
range relative to the London time.
Daylight savings time OFF -26 hours to +26 hours
Daylight savings time ON -25 hours to +27 hours
■
Daylight savings time
When the daylight savings time is set to ON while the watch operates in the
alternate time mode, the indicated time is increased by 1 hour.
Using the alternate time mode
Using the alternate time mode
Modes supporting this function:
[A-TM]
Mode hand
Button (A)
Button (B)

28
29
Some areas observe Daylight Saving Time.
• Daylight Saving Time rules will vary depending on the country or region
within a country.
When the watch receives a successful radio signal update for the 5 cities, the
Daylight Saving Time setting is automatically updated, provided the user
has not manually turned OFF overridden the Daylight Saving Time setting.
If you live in an area that does not receive a radio signal, you will need to
update the Daylight Saving Time setting manually.
→
Page 30
■
Checking the daylight savings time setting
While the watch is in the time display mode or A-TM
mode and the crown is set at position
0
, perform
the following steps.
1.
Press and release the upper right button (B).
The second hand moves and points to the current
setting for daylight savings time (ON or OFF).
2.
Press and release the upper right button (B).
The current time display mode is resumed.
• Even if the button is not pressed, the current time display mode is
resumed automatically after about 10 seconds.
Button (B)
ON: Daylight savings
time is set.
OFF: Daylight savings
time is not set.
During the Daylight Saving Time season
During the Daylight Saving Time season

30
31
■
To manually change the Daylight Saving
Time setting
1. Pull the crown out to position
1
.
2. Rotate the crown to choose the city.
→
pages 16 and 17
3. Pull the crown out to position
2
.
4. Press and release the upper right button
(B) to change the daylight savings time
setting to ON or OFF.
→
page 29
5. Return the crown to position
0
to finish
the setting.
0 1 2
Button (B)
●
Precautions for setting the daylight savings time to ON/OFF
When manually changing the Daylight Saving Time from OFF to ON to OFF, this
engages the manual override built into the watch. This manual override precludes
Daylight Saving Time from being automatically adjusted during the radio signal update.
If this function is not desired, the only way to cancel the manual override is to do the all
reset and 0-Positioning outlined.
→
page 54
During the Daylight Saving Time season
■
If you live in an area that does not observe Daylight Saving Time
Change the daylight savings time setting to OFF manually. Then, as long
as the city is selected, the setting remains OFF and the watch ignores the
daylight savings time update direction included in the radio signal.
●
Sharing of daylight savings time setting
• The Daylight Saving Time / standard time is shared by multiple cities and regions
within the range of each transmitter station (Germany or U.S.A.). Whenever radio
signal is received from each station, the setting is updated automatically.
• If you manually set the watch to the standard time in a city, the watch will
always indicate the standard time for that city without synchronizing with other
cities.
During the Daylight Saving Time season

32
33
The chronograph is able to measure time up to 59 minutes 59 seconds in
1-second units. It is reset to 0 after reaching 59 minutes 59 seconds.
1. Pull the crown out to position
1
.
2. Rotate the crown to align the mode
hand to the CHR (chronograph)
position.
3. Return the crown to position
0
.
The second hand and function hand
move to the 0 position respectively.
• The second hand changes to the
chronograph second hand and
moves in 1-second steps after a time
measurement is started.
• The function hand (2:00 sub dial)
changes to the chronograph minute
hand and moves in 1-minute steps after
a time measurement is started.
0 1 2
Function hand
Second hand
■
Starting time measurement
Press and release the upper right button (B).
The chronograph starts measurement.
• The chronograph stops and starts whenever you
press and release the upper right button (B).
• Pulling the crown out during chronograph
operation will stop and reset the chronograph.
■
Resetting the chronograph
While the chronograph is stopped, press
and release the lower right button (A).
The chronograph resets to 0 minute 0 second.
• During measurement, the chronograph will not be
reset even if you press the button (A).
0 1 2
Button (A)
Button (B)
• Radio signal cannot be received in the chronograph mode.
• After you have completed chronograph use, be sure to reset your watch to one
of the time modes.
→
pages 16 to 17, or 26 to 27
Using the chronograph function
Using the chronograph function
Modes supporting this function:
[CHR]
Mode
hand

34
35
The alarm function uses a 24-hour clock. Once the alarm has been set, the alarm
sounds for 15 seconds when the set time is reached once a day. The alarm can be
used in one of the five cities as well as the alternate time mode. The alarm does
not operate while the watch is in the alarm [ALM] setting mode.
■
Setting the Alarm Time
1. Pull the crown out to position
1
.
2. Rotate the crown to align the mode
hand to the ALM (alarm) position.
The hands move to the currently set alarm time.
3. Pull the crown out to position
2
.
4. Rotate the crown to set the desired
alarm time.
• Rotating the crown clockwise causes the
minute hand to advance by 1 minute.
• Rotating the crown counterclockwise
causes the minute hand to go back by 1
minute.
0 1 2
Button (B)
Button (A)
• Check AM and PM with the 24-hour hand (10:00 sub dial) to set the correct
AM or PM time.
• Rotating the crown quickly engages the quick advance feature for the
minute and hour hands. To stop the rapid advancement, turn the crown
one click in either direction.
5.
Press and release the
upper right button (B) to
turn the alarm ON or OFF.
• Whenever you press and
release the button (B), a tone
sounds and the second hand
moves to indicate the alarm
is turned ON or OFF.
6. Push in the crown in to position
1
.
7. Rotate the crown to select a city or the alternate [A-TM] time.
• The alarm will operate according to the city time currently selected.
8.
Return the crown to position
0
to complete alarm time setting.
Second hand
position when
alarm is ON
Second hand position
when alarm is OFF
Using the alarm
Using the alarm
Modes supporting this function:
[ALM]
Mode
hand

36
37
■
Setting the alarm to ON or OFF
1. Pull the crown out to position
1
.
2. Rotate the crown to align the mode
hand to ALM (alarm).
3. Press and release the upper right
button (B).
• Pressing and releasing the upper right
button (B) changes the alarm settings
between ON and OFF.
0 1 2
Button (B)
Button (A)
Second hand
position when
alarm is ON
Second hand position
when alarm is OFF
Using the alarm
4. Rotate the crown to select a city or [A-TM].
• While the watch is in the alarm mode, the alarm will not sound.
5. Return the crown to position
0
to finish the setting.
■
Stopping the alarm
While the alarm is sounding, press and release either the upper right button
(B) or lower right button (A), or pull out the crown.
■
Alarm sound monitor
While the watch is in the [ALM] mode and the crown is set at position
0
,
press the button (A). The alarm sound is played back. The alarm sounds for 5
seconds. To stop the alarm in the interim, press the button (A) or (B).
• While the hands are moving from another mode to the ALM mode, you
cannot play back the alarm sound.
Using the alarm
Mode
hand
/