
DVD Recorder
DVR90DE
If you need additional assistance for set-up or operating after reading owner’s manual,
please call TOLL FREE : 1-800-968-3429 or visit our web site at http://www.funai-corp.com
Please read before using this equipment.
E6500UD.QX 03.12.8 19:06 Page 1

2
Table of contents
Timer recording . . . . . . . . . . . . . . . . . . . . . . . . .41
Checking the imformation on the timer
programming during the timer recording . . . .43
The priority of overlapped setings . . . . . . . . . .44
Setting a disc to protect . . . . . . . . . . . . . . . . . .45
Recording from an external component . . . . . .46
Playing discs . . . . . . . . . . . . . . . . . . . . .48
Information on DVD play . . . . . . . . . . . . . . . . .48
Basic Play . . . . . . . . . . . . . . . . . . . . . . . . . . . . . .49
Playing discs using the disc menu . . . . . . . . . . .51
Playing discs using the title menu . . . . . . . . . . .52
Resume play . . . . . . . . . . . . . . . . . . . . . . . . . . . .53
Step by step playback . . . . . . . . . . . . . . . . . . . .53
Repeat play . . . . . . . . . . . . . . . . . . . . . . . . . . . .54
Zoom . . . . . . . . . . . . . . . . . . . . . . . . . . . . . . . . .55
Title/Chapter search . . . . . . . . . . . . . . . . . . . . .56
Track search . . . . . . . . . . . . . . . . . . . . . . . . . . .57
Time search . . . . . . . . . . . . . . . . . . . . . . . . . . .57
Fast forward / Fast reverse search . . . . . . . . . .58
Slow forward / Slow reverse play . . . . . . . . . . .58
Skipping TV commercials during play . . . . . . . .59
Selecting the format of audio and video . . . . . .59
Switching audio soundtrack . . . . . . . . . . . . . . . . . . .59
Switching subtitles . . . . . . . . . . . . . . . . . . . . . . . . . .61
Switching camera angles . . . . . . . . . . . . . . . . . . . . . .62
Reducing block noise . . . . . . . . . . . . . . . . . . . . . . . .62
Editing . . . . . . . . . . . . . . . . . . . . . . . . .64
Information on disc editing . . . . . . . . . . . . . . . .64
Editing discs . . . . . . . . . . . . . . . . . . . . . . . . . . . .65
Deleting titles . . . . . . . . . . . . . . . . . . . . .65, 69, 77, 86
Putting names on titles . . . . . . . . . . . . . .66, 71, 80, 87
Setting or clearing chapter markers . . . . . . .68, 73, 81
Deleting parts of titles . . . . . . . . . . . . . . . . . . . .70, 78
Setting pictures for thumbnails . . . . . . . . . . . . . .74, 83
Setting titles to protect . . . . . . . . . . . . . . . . . . . . . .75
Releasing titles from protecting . . . . . . . . . . . . . . . .76
Adding titles to a playlist . . . . . . . . . . . . . . . . . . . . .84
Deleting a playlist . . . . . . . . . . . . . . . . . . . . . . . . . . .85
Using SETUP menu . . . . . . . . . . . . . . .88
Other settings: Parental Lock . . . . . . . . . . . . . .89
Setting a parental lock level . . . . . . . . . . . . . . . . . . .89
Other settings: Language settings . . . . . . . . . . .92
Choosing the menu language . . . . . . . . . . . . . . . . . .92
Choosing the audio language . . . . . . . . . . . . . . . . . .93
Choosing the subtitle language . . . . . . . . . . . . . . . . .94
Other settings: Audio settings . . . . . . . . . . . . . .96
Setting digital audio output . . . . . . . . . . . . . . . . . . .96
Compressing the range of sound volume . . . . . . . . .98
Outputting the sound during play in fast forward . .99
Other settings: Display . . . . . . . . . . . . . . . . . .100
Others . . . . . . . . . . . . . . . . . . . . . . . .102
Troubleshooting . . . . . . . . . . . . . . . . . . . . . . . .102
Quick Guide to DVD disc types . . . . . . . . . . . .104
Language code . . . . . . . . . . . . . . . . . . . . . . . . .105
Notes about discs . . . . . . . . . . . . . . . . . . . . . . .106
Glossary . . . . . . . . . . . . . . . . . . . . . . . . . . . . . .107
IMPORTANT SAFEGUARDS . . . . . . . . 3
PRECAUTIONS . . . . . . . . . . . . . . . . . . .4
LASER SAFETY . . . . . . . . . . . . . . . . . . . . . . . . . .4
About Copyright . . . . . . . . . . . . . . . . . . . . . . . . .4
Before you start . . . . . . . . . . . . . . . . . . .5
Features . . . . . . . . . . . . . . . . . . . . . . . . . . . . . . . .5
Easy understanding for DVD recording . . . . . . .6
Guide to Displays . . . . . . . . . . . . . . . . . . . . . . . . .8
Accessories . . . . . . . . . . . . . . . . . . . . . . . . . . . . .10
Installing batteries in the remote control . . . . .10
Using a remote control . . . . . . . . . . . . . . . . . . .11
Information on this owner's manual . . . . . . . . .11
Symbol in this owner's manual . . . . . . . . . . . . .11
Location of controls . . . . . . . . . . . . . . . . . . . . . .12
Front Panel . . . . . . . . . . . . . . . . . . . . . . . . . . . . . . . .12
Rear Panel . . . . . . . . . . . . . . . . . . . . . . . . . . . . . . . . .13
Remote Control . . . . . . . . . . . . . . . . . . . . . . . . . . . .14
Front display . . . . . . . . . . . . . . . . . . . . . . . . . . .15
Connections . . . . . . . . . . . . . . . . . . . . .16
Connection to antenna . . . . . . . . . . . . . . . . . . .16
When connecting to a cable box
with only a few scrambled channels . . . . . . . . . . . . .16
When connecting to a cable box
with many scrambled channels . . . . . . . . . . . . . . . . .17
Connection to other devices . . . . . . . . . . . . . . .18
Connection to TV with a standard A/V cable . . . . .18
Connection to TV with a S-Video cable . . . . . . . . . .19
Connection to TV with a component video cable . .19
Connection to TV and VCR . . . . . . . . . . . . . . . . . .20
Connection to AV amplifier
with a coaxial digital audio cable . . . . . . . . . . . . . . .21
Getting started . . . . . . . . . . . . . . . . . . .22
Switching on . . . . . . . . . . . . . . . . . . . . . . . . . . . .22
Initial setting: Channel setting . . . . . . . . . . . . . .22
Getting channels automatically . . . . . . . . . . . . . . . . .23
Adding/deleting channels . . . . . . . . . . . . . . . . . . . . .24
Initial setting: Clock . . . . . . . . . . . . . . . . . . . . . .25
Setting the clock . . . . . . . . . . . . . . . . . . . . . . . . . . .25
Adjusting the clock automatically . . . . . . . . . . . . . . .27
Setting the daylight savings time . . . . . . . . . . . . . . . .28
Initial setting: Selecting the TV aspect ratio . . .29
Initial setting: RF converter output
(Watching the TV programs received
by the tuner of the DVD recorder) . . . . . . . . . .30
Recording . . . . . . . . . . . . . . . . . . . . . . .32
Information on DVD recording . . . . . . . . . . . . .32
Recording speed . . . . . . . . . . . . . . . . . . . . . . . . .32
Restrictions on recording . . . . . . . . . . . . . . . . .32
Settings for recording to a blank disc . . . . . . . .33
Formatting a disc . . . . . . . . . . . . . . . . . . . . . . . .34
Recording from the TV . . . . . . . . . . . . . . . . . . .36
One-touch timer recording . . . . . . . . . . . . . . . .37
Checking the recording picture quality . . . . . . .37
Finalizing the discs . . . . . . . . . . . . . . . . . . . . . . .38
E6500UD.QX 03.12.8 19:26 Page 2

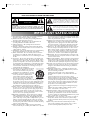
The lightning flash with arrowhead symbol, within an
equilateral triangle, is intended to alert the user to the
presence of uninsulated “dangerous voltage” within
the product’s enclosure that may be of sufficient mag-
nitude to constitute a risk of electric shock to persons.
The exclamation point within an equilateral triangle is
intended to alert the user to the presence of impor-
tant operating and maintenance (servicing) instruc-
tions in the literature accompanying the appliance.
CAUTION
:
TO REDUCE THE RISK OF ELECTRIC SHOCK, DO NOT
REMOVE COVER (OR BACK). NO USER SERVICEABLE PARTS
INSIDE. REFER SERVICING TO QUALIFIED SERVICE PERSONNEL.
CAUTION
RISK OF ELECTRIC SHOCK
DO NOT OPEN
3
IMPORTANT SAFEGUARDS
by items placed upon or against them, paying particular atten-
tion to cords at plugs, convenience receptacles, and the point
where they exit from the product.
14)Lightning - For added protection for this product during a
lightning storm, or when it is left unattended and unused for
long periods of time, unplug it from the wall outlet and dis-
connect the antenna or cable system. This will prevent dam-
age to the product due to lightning and power-line surges.
15)Power lines - An outside antenna system should not be locat-
ed in the vicinity of overhead power lines or other electric
light or power circuits, or where it can fall into such power
lines or circuits. When installing an outside antenna system,
extreme care should be taken to keep from touching such
power lines or circuits as contact with them might be fatal.
16)Overloading - Do not overload wall outlets, extension cords,
or integral convenience receptacles as this can result in a risk
of fire or electric shock.
17)Object and Liquid Entry - Never push objects of any kind into
this product through openings as they may touch dangerous
voltage points or short-out parts that could result in a fire or
electric shock. Never spill liquid of any kind on the product.
18)Servicing - Do not attempt to service this product yourself as
opening or removing covers may expose you to dangerous
voltage or other hazards. Refer all servicing to qualified ser-
vice personnel.
19)Damage Requiring Service - Unplug this product from the
wall outlet and refer servicing to qualified service personnel
under the following conditions:
a) When the power-supply cord or plug is damaged,
b) If liquid has been spilled, or objects have fallen into the
product,
c) If the product has been exposed to rain or water,
d) If the product does not operate normally by following the
operating instructions. Adjust only those controls that are
covered by the operating instructions as an improper adjust-
ment of other controls may result in damage and will often
require extensive work by a qualified technician to restore
the product to its normal operation,
e) If the product has been dropped or damaged in any way,
and
f) When the product exhibits a distinct change in perfor-
mance - this indicates a need for service.
20)Replacement Parts - When replacement parts are required,
be sure the service technician has used replacement parts
specified by the manufacturer or have the same characteris-
tics as the original part. Unauthorized substitutions may result
in fire, electric shock, or other hazards.
21)Safety Check - Upon completion of any service or repairs to
this product, ask the service technician to perform safety
checks to determine that the product is in proper operating
condition.
22)Heat - The product should be situated away from heat
sources such as radiators, heat registers, stoves, or other
products (including amplifiers) that produce heat.
1) Read Instructions - All the safety and operating instructions
should be read before the product is operated.
2) Retain Instructions - The safety and operating instructions
should be retained for future reference.
3) Heed Warnings - All warnings on the product and in the
operating instructions should be adhered to.
4) Follow Instructions - All operating and use instructions
should be followed.
5) Cleaning - Unplug this product from the wall outlet before
cleaning. Do not use liquid cleaners or aerosol cleaners. Use
a damp cloth for cleaning.
6) Attachments - Do not use attachments not recommended by
the product manufacturer as they may cause hazards.
7) Water and Moisture - Do not use this product near water -
for example, near a bath tub, wash bowl, kitchen sink, or
laundry tub; in a wet basement; or near a swimming pool; and
the like.
8) Accessories - Do not place this product on an unstable cart,
stand, tripod, bracket, or table. The product may fall, causing
serious injury to a child or adult, and serious damage to the
product. Use only with a cart, stand, tripod, bracket, or table
recommended by the manufacturer, or sold with the product.
Any mounting of the product should follow the manufactur-
er’s instructions, and should use a mounting accessory rec-
ommended by the manufacturer.
9) A product and cart combination should be
moved with care. Quick stops, excessive
force, and uneven surfaces may cause the
product and cart combination to overturn.
10)Ventilation - Slots and openings in the cabi-
net are provided for ventilation and to
ensure reliable operation of the product
and to protect it from overheating, and
these openings must not be blocked or
covered. The openings should never be blocked by placing
the product on a bed, sofa, rug, or other similar surface. This
product should not be placed in a built-in installation such as
a bookcase or rack unless proper ventilation is provided or
the manufacturer's instructions have been adhered to.
11)Power Sources - This product should be operated only from
the type of power source indicated on the marking label. If
you are not sure of the type of power supply to your home,
consult your product dealer or local power company. For
products intended to operate from battery power, or other
sources, refer to the operating instructions.
12)Grounding or Polarization - This product may be equipped
with a polarized alternating-current line plug (a plug having
one blade wider than the other). This plug will fit into the
power outlet only one way. This is a safety feature. If you are
unable to insert the plug fully into the outlet, try reversing
the plug. If the plug should still fail to fit, contact your electri-
cian to replace your obsolete outlet. Do not defeat the safety
purpose of the polarized plug.
13)Power-Cord Protection - Power-supply cords should be
routed so that they are not likely to be walked on or pinched
PORTABLE CART WARNING
(Symbol provided by RETAC)
S3125A
WARNING: TO REDUCE THE RISK OF FIRE OR ELECTRIC SHOCK, DO NOT EXPOSE
THIS APPLIANCE TO RAIN OR MOISTURE.
E6500UD.QX 03.12.8 19:06 Page 3

4
FCC WARNING- This equipment may generate or use radio frequency energy. Changes or
modifications to this equipment may cause harmful interference unless the modifications are
expressly approved in the instruction manual. The user could lose the authority to operate
this equipment if an unauthorized change or modification is made.
RADIO-TV INTERFERENCE
This equipment has been tested and found to comply with the limits for a Class B digital device, pursuant to
Part 15 of the FCC Rules. These limits are designed to provide reasonable protection against harmful inter-
ference in a residential installation. This equipment generates, uses, and can radiate radio frequency energy
and, if not installed and used in accordance with the instructions, may cause harmful interference to radio
communications. However, there is no guarantee that interference will not occur in a particular installation.
If this equipment does cause harmful interference to radio or television reception, which can be determined
by turning the equipment off and on, the user is encouraged to try to correct the interference by one or
more of the following measures:
1. Reorient or relocate the receiving antenna.
2. Increase the separation between the equipment and receiver.
3. Connect the equipment into an outlet on a circuit different from that to which the receiver is connected.
4. Consult the dealer or an experienced radio/TV technician for help.
This Class B digital apparatus complies with Canadian ICES-003.
Cet appareil numérique de la classe B est conforme à la norme NMB-003 du Canada.
CAUTION: TO PREVENT ELECTRIC SHOCK, MATCH WIDE BLADE OF PLUG TO
WIDE SLOT, FULLY INSERT.
ATTENTION: POUR ÉVITER LES CHOC ÉLECTRIQUES, INTRODUIRE LA LAME LA
PLUS LARGE DE LA FICHE DANS LA BORNE CORRESPONDANTE DE LA
PRISE ET POUSSER JUSQU’AU FOND.
A NOTE ABOUT RECYCLING
This product’s packaging materials are recyclable and can be reused. Please dispose of any materials in
accordance with your local recycling regulations.
Batteries should never be thrown away or incinerated but disposed of in accordance with your local regu-
lations concerning chemical wastes.
PRECAUTIONS
About Copyright
Unauthorized copying, broadcasting, public performance and lending of discs are prohibited.
This product incorporates copyright protection technology that is protected by method claims of certain
U.S. patents and other intellectual property rights owned by Macrovision Corporation and other rights own-
ers. Use of this copyright protection technology must be authorized by Macrovision Corporation, and is
intended for home and other limited viewing uses only unless otherwise authorized by Macrovision
Corporation. Reverse engineering or disassembly is prohibited.
LASER SAFETY
This player employs a laser. Only a qualified service person should remove the cover or attempt to service
this device, due to possible eye injury.
CAUTION: USE OF CONTROLS OR ADJUSTMENTS OR PERFORMANCE OF PROCEDURES OTHER
THAN THOSE SPECIFIED HEREIN MAY RESULT IN HAZARDOUS RADIATION EXPOSURE.
CAUTION: VISIBLE AND INVISIBLE LASER RADIATION WHEN OPEN AND INTERLOCK DEFEATED.
DO NOT STARE INTO BEAM.
LOCATION: INSIDE, ON THE DECK MECHANISM.
Manufactured under license from Dolby Laboratories. “Dolby” and the double-D symbol are trademarks
of Dolby Laboratories.
E6500UD.QX 03.12.8 19:06 Page 4

5
Before you start
Before you start
Recording
This DVD recorder is compatible for you with both
DVD-RW, which is rewritable repeately, and DVD-
R, which is available for recording once. You can
choose either one for your convenience.
Up to 8 program recording:
You can program the unit to record up to 8 pro-
grams, up to a year in advance. Daily or weekly pro-
gram recordings are also available.
One-touch timer recording:
Easily you can set a recording time as you prefer.
Every time the REC button pressed during record-
ing, the recording time will be increased by 30 min-
utes up to 4 hours. The recording automatically
stops when the recording time you set is reached.
REC MONITER:
Just one press of REC MONITOR button makes you
available for confirming of the recording picture
quality with the current recording mode before you
attempt to record the program. You can change the
recording mode to another here.
Automatic Chapter marker setting:
Chapter markers will be put on recordings as you
set in SETUP menu before attempting to record. It
greatly helps you to edit the recordings as you pur-
pose.
Automatic Title menu making:
The DVD recorder makes title menus automatically
as the recordings are made.
Automatic PLAYLIST making (VR mode):
The Playlist will be prepared from the Original list,
so that you can edit titles in Playlist as you prefer.
The original list is kept as it is.
Play
Theater surround sound in your home:
When connenting the DVD recorder to an amplifer
or a decorder which is compatibale with Dolby
Digital, you are allowed to experience the theater
surround sound from discs with those sorround
sound systems.
Quick search for what you want to watch:
You can easily find the part you want to watch using
serch function. Search for a point on a disc by title,
chapter, or time.
Start to play from Original Playlist:
Title playing is available from either an original list or
Playlist.
Editing
Setting/Clearing chapter markers:
You can easily add chapter markers anywhere in
your recordings for easy editing. (VR mode)
Making your own Playlist:
With the original remains as it is, you can edit titles
on Playlist variously as you prefer.
Putting names on titles (Page XX)
Setting pictures for thumbnails (Page XX)
Setting/clearing chapter markers (Page XX)
Deleting parts of titles (Page XX) etc
Protecting titles:
To avoid erasing titles, the protect function is useful
when it is ON in the original list.
Compatibility
Available for playing discs recorded with
Video mode on a regular DVD player (Video
mode):
Discs recorded with the Video mode can be played
on regular DVD players, including computer DVD
drives compatible with DVD-Video playback*.
* DVD-Video Format (Video mode) is a new format for
recording on DVD-R/RW discs that was approved by the
DVD Forum in 2000. Adoption of this format is optional
for manufactures of DVD playback devices, and there are
DVD-Video players, DVD-ROM drives or other DVD play-
back devices that do not play DVD-R/RW discs recorded
in the DVD-Video Format.
Features
Not only playing the discs of DVD or CD, but this DVD recorder features for you recording to DVD discs
and editing them after that.
Followings are what you can do with this DVD recorder.
E6500UD.QX 03.12.8 19:06 Page 5

Before you start
Easy understanding for DVD recording
You may have some simple questions about DVD recording. The followings will help you to understand eas-
ily how to prepare for DVD recording and to attempt to record. To DVD discs in steps.
6
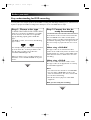
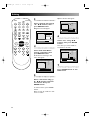
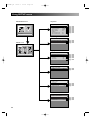
Step 1: Choose a disc type
There are several types of DVD disc recordable
for the intension of use. Choose an applicable
type by following “Quick guide to DVD disc
type”.
This DVD recorder can record on the following
type of discs.
For example, when you want to record repeated-
ly on the same disc, or when you want to edit
the disc after recording, select either the
rewritable DVD-RW type disc.
When you want to save recordings without any
alteration, a non-rewritable DVD-R can be your
choice.
Step 2: Format the disc be
ready for recording
Insert the disc in the recorder. Then, format the
disc from SETUP menu. Video format (Video
mode) or Video recording format (VR mode) will
be available depending on the disc type inserted.
This is necessary to prepare the disc for record-
ing.
When using a DVD-RW
This type of disc can be formatted in either
(Video mode or VR mode). Video mode discs can
be played back on a variety of other DVD equip-
ment. VR mode discs are allowed for more var-
ied editing.
When using a DVD-R
These discs will be formatted in Video mode.
This type of disc can be played back on a variety
of other DVD equipment.
Note:
• You cannot mix two formats in one DVD-RW.
• You can change a DVD-RW’s format to the
other format. However, the disc’s contents will
be lost when reformatting.
• Not all discs can be played on other DVD
equipment.
Now you are ready for recording.
E6500UD.QX 03.12.8 19:06 Page 6

7
Before you start
Before you start
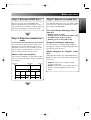
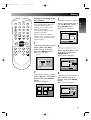
Step 3: Record to DVD discs
Record a program by pressing REC button.
When using the timer, one-touch timer record-
ing, manual timer recording are available. Refer to
each page describing the operation for details.
Step 4: Play the recorded con-
tents
You can select the title you want to play from a
displayed menu, and immediately start to play.
Recorded contents are very accessible on a disc,
the procedure is simple really as you choose a
title on a chapter from the menu screen.
What is titles and chapters?
The contents of DVD disc are generally devided
into some titles. Titles may be further subdivided
into chapters.
Title 1 Title 2
Chapter 1 Chapter 1Chapter 2 Chapter 3 Chapter 2
Start Rec. Stop/Start Stop Rec.
Step 5: Edit the recorded disc
You will find editing discs very easy, and the DVD
recorder offers convenient edit functions, which
are possible only with DVDs.
You can edit the followings from a
title list.
• Putting names on titles
• Setting pictures for thumbnails (VR mode)
• Setting/clearing chapter markers
• Deleting parts of titles (VR mode)
Original and Playlist (VR mode)
You can edit the recordings in playlist without
changing the original recordings. Any playlist does
not take up much disc space.
What “Original” or “Playlist” refers
for?
Throughut this manual, you will find Original and
Playlist to refer to the actual content and the edit-
ed version.
• Original content refers to what’s actually
recorded on the disc.
• Playlist content refers to the edited version of
the disc---how the Original content is to be
played.
E6500UD.QX 03.12.8 19:06 Page 7

Before you start
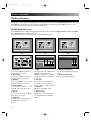
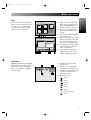
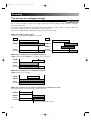
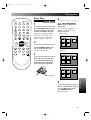
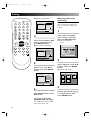
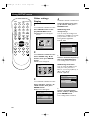
Guide to Displays
The DVD recorder uses the following types of display for most opertions. SETUP/DISC/CD menu, Title list,
and DISPLAY, which allows you to change the playing status of disc during play. DISPLAY also gives you
some disc information for checking the status of the disc.
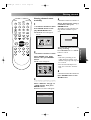
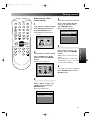
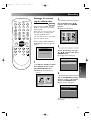
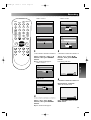
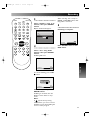
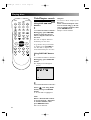
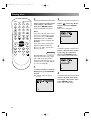
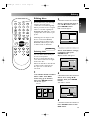
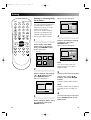
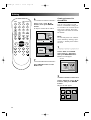
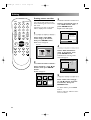
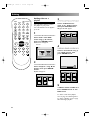
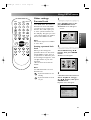
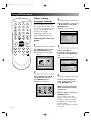
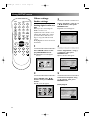
SETUP/DISC/CD menu
Press SETUP button to display the setup main menu, then choose either of SETUP/DISC/CD by K / L / { / B.
Press ENTER button to display each menu.
These provides entries to all main functions of the DVD recorder.
1. Playback:
To set up the DVD recorder to
play discs as you prefer.
2. Recording:
To set up the DVD recorder to
record to discs as you prefer.
3. Display:
To set up the OSD screen of the
DVD recorder as you prefer.
4. Select Video:
To choose a line input to record
to DVD discs from other video
equipment.
5. Clock:
To set up the clock of the DVD
recorder as you need.
6. Channel:
To make the channel setting of
the DVD recorder as you
prefer.
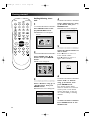
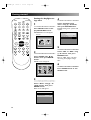
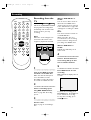
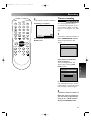
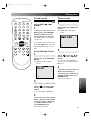
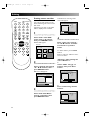
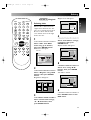
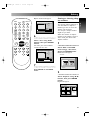
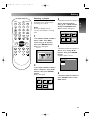
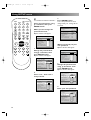
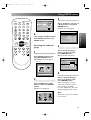
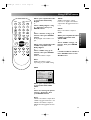
1. Edit:
Turns on a title list, (When a disc
with VR mode is inserted,
'Original' or 'PlayList' is available.),
which shows the recorded titles
on the disc.
2. Format:
Allows you to erase all of the
recorded content on the disc.
The disc will be completely blank.
3. Finalize:
Allows you to finalize a disc
recorded titles.
4. Disc Protect:
Allows you to protect a titles on
an original list from accidental
editing.
1. Random Playback:
To set the random play program-
ming.
2. Program Playback:
To set the program playing.
Setup Menu
CD Playback Mode
Random Playback
Program Playback
1 2
Setup Menu
Disc
Edit
Format
Finalize
Disc Protect OFF ON
1 2 3
4
Setup Menu
Setup
Playback Setting
1 2 3
4 5 6
8
E6500UD.QX 03.12.8 19:06 Page 8

9
Before you start
Before you start
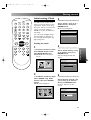
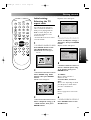
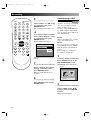
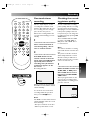
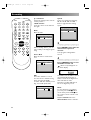
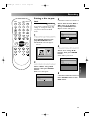
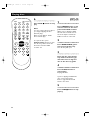
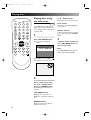
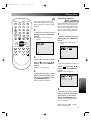
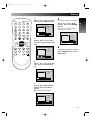
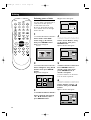
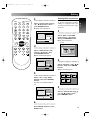
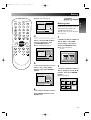
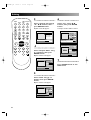
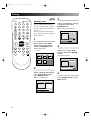
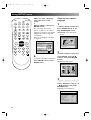
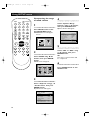
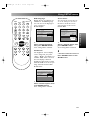
DISPLAY
DISPLAY appears by pressing DIS-
PLAY button, then gives you the
information on the disc playing.
And some settings are available
while disc play.
1. Indicates a disc type and a
format mode.
2. Indicates a recording mode
and possible recoding time.
3. Indicates a title number, chap-
ter number, and the time
lapse of disc play.
4. Each icon means:
: Search
: Audio
: Subtitle
: Angle
: Repeat
: Marker
: Noise Reduction
: Zoom
DVD-RW
SP 1:25
Video Format
1 1 00:00:00
13
24
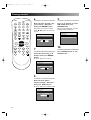
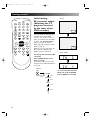
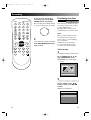
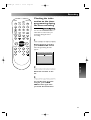
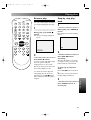
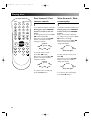
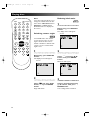
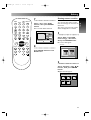
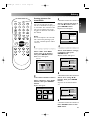
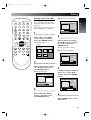
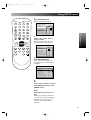
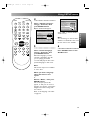
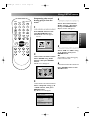
Edit
Title list allows you to check the
titles recorded on the disc easily.
You can choose a title to play
from this screen and can easily
edit the titles as you prefer.
1. Titles recorded on the disc.
Each can be selected to edit
by pressing ENTER button
with the cursor on the title
2. Protect icon, which appears
when the title has been pro-
tected.
3. The selected title thumbnails
from the title list.
4. The menus in here for editing
titles as you prefer. The avail-
able menus depends on the
disc type and the format type.
5. The details of the title, which
can be changed to the title
name you will edit.
6. Time status bar of the title,
which can be used to put
chapter marks as you prefer.
Disc > Original
1
Title Delete
Scene Delete
Edit Title Name
Chapter Mark
Index Picture Set
Protect On
1/JAN AM 1:00 CH12 XP
0:01:25
Disc > Original
1 1 32
54
1/JAN AM00:00 1/JAN AM00:00
1/JAN AM00:00
1/JAN AM00:00
1/JAN AM00:00
21
3 4
6 5
E6500UD.QX 03.12.8 19:06 Page 9

Before you start
10
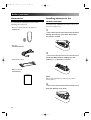
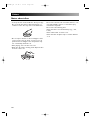
Accessories
You will find the following accessories when
unpacking the carton box.
• Remote control with two AA batteries
(NB001UD)
• RF cable
(WPZ0901TM002)
• Audio/Video cables
• Owner’s Manual
(0VMN03892)
Owner's Manual
Installing batteries in the
remote control
You will need to install batteries in the remote con-
trol to be ready to use.
1
Unsnap the battery cover from the back of
the remote control.
2
Install two AA batteries making sure the
polarity (+ / –) direction is correct.
Note:
When replacing batteries, make sure to replace
them in pairs.
3
Snap the battery cover back.
E6500UD.QX 03.12.8 19:06 Page 10

11
Before you start
Before you start
Information on this owner's
manual
This owner's manual is designed mainly for the
operation of the remote control:
Please read this owner's manual carefully to learn
how to use the features explained through the man-
ual.
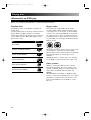
Symbol in this owner's manual
Many functions of this DVD recorder are depending
on the disc type or the recording mode.
To specify for what disc type or recording mode
each function is, we put the following symbols at
the beginning of each item to operate.
Symbol Description
Available to DVD Video discs
Avaialble to DVD-RW with Video
mode
Avaialble to DVD-RW with VR
mode
Available to DVD-R discs
Available to CD discs
DVD-RW
Video
DVD-R
DVD-V
DVD-RW VR
CD
Note:
Incorrect use of batteries can result in hazards such
as leakage and bursting. Please observe the following:
• Do not mix new and old batteries together.
• Do not use different kinds of battery together,
although they may look similer, different batteries
may have different voltages.
• Make sure that the plus and minus ends of each
battery match the indications in the battery com-
partment.
• Remove batteries from equipment that is not
going to be used for a month or more.
• When disposing of used batteries, please comply
with governmental regulations or environmental
public instruction's rules that apply in your country
or area.
• Do not recharge, short-circuit, heat, burn or disas-
semble batteries.
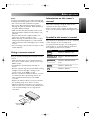
Using a remote control
Keep in mind the following when using the remote
control:
• Make sure that there are no obstacles between
the remote control and the remote sensor on the
DVD recorder.
• Use within the operating range and angle as
shown.
• Remote operation may become unreliable if strong
sunlight or fluorescent light is shining on the
remote sensor of the DVD recorder.
• Remote controllers for different devices can inter-
fere with each other. Avoid using remotes for
other equipment located close to the DVD
recorder.
• Replace the batteries when you notice a fall off in
the operating range of the remote control.
• When the batteries run down or you change the
batteries, the remote control mode and TV preset
code are automatically reset. See page XX to
reset them.
R
E
C
M
O
D
E
R
E
C
PO
W
ER
D
I
S
P
L
A
Y
R
E
C
S
P
E
E
D
C
L
E
A
R
C
M
SK
IP
S
K
I
P
R
E
C
P
A
U
S
E
P
E
N
T
E
R
R
E
C
M
O
N
I
T
O
R
O
P
E
N
/
C
L
O
S
E
T
IM
E
R
P
RO
G
.
M
E
N
U
P
L
A
Y
L
I
S
T
T
O
P
M
E
N
U
/
O
R
IG
IN
A
L
SP
A
C
E
1
2
3
4
5
6
7
8
9
0
k
A
K
F
W
D
g
S
T
O
P
C
P
L
A
Y
B
R
E
V
h
HG
C
H
.@
/
:
A
B
C
D
E
F
G
H
I
J
K
L
M
N
O
P
Q
R
S
T
U
V
W
X
Y
Z
Remote
control
60˚
Within
about 7m
E6500UD.QX 03.12.8 19:06 Page 11

Before you start
12
Location of controls
Front Panel
1234567
11 10
89
12
13 1514
1. POWER button
Press to turn the DVD
recorder on and off.
2. STOP C button
Press to stop play or record-
ing.
3. REW H button
Press to skip to the previous
chapter or track.
Press and hold for 1.5 sec-
onds to fast reverse.
4. PLAY B button
Press to start or resume play.
5. FF G button
Press to skip to the next
chapter or track.
Press and hold for 1.5 sec-
onds to fast forward.
6. CH L / K button
Press to change the channel
up and down.
7. A (OPEN/CLOSE) button
Press to open or close the
disc tray.
8. Disc tray
Place a disc when open.
9. Display
10. REC SPEED button
Press to switch the recording
speed.
11. REC button
Press to start recording.
12. Remote control sensor
Receive signals from your
remote control so that you
can control the DVD
recorder from a distance.
13. S-VIDEO INPUT(LINE2)
Use to connect the S-Video
output of external equipment
with an S-Video cable.
14. VIDEO INPUT(LINE2)
Use to connect external
equipment with a standard
video cable.
15. AUDIO INPUT(LINE2)
Use to connect external
equipment with standard
audio cables.
E6500UD.QX 03.12.8 19:06 Page 12

13
Before you start
Before you start
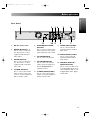
Rear Panel
1362
11 10 9
7
4
8
5
1. AC IN – Power inlet
2. AUDIO OUTPUT 1, 2
Use to connect a TV moni-
tor, AV receiver or other
equipment with standard
audio cables.
3. VIDEO OUTPUT
Use to connect a TV moni-
tor, AV receiver or other
equipment with a standard
video cable.
4. S-VIDEO OUTPUT
Use to connect the S-Video
input of a TV monitor, AV
receiver or other equipment
with an S-Video cable.
5. COMPONENT VIDEO
OUTPUT
Use to connect a TV monitor
with component video inputs
with component video cables.
6. TV ANTENNA IN
Use to connect an antenna.
7. TV ANTENNA OUT
Use to connect an antenna
cable to pass the signal from
the TV ANTENNA IN to
your TV monitor.
8. S-VIDEO INPUT(LINE1)
Use to connect the S-Video
output of external equipment
with an S-Video cable.
9. VIDEO INPUT(LINE1)
Use to connect external
equipment with a standard
video cable.
10. AUDIO INPUT(LINE1)
Use to connect external
equipment with standard
audio cables.
11. COAXIAL DIGITAL
AUDIO OUTPUT
Use to connect an AV receiv-
er, Dolby Digital decorder or
other equipment with a coax-
ial digital input with a digital
coaxial cable.
E6500UD.QX 03.12.8 19:06 Page 13

Before you start
14
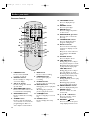
Remote Control
POWER
DISPLAY
REC SPEED CLEAR
CM SKIP
SKIP
REC
PAUSE
SETUP
REPEAT
ZOOM
ENTER
RETURN
REC
MONITOR
OPEN/CLOSE
TIMER
PROG.
MENU
PLAY LIST
TOP MENU/
ORIGINAL
SPACE
1
2
3
4
5
6
7
8
9
0
k
A
K
{ B
L
FWD
g
STOP
C
PLAY
B
REV
h
HG
CH
.@/:
ABC
DEF
GHI
JKL
MNO
PQRS
TUV
WXYZ
12
116
18
19
20
21
22
24
25
23
17
3
4
5
7
9
11
15
14
2
6
8
10
13
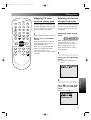
1. POWER button
Press to turn the DVD
recorder on and off.
2. DISPLAY button
Press to display or change the
on-screen display.
3. CH K / L button
Press to change the channel
up and down.
4. REC MONITOR button
Press to check the video to be
recorded before attempting.
5. REC SPEED button
Press to switch the recording
speed.
6. CLEAR button
Press to clear the password
once entered or to cancel the
programming for CD or to
clear chapter search function.
13. TOPMENU button
Press to display the top
menu.
14. REPEAT button
Press to repeat play.
15. ZOOM button
Press to enlarge the picture
on the screen.
16. OPEN/CLOSE A button
Press to open or close the
disc tray.
17. TIMER PROG. button
Press to display the timer
program setting menu.
18. Number buttons
Press to select a title/chap-
ter/track on display or a TV
channel.
Or press to enter values for
the settings in the SETUP
menu.
19. CM SKIP button
Press to skip the 30 sec.
20. SKIP H button
During play, press to skip to
the previous chapter or track.
Or during play is paused, press
to play reverse step by step.
SKIP G button
During play, press to skip to
the next chapter or track.
Or during play is paused, press
to play forward step by step.
21. FWD D button
During playback, press to play
fast forward.
Or during play is paused,
press to play slow forward.
22. MENU ORG/PL button
Press to display the Play List.
23. ENTER button
Press to confirm or select
menu items.
24. K / L / B / { buttons
Press to move the cursor
around the screen.
25. RETURN button
Press to return to the previ-
ously displayed menu screen.
7. REC button
Press to start recording.
8. PAUSE F button
Press to pause play or
recording.
9. PLAY B button
Press to start or resume play.
10. REV E button
During play, press to play fast
reverse.
Or during play is paused,
press to play slow reverse.
11. STOP C button
Press to stop play or record-
ing.
12. SETUP button
Press to display the setup
menu.
E6500UD.QX 03.12.8 19:06 Page 14

15
Before you start
Before you start
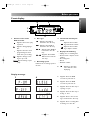
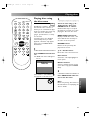
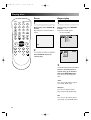
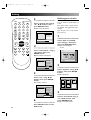
Front display
1. Current status of the
DVD recorder
: Appears when a disc play
is paused.
: Appears during playing a
disc.
: Appears when the timer
programming has been
made and is proceeding.
: Appears during record-
ing is in proceed.
:Appears during repeat
play.
2. Disc type
: Appears when CD is
inserted in the disc tray.
: Appears when DVD is
inserted in the disc tray.
: Appears when DVD-R
is inserted in the disc
tray.
: Appears when DVD-
RW is inserted in the
disc tray.
3. Recording speed
Indicates the recording speed of
the disc.
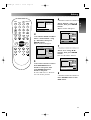
Display message
1
2
3
4
5
6
4. Title/Track and Chapter
mark
: Appears when indicat-
ing a title/track number.
: Appears when indicat-
ing a chapter number.
5. Displays the following
• Playing time / remaining time
• Current title / chapter / track
number
• Recording time
• Clock
• Channel number
6. : Appears in the after-
noon with the clock
displaying.
1. Appears when the DVD
recorder is powered on.
2. Appears when the DVD
recorder is powered off.
3. Appears when the disc tray is
opening or open.
4. Appears when the disc tray is
closing or close.
5. Appears when a disc is load-
ing or loaded in the disc tray.
6. Appears when recording data
is writing on to the disc.
1
6
3
5
2
4
E6500UD.QX 03.12.8 19:06 Page 15

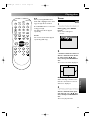
Connections
16
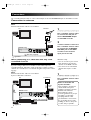
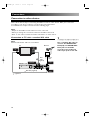
With this setup:
• You can record any non-scram-
bled channel by selecting the
channel on the DVD recorder.
• You cannot record scrambled
channels that require a cable
box.
1
Use a standard antenna cable
as shown.
When connecting to a cable box with only a few
scrambled channels
If you are using a cable box or satellite receiver with only a few
scrambled channels, follow the setup on this page. If many or all the
channels are scrambled, we recommend using the setup on the follow-
ing page.
Note:
Antenna and antenna cable are not included.
A piece of RF cable is included.
TV
VHF/UHF
IN
VHF/UHF
OUT
ANT.
IN
ANT.
OUT
VHF/UHF
IN
DVD Recorder
To Antenna
Cable
box
antenna
cable
1
RF
cable
1
RF cable (supplied)
1
: signal flow
Note to the Cable TV
System Installer :
This reminder is provided to
call the Cable TV system
installer’s attention to Article
820-40 of the National
Electrical Code, which
provides guidelines for proper
grounding - in particular,
specifying that the cable
ground shall be connected to
the grounding system of the
building, as close to the point
of cable entry as possible.
1
Use a standard antenna cable
to connect the wall jack to
the TV ANTENNA IN jack
on the DVD recorder.
2
Use a standard antenna cable
to connect the TV ANTEN-
NA OUT jack on the DVD
recorder to the antenna
input jack on the TV.
Use a standard antenna cable to connect the wall jack to the TV ANTENNA IN jack on the DVD recorder.
Connection to antenna
Note:
Antenna and antenna cable are not included.
TV
VHF/UHF
IN
ANT.
IN
ANT.
OUT
DVD Recorder
Antenna
antenna
cable
1
RF cable (supplied)
2
: signal flow
E6500UD.QX 03.12.8 19:06 Page 16

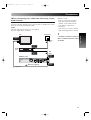
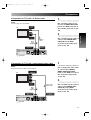
With this setup:
• You can record any unscram-
bled channel by selecting the
channel on the cable box. Be
sure that the cable box is
turned on.
• You cannot record one channel
while watching another channel.
1
Use a standard antenna cable
as shown.
When connecting to a cable box with many scram-
bled channels
If many or all the channels you receive by cable or satellite are scram-
bled, we recommend using this setup.
Note:
Antenna and antenna cable are not included.
A piece of RF cable is included.
TV
VHF/UHF
IN
VHF/UHF
OUT
VHF/UHF
IN
ANT.
OUT
ANT.
IN
DVD Recorder
To Antenna
Cable
box
1
1
antenna
cable
1
RF
cable
: signal flow
RF cable (supplied)
Connections
Connections
17
E6500UD.QX 03.12.8 19:06 Page 17

Connections
18
1
Use a standard A/V cable to
connect the AUDIO OUT-
PUT(L/R) and VIDEO OUT-
PUT jacks on the DVD
recorder to the audio and
video input jacks on the TV.
Connection to TV with a standard A/V cable
Note:
Antenna and antenna cable are not included.
TV
VHF/UHF
IN
A/V
IN 1
ANT.
IN
ANT.
OUT
AUDIO/VIDEO
OUTPUT
DVD Recorder
Antenna
antenna
cable
A/V
cable
(supplied)
1
: signal flow
RF cable (supplied)
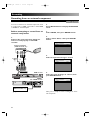
Connection to other devices
There will be various ways of connecting the DVD recorder to other devices. Make your connection
according to your choice of devices, screen format, and sound format.
You will find some sample connections in the following pages.
Note:
• All jack on the DVD recorder will not need to connected.
• When you change the connections, all devices should be turned off.
• Refer to each owner's manual for further information on other devices.
E6500UD.QX 03.12.8 19:06 Page 18

Connections
Connections
19
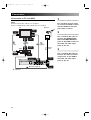
1
Use a S-Video cable to con-
nect the S-VIDEO OUTPUT
jack on the DVD recorder to
the S-Video input jack on the
TV.
2
Use a standard audio cable to
connect the AUDIO OUT-
PUT(L/R) on the DVD
recorder to the audio input
jacks on the TV.
Connection to TV with a S-Video cable
Note:
S-video cable is not included.
1
Use a component video cable
to connect the COMPO-
NENT VIDEO OUTPUT
jacks on the DVD recorder to
the component input jacks
on the TV.
2
Use a standard audio cable to
connect the AUDIO OUT-
PUT(L/R) on the DVD
recorder to the audio input
jacks on the TV.
Connection to TV with a component video cable
Note:
Component video cable is not included.
TV
DVD Recorder
S-VIDEO
INPUT
S-VIDEO
OUTPUT
A/V
IN 1
AUDIO/VIDEO
OUTPUT
S-Video
cable
1
A/V
cable
(supplied)
2
: signal flow
TV
COMPONENT
VIDEO OUT
COMPONENT
VIDEO IN
DVD Recorder
A/V
IN 1
AUDIO/VIDEO
OUTPUT
component
video cable
1
A/V
cable
(supplied)
2
: signal flow
E6500UD.QX 03.12.8 19:06 Page 19

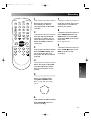
Connections
20
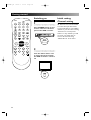
1
Use standard antenna cables
to connect the DVD recorder
and the VCR from the wall
jack socket as shown.
2
Use a standard A/V cable to
connect the AUDIO OUT-
PUT and VIDEO OUTPUT
jacks on the DVD recorder to
the audio and video input
jacks on the TV.
3
Use a standard A/V cable to
connect the audio and video
output jacks on the VCR to
the audio and video input
jacks on the TV.
Connection to TV and VCR
Note:
Antenna and antenna cable are not included.
A piece of Audio/Video cable and RF cable are included.
TV
VHF/UHF
OUT
ANT.
OUT
AUDIO/VIDEO
OUTPUT
DVD Recorder
ANT.
IN
A/V
IN 2
A/V
OUT
Antenna
A/V
IN 1
VHF/UHF
IN
VHF/UHF
IN
VCR
RF cable (supplied)
1
A/V
cable
3
antenna
cable
1
RF
cable
1
A/V
cable
(supplied)
2
: signal flow
E6500UD.QX 03.12.8 19:06 Page 20
Page is loading ...
Page is loading ...
Page is loading ...
Page is loading ...
Page is loading ...
Page is loading ...
Page is loading ...
Page is loading ...
Page is loading ...
Page is loading ...
Page is loading ...
Page is loading ...
Page is loading ...
Page is loading ...
Page is loading ...
Page is loading ...
Page is loading ...
Page is loading ...
Page is loading ...
Page is loading ...
Page is loading ...
Page is loading ...
Page is loading ...
Page is loading ...
Page is loading ...
Page is loading ...
Page is loading ...
Page is loading ...
Page is loading ...
Page is loading ...
Page is loading ...
Page is loading ...
Page is loading ...
Page is loading ...
Page is loading ...
Page is loading ...
Page is loading ...
Page is loading ...
Page is loading ...
Page is loading ...
Page is loading ...
Page is loading ...
Page is loading ...
Page is loading ...
Page is loading ...
Page is loading ...
Page is loading ...
Page is loading ...
Page is loading ...
Page is loading ...
Page is loading ...
Page is loading ...
Page is loading ...
Page is loading ...
Page is loading ...
Page is loading ...
Page is loading ...
Page is loading ...
Page is loading ...
Page is loading ...
Page is loading ...
Page is loading ...
Page is loading ...
Page is loading ...
Page is loading ...
Page is loading ...
Page is loading ...
Page is loading ...
Page is loading ...
Page is loading ...
Page is loading ...
Page is loading ...
Page is loading ...
Page is loading ...
Page is loading ...
Page is loading ...
Page is loading ...
Page is loading ...
Page is loading ...
Page is loading ...
Page is loading ...
Page is loading ...
Page is loading ...
Page is loading ...
Page is loading ...
Page is loading ...
Page is loading ...
Page is loading ...
-
 1
1
-
 2
2
-
 3
3
-
 4
4
-
 5
5
-
 6
6
-
 7
7
-
 8
8
-
 9
9
-
 10
10
-
 11
11
-
 12
12
-
 13
13
-
 14
14
-
 15
15
-
 16
16
-
 17
17
-
 18
18
-
 19
19
-
 20
20
-
 21
21
-
 22
22
-
 23
23
-
 24
24
-
 25
25
-
 26
26
-
 27
27
-
 28
28
-
 29
29
-
 30
30
-
 31
31
-
 32
32
-
 33
33
-
 34
34
-
 35
35
-
 36
36
-
 37
37
-
 38
38
-
 39
39
-
 40
40
-
 41
41
-
 42
42
-
 43
43
-
 44
44
-
 45
45
-
 46
46
-
 47
47
-
 48
48
-
 49
49
-
 50
50
-
 51
51
-
 52
52
-
 53
53
-
 54
54
-
 55
55
-
 56
56
-
 57
57
-
 58
58
-
 59
59
-
 60
60
-
 61
61
-
 62
62
-
 63
63
-
 64
64
-
 65
65
-
 66
66
-
 67
67
-
 68
68
-
 69
69
-
 70
70
-
 71
71
-
 72
72
-
 73
73
-
 74
74
-
 75
75
-
 76
76
-
 77
77
-
 78
78
-
 79
79
-
 80
80
-
 81
81
-
 82
82
-
 83
83
-
 84
84
-
 85
85
-
 86
86
-
 87
87
-
 88
88
-
 89
89
-
 90
90
-
 91
91
-
 92
92
-
 93
93
-
 94
94
-
 95
95
-
 96
96
-
 97
97
-
 98
98
-
 99
99
-
 100
100
-
 101
101
-
 102
102
-
 103
103
-
 104
104
-
 105
105
-
 106
106
-
 107
107
-
 108
108


Ask a question and I''ll find the answer in the document
Finding information in a document is now easier with AI
Related papers
-
Sylvania ZV450SL8 Owner's manual
-
-
-
-
-
-
-
-
-
Sylvania EWR10D5 User manual
