Thorens TD 2010 User manual
- Category
- Audio turntables
- Type
- User manual
This manual is also suitable for
Page is loading ...

Page is loading ...
Page is loading ...

INTRODUCTION 38
CONSIGNES DE SECURITE 39
DEBALLAGE ET MONTAGE 40
INSTALLATION ET RACCORDEMENT 42
INSTALLATION DE LA CELLULE DE LECTURE 44
REGLAGE DE LA HAUTEUR DU BRAS 45
REGLAGE PRECIS DE LA CELLULE 46
BRAS DE LECTURE TP 250 (TD 2010) 47
BRAS DE LECTURE TP 300 (TD 2030) 48
UTILISATION DE LA PLATINE 49
MAINTENANCE ET ENTRETIEN 50
CARACTERISTIQUES TECHNIQUES 51
INFORMATIONS SERVICE APRES-VENTE 52
INTRODUCTION 22
HINTS FOR SAFETY AND PRECAUTION 23
UNPACKING AND ASSEMBLY 24
PLACEMENT AND CONNECTIONS 26
MOUNTING THE PICKUP CARTRIDGE 28
ADJUSTING TONEARM HEIGHT 29
ALIGNMENT OF PICKUP CARTRIDGE 30
TONEARM TP 250 (TD 2010) 31
TONEARM TP 300 (TD 2030) 32
OPERATION 33
MAINTENANCE AND CARE 34
TECHNICAL SPECIFICATIONS 35
SERVICE INFORMATION 36
Page is loading ...
Page is loading ...
Page is loading ...
Page is loading ...
Page is loading ...
Page is loading ...
Page is loading ...
Page is loading ...
Page is loading ...
Page is loading ...
Page is loading ...
Page is loading ...
Page is loading ...
Page is loading ...
Page is loading ...
Page is loading ...

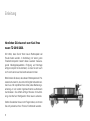
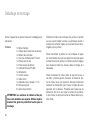
Congratulations for your purchase of the
new TD 2010 / 2030.
We hope that your new record player will give you lots
of listening pleasure. In combination with a good pickup
cartridge this turntable is to yield outstanding sound. Man-
ufacturing and assembly of this record player has been
carried out in Germany which will guarantee you its high
quality and functionality being maintained for many years
to come.
Please keep in mind that this device is a precision instru
-
ment and therefore requires some attention and care. We
strongly advise to read these instructions attentively be-
fore proceeding with the set-up as it contains all neces-
sary information and guidance for assembly, placement,
set-up and configuration of your new record player.
In the event that you have any question this user manual
cannot answer please do not hesitate to ask your Thorens
dealer for further assistance.
22

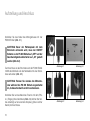
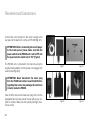
PLEASE READ THIS PAGE CAREFULLY BEFORE
OPERATING YOUR UNIT!
CAUTION
To reduce risk of electric shock, do not remove the cover (or back).
No user-serviceable parts inside.
EXPLANATION OF GRAPHICAL SYMBOLS
The lightning flash with arrowhead symbol, within
an equilateral triangle, is intended to alert you to
the presence of uninsulated ‘dangerous voltage’
within the product’s enclosure that may be of suf
-
ficient magnitude to constitute an electric shock to
persons.
The exclamation point within an equilateral triangle
is intended to alert you to the presence of important
operating and maintenance (servicing) instructions in
the literature accompanying the appliance.
WARNING
TO PREVENT FIRE OR SHOCK HAZARD, DO NOT EXPOSE THIS
APPLIANCE TO RAIN OR MOISTURE.
IMPORTANT: DISPOSAL OF WASTE EQUIP-
MENT BY USERS IN PRIVATE HOUSEHOLDS
IN THE EUROPEAN UNION
This symbol on the product or on its packaging in-
dicates that this product must not be disposed off
with your other household waste. Instead, it is your
responsibility to dispose of your waste equipment by
handing it over to a designated collection point for
the recycling of waste electrical and electronic equip-
ment. The separate collection and recycling of your
waste equipment at the time of disposal will help to
conserve natural resources and ensure that it is re-
cycled in a manner that protects human health and
the environment. For more information about where
you can drop off your waste equipment for recycling,
please contact your local city office, your household
waste disposal service or the shop where you pur-
chased the product.
This product was tested and complies with all the
requirements for the CE Mark.
23

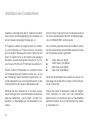
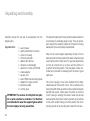
Carefully remove the unit and its accessories from the
shipping box.
Supplied items:
ATTENTION: The surface of both plinth and plat-
ter is quite sensitive to scratches. It is therefore
recommended to wear the supplied gloves whilst
the record player is being assembled.
1 x user manual
1 x plinth (with/without tonearm)
1 x motor in housing
1 x Thorens drive belt
1 x platter with felt mat
1 x tonearm counterweight
1 x electronic control unit PS 800
1 x mains adaptor
1 x power cord
1 x set of RCA interconnecting leads
1 x adaptor for single records
3 x protective disks
2 x cotton glove
Proceed with placing the three protective disks where the
record player is eventually going to stay. They are provid
-
ed to prevent the sensitive surface of furniture from being
damaged by the record player’s spiked feet.
Now put the record player respectively its feet onto the
disks and after the final position has been achieved make
sure that the plinth is fairly level. For any fine-adjustments
turn the tip of each foot up or down until the plinth is in
a perfect horizontal position. This procedure is best con
-
trolled (and corrected if necessary) with the help of good
spirit level.
The motor housing is now to be inserted into the dedi
-
cated recess at the rear left corner. This is carried out by
having the plinth lifted up and the motor positioned exactly
beneath the recess. Slowly lower the plinth so that the
motor housing is entering the recess. Great care should
be taken while doing this in order to prevent any scratches
on the plinth surface. Being in its final position the motor
housing should not be touching the inside of the recess.
24

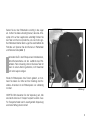
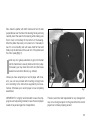
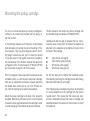
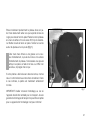
Now take the platter with both hands and hold its axle
perpendicular over the hole in the bearing. Slowly and very
carefully insert the axle into the bearing while making sure
that it must not forcefully hit the bottom of the bearing.
After the platter has been put in place turn it manually to
see if it runs smoothly and with ease. Add felt mat and
finally loop the belt around the outer rim of the platter and
the motor pulley (Fig. 1).
Avoid any oil or greasy substance to get onto the belt
and the transmission area of platter and motor pulley.
If necessary you may clean them with a lint-free tissue
soaked in an alcoholic dilution (e.g. ethanol).
Unless you have acquired your record player with tone
-
arm, you can now proceed with mounting a foreign tone
arm according to the instructions supplied by its manu-
facturer. Otherwise your record player is now completely
assembled.
IMPORTANT: It is highly recommended to save the ship
-
ping box and all packing material in case the record player
needs to be packed again for transportation.
Fig. 1
Thorens cannot be held responsible for any damage that
may occur during transport on the ground that the record
player has not been properly packed.
25

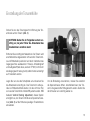
Connect the cord coming from the motor housing to the
rear panel of the electronic control unit PS 800 (Fig. 2.1).
ATTENTION: Before connecting the record player
to the mains power please make sure that the
power switch on the PS 800 unit is set to OFF and
the speed selector switch set to “33” (Fig.2.2).
The PS 800 unit is connected to the mains by using the
supplied mains adaptor and the power cord plugged into
a wall socket (Fig. 2.3).
ATTENTION: Never disconnect the motor plug
from the PS 800 unit while it is switched ON. Dis
-
regarding this advise may damage the electronic
circuitry inside the PS 800.
Take the RCA interconnect leads and plug them into the
designated (phono) input jacks at the rear side of your am
-
plifier or receiver. Make sure that polarity (left/right chan-
nel!) is correct.
Fig. 2.1 Fig. 2.2
Fig. 2.3 Fig. 2.4
26

Hint: if your amplifier lacks a built-in phono stage you need
to acquire a special external phono-preamplifier. For am-
plifiers/receivers featuring a 5-pin DIN-socket at the phono
input section you will need a special adaptor (RCA to DIN)
which may be available from your Thorens dealer.
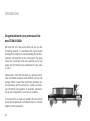
When placing the record player to its final position make
sure that it is a fair distance away from other audio devic
-
es, such as amplifier, receiver or CD player. This measure
is to avoid electro-magnetic interferences which can yield
a distorting effect in the sensitive pickup cartridge, which
may be audible as hum during playback.
Electro-magnetic interferences however can be dis
-
closed and eliminated by simply changing the position
of the record player with respect to the other devices.
Thorens record players are relatively insensitive when sub-
ject to foot-fall shocks or airborne resonance. Neverthe-
less, a general problem remains when it comes to playing
back vinyl records with a high-quality pickup cartridge. It
is therefore highly recommended to choose a sturdy piece
of furniture for placement and to avoid the proximity of the
record player to the loudspeakers.
Under certain circumstances all these precautions may not
be good enough in older houses with wooden floor con
-
struction. Here, in most cases a solid shelf firmly mounted
to a supporting wall can be very beneficial for the sonic
properties of the record player if it is placed on such a shelf
or console.
27

You can now mount and adjust your pickup cartridge ac-
cording to the instructions provided with the pickup or
with the tonearm.
In the following chapters you’ll find some comprehensive
hints and advise concerning the correct mounting of Tho
-
rens tonearms. They may accordingly be used for mount-
ing foreign tonearms as well, yet if in doubt you should
in any case resort to the original instructions provided by
the manufacturer of the tonearm. Special hints about the
configuration of the Thorens tonearms TP 250 and TP 300
are to be found on page 31-32 of this manual.
Hint: If you happen to have acquired this record player as a
complete system, i.e. with tonearm and pickup cartridge,
there are no adjustments necessary because everything
has already been carried out for you in the Thorens fac
-
tory. Only the tracking force needs to be adjusted.
Mount the pickup cartridge to the slots in the tonearm’s
headshell. While doing this basic work it is recommended
to leave the stylus guard attached to the cartridge in order
to avoid damaging of the delicate stylus and cantilever.
Thorens tonearms will accept any pickup cartridge with
the standard fixing hole distance of 12.5 mm (1/2 ”).
Carefully and with the help of tweezers the four colour-
coded litz wires coming from the tonearm’s headshell are
attached to the respective pins (identical colours) at the
rear face of the cartridge.
R
G
L
G
For the time being do not tighten the headshell screws.
Fine-adjusting and fixing the cartridge is done after having
determined the final tone arm height.
Hint: If Grado pickup cartridges are going to be employed
it is recommended to fix the cartridge with the screws
“upside down”. This means that the screws are inser
-
ted from underneath through the holes of cartridge and
headshell whereby the nuts are to fix the screws on top of
the headshell.
right channel, red (signal)
right channel, green (ground)
left channel, white (signal)
left channel, blue (ground)
28

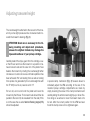
The counterweight is attached to the rear end of the tone-
arm by some slight pressure and a clockwise rotation to-
wards the tonearm’s bearings (Fig. 3).
ATTENTION: Great care is necessary for the fol
-
lowing mounting and adjust-ment procedures,
because the slightest mistake may damage the
stylus and cantilever of your pickup cartridge.
Carefully detach the stylus guard from the cartridge. Low
-
er the lift lever and move the tonearm to a position in be-
tween tonearm rest and the outer rim of the platter. Now
balance the tonearm by rotating the counterweight either
clockwise or counter-clock-wise until total equilibrium has
been achieved. Hint: anti-skating force as well as tracking
force (unless it is generated by the counterweight like with
the TP 250) must in any case be set to “0”.
Put an old, worn record onto the platter and lower the
tonearm by the lift lever. The tonearm tube should then be
parallel to the record (to be visualised from the side). If this
is not the case the so-called Vertical Tracking Angle (VTA)
should be adjusted.
Fig. 3
A special clamp mechanism (Fig. 3) however allows to
individually adjust the VTA according to the size of the
mounted pickup cartridge. Adjustments are made by
simply loosening the screw of the clamp mechanism and
carefully sliding the entire tonearm slightly up or down. Be-
fore doing so we advise to move the tonearm back onto
its rest. After the correct position for the VTA has been
found the clamp screw is to be tightened again.
29

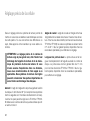
Only a painstakingly aligned pickup cartridge is able to
compliment the outstanding sonic capabilities and poten-
tial of this record player. If you consider the alignment too
difficult to be carried out by yourself, do not hesitate to ask
your Thorens dealer for a helping hand.
ATTENTION: When aligning the cartridge great
care is once more obligatory in order to avoid that
the delicate stylus or sensitive parts of the tone
-
arm are being damaged. If you are a newcomer
without any experience it is better to leave this
work to an expert who knows the specific char-
acteristics of most cartridges. A badly aligned
pickup cartridge will be well on the way to yield
bad sound and to damage your records!
Azimuth: This is the angle between cantilever and record
groove. It should be exactly 90° (excluding those cartridg-
es in which the cantilever has purposely been installed with
a slight offset). Azimuth can be adjusted neither on the TP
250 nor on the TP 300. It is therefore most important that
a cartridge with precise azimuth is going to be mounted.
Offset: this is the angle between the longitudinal axis of
the pickup cartridge and the tonearm’s longitudinal axis.
In all pivoted tonearms (like TP 250 and TP 300) the opti-
mum angle is to be found between 21° and 24°. The spe-
cial cartridge alignment gauge required for this adjustment
may be available from your Thorens dealer.
Overhang: this is the distance between the stylus tip and
the centre of the platter spindle. For the TP 250 and TP
300 the overhang should be 17 mm. The special cartridge
alignment gauge required for this adjustment may be avail-
able from your Thorens dealer.
30

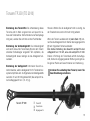
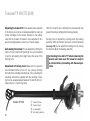
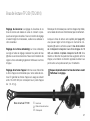
Adjusting the tonearm lift: It has already been adjusted
in the factory and can be considered suitable for nearly all
pickup cartridges in the market. However in the unlikely
case that the tonearm lift needs to be re-adjusted to fit a
special cartridge please contact your Thorens dealer.
Anti-skating force (bias): This is adjusted by shifting the
button on the tonearm’s lift bench
(2). It is recommended
to set the anti-skating force slight below the value of the
tracking force.
Adjustment of tracking force: Make sure to inquire the
recommended tracking force for your pickup cartridge
from either the cartridge manufacturer or by consulting the
mounting instructions supplied with the cartridge. Track
-
ing force is usually adjusted between 10 and 25 mN (cor-
responding to 1.0 and 2.5 grams).
Hint: Do not set too low a tracking force, because this may
prevent the pickup car-tridge from tracking properly.
After the tonearm has been correctly balanced (see page
29) you can apply the tracking force by rotating the coun-
terweight (3) according to the following scheme: a half turn
of the counterweight corresponds to a tracking force of
10 mN (1.0 g) whereby a full turn corresponds to a force
of 20 mN (2.0 g). Turning the counter-weight towards the
bearings will increase tracking force, whereas turning the
weight into the opposite direction will decrease it.
Make sure that the tonearm is kept in its armrest
before doing these adjustments.
Tonearm TP 250
➀
➁
➂
➀
➁
➂
tonearm lift lever
tonearm bench
counterweight
31

Adjusting the tonearm lift: It has already been adjusted
in the factory and can be considered suitable for nearly all
pickup cartridges in the market. However in the unlikely
case that the tonearm lift needs to be re-adjusted to fit a
special cartridge please contact your Thorens dealer.
Anti-skating force (bias): This is adjusted by shifting the
button on the tonearm’s lift bench
(2). It is recommended
to set the anti-skating force slight below the value of the
tracking force.
Adjustment of tracking force: Make sure to inquire the
recommended tracking force for your pickup cartridge
from either the cartridge manufacturer or by consulting the
mounting instructions supplied with the cartridge. Track
-
ing force is usually adjusted between 10 and 25 mN (cor-
responding to 1.0 and 2.5 grams).
Hint: Do not set too low a tracking force, because this may
prevent the pickup cartridge from tracking properly.
Tracking force is applied by a spring inside the bearing
assembly. After the tonearm has been correctly balanced
(see page 29) you can adjust the tracking force by turning
the dial knob (4) at the bearing assembly.
Set tracking force dial to “0” before balancing the
tonearm and make sure the tonearm is kept in
its armrest before proceeding with these adjust
-
ments.
Tonearm TP 300
➀
➁
➂
➃
tonearm lift lever
tonearm bench
counterweight
anti-skating dial knob
➀
➁
➂
➃
32

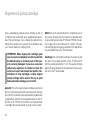
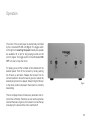
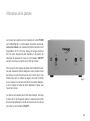
Fig. 6
The motor of the record player is electronically controlled
by the connected PS 800 unit (Fig. 6). The toggle switch
on the right is for selecting the speed whereby two speeds
are available: 33 rpm for long playing records and 45
rpm for singles. The toggle switch on the left labelled ON/
OFF is to start or stop the motor.
For playing a record the turntable is first started with the
desired speed. Then lift the tonearm by slowly pushing
the lift lever up and back. Release the tonearm from its
rest and position it above the lead-in groove or above the
desired piece/track to be played. Slowly bring the lift lever
to the down-position whereupon the tonearm is smoothly
descending.
This record player does not feature any automatic end-of-
record shut-off facility. Therefore, as soon as the stylus has
reached the lead-out groove, the tonearm is to be lifted up
manually by the lever and the motor switched off.
33

Your record player requires no particular maintenance.
If over the time dust has collected on the plinth you can
wipe it off with a moistened cloth. Hint: A pre-moistened
cleaning tissue for glasses is a very good choice for doing
this.
ATTENTION: Do not use paper tissue or any
coarse-fibred cloth because they may leave
scratches on the rather sensitive acryl surface.
Also refrain from using a dry cloth for cleaning
because this will in any case generate undesired
static charges.
The Thorens precision belt should be exchanged at least
every other year. If the record player is not in use for a
longer time, it is advisable to remove the belt in order to
prevent a premature ageing under tension.
If the record player is frequently in use it is recommended
to have the bearing checked and lubrication renewed after
about 5 years.
34

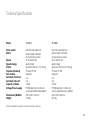
Model
Drive system
Motor
Speed
Speed change
Platter
Tonearm (standard)
Anti-skating
Automatic functions
Automatic shut-off
Capacity of leads
Voltage/Power supply
Dimensions (WxDxH)
Weight
TD 2010
belt drive (via platter rim)
electronically controlled
AC synchronous motor
33 and 45 rpm
electronically
aluminium 300 mm (12”) 4.5 kg
Thorens TP 250
magnetic
n/a
n/a
140 pF
PS 800 electronic control unit
country-specified mains adaptor
420 x 340 x 160 mm
18.0 kg
Technical modifications subject to change. Handmade in Germany
TD 2030
belt drive (via platter rim)
electronically controlled
AC synchronous motor
33 and 45 rpm
electronically
aluminium 300 mm (12”) 6.2 kg
Thorens TP 300
magnetic
n/a
n/a
140 pF
PS 800 electronic control unit
country-specified mains adaptor
420 x 340 x 200 mm
22.0 kg
35

Your Thorens dealer or distribution partner shall be pleased
to assist you in the event that you have any further queries
or need additional information concerning Thorens prod-
ucts.
You may contact Thorens also directly:
Thorens Export Company Ltd.
Im Huebel 1, CH-4304 Giebenach, Switzerland
www.thorens.com, [email protected]
In case of warranty claims you are kindly requested to
first contact your Thorens dealer or distributor.
Further information may also be obtained from:
36
Page is loading ...
Page is loading ...
Page is loading ...
Page is loading ...
Page is loading ...
Page is loading ...
Page is loading ...
Page is loading ...
Page is loading ...
Page is loading ...
Page is loading ...
Page is loading ...
Page is loading ...
Page is loading ...
Page is loading ...
Page is loading ...
Page is loading ...
Page is loading ...

© 2006 Thorens Export Company AG
Im Huebel 1, CH-4304 Giebenach
E-Mail: [email protected]
Internet: www.thorens.com

analog high fidelity
Printed in Germany · UM2000S-1006-A
-
 1
1
-
 2
2
-
 3
3
-
 4
4
-
 5
5
-
 6
6
-
 7
7
-
 8
8
-
 9
9
-
 10
10
-
 11
11
-
 12
12
-
 13
13
-
 14
14
-
 15
15
-
 16
16
-
 17
17
-
 18
18
-
 19
19
-
 20
20
-
 21
21
-
 22
22
-
 23
23
-
 24
24
-
 25
25
-
 26
26
-
 27
27
-
 28
28
-
 29
29
-
 30
30
-
 31
31
-
 32
32
-
 33
33
-
 34
34
-
 35
35
-
 36
36
-
 37
37
-
 38
38
-
 39
39
-
 40
40
-
 41
41
-
 42
42
-
 43
43
-
 44
44
-
 45
45
-
 46
46
-
 47
47
-
 48
48
-
 49
49
-
 50
50
-
 51
51
-
 52
52
-
 53
53
-
 54
54
-
 55
55
-
 56
56


Thorens TD 2010 User manual
- Category
- Audio turntables
- Type
- User manual
- This manual is also suitable for
Ask a question and I''ll find the answer in the document
Finding information in a document is now easier with AI
in other languages
- français: Thorens TD 2010 Manuel utilisateur
- Deutsch: Thorens TD 2010 Benutzerhandbuch