Page is loading ...
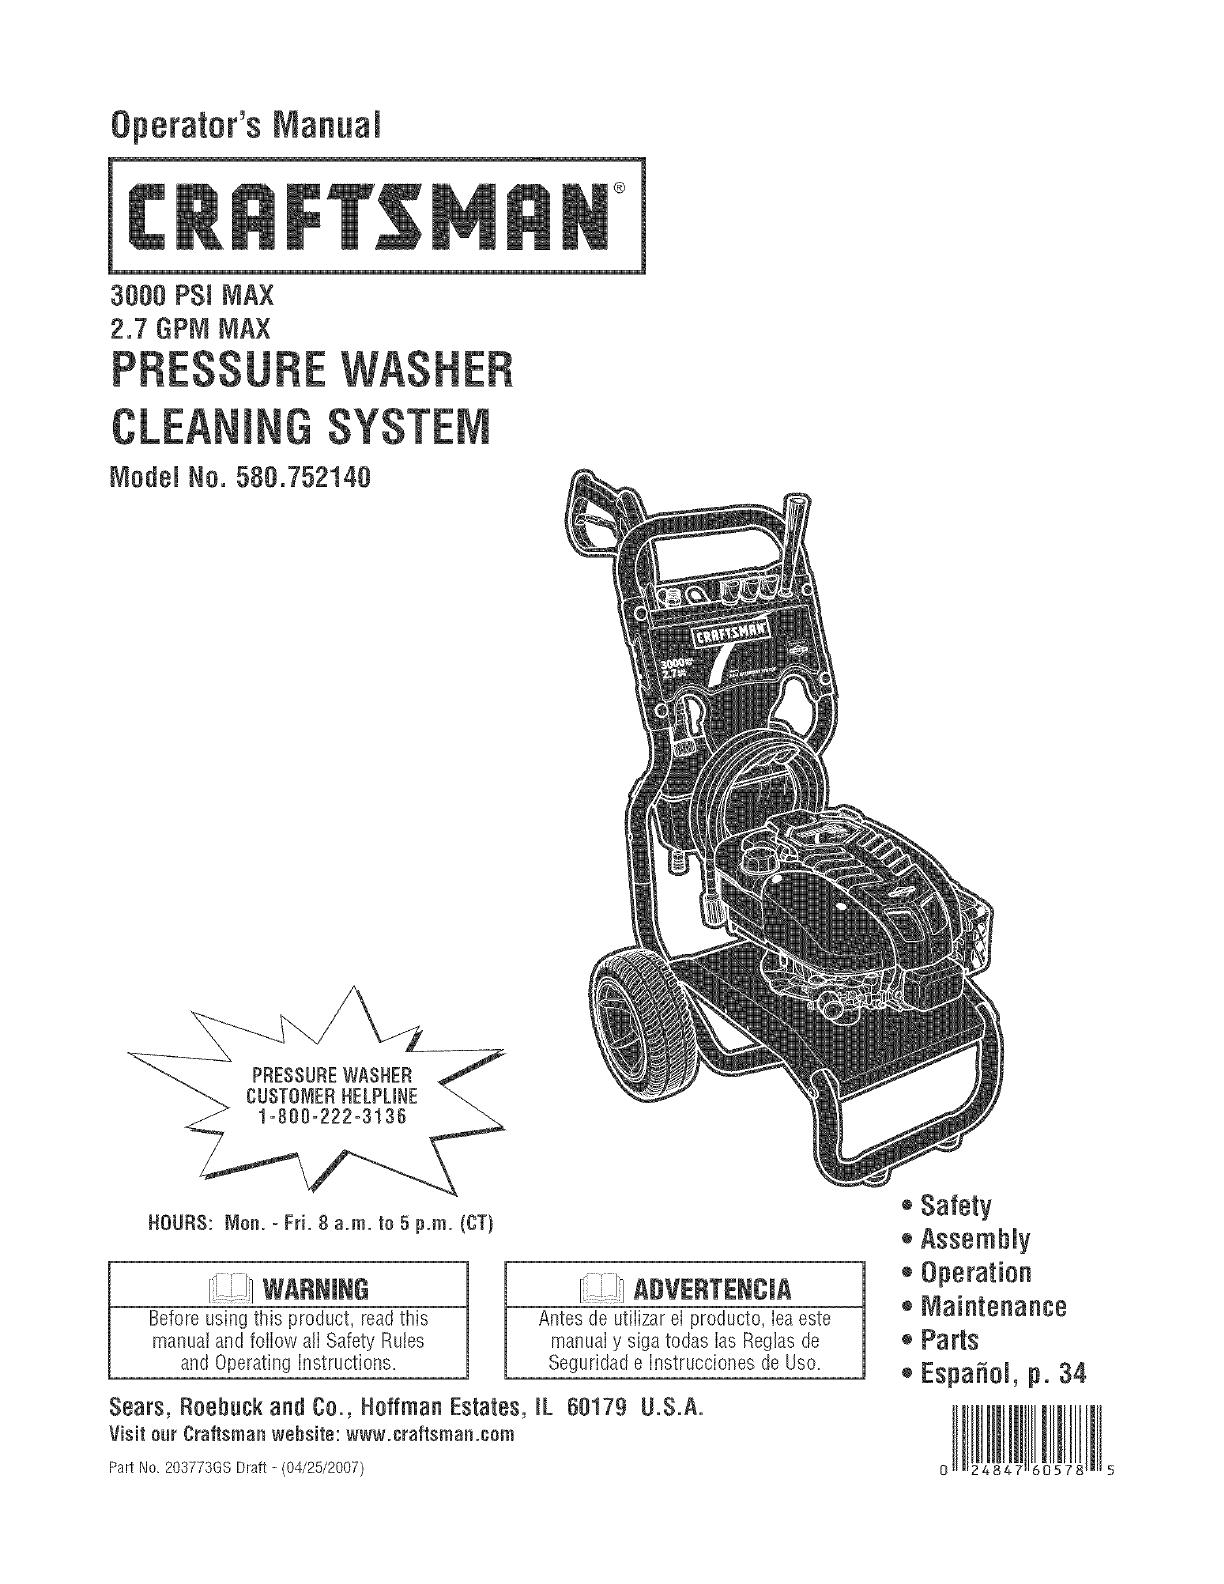
Operator'sManual
®
3000 PSi MAX
2.7 GPiVIMAX
_odei No. 580.752140
PRESSUREWASHER
CUSTOMERHELPLINE
HOUriS: Non. - Fri. 8 a.m. to 5 p.m. (CT)
wAReeeG
Before usingthis product, readthis
manualand follow atISafetyRutes
and Operating Instructions.
ADVER'rENCmA
Antes de utiiizar el producto, Ieaeste
manuaiy siga todas IasReglasde
Seguridade Instrucciones de Uso.
Sears, Roebuck and Ca., Hoffman Estates, [L 68179 U.S.A.
Visit our Craftsman website: www.craftsman.eom
Part No. 203773GS Draft - (04/25/2007)
®Safety
®AssembJy
®Operation
,, Maintenance
,, Parts
,, Espa_oi, p. 34
0 4
WARRANTY.......................................... 2
SAFETYRULES...................................... 2-5
FEATURESANDCONTROLS.............................. 6
ASSEMBLY........................................ 7-10
OPERATION....................................... 11-15
SPECIFICATIONS..................................... 16
MAINTENANCE.................................... 17-2!
STORAGE........................................... 22
TROUBLESHOOTH'_IG.................................. 23
REPLACEMENTPARTS.............................. 24-31
EMISSIONCONTROLWARRANTY..................... 32-33
ESPA__OL......................................... 34-59
HOWTO ORDERPARTS........................ BACKPAGE
If this pressurewasher faiis dueto a defectin materiai or workmanship within one year from the dateof purchase,return it to
any Searsstore, other Craftsman outlet, or SearsParts & RepairCenterin the UnitedStates or Canadafor free repair (or
replacementif repair proves impossible).
Ali warranty coverageapplies for only 90 days from dateof purchaseif this pressure washer is ever usedfor commercial or
rentaipurposes.
This warranty gives you specific legal rights, and you mayalso haveother rights which vary from stateto state.
Sears, Roebuck and Ce,, Heffman Estates, JL68179
Sears Canada Jnc,, Terente, 8ntarie, Canada MSB 2B8
Thisis the safety alert symbol, tt is used to alert yea to potentialpersenaminjary hazards. ObeyaHsafety messages
that fellow this symbemto avoid pessiNe injuryor death.
_Read this manual carefully and become familiar
..... with yourpressurewasher. Knew its applications,
itslimitations, and any hazardsinvolved.
Thesafety alert symboi (,_) is usedwith a signal word
(DAr/GER,CAUTIOr/,WARNING),a pictorial and/or a safety
messageto alert you to hazards.BANGERindicatesa hazard
which, if not avoided, wi/'/resuIt in deathor serious injury.
WARNINGindicates a hazardwhich, if not avoided, cou/d
result in deathor serious injury. CAUTtONindicatesa hazard
which, if not avoided, might result in minor or moderate
injury. NOTICEindicatesa situation that could result in
equipment damage. Foiiow safety messagesto avoid or
reducethe risk of injury or death.
Hazard SymhoJsand Nteanings
ToxicFumes HazardousChemical
SlipperySurface
Fire
ElectricalShock
Moving Parts
Fall FluidInjection
Explosion Operator'sManual
FlyingObjects Kickback Hot Surface
© SearsBrands, LLC

Contentsare harmful or fatai if swalIowed.Avoid
contact to eyes,skin or clothing. DONOTtake
internaliy. Avoid breathing the mist or vapor.
Overexposureto eyes or skin cancause irritation.
Keepstabilizer out of the reachof chiidren.
Fueistabiiizer is a hazardouschemical.**
FresbStartTM fue! cap is designedto hold a cartridge whicb
contains fuel stabilizer.
• If SWALLOWED,call pbysician immediately. DONOTinduce
vomiting. If inhaled removeto fresh air. h_caseof eye or skin
contacL flusb with water for 15 rninutes.
• Store unopenedcartridges in acool, dry_well ventilated area.
Keepopen cartridge in fuel cap, and fuel cap closed on fuel tank
when not in use.
• h_the caseof an emergency,contact a physician immediately
and call 1-800-424-9300 for material safety irfforrnation.
• *Fuel stabilizer contains: 2,6-di-tret-butylphenol (128-39-2) and aliphatic petroleum
distillate (64742-47-8),
WARNING
Runningengine gives off carbon monoxide, an
odoriess, coloriess, poison gas.
Breathingcarbon monoxide can cause headache,
fatigue, dizziness,vomiting, confusion, seizures,
nausea,fainting or death.
Some chemicals or detergents may be harmful if
inhaled or ingested, causing severe nausea,
fainting, or poisoning.
• OperatepressurewasherONLYoutdoors.
o Keepexhaustgasfromenteringaconfinedareathrough
windows,doors,ventilationintakes,or otheropenings.
o DONOTstartor runengineindoorsorin anenclosedarea,
evenif windowsanddoorsareopen.
• Usea respiratoror maskwheneverthereisa cbancetbat
vaporsrnaybeinhaled.
• Readall instructionswith masksoyouarecertaintbernaskwill
providethenecessaryprotectionagainstinhalingharmful
vapors.
WARNING
_'_ Fuet and its vapors are extremely flammable and
explosive.
Fire or explosion can cause severe burns or
death.
WHENARRmNG ORBRAINING FUEL
o Turn pressure wasber OFFand let it cool at least 2 minutes
before removing fuel cap. Loosen cap slowly to relievepressure
in tank.
o Fill or drain fuel tank outdoors.
• DONOTover% tank. Allow spacefor fue! expansion.
o If fuel spills, wait until it evaporatesbefore starting engine.
• Keepfuel away frorn sparks, openflames, pilot lights, heat,and
other ignition sources.
• DONOTlight a cigarette or smoke.
WHENSTARTINGEQUmPIVIENT
o Ensure spark plug, muffler, fuel cap, and air cleaner arein
place.
o DO NOTcrank enginewith spark plug removed.
WHENOPERATINGEQUIP_tENT
• DONOTtip engine or equiprnentat anglewhicb causes fuel to
spill
o DONOTspray'flamrnable liquids.
WHENTRANSPORTmNGOR REPAIRmNGEQNIPI_IENT
o Transport/repair witb fuel tank EMPTYor with fuel shutoff valve
OFF.
o Disconnect spark plug wire.
WHENSTORINGFUELOR EQUIPMENTWiTH FUELmNTANK
• Store away from furnaces, stoves_water heaters_dotbes
dryers, or other appliances that havepilot light or other ignition
source becausetbey can ignite fuel vapors.
WARNING
Risk of electrocution.
Contact with power source can cause electric
shock or burn.
• NEVERspray'near power source.

WARNING
Starter cord kickback (rapid retraction) can result
in bodily injury. Kickback will pulI hand and arm
toward engine faster than you can Iet go.
Broken bones, fractures, bruises, or sprains
could result.
• NEVERpull starter cord without first relieving spray gun
pressure.
o When starting engine pull cord slowly until resistanceis felt
andthen pul! rapidly to avoid kickback.
o After eachstarting atternpt where enginefails to run, always
point spray gun in safe direction andsqueezespray gun trigger
to releasehigh pressure. Engagespray gutstrigger lock.
o Firmly grasp spray gun with both hands when using high
pressure spray to avoid iniury when spray gun kicks back.
WARNING
Useof pressure washer cancreate puddles and
slippepj surfaces.
Kickbackfrom spray gun cancause you to fail.
* Operatepressurewasherfrornastablesurface.
o Thecleaningareashouldhaveadequateslopesanddrainageto
reducethepossibilityof afalldueto slipperysurfaces.
o Beextremelycarefulif yournustusethepressurewasherfrom
a ladder,scaffolding,or anyothersimilarlocation.
o Firmlygraspspraygunwithbothhandswhenusinghigh
pressuresprayto avoidinjurywhenspraygutskicksback.
WARNING
Contact with muffler area can result in serious
burns.
Exhaustheat/gases can ignite combustibles,
structures or damagefuel tank causing a fire.
* DONOTtouchhotpartsandAVOIDhotexlsaustgases.
o Allowequipmentto coolbeforetouching.
o Keepatleast5feet (152crn)ofclearanceonall sidesof
pressurewasherincludingoverhead.
o Codeof FederalRegulation(CFR)Title36 Parks,Forests,and
PublicPropertyrequireequipmentpoweredbyaninternal
combustionengineto haveasparkarrester rnaintainedin
effectiveworkingorder,complyingto USDAForestservice
standard5!00-1C or laterrevision.IntheStateofCaliforniaa
sparkarresteris requiredundersection4442oftheCalifornia
Publicresourcescode.Otherstatesrnayhavesimilarlaws.
pressure stream of water th_(ttlsJ-['_
equipment produces can cut through skin and its
_ nderlying tissues, ieading to serious injury and
possible amputation.
_l '_ Spray gun traps h gh water pressure, even when
engine is stopped and water is disconnected,
which can cause injury.
DONOTallow CHILDRENto operate pressure washer.
NEVERrepair high pressure hose. Replaceit.
NEVERrepair leaking connections with sealantof any kind
Replaceo-ring or seal
NEVERconnect high pressure hoseto nozzle extension
Keephigh pressure hoseconnectedto purnp and spray gun
while system is pressurized.
ALWAYSpoint spray gun in safe direction and squeezespray
gun trigger to releasehigh pressure, everytime you stop
engine. Engagetrigger lock when not itsuse.
NEVERaim spray gutsat people, animab, or plants
DO NOTsecure spray gun in open position.
DO NOTleavespray gun unattended while rnachineis running
NEVERusea spray gun which does not have atrigger lock or
trigger guard in place andin working order
Always be certain spray gun, nozzbs and accessories are
correctly attached.
WARNING
Unintentionalsparking can result in fire or
'_¢ electrb shock.
WHENADJNSTmNGOR_dAKtNGREPAIRSTOYOURPRESSURE
WASHER
o Disconnectthe sparkplugwirefrornthesparkplugandplace
thewirewhereit cannotcontactsparkplug.
WHENTESTmNGFORENGINESPARK
o Useapprovedsparkplugtester.
• DONOTcheckfor sparkwith sparkplugremoved.
WARNING
Starter and other rotating parts can entangie
sands, hair, clothing, or accessories.
• NEVERoperate pressure washer without protective housing or
covers.
o DO NOTwear loose dothing_ iewelry or anything that may be
caught in the starter or other rotating parts.
o Tie up long hai! and rernove jewelry.
WARNING
jRisk of eye injury.
..L..__JSpray can splash back or propel objects.
Alwayswear safety goggles when using this equipment or in
vicinity of where equipment is in use.
Beforestarting the pressure washer, be sureyou are wearing
adequatesafety goggles.
NEVERsubstitute safety'glasses for safety'goggles.
i NOTICE
High pressure spray may damage fragiie items including
glass.
• DO NOTpoint spray gun at glasswhen using MAX (0°) nozzle.
NEVERaim spray gun at plants.
Improper treatment of pressure washer can damage it and
shorten its iife.
Ifyou havequestions about intended use, ask dealer or contact
Sears.
NEVERoperate units with broken or missing pa!ts, or without
protective housing or covers.
DO NOTby-pass any safetydevice on this rnachine.
DONOTtamper with governed speed.
DONOToperate pressure washer above rated pressure.
DONOT modify pressure washer in any'way.
Before starting pressure washer incold weather,check all parts
of the equiprnentto besure ice has not formed there.
NEVERmove machine by pulling on hoses. Use handle
provided on unit.
Checkfuel system for leaksor signs of deterioration, such as
chafed or spongy hose,!oose or missing clamps_or damaged
tank or cap. Correct all defects beforeoperating pressure
washer.
This equipment is designedto be usedwith Searsauthorized
parts ONLY.If equipment is used with parts that DO NOT
comply with minimum specifications, userassumes all risks
and liabilities.

KNOWYOURPRESSUREWASHER
,r' F I_Read the Operator's ManuaJ and safety ruJesbefore operatingyourpressurewasher.
....Compare the illustrationswithyour pressurewasher to familiarizeyourselfwiththe locationsofvariouscontrolsand
adjustments. Save this manuaI for future reference,
Spray Gun Nozzle Extension with
Quick Connect
Recoil Starter
CleaningTank
ProjectProTM Nozzles
HydroFoamTM Launcher
High PressureHose
FuelTank
Air Filter
Oil FillCap/Dipstick
Throttle Lever
& Choke Level
HigI1PressureOutlet &
Water Inlet
Air FHter-- Protectsengine byfiltering dust and debris out of
intakeair.
Autematic CeeJDawnSystem -- Cycles waterthrough pump when
water reaches 125°-155°F. Warmwater will discharge from purnp
onto ground. This system prevents internal pump damage.
CJeaeiegTack - Usedto provide HydroFoamTM wash or other
detergentto the low pressurewater stream.
CheLaLever -- Preparesa cold engine for starting.
Feel Tack -- Fill tank with regular unleadedfuel. Always leave room
for fuel expansion.
High Pressare Hese-- Connectone end to the water pump andthe
other endto the spray gun.
High Pressare OutJet-- To connect high pressure hose.
HydreFeamTM kauecher -- Use to apply HydroFoamTM wash or
other detergents designedspecifically for pressure washers.
Pumpequipped with Automatic
Cool Down System
NezzJeE×teesieewith Qaick Ceeeect-- Allows you to switch
between three different spray nozzlesand HydroFoamTM Launcher.
Oil Fill Cap!Dipstick -- Checkand addengine oil here. Seepage 19
for oil recommendations and filling instructions.
PrejectPreTM Nezzles -- Max,General,and DelicateNozzles:for
various cleaningapplications.
Pump -- Developshigh pressure.
ReceiJStarter -- Usefor starting the engine manually.
Spray Gue -- Controls the application of water onto cleaning surface
with trigger device. Includes safetylatch.
Thrattle Lever--Sets engine in starting mode for recoil starter and
stops a running engine.
Water Icier -- Connect garden hosehere.

Your cleaningsystem requiressome assembIyand is ready
for useonly after it has been properiy servicedwith the
recommendedoil and fuel.
tf you haveany prohbmswith the assembly of your
pressurewasher, please call the pressurewasher hempline
at 1o800o222o3136.
UNPACKTHEPRESSUREWASHER
1. RemoveeveGrthingfrom carton exceptpressurewasher.
2. Opencarton completely bycutting eachcorner from top
to bottom.
3. Removepressure washer from carton.
CARTONCONTENTS
Checkali contents, if any parts are missing or damaged,call
the pressure washer hetplineat 1=800=222=3136.
° Main Unit
* Handb with 6ieaning TankAssembly
o AccessoryTray
° High PressureHose
* Spray Gun
o NozzleExtensionwith Quick ConnectFitting
, HydroFoamTM Wash
° Oil Bottle
, Parts Bag (which includes the following):
o Operator's Manual
, Owner's RegistrationCard
, SafetyGoggies
o DetergentSiphoning Hose/Fiiter
, Bagcontaining 3 muiti-coiored ProjectProTM NozzIes
, HydroFoamTM Launcher
o HydroFoamTM Launcher & Wash instruction Sheet
° FreshStart FuelCartridge
* HandleFasteningHardwareKit (whichincludes):
* CarriageBolts (2)
° Plastic Knobs (2)
° TreeClips (4)
Becomefamiiiar with eachpiecebefore assemblingthe
pressure washer. Identify aticontents with the iiiustrationon
page 6. if any parts are missing or damaged,callthe
pressure washer hetplineat 1=800=222=3136.
ASSEMBLINGCLEANINGSYSTEM
YourCraftsmancleaningsystem will needassembly before
operation:
1. Fiii out andsend in registration card.
2. Attach handleand accessorytray.
3. Connectdetergent siphon hoseto pump.
4. Add oii to engine crankcase.
5. Add fuel to fuel tank.
6. Connectpressure hoseto spray gun andpump.
7. Connectwater supply to pump.
8. Attach nozzleextension to spray gun.
9. Select/attachquick connect ProjectProTM nozzleto nozzle
extension.
Attach Handle and Aecesse_ Tray
1. Placehandle (A) onto handb supports (B) connectedto
main unit. Make sure holes (C) in handb align with holes
(C) on handle supports.
NOTE:It may be necessaryto move the handle supports
from sideto side in order to align the handie so it wiii slide
overthe handb supports.
2. Insert carriageboits (A) through holesfrom outside of
unit and attach a plastic knob (B) from inside of unit.
Tighten by hand.
3. Placeaccessorytray (A) over holes (C) on handle
(viewing from front of unit). Pushthe tree clips (B) into
the holes until they sit fiat againstthe accessorytray.
/
/
Insert multi-colored ProjectProTM nozzlesand other
supplied accessories in spaces provided in accessory
tray. SeeHow to UseAccessory Tray.

Attach Detergent Siphon Hose te Pemp
Thepressure washer is equipped with two detergent
siphoning hoses.One is attachedto the cleaningtank and
one is loosefor siphoning pressure washer safe detergents
from a bottle or container.
Attach one of the detergent siphon hoses (A) to the barbed
hose fitting (B) on the pump,
Add Fuel
Fuel must meet these requirements:
o Clean,fresh, unleadedgasoline.
. A minimum of 87 octane/87AKI (91 RON).High altitude
use,see High Altitude.
. Gasolinewith up to 10% ethanol (gasohot) or up to
15% MTBE(methyl tertiary butyl ether) is acceptable.
iMPORTANT:Onlyone detergent siphoning hosecan be used
at a time.
Add Engine Oil
1. Placepressurewasher on a fiat, ieveisurface.
2. Cleanarea around oii fiii and remove yeilow oil fill
cap/dipstick.
NOTE:See Oi/Recommendations in Ma,_qtenancesection.
Verify provided oiI bottle is the correct viscosity for current
ambient temperature.
3. Using oil funnel (optional), slowly pour contents of
provided oil bottie into off fiii opening.
improper treatment of pressurewasher can damageit and
shorten its iife.
DONOTattempttocrankor sta!ttheenginebeforeit hasbeen
properlyservicedwiththerecommendedoil.Thismayresultin
anenginefailure.
4. Replaceoil fill cap/dipstick and fully tighten.
Avoid pressure washer damage.
Faiiureto foliow Operator's Manualfor fuel
recommendations voids warrant,G
DONOTuseunapprovedgasolinesuchasE85.
DONOTmixoil in gasoline.
DONOTmodifyengineto runon alternatefuels.
To protect the fuei system from gum formation, mix in a fuel
stabiiizer when adding fuel. See Storage.Ali fuet is notthe
same. if you experiencestarting or performance problems
after using fuel, switch to a different fuei provider or change
brands. This engine is certified to operateon gasoline. The
emission control system for this engine is EM (Engine
Modifications).
WARNING
Fuetand its vapors are extremely flammable and
explosive.
Fireor explosion can causesevere burns or
death.
WHEN ADDmNGFUEL
o TurnpressurewasherOFFandletit coo[atleast2 minutes
beforeremovingfuelcap.Loosencapslowlyto relievepressure
in tank.
o Fillfueltankoutdoors.
• DONOTover%tank.Allowspaceforfue!expansion.
o Iffuelspills waituntilitevaporatesbeforestartingengine.
• Keepfuelawayfromsparks,openflames,pilotlights,heat,and
otherignitionsources.
DONOTlighta cigaretteorsmoke.
Cleanareaaround fuet filI cap, removecap.
Slowly add regular unleadedfuet (A) to fuel tank (B). Be
carefui not to overfiii. Aliow about 1,5" (4 cm) (C) oftank
space for fuel expansion,
o
1,
2,
CAUTJSN!AtcohoI-blendedfuels (caiiedgasohoi, ethanol or
methanoi) can attract moisture, which ieadsto separation and
formation of acids during storage.Acidic gascan damagethe
fuei system of an enginewhiie in storage.
Toavoidengineproblems,the fueI systemshouldbetreated
with afuet preserver or emptied beforestorageof 30 daysor
longer,if adding a fue! preserver,fiii the fue! tank with fresh
fuei. if only partialiy tiffed, air in the tank wiii promote fuel
deterioration during storage, if fueI preserver is not used,
drainthe fueItank, startthe engineand iet it run untiithe fuel
linesand carburetorareempty. Usefresh fueInext season.See
Storagefor additionaiinformation.
NEVERuseengine or carburetor cleanerproducts in the fuel
tank as permanent damagemay occur.
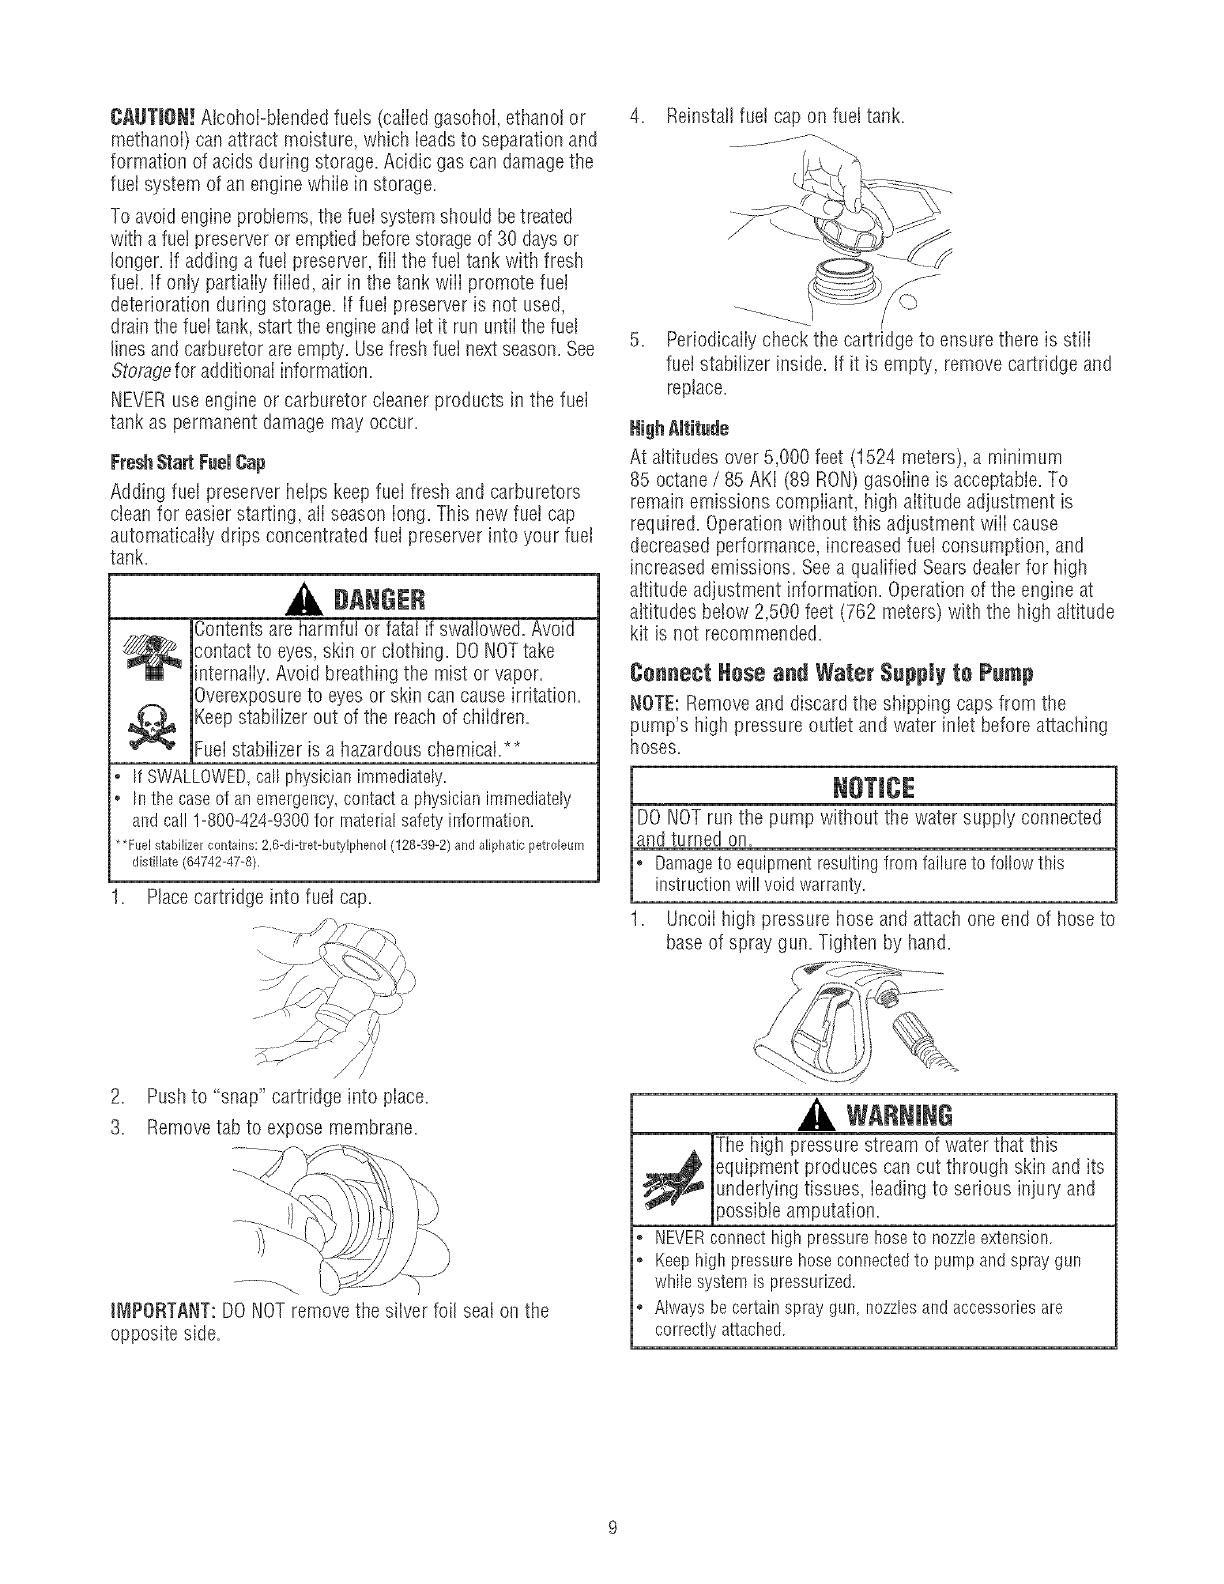
FreshStart FuelCap
Adding fuel preserver helps keepfueI fresh and carburetors
cleanfor easierstarting, ali season iong. This new fuei cap
automatically drips concentratedfuel preserver into your fuel
tank.
BANGER
Contentsare harmful or fatal if swallowed. Avoid
contact to eyes,skin or clothing. DONOTtake
internally.Avoid breathingthe mist or vapor.
Overexposureto eyesor skin can causeirritation.
Keepstabilizerout of the reachof chiidren.
Fueistabiiizer is a hazardouschemical.**
If SWALLOWED,callphysicianimmediately.
* h_thecaseof anemergency,contacta physicianimmediately
andcall1-800-424-9300for materialsafety[nforrnation.
**Fuel stabilizer contains: 2,6-di-tret-butylphenol (128-39-2) and aiiphatic petroleum
distil!ate (64742-47-8),
1. Placecartridge into fuei cap.
4. Reinstallrue!cap on fueltank.
5. Periodicaliy checkthe cartridge to ensurethere is stiii
fuei stabilizer inside. If it is empty, removecartridge and
replace.
Nigh,_Nitude
At altitudes over5,000 feet (1524 meters), a minimum
85 octane/ 85 AKI (89 RON)gasoline is acceptable.To
remainemissions compiiant, high aititude adjustment is
required. Operationwithout this adjustment wiii cause
decreasedperformance, increased fueI consumption, and
increasedemissions. Seea qualified Searsdealerfor high
altitude adjustment information. Operationof the engine at
altitudes below 2,500 feet (762 meters)with the high altitude
kit is not recommended.
Cenneet Hese and Water Supply te Pump
NOTE:Removeand discardthe shipping caps from the
pump's high pressureoutlet andwater inlet beforeattaching
hoses.
DONOTrun the pump without the water supply connected
and turned on.
Damageto equipmentresultingfrom failureto followthis
instructionwillvoidwarranty.
Uncoii high pressure hose and attach one end of hoseto
baseof spray gun. Tigllten by hand.
.... j
j/ /
2. Pushto "snap" cartridge into piace.
3. Removetab to expose membrane.
IMPORTANT:DONOTremovethe silver foil sealon the
opposite side.
WARNING
Thehigh pressurestream of water that this
_ quipment produces cancut through skin and its
underlyingtissues, ieadingto serious injury and
_ossibteamputation.
• NEVERconnecthighpressurehoseto nozzleextension.
o Keephighpressurehoseconnectedto pumpandspraygun
whilesystemis pressurized.
o Alwaysbecertainspraygun,nozzlesandaccessoriesare
correctlyattached.
2. 6. TurnONwater,pointguninasafedirectionandsqueeze
triggertopurgepumpsystemofairandimpurities.
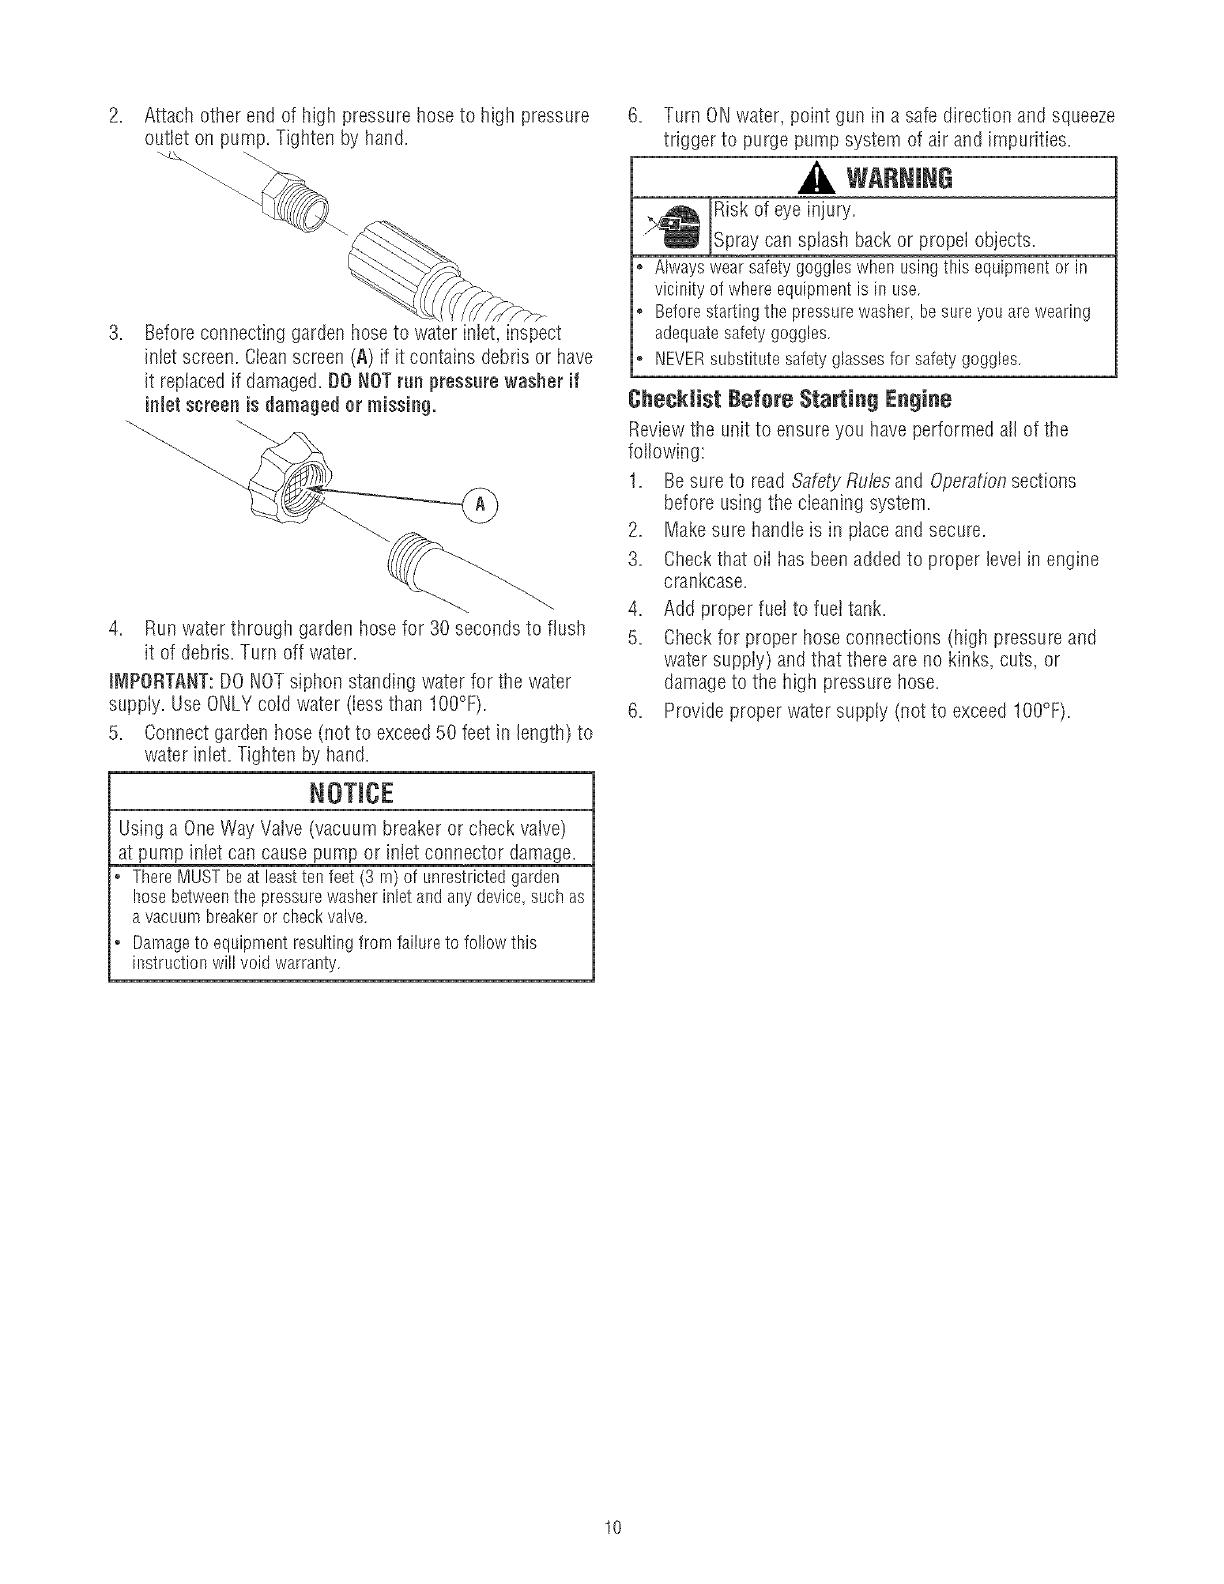
Attachotherendofhighpressurehosetohighpressure
outietonpump.Tightenbyhand.
3. Beforeconnectinggardenhosetowaterinlet,inspect
inletscreen.Cleanscreen(A)ifitcontainsdebrisorhave
itreplacedifdamaged.DONOTrunpressurewasherif
interscreen isdamaged or missing.
4. Run water througil garden hose for 30 secondsto flush
it of debris. Turn off water.
iMPORTANT:DONOTsiphon standing water for the water
supply=UseONLYcoid water (iessthan IO0°F).
5. Connectgarden hose (not to exceed50 feet in length) to
water inlet. Tighten by hand.
WARNING
IRisk of eyeinjury.
_Spray cansplash back or propel objects.
Alwayswearsafetygoggleswhenusingthis equipmentor in
vicinityof whereequipmentisin use.
Beforestartingthepressurewasher,besureyouarewearing
adequatesafetygoggles.
NEVERsubstitutesafetyglassesfor safetygoggles.
ChecMist Befere Starting Engine
Reviewthe unit to ensureyou have performed all of the
following:
1= Besure to read SafetyRules and Operationsections
before usingthe cieaning system.
2= Makesure handle is in placeand secure=
3= Checkthat eli has beenadded to proper levelin engine
crankcase=
4. Add proper fuelto fuel tank.
5. Checkfor proper hoseconnections (high pressure and
water suppiy) and that there are no kinks, cuts, or
damageto the high pressure hose.
6. Provideproper water supply (not to exceedIO0°F).
Using a One Way Valve (vacuum breaker or check valve)
at pump inlet can cause pump or inlet connector damage.
ThereMUST beat leastten feet (3 rn)of unrestricted garden
hosebetweenthe pressure washer inlet and any device,such as
avacuum breakeror checkvalve.
Damageto equipment resulting from failure to follow this
instruction will void warranty.
10
HOWTOUSEYOURCLEANINGSYSTEM
If you haveany probbms operatingyour pressure washer,
pleasecallthe pressure washer heJpfineat 1-800-222-3136,
Pressure Washer Lecation
PressureWasherCJearance
VANNING
Exhaustheat/gases can ignite combustibbs,
structures or damagefuei tank causing a fire.
o Keepatleast5ft. (152cm)clearanceonall sidesofpressure
washerincludingoverhead.
Macepressure washer outdoors in an areathat wiii not
accumulate deadtyexhaustgas. DONOTpiacepressure
washer where exhaustgas (A) could accumulateand enter
inside or be drawn into a potentiaily occupied building.
Ensureexhaustgas is kept awayfrom any windows, doors,
ventiiation intakes, or other openingsthat can aliow exhaust
gasto coiiect in a confined area. Prevaiiingwinds and air
currents should be taken into considerationwhen positioning
_ressurewasher.
WARNING
Runningengine gives off carbon monoxide, an
odorless, colorless, poison gas.
Breathingcarbon monoxide can causeheadache,
fatigue, dizziness,vomiting, confusion, seizures,
nausea,fainting or death.
° OperatepressurewasherONLYoutdoors.
o Keepexhaustgasfromenteringaconfinedareathrough
windows,doors,ventilationintakes,or otheropenings.
* DONOTstat or runengineindoorsor in anenclosedarea,
evenif windowsanddoorsareopen.
\
To Start Your Cleaning System
To start your engine=poweredcleaning system for the first
time, foiiow these instructions step=by=step.This information
also applies wheneveryou start the engine after you havelet
the pressure washer sit idle for at bast a day.
1. Placepressure washer nearan outside water source
capableof supplying water at a flow rategreater than
3.7 galions per minute and no iess than 20 PSi at
pressurewasher end of garden hose.
2. Checkthat higil pressure hose istightty connectedto
spray gun and pump. SeeAssemby for illustrations.
3. Makesure unit is in a ieveiposition.
4. Connectgarden hoseto water inteton pressurewasher
pump.
5. Turn ONwater, point gun in a safe direction and squeeze
trigger to purge pump system of air and impurities.
[
DONOTrun the pump without the water supply connected
and turned on.
t amageto equipmentresultingfrom failureto followthisinstructionwillvoidwarranty
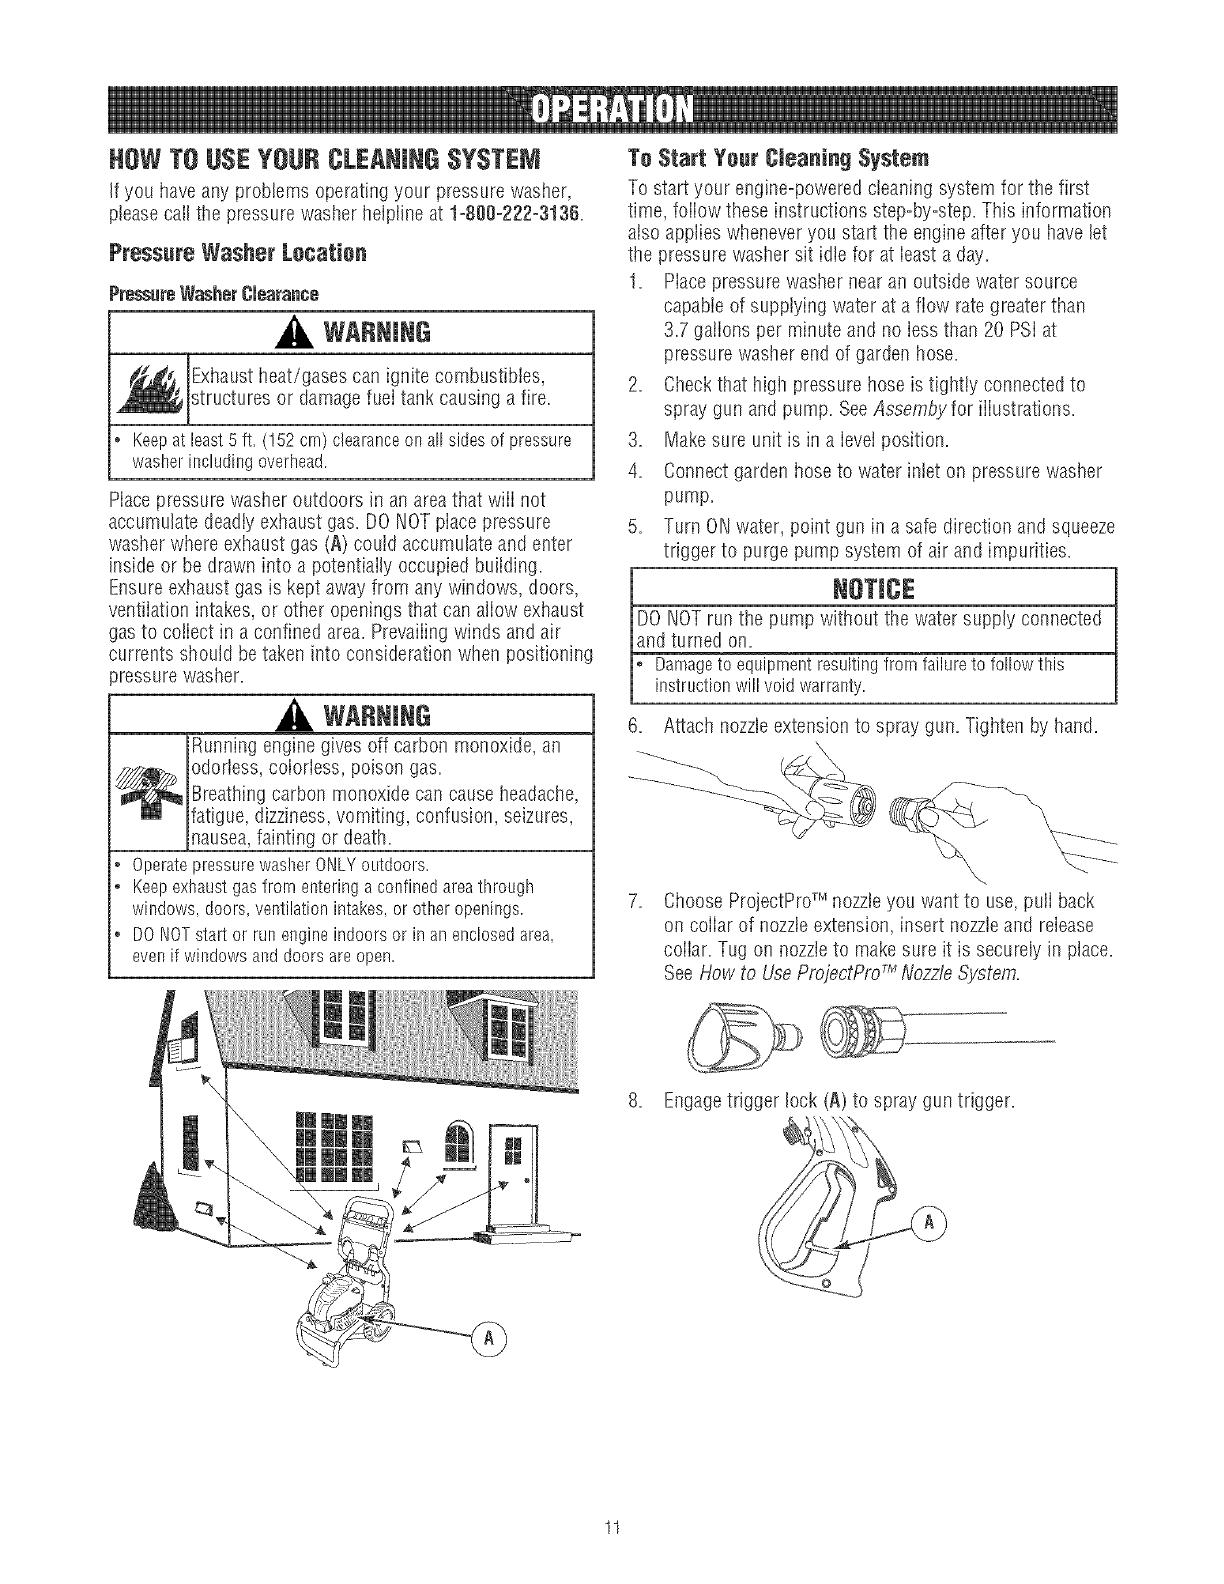
6. Attach nozzleextension to spray gun. Tighten by hand.
ChooseProjectProTM nozzleyou want to use,puff back
on coiiar of nozzleextension, insert nozzleand release
coliar. Tug on nozzleto makesure it is securely in place.
SeeHow to UseProjectPro7MNozzleSystem.
8. Engagetrigger lock (A) to spray gun trigger.
C_
11

9. Move throttie lever (A) to "Fast" position, shown here as
a rabbit.
10=Move choke lever (B) to "Choke" position.
NOTE:Fora warm engine, be surethe choke lever is in the
"Run" position.
iMPORTANT:Beforestarting the pressure washer, be sure
'ou arewearing adequatesafety goggles.
WABNING
Risk of eyeinjury.
=_Spray cansp ash back or propel objects.
Alwayswearsafetygoggleswhenusingthis equiprnentor in
vicinityofwhereequipmentisin use.
Beforestartingthepressurewasher,besureyouarewearing
adequatesafetygoggles.
NEVERsubstitutesafetyglassesforsafetygoggles.
1. Whenstarting engine, position yourself as
recommended, grasp handle and pull recoii starter
lightly until you feel some resistance,then pulI briskly.
WARNING
Startercord kickback(rapid retraction) can result
in bodily injury. KickbackwilI pulI handand arm
toward enginefaster than youcan iet go.
Brokenbones, fractures, bruises, or sprains
could result.
o NEVERpullstartercordwithoutfirst relievingspraygun
pressure.
• Whenstartingengine_pullcordslowlyuntilresistanceisfelt
andthenpul!rapidlyto avoidkickback.
o Aftereachstartingattemptwhereenginefails1orun,always
pointspraygunin safedirectionandsqueezesprayguntrigger
to releasehighpressure.Engagesprayguntriggerlock.
o Firmlygraspspraygunwith bothhandswhenusinghigh
pressuresprayto avoidinjurywhenspraygunkicksback.
12. Return recoii starter siowiy. DOriOT let rope "snap
back"against starter.
13. When engine starts, siowiy movechoke ieverto "Run"
position, as engine warms, if engine falters, move choke
leverto "Choke" position, then to "Run" position.
14. After eachstarting attempt, where enginefails to run,
always point gun in safe direction and squeezespray
gun trigger to releasehigh pressure. Move choke lever
to "Choke" position, and repeatsteps 11 through 13.
15. If enginefaiis to start after six pulis, movechoke ieverto
"Run" position, and repeatsteps 11 through 13.
NOTE:Always keepthe throttle iever in the "Fast" position
when operatingthe pressure washer.
WARNING
Thehigh pressurestream of water that this
equipment produces cancut through skin and its
underlyingtissues, ieadingto serious injupj and
_ossibleamputation.
Spray gun traps high water pressure,evenwhen
engine is stopped and water is disconnected,
which can cause injury.
o DONOTa!lowCHILDRENtooperatepressurewasher.
• Keephighpressurehoseconnectedto pumpandspraygun
whilesystemis pressurized.
o NEVERaimspraygunatpeople,animals_or plants.
• DONOTsecurespraygun inopenposition.
o DONOTleavespraygununattendedwhilemachineis running.
o NEVERusea spraygunwhichdoesnothaveatriggerlockor
triggerguardin placeandin workingorder.
o Alwaysbecertainspraygun,nozzlesandaccessoriesare
correctlyattached.
WARNING
Contact with muffler area can result in serious
burns.
Exhaustheat/gases can ignite combustibles,
structures or damagefuel tank causing a fire.
o
®
o
DO NOTtouch hot parts and AVOIDhot exhaust gases.
Allow equipment to cool beforetouching.
Keepat least 5 feet (152 cm) of clearanceon all sides of
pressure washer including overhead.
Codeof FederalRegulation (CFR)Title 36 Parks Forests, and
Public Property require equiprnent powered by an internal
combustion engine1ohave aspark arrestor rnaintainedin
effective working order, complying to USDAForestservice
standard 5100-1C or later revision. Intl_eStateof California a
spark arrestor is required under section 4442 of the California
Public resources code. Other statesmay have similar laws.
12

How to Stop Your CJeaningSystem
1= Reieasespray gun trigger and letengine idtefor two
minutes.
2. Move throttie to SLOWposition, then STOPposition.
WARNING
,,_ Backfire,fire or engine damagecouId occur.
o DONOTstopenginebymovingchokeleverto "Cheke"position.
3. ALWAYSpoint spray gun in a safe direction and squeeze
spray gun trigger to releaseretainedhigh water pressure.
iMPORTANT:Spraygun traps high water pressure,even
when engine is stopped and water is disconnected.
WANNING
The high pressure stream of water that this
equipment produces cancut through skin and its
_ nderlying tissues, ieadingto serious injury and
)ossibieamputation.
Spray gun traps high water pressure,evenwhen
engine is stopped and water is disconnected,
which can cause injury.
, Keephighpressurehoseconnectedto purnpandspraygun
whilesystemis pressurized.
o ALWAYSpointspraygunin safedirectionandsqueezespray
guntrigger,to releasehighpressureeverytimeyoustop
engine.Engagetriggerlockwhennotinuse.
4. Engagetrigger iock on spray gun when not in use.
How to Use Accessory Tray
Theunit is equipped with an accessorytray with piacesto
store your ProjectProTM nozzles,HydroFoamTM launcher,spray
gun and nozzleextension. Thereis aiso a hook at the front of
the accessorytray to hold your high pressure hose. Identify
ali accessorieswith the iiiustration on page6.
NOTE:Theextra hoie in the tray is for storing a utiiity brush.
Theextra clip in thetray is for storing a turbo nozzle.The
brush and turbo nozzleare NOTincludedwith your pressure
washer.You canbuy these items as optional accessories.
1. Placenozzleextensionthrough hole on accessorytray,
asshown.
.
3.
4.
.
Macespray gun through hole on accessorytray on right
side of unit.
Insert multi-coIored ProjectProTM nozzlesin spaces
provided in accessorytray.
Insert HydroFoamTM iauncherin spaceprovided in
accessorytray next to the multi-colored ProjectProTM
nozzles.
Hanghigh pressure hose on hook attachedto accessory
tray on front of tray as shown.
How to Use ProjectPro TM Nozzle System
Thequick-connect on the nozzleextensionaliows you to
switch betweenthree different ProjectProTM system nozzles.
ProjectProTM nozzlescan be changedwhile pressure washer
is running oncespray gun trigger lock is engaged.The
ProjectProTM nozzlesvary the pressure and spray pattern as
shown.
High Pressure
Delicate General Max
40° Yellow 15° Orange 0° Red
2350 PSI 2675 PSI 3000 PSi
2.7 GPM 2.5 GPM 2.3 GPM
Fellowthese instructionste changeProjectProTM nozzles:
1. Engagetrigger lock on spray gun.
WARNING
Thehigh pressurestream of water that this
_ quipment produces cancut through skin and its
underiyingtissues, ieadingto serious injup/and
_ossibleamputation.
o NEVERexchangeProjectProTM nozzleswithoutlockingthe
triggerlockonthespraygun.
• DONOTtwist ProjectProTM nozzleswhilespraying.
2. Puii backcollar on quick-connect and puii current
ProjectProTM nozzleoff. Store ProjectProTM nozzlesin
holder provided on the accessorytray.
13
.
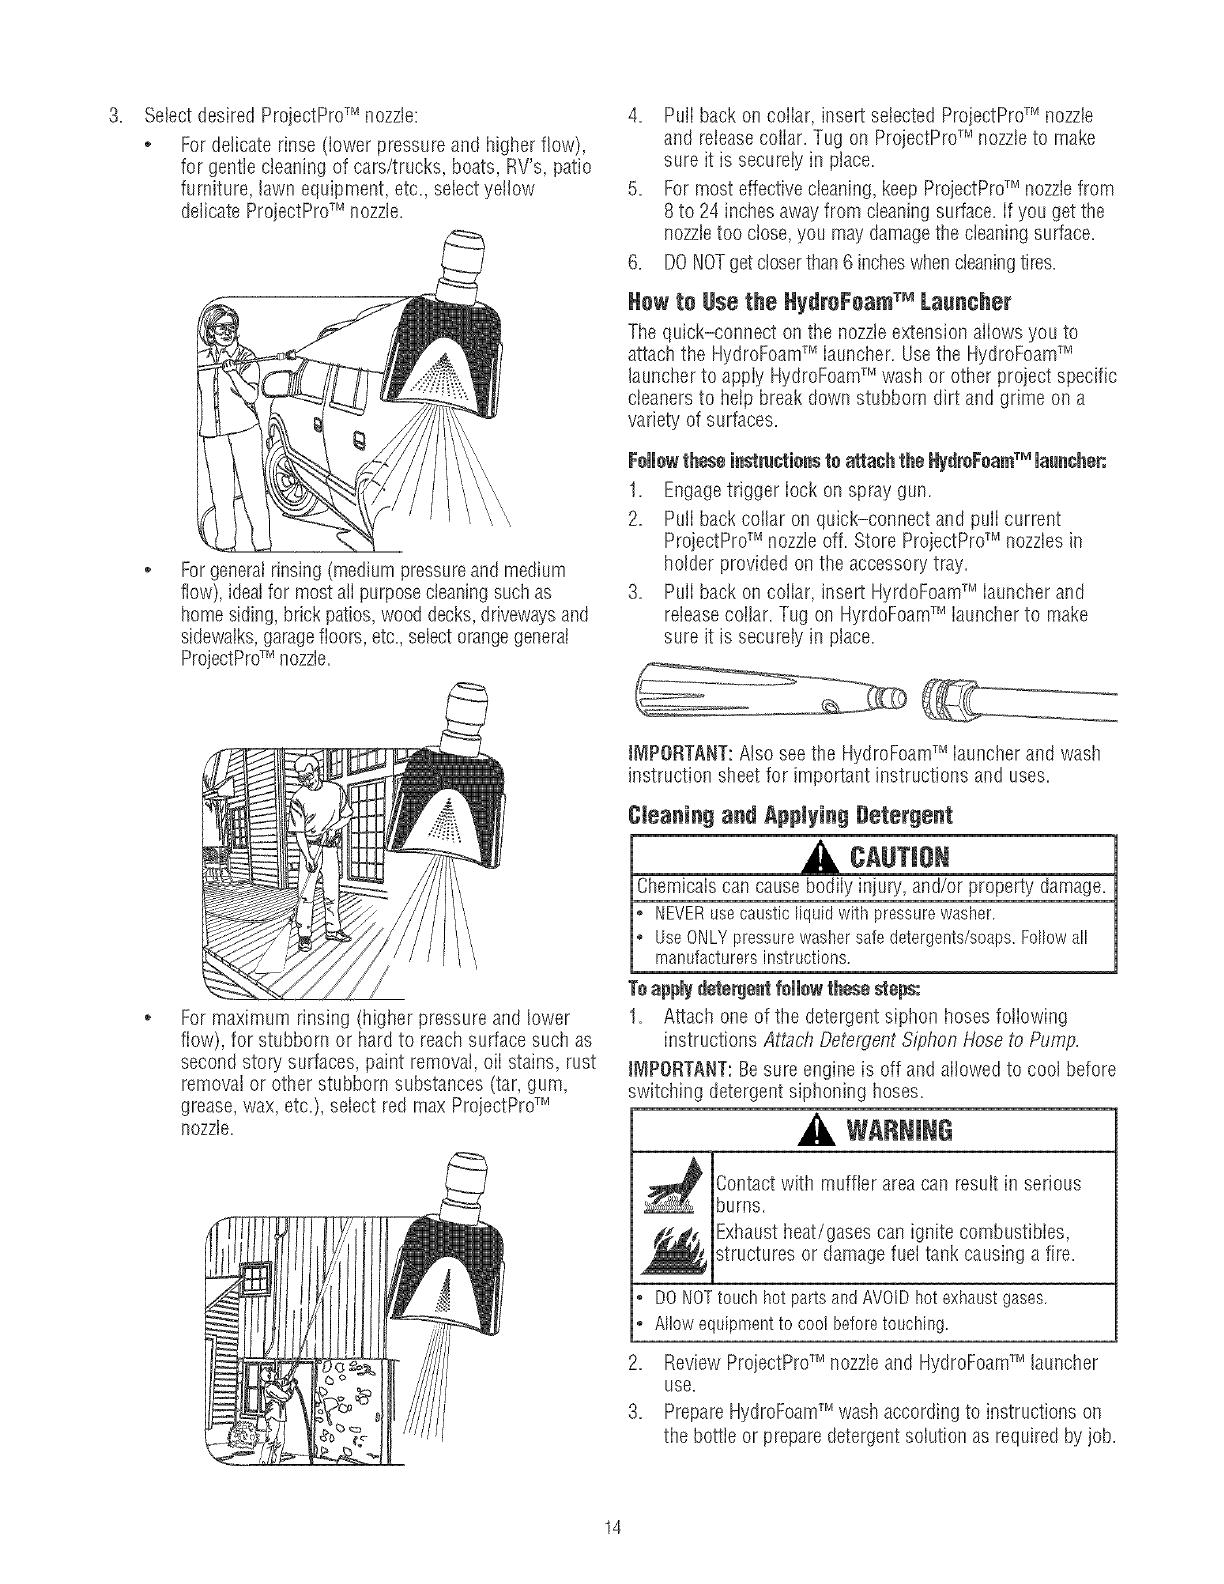
Select desired ProjectProTM nozzle:
* Fordelicate rinse (lower pressure and higher flow),
for gentb cleaning of cars/trucks, boats, RV's, patio
furniture, lawn equipment, etc, selectyellow
delicate ProjectProTM nozzle.
Forgeneralrinsing(medium pressureand medium
flow), idealfor mostatI purposecleaningsuch as
homesiding,brick patios,wooddecks,drivewaysand
sidewalks,garagefloors, etc.,selectorangegeneral
ProjectProTM nozzle.
Formaximum rinsing (higher pressure and lower
flow), for stubborn or hard to reachsurfacesuch as
second story surfaces,paint removal,oii stains, rust
removalor other stubborn substances (tar, gum,
grease,wax, etc.), select red max ProjectProTM
nozzle.
4. PulIback on collar, insert selectedProjectProTM nozzle
and releasecollar. Tug on ProjectProTM nozzleto make
sure it is securely in place.
5. Formost effectivecleaning,keepProjectProTM nozzlefrom
8to 24 inchesawayfrom cleaningsurface. If you get the
nozzletoo close,you may damagethe cleaningsurface.
6. DONOTgetcloserthan6 incheswhencleaningtires.
Hew te Use the HydroFoam TM Launcher
The quick-connect on the nozzleextension aliows you to
attach the HydroFoamTM launcher. Usethe HydroFoamTM
launcherto appiy HydroFoamTM wash or other project specific
cleaners to heip break downstubborn dirt and grime on a
variety of surfaces.
FeJJewthese instrustbns te attachthe HydrePaamTM launcher:
1. Engagetrigger iock on spray gun.
2. Puli back collar on quick-connect and puli current
ProjectProTM nozzle off. Store ProjectProTM nozzlesin
holder provided on the accessorytray.
3. PulIback on collar, insert HyrdoFoamTM launcherand
releasecollar. Tug on HyrdoFoamTM launcherto make
sure it is securely in place.
IMPORTANT:Also seethe HydroFoamTM launcherand wash
instruction sheet for important instructions and uses.
Cteanin9 and Applyin9 Detergent
NEVERusecausticliquidwithpressurewasher.
UseONLYpressurewashersafedetergents/soaps.Followall
rnanufacturersinstructions.
Teapplydetergentfelbw thesesteps:
1. Attach oneof the detergent siphon hosesfollowing
instructions Attach DetergentSiphon Hoseto Pump.
IMPORTANT:Besure engine is off and allowedto cool before
switching detergent siphoning hoses.
WARNING
Contact with muffler area can result in serious
burns.
Exhaustheat/gases can ignite combustibles,
structures or damagefuel tank causing a fire.
• DONOTtouchhotpartsandAVOIDhotexhaustgases.
° Allowequipmenttocoolbeforetouching.
2. ReviewProjectProTM nozzleand HydroFoamTM launcher
use.
3. PrepareHydroFoamTM washaccording to instructions on
the bottie or preparedetergentsolution as requiredby job.
14
4. Makesuredetergentshut-offvalveoncieaningtankisin
"Off"position.
5. Ifusingcieaningtank,pourdetergentintocleaningtank.
NOTE:Thecieaningtankhoidsonegation.
6. MakesureHyrdoFoamTM Launcheris installed.
NOTE:Detergentcannot be appiied with the high pressure
nozzles(Yellow, Orange or Red).
7. Make sure garden hoseis connectedto water inlet.
Checkthat high pressure hose is connectedto spray gun
and pump. Turn on water.
You must attachaII hoses before
Startingtheenginewithoutallthehosesconnectedandwithout
thewaterturnedONwill damagethepump.
Darnageto equipmentresultingfrom failuretofollowthis
instructionwillvoidwarranty.
8. Engagetrigger lock on spray gun and start engine
foiiowing instructions How to Start Your Pressure
Washer.
9A. If using cteaningtank, rotate detergentshut=offvalve on
cleaningtank to "On" position (A).
IMPORTANT:if using detergent siphoning hose, makesure
detergent shut-off valve on cleaningtank is in the "Off"
position.
9B. If using detergentsiphoning hose, placesmali fiiter end
of detergentsiphoning tube into detergentcontainer.
NOTE:Makesure the fiiter is fully submerged in detergent
while applying detergent.
NOTICE
Contact with the hot muffler candamagedetergent
siphoning tube.
Wheninseltingthefilterintoadetergentsolutionbottle,route
thetubesoasto keepit from inadvertently'contactingthehot
rnuffier.
10. Appiy HydroFoamTM washto a dry surface, starting at
lower portion of areato be washedand work upward,
using long, even,overlapping strokes.
NOTE:To prevent water spotting on vehicles,work in a
shadedareaand allow surfacesto cool before beginning.
11. Aiiow HydroFoamTM wash to soak in between
3-5 minutes beforewashing and rinsing. Reapptyas
neededto prevent surface from drying. DONOTaiiow
HydroFoamTM wash to dry on (preventsstreaking).
Forbest results, scrub the HydroFoamTM wash covered
surface to heip remove stubborn dirt, grime and stains. For
vehicles, usea soft car wash brush or mitt. Fordecking,
siding and concrete, usea brush appropriatefor the type of
surface being cieaned.
IMPORTANT:When using the detergent siphoning hose,you
must flush the detergentsiphoning system after eactsuseby
placingthe fiiter into a bucket of cleanwater, then run the
pressure washer in low pressure for 1=2minutes.
Pressure Washer Rinsing
After NydreFeamTM washis applied,scourthemlffaeeand rinse
it cleanasfollows:
1. Engagetrigger iock on spray gun.
2. Makesure detergent shut-off valve is in "Off" position.
3. RemoveHyrdoFoamTM Launcherfrom nozzteextension.
4. Selectand instaii desired ProjectProTM nozzle,as
described in How to Use ProjectPmTM HozzleSystem.
5. Keepspray gun a safedistancefrom spray surface.
WARNING
Kickbackfrom spray gun cancauseyou to fail.
6.
• Operatepressurewasherfrom astablesurface.
° BeextrerneIycarefulifyou mustusethepressurewasherfrom
a ladder,scaffolding,or anyothersimilarlocation.
• Firmlygraspspraygunwithbothhandswhenusinghigh
pressuresprayto avoidinjurywhenspraygunkicksback.
Apply a high pressure spray to a small areaand then
check the surface for damage.If no damage,proceedto
step 7=
Start at top of areato be rinsed, working down with
same overlapping strokes usedfor cleaning.
Autemati¢ Cool Dawn System {Thermal llelief)
If you run the engine on your pressure washer for
3-5 minutes without pressing the trigger on the spray gun,
circuiating water in the pump can reachtemperatures above
125°F.Thesystem engagesto cool the pump by discharging
the warm water ante the ground=
15

ENGINETECHNICALiNFORtViATION
This is a single cylinder, overheadvalve (OHV),air cooled
engine, it is a iow emissions engine.
Inthe Stateof Caiifornia, Model 120000 enginesare certified
by the California Air Resources Boardto meet emissions
standardsfor 125 hours. Such certification does not grant
the purchaser, owner or operator of this engine any
additional warranties with respectto the performance or
operational life of this engine.Theengine is warranted soidy
according to the product and emissions warranties stated
elsewherein this manual=
Power Ratings
Thegross power rating for individuaI gas engine models is
labeledin accordancewith SAE(Societyof Automotive
Engineers)codeJ1940 (Small Engine Power & Torque
Rating Procedure),and rating performance hasbeen
obtained andcorrected in accordancewith SAEJ1995
(Revision2002=05).Torquevalues are derived at3060 RPM;
horsepower values are derivedat 3600 RPM.Actuai gross
engine power wiii be lower and is affected by, among other
things, ambient operating conditions and engine-to-engine
variabiiity. Givenboth the wide array of products on which
enginesare placedand the variety of environmental issues
appiicabb to operatingthe equipment, the gas engine wiii not
developthe ratedgross power when used in a given pieceof
power equipment (actual "on-site"or net power). This
difference is due to a variety of factors including, but not
limited to, accessories (air cteaner,exhaust,charging,
cooiing, carburetor, fuel pump, etc.), appiication iimitations,
ambient operating conditions (temperature,humidity,
altitude), and engine-to-engine variabiiity. Dueto
manufacturing and capacity iimitations, Briggs & Stratton
maysubstitute an engine of higher ratedpower for this
Seriesengine.
PRODUCTSPECiFiCATiONS
PressureWasherSpecifications
Max Outbt Pressure ....................... 3,000 PSi
Max FtowRate............................. 2.7 GPM
ChemicatMix......................... Use asdirected
Water SupplyTemperature .......... Not to exceed IO0°F
Shipping Weiglst............................. 71 Ibs.
Engine Specifications
Bore ................................. £69 in. (68mm)
Stroke ............................... £04 in. (52ram)
Displacement ........................ 11.57in. (190 cc)
SparkPlug
Type:..................... Briggs & Stratton 491055S
SetGapTo: ...................... O.020inch(O.50mm)
ArrnatureAir Gap: ........... 0.006-0.014in.(O.15-0.36rnm)
Valveclearancewithvalvespringsinstalledand piston1/4in,
(6 turn)pasttopdeadcenter(checkwhenengineiscold),
Intake.................... 0.004°0.006in.(0.10=0.15ram)
Exhaust .................. 0.004-0.008in.(O.10-O.20turn)
FuelCapacity............................... 1.6Quarts
OilCapacity....................... 22 Ounces(0.65liter)
NOTE:Forpracticai operation, the engine ioad should not
exceed 85% of rated power. Enginepower will decrease
3-I/2% for each1,000 feet (300 meters) abovesea Ieveiand
1% for each 10° F(5.6° C) above77° F(25° C). It should
operatesatisfactorily at an angle up to 15°.
16
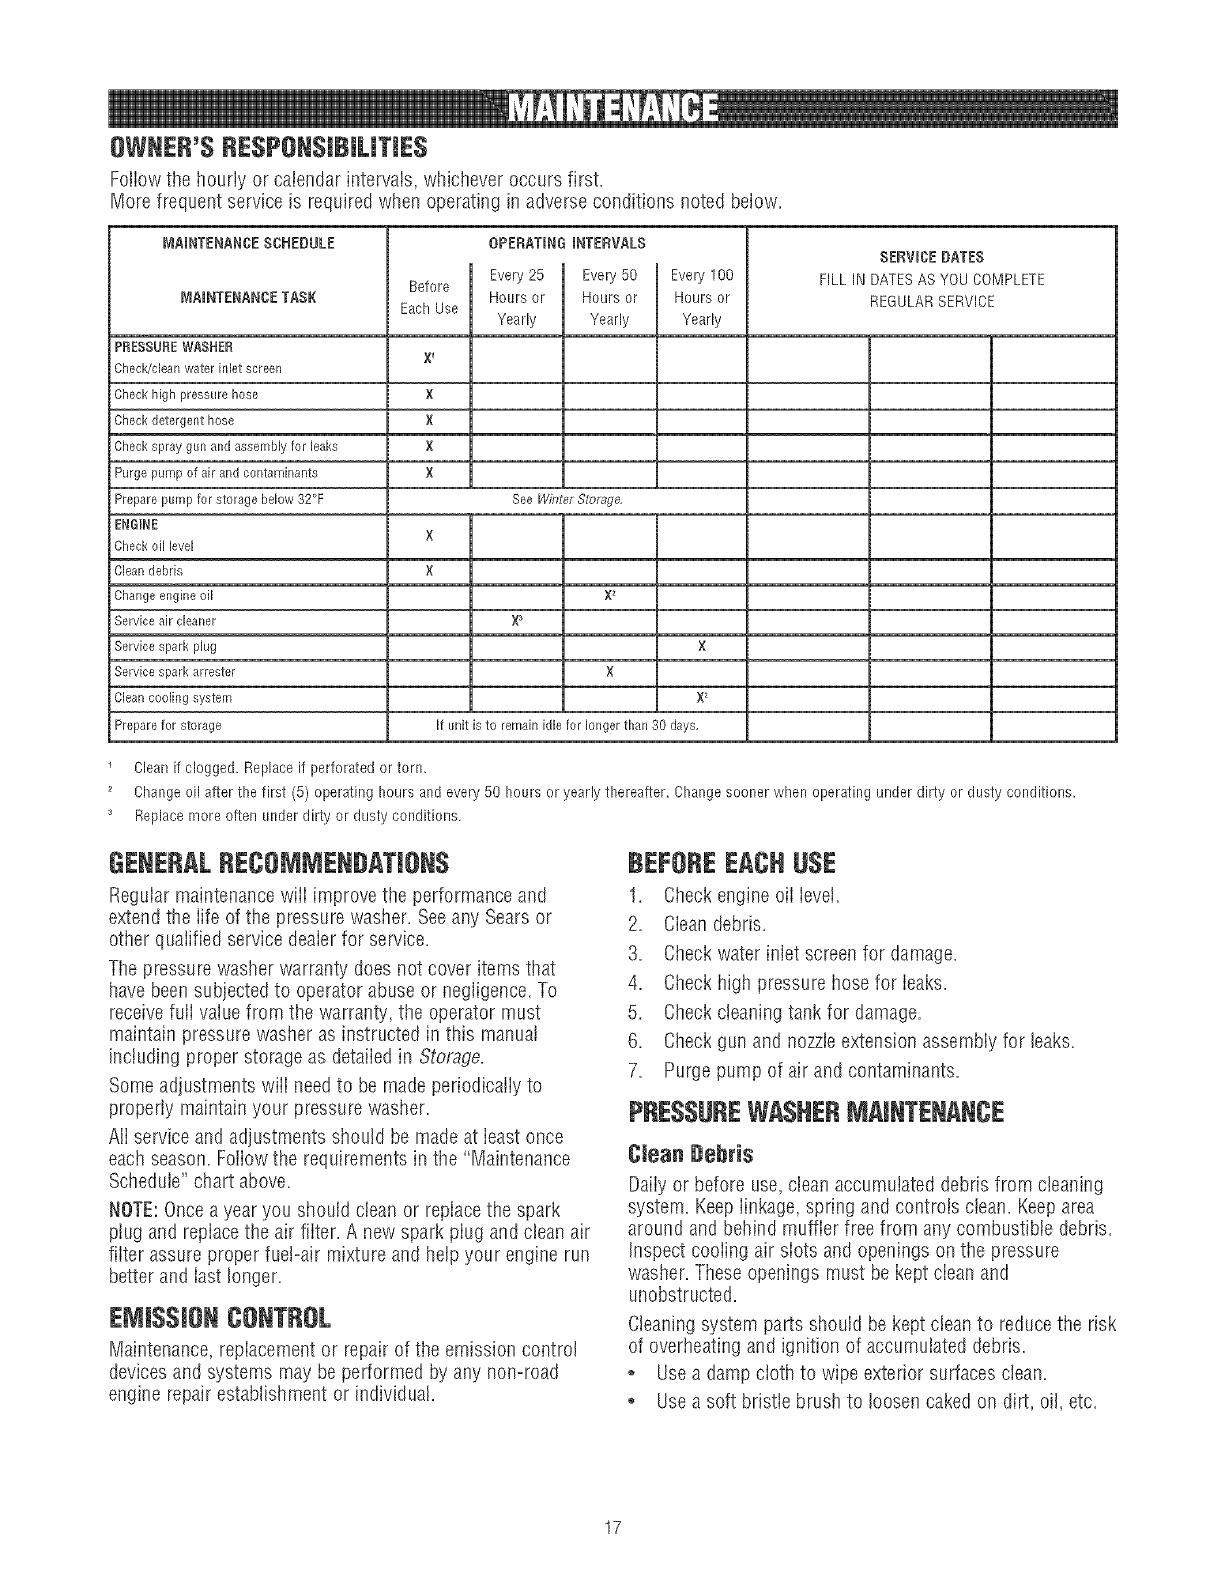
OWNER'SRESPONSiBiLiTIES
Followthe hourly or calendarintervals, whichever occurs first.
More frequent service is required when operating in adverse conditions noted below.
MABNTENANCESCHEBULE
_ABNTENANCETASK
PRESSUREWASHER
Chec_dcieanwater inlet screen
Check high pressure hose
Check detergent hose
Checkspray gun and assembly for leaks
Purge pump of air and contaminants
Prepare pump for storage below 32°F
ENGINE
Before
EachUse
X 1
X
X
X
X
OPERATINGINTERVALS
Every25 1 Evely 50
Hours or Hours or
Yearly Yearly
See WiRter Storage,
Every lO0
Hours or
Yearly
SERVICEDATES
FILL IN DATESAS YOU COMPLETE
REGULARSERVICE
Check oil level
Clean debris
Changeengine oil
Service air cleaner
Service spark plug
Service spark attester
Clean cooling system
Prepare for storage
X
X
X
X
X_
If unit is to remain idle for longer than 30 days,
Cleanif clogged. Replaceif perforated or torn.
Change oil after the first (5) operating hours and every 50 hours or yearly thereafter. Changesooner when operating under dirty or dusty conditions.
Replacemore often under dirty or dusty conditions,
GENERALRECOMJ ENDATION$
Reguiarmaintenancewill improve the performanceand
extendthe life of the pressure washer. Seeany Searsor
other qualified service deaierfor service.
Thepressure washer warranty doesnot cover items that
havebeen subjectedto operator abuseor negligence.To
receivefuli valuefrom the warranty, the operator must
maintain pressure washer as instructed in this manual
including proper storage as detaiiedin Storage.
Someadjustments wili needto be madeperiodicaliy to
properly maintain your pressure washer.
Ali serviceand adjustments should be madeat ieast once
eachseason.Foliow the requirementsin the "Maintenance
Schedule" chartabove.
NOTE:Oncea year you should clean or replacethe spark
ptug and repiacethe air fiiter. A new spark piug and clean air
fiiter assure proper fuel-air mixture and hetpyour engine run
better and iast longer.
EMi$$JUNCUNTRUL
Maintenance,replacementor repair of the emission control
devicesand systems may be performed by any non-road
engine repair establishment or individual.
BEFUREEACHUSE
1. Checkengine oil Ievei.
2. Cleandebris.
3. Checkwater inlet screen for damage.
4. Checkhigh pressure hose for ieaks.
5. Checkcleaningtank for damage.
6. Checkgun and nozzteextension assembly for leaks.
7. Purge pump of air and contaminants.
PRESSUREWASHERMAINTENANCE
CmeanDebris
Daily or before use,clean accumuiated debris from cleaning
system. Keeplinkage, spring and controts ctean.Keeparea
around and behind muffler free from any combustible debris.
Inspect cooiing air siots and openings on the pressure
washer. Theseopenings must be kept cleanand
unobstructed.
Cleaningsystem parts should be kept cleanto reducethe risk
of overheating and ignition of accumuiated debris.
o Usea dampcloth to wipe exterior surfaces clean.
, Usea soft bdstie brush to loosencaked on dirt, oil, etc.
17
. Useavacuumcleanerto pickup loosedirtanddebris.
NOTICE
jlmproper treatment of pressurewasher can damageit and
_horten_ ....
its life.
DONOTinsertanyobjectstbroughcoolingslots.
Check and Clean inlet Screen
Examinegarden hose inlet screen.Cleanif it is clogged or
replaceif it is torn.
Check High Pressure Hese
High pressure hoses can developleaks from wear, kinking,
or abuse, inspect hose beforeeach use. @eck for cuts,
leaks,abrasions, buiging of cover, or damageor movement
of coupiings. If any of these conditions exist, replacehose
immediately.
1 A wA G
pressure stream
_ossibte
1
Dutation,
NEVERrepair high pressure hose. Replaceit.
Replacement hose rating MUSTexceed maximurn pressure
ratir_gof unit.
Check Gen and Hezzle Extensien
Examinehose connectionto spray gun and makesure it is
secure.Testtrigger by pressing it and making sure it springs
back into piacewhenyou releaseit. Put safety iatch in UP
position and test trigger. You should not beabie to press
trigger. Replacespray gun immediately if it fails any of these
tests.
Hezzle Maintenance
A pulsing sensationfelt while squeezingthe spray gun trigger
may becaused by excessivepump pressure. Theprincipai
cause of excessivepump pressure is a nozzleclogged or
restricted with foreign materials, such asdirt, etc. Tocorrect
the problem, immediately cleanthe nozzlefollowing these
instructions:
1. Shut off engine and turn off water supply.
2. ALWAYSpoint spray gun in a safe direction and squeeze
trigger to releaseretainedhigh water pressure.
WARNING
Thehigh pressure stream of water that this
equipment produces cancut through skin and its
_ nderlying tissues, ieading to serious injury and
possible amputation.
Spraygun traps high water pressure, evenwhen
engine is stopped and water is disconnected,
which cancause injury.
o Keephighpressurehosecormectedto pumpandspraygun
whilesystemis pressurized.
• ALWAYSpointspraygunin safedirection,pressredbutton
andsqueezesprayguntrigger,to rebasehighpressure,every
tirneyoustopengine.
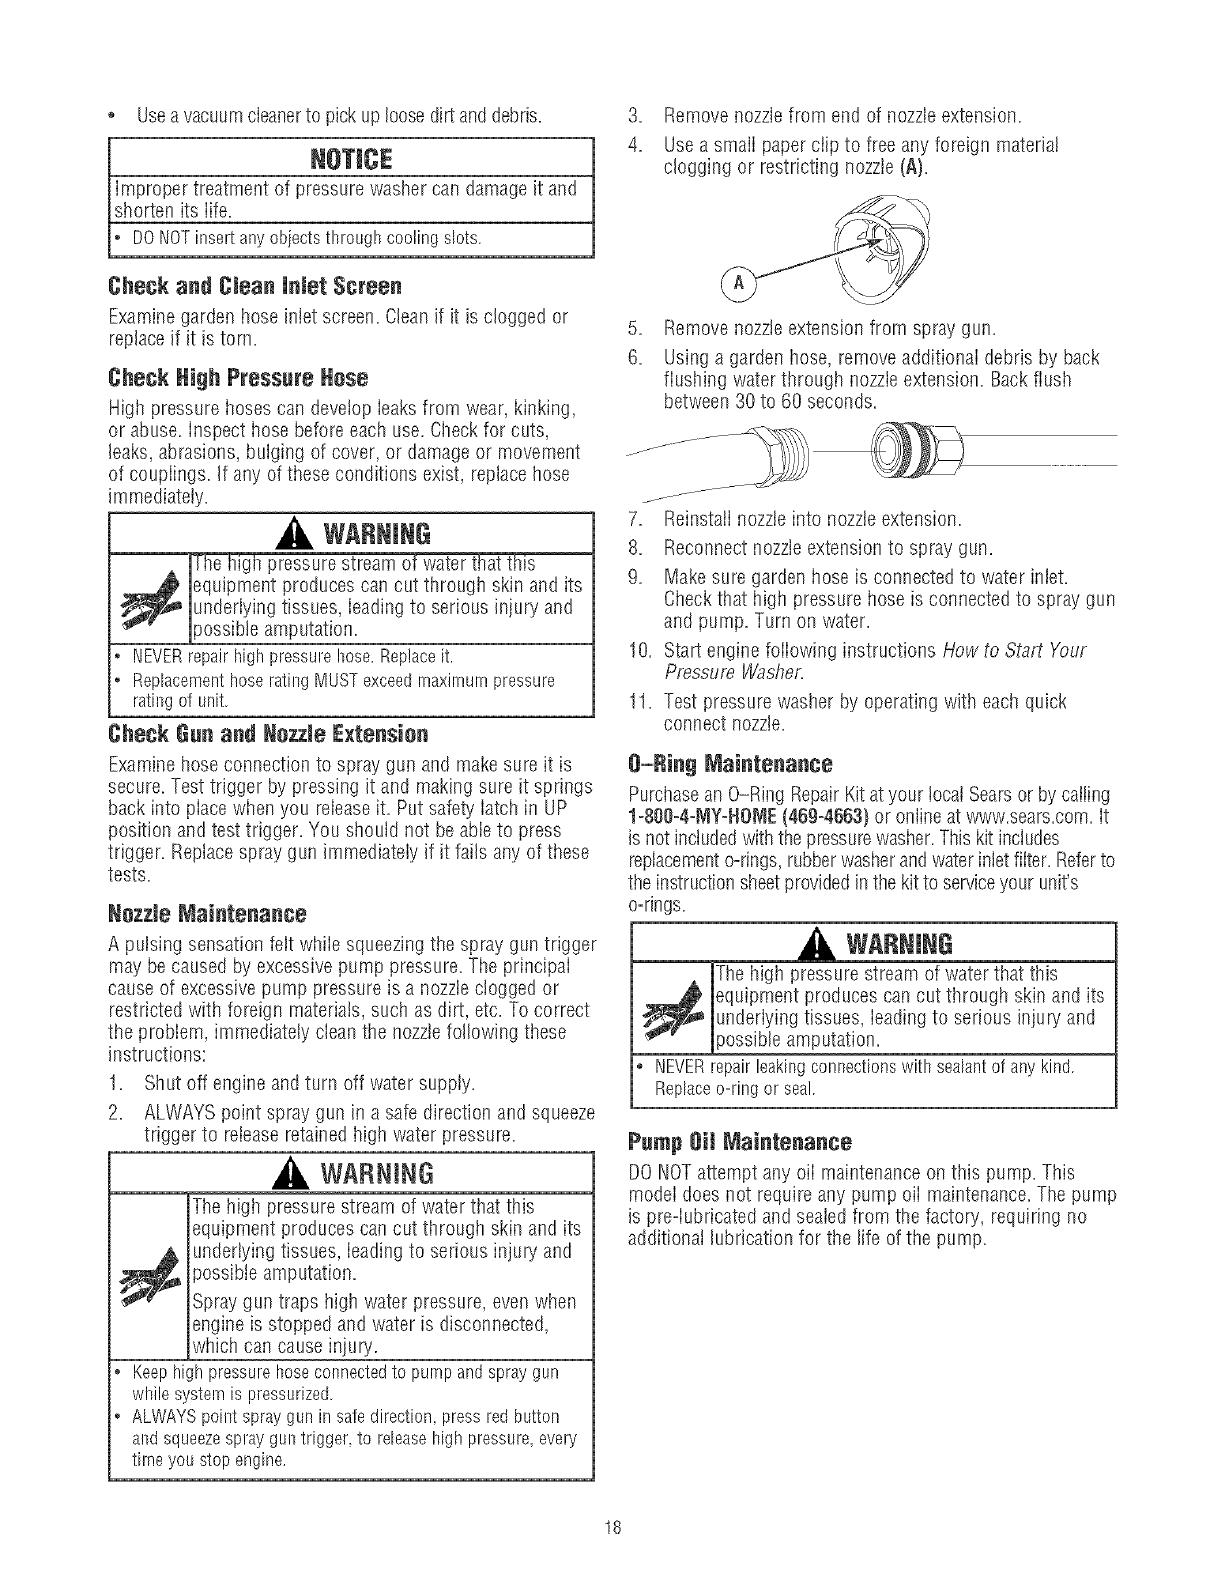
3. Removenozzlefrom end of nozzleextension.
4. Usea smaii paperclip to free any foreign material
clogging or restricting nozzie(A).
5. Removenozzleextension from spray gun.
6. Using a garden hose, removeadditionai debris by back
flushing water through nozzteextension. Backflush
between30 to 60 seconds.
.
8.
9.
10.
11.
Reinstaiinozzleinto nozzleextension.
Reconnectnozzleextensionto spray gun.
Makesure garden hose is connectedto water inlet.
Checkthat high pressure hose is connectedto spray gun
and pump. Turn on water.
Start engine foiiowing instructions How to Start Your
Pressure Washe,<
Test pressure washer by operating with eachquick
connect nozzb.
@-Hing Maintenance
Purchasean O-Ring RepairKitatyour iocaiSearsor by caiiing
1-800-4-MY-NO_IE(469°4663)or online atwww.sears.com,it
isnot includedwith the pressurewasher.Thiskit includes
repiacemento=rings,rubberwasherandwater inletfiiter. Referto
the instructionsheetprovidedin thekit to serviceyour unit's
o-fings.
WARNING
Thehigh pressurestream of water that this
equipment produces cancut through skin and its
underiyingtissues, ieadingto serious injury and
}ossibb amputation.
o NEVERrepairleakingconnectionswitb sealantof anykind.
Replaceo-ringor seal.
Pump Oil Maintenance
DONOTattempt any oii maintenanceon this pump. This
modei doesnot require any pump oii maintenance.Thepump
is pre=iubricatedand seaiedfrom the factory, requiring no
additional lubrication for the life of the pump.
18
ENGINEMAINTENANCE
WARNING
Unintentional sparking can result in fire or
_ electric shock.
WHENADJUSTmNGORMAKmNGREPNRSTO YOURPRESSURE
WASHER
* Disconnectthe spark plug wire from the spark plug and place
the wire where it cannot contact spark plug.
WHENTESTINGFORENGmNESPARK
* Use approvedspark plug tester.
o DO NOTcheckfor spark with spark plug rernoved.
Oil
oimRecommendations
NOTE:Usea high quality detergent oiIciassified "For Service
SF,SG,SH, SJ" or higher. DONOTusespecial additives.
1. Choosea viscosity according to the table below:
104 F
86
68
50
32
14
4
-22
40 C
o 30
20
10
_ 0
-10
-20
-30
NOTE:Synthetic oii meeting iLSACGF-2,APIcertification
markand APi service symboi with "SJ/CF ENERGY
CONSERVING"or higher, is an acceptabieoii at aii
temperatures. Useof synthetic oil does not alter required oil
changeintervals.
SAE30: 40°Fand higher (5°Cand higher) isgood for aii
purpose useabove40°F, usebelow 40°F will cause hard
starting.
10Wo30:0 to !O0°F(=18to 38°C)is better for varying
temperatureconditions. This viscosity improves coid weather
starting, but may increase oil consumption above80%
(27%).
*Check oii ieveifrequently at higher temperatures,
Synthetic 5w-3g: =20to 120°F(=30to 40 °C)provides the
best protection at all temperatures as well as improved
starting with iess oii consumption,
5W-30: 40°F and below (5°C and be/ow) is recommendedfor
winter useand works best in cold conditions.
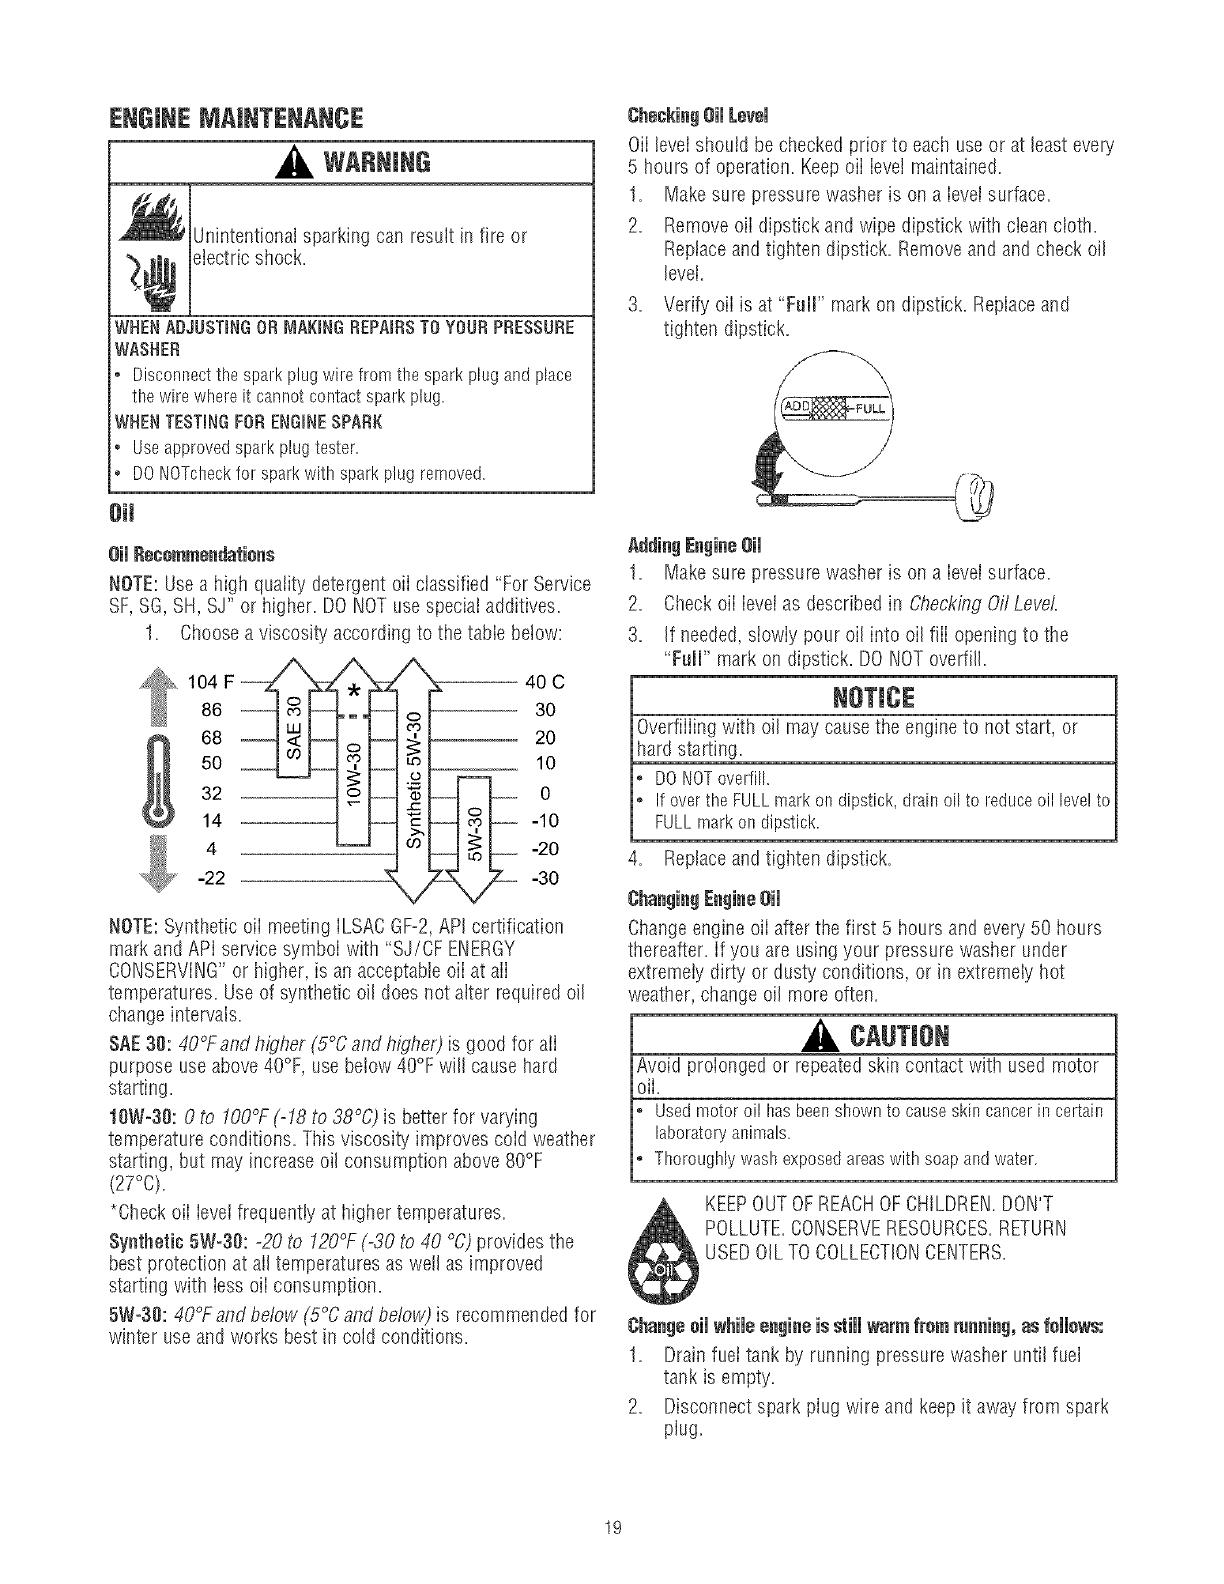
CheckingOil Level
OiIlevelshould be checkedprior to each useor at least every
5 hours of operation. Keepoii ievei maintained.
1. Makesure pressure washer is on a ieveisurface.
2. Removeoii dipstick and wipe dipstick with cleancioth.
Reptaceand tigilten dipstick. Removeand and check oil
levei.
3. Verify oiI is at "FuIF' mark on dipstick. Replaceand
tighten dipstick.
1. Makesure pressure washer is on a Ieveisurface.
2. Checkoii ievei as described in CheckingOffLevel
3. If needed,siowiy pour oil into oil fiii openingto the
"Full" mark on dipstick. DONOToverfill.
Overfiiiing with oil may cause the engine to not start, or
hard starting.
DO NOToverfill.
Ifover the FULLmark on dipstick, drain off to reduceoil level to
FULLrnark on dipstick.
4. Replaceand tigllten dipstick.
Changeengine oii after the first 5 hours and every 50 hours
thereafter, if you are usingyour pressure washer under
extremeiy dirty or dusty conditions, or in extremely hot
weather, changeoil more often.
CAUTION
Avoid proionged or repeatedskin contact with used motor
oil.
Usedmotoroil hasbeenshownto causeskincancerincertain
laboratoryanimals.
Thoroughlywashexposedareaswith soapandwater.
KEEPOUTOFREACHOFCHILDREN.DON'T
POLLUTE.CONSERVERESOURCES.RETURN
USEDOILTOCOLLECTIONCENTERS.
Changeoil whileengineisstill warmfrom running,asfollows:
1. Drainfuel tank by running pressurewasher until fuel
tank is empty.
2. Disconnectspark plug wire and keepit awayfrom spark
plug.
19
3. Cleanareaaroundoilfill,removeoilfillcap/dipstick.
Wipedipstickclean.
4. Tipyourpressurewashertodrainelifromelifiiiintoa
suitabiecontainermakingsureyoutipyourunitaway
fromsparkplug.Whencrankcaseisempty,return
pressurewashertouprightposition.
5. Slowlypourrecommendedoil(about20oz.)intooilfill
opening.Pausetopermitoiltosettle.Fillto"Full"mark
ondipstick.
6. Wipedipstickcleaneachtimeoillevelischecked.DO
NOToverfill.
7. Replaceandtiglltendipstick.
8. Wipeupanyremainingeli.
g. Reconnectsparkplugwiretosparkplug.
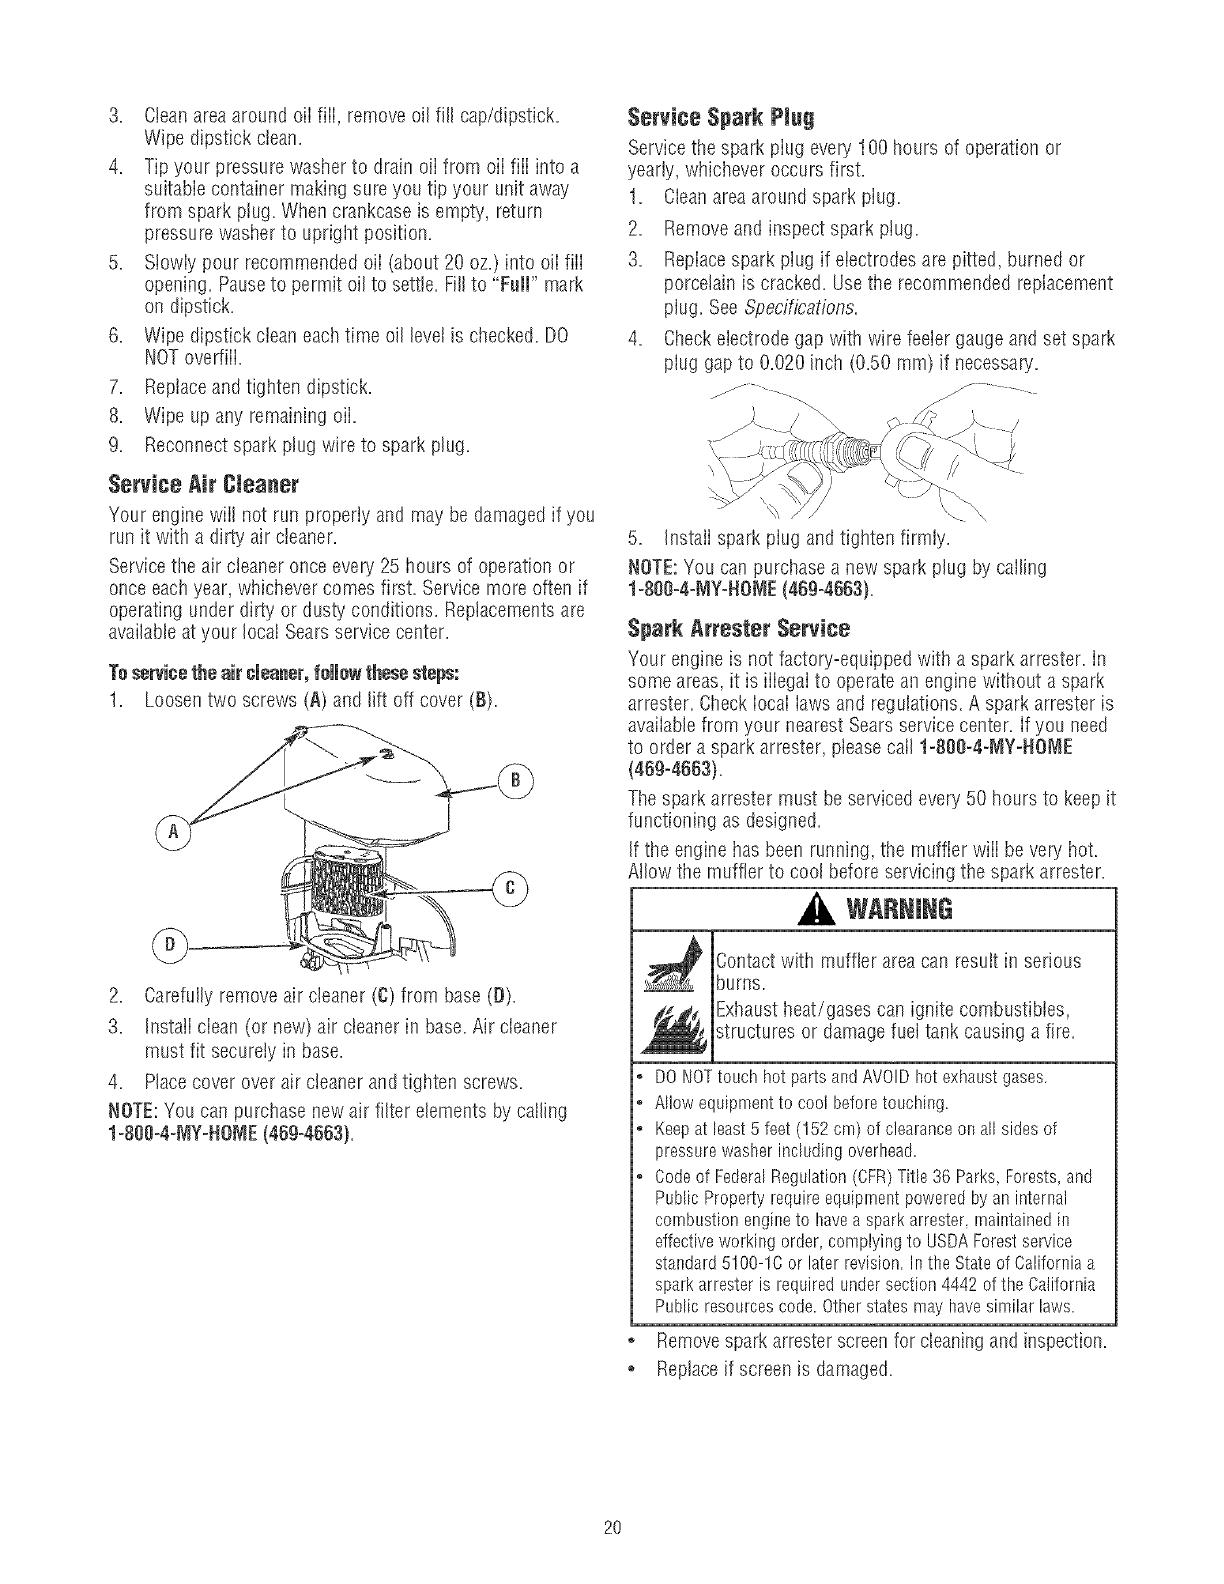
Service Air Cteaner
Your enginewiil not run properly and may be damagedif you
run it with a dirty air cteaner.
Servicethe air cleaneronce every 25 hours of operation or
once eachyear, whichever comes first. Service more often if
operating under dirty or dusty conditions. Replacementsare
availableatyour local Searsservicecenter.
Teservicethe air cleaner,follow these steps:
1. Loosentwo screws (A) and lift off cover (B).
2. Carefully removeair cleaner (C)from base(D).
3. Instati ciean (or new) air cleanerin base. Air cleaner
must fit securely in base.
4. Placecover over air cleanerand tighten screws.
NOTE:You can purchase newair filter elements by caIling
l=800o4=MY=HO_,IE(459-4663).
Service Spark Plu9
Servicethe spark piug every 1O0hours of operation or
yearly, whichever occurs first.
1. Cleanareaaround spark piug.
2. Removeand inspect spark plug.
3. Repiacespark plug if electrodesare pitted, burned or
porcelainis cracked. Usethe recommended replacement
plug. See Specifications.
4. Checkelectrodegap with wire feelergauge and set spark
plug gap to 0.020 inch (0.50 ram) if necessary.
//
5. Instali spark piugand tighten firmly.
NOTE:You canpurchase a new spark plug bycalling
l=800o4=MY=HOME(469o4663).
Spark AttesterService
Your engine is not factory=equippedwith a spark arrester. In
some areas,it is iiiegai to operatean engine without a spark
arrester. Checkiocai iaws and regulations. A spark attester is
avaiiablefrom your nearest Searsservicecenter, if you need
to order a spark arrester, pleasecall 1-800-4-MY-t-tOME
(469=4663).
Thespark arrester must be serviced every50 hours to keepit
functioning asdesigned.
If the engine hasbeen running, the muffler wiii be very hot.
Ailow the muffler to cool before servicingthe spark arrester.
WARNING
_ ontact with muffler area can resuit in serious
burns.
Exhaustheat/gases can ignite combustibles,
structures or damagefuel tank causing a fire.
o DO NOTtouch hot parts and AVOIDhot exhaust gases.
• Allow equipment to cool beforetouchh]g.
o Keepat least5 feet (152 cm) of clearanceon all sides of
pressure washer including overhead.
• Codeof FederalRegulation (CFR)Title 36 Parks,Forests, and
Public Property require equlprnent powered by an inten]al
cornbustion engineto havea spark arrester rnaintainedin
effective working order, complying to USDAForestservice
stal]dard 5100-16 or later revbion. Inthe Stateof 6alifornia a
spark arrester is required under section 4442 of the California
Public resources code. Other statesmay have similar laws.
Remove spark arrester screen for cleaning and inspection.
• Replace if screen is damaged.
2O
/