PEAQ PBR110 Owner's manual

Category
Blu-Ray players
Type
Owner's manual
2 - 28
30 - 56
58 - 84
86 - 112
English
Deutsch
Nederlands
Svenska
ENGLISH
30
READ CAREFULLY AND KEEP FOR FU-
TURE REFERENCE.
v
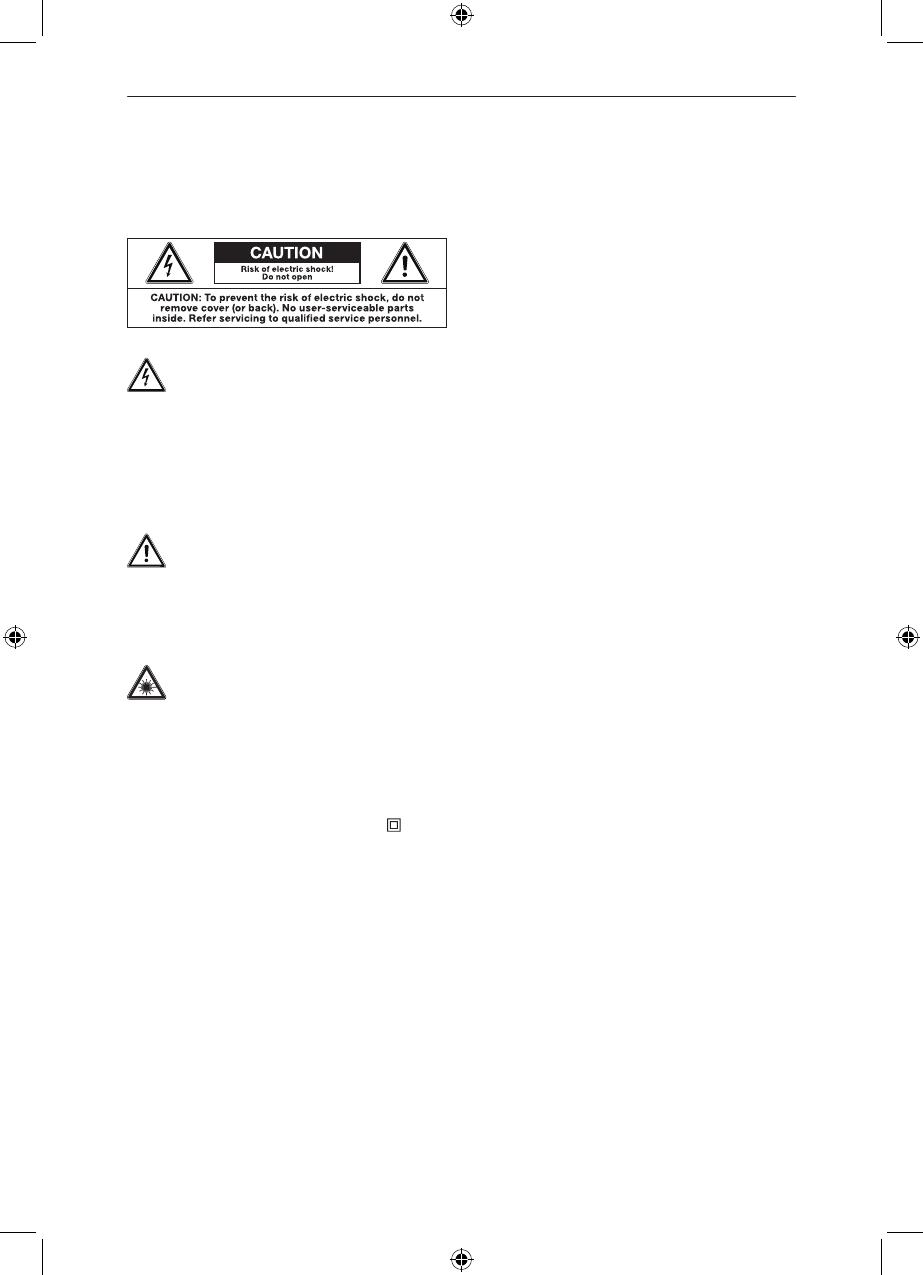
The lightning flash with arrowhead
within an equilateral triangle is intend-
ed to alert the user to the presence of unin-
sulated “dangerous voltage” inside the en-
closure of this appliance, which may be of
sucient magnitude to constitute a risk of
electric shock to persons.
The exclamation point within an equi-
lateral triangle is intended to alert the
user to the presence of important operating
and maintenance instructions in the litera-
ture accompanying this appliance
CAUTION! Use of controls or adjust-
ments of procedures other than
those specified herein may result in hazard-
ous radiation exposure.
For safety reasons, this class II appliance
is provided with double or reinforced insu-
lation as indicated by this symbol .
Before connecting the appliance to a
socket outlet, make sure the voltage in-
dicated on the appliance corresponds to
your local mains.
The MAINS plug is used as the discon-
nect device; the disconnect device shall
remain readily operable.
If the supply cord is damaged, it must be
replaced by the manufacturer or its service
agent or similarly qualified person in order
to avoid hazard.
WARNING: To reduce the risk of fire or
electric shock, do not expose this appli-
ance to rain or moisture. The apparatus
v
IMPORTANT SAFETY INSTRUCTIONS
shall not be exposed to dripping or splash-
ing and no objects filled with liquids, such
as vases, shall be placed on the appara-
tus.
CAUTION: This Blu-ray player employs a
laser system. to prevent direct exposure
to the laser beam, do not try to open the
enclosure or defeat the safety interlocks.
When open and the interlocks are defeat-
ed, visible laser radiation is present.
Regularly check if the supply cord, appli-
ance or extension cable are defective. If
found defective, do not put appliance into
operation. Immediately pull the plug.
Place the supply cord and, if necessary,
an extension cable in such a way that pull-
ing or tripping over it is impossible. Do not
allow the supply cord to hang down within
easy reach.
Do not jam, bend or pull the supply cord
over sharp edges.
Protect the supply cord from being walked
on or pinched particularly at the plug, con-
venience receptacles and the point where
it exits from the appliance.
Never pull the plug by the supply cord or
with wet hands.
Disconnect the mains plug in case of
faults during use, during lightening storms,
before cleaning and when not using the
appliance for a longer period of time.
The appliance may not function properly
or not react to the operation of any control
due to electrostatic discharge. Switch o
and disconnect the appliance; reconnect
after a few seconds.
Refer all servicing to qualified service per-
sonnel. Do not attempt to repair the appli-
ance yourself. Servicing is required when
the appliance has been damaged in any
way, such as the supply cord or plug are
damaged, liquid has been spilled, objects
have fallen into the appliance, the enclo-
sure is damaged, the appliance has been
ENGLISH
31
exposed to rain or moisture, does not op-
erate normally, or has been dropped.
Upon completion of any service or repairs
to this product, ask the service technician
to perform safety checks to determine that
the product is in proper operating condi-
tion.
Do not use attachments or accessories
other than recommended by the manufac-
turer or sold with this appliance. Install in
accordance with this user manual.
When installing the appliance, leave suf-
ficient space for ventilation. Do not install
in bookcases, built-in cabinets or the like.
The ventilation should not be impeded
by covering the ventilation openings with
items, such as newspapers, table-cloths,
curtains, etc. Do not insert any objects.
No naked flame sources, such as lighted
candles, should be placed on the appa-
ratus.
Do not place any electronic equipment or
toys on the appliance. Such items could
fall from the top and cause product dam-
age and/or personal injury.
Do not install near any heat sources such
as radiators, heat registers, stoves or other
appliances (including amplifiers) that pro-
duce heat
Do not apply excessive force to the front
or top, as this could ultimately overturn the
appliance.
Do not shift or move the appliance when
powered on.
Do not touch, push or rub the surface of
the appliance with any sharp or hard ob-
jects.
Do not move the appliance from cold into
warm places and vice versa. Condensa-
tion can cause damage to the appliance
and electrical parts.
For appliances with earphone jack: DAN-
GER! Excessive sound pressure from ear-
phones and headphones can cause hear-
ing loss. If you listen to loud music for a
long time, your hearing may be impaired.
Set to moderate volume.
For appliances with USB function: Reset
appliance by disconnecting USB device
from appliance in case of malfunction.
For appliances with USB function: If an
USB data storage medium malfunctions
as a result of electrostatic discharge and
momentary electrical surges, disconnect
the device from the appliance.
For appliances / accessories intended for
use of batteries:
CAUTION! Danger of explosion if batter-
ies are incorrectly replaced. Replace only
with the same or equivalent type. Observe
correct polarity.
Batteries (battery pack or batteries in-
stalled) shall not be exposed to excessive
heat such as sunshine, fire or the like. Pro-
tect from mechanical shock. Keep dry and
clean. Keep away from children.
Do not open, dismantle, shred or short-
circuit batteries. Do not mix old and new
batteries.
Dispose of properly. Pay attention to envi-
ronmental aspects of battery disposal. Do
not dispose of in household waste.
Refer to safety and other instructions on
the battery or its packaging.
ENGLISH
32
Main unit
1 2 3 4 5 6 7 8 9
1 2 4 53
1 Tray
2 Standby/On display
3 Remote control sensor
4 Display
5 OPEN/CLOSE
1 Supply cord
2 Ethernet connection
3 HDMI out (TV)
4 Analogue audio out
6 PLAY/PAUSE
7 Previous
8 Next
9 USB
10 STANDBY/ON button
5 Coaxial digital audio out
6 FBAS video out
10
6
ENGLISH
33
Accessories
1x Remote control
1x Audio/Video cable
2x Batteries (AAA)
CONTROL RANGE APPROX. 8 M
30°
OPENING USB PORT INSERTING BATTERIES
1x User Manual
ENGLISH
34
Remote control
STANDBY/ON
Number buttons
(0, 1-9)
SEARCH
Basic operation buttons:
FAST REVERSE
FAST FORWARD
PREVIOUS
NEXT
STOP
PAUSE
PLAY
STEP
DISC MENU
SETUP
AUDIO: Audio language
Colour buttons:
RED (A)
GREEN (B)
YELLOW (C)
BLUE (D)
OPEN/CLOSE
RETURN
REPEAT: Repeat playback
OSD: On Screen Display
SUBTITLE
A-B: A-B repeat
ANGLE
POPUP MENU/
TITLE MENU
Navigation keys
ENTER
VOL: Volume control
(– VOL +)
RESOLUTION: 576i, 576p,
720p, 1080i, 1080p
PIP: Secondary Video mode
(Picture in picture)
SECONDARY AUDIO:
To set audio in secondary
video mode
MUTE: No sound
ENGLISH
35
Safety remark
The lightning flash with arrowhead
within an equilateral triangle is in-
tended to alert the user to the
presence of uninsulated “dangerous volt-
age” inside the enclosure of this appliance,
which may be of sufficient magnitude to
constitute a risk of electric shock to persons
and animals.
The exclamation point within an
equilateral triangle is intended to
alert the user to the presence of
important operating and maintenance in-
structions in the literature accompanying this
appliance.
Important safety instructions. Read carefully
and keep for future reference.
The laser radiation label is located at the bot-
tom of the appliance.
Do not touch the lens inside the disc com-
partment.
CAUTION! Use of controls or adjustments
of procedures other than those specified
herein may result in hazardous radiation ex-
posure.
DANGER! Invisible laser radiation
when open and safety interlock
failed or defeated. Avoid direct ex-
posure to the beam. Do not touch the lens.
To reduce the risk of fire or electric shock, do
not expose this apparatus to rain or mois-
ture. The apparatus shall not be exposed
to dripping or splashing and that objects
filled with liquids, such as vases, shall not be
placed on apparatus.
This item incorporates copyright protection
technology that is protected by U.S. patents
and other intellectual property rights. Use of
this copyright protection technology must
be authorized by Rovi Corporation, and is
intended for home and other limited view-
ing uses only unless otherwise authorized
by Rovi Corporation. Reverse engineering or
disassembly is prohibited.
Manufactured under license
from Dolby Laboratories.
Dolby and the double-D symbol are trade-
marks of Dolby Laboratories.
Manufactured under license
under U.S. Patent Nos:
5,956,674; 5,974,380; 6,487,535 & other
U.S. and worldwide patents issued & pend-
ing. DTS, the Symbol, & DTS and the Sym-
bol together are registered trademarks &
DTS Digital Surround and the DTS logos are
trademarks of DTS, Inc. Product includes
software. DTS, Inc. All Rights Reserved.
ENGLISH
36
TV / PROJECTOR
1. Use A/V cable to connect video output
(yellow) and audio outputs (red/white) to
respective inputs of TV.
2. Connect HDMI faucet to respective input
of a TV.
Connections
POWER SUPPLYAMPLIFIER AND TV
NETWORK / INTERNET
Use coaxial cable (not included) to connect
COAXIAL output to COAXIAL type digital au-
dio input of amplifier. Connect video output
to respective input of TV.
Plug in the appliance. The power indica-
tor turns red with the unit being in standby
mode.
To receive services such as BD-Live, connect
an network cable with Internet connection
to the ETHERNET jack on the back of the
appliance.
ENGLISH
37
STANDBY/ON
Press on the main unit or remote control
to turn on the unit. The power indicator turns
white. Press again to return to standby
mode. The power indicator changes to red
again.
EJECT
To open or close the disc tray, press the
OPEN/CLOSE button.
Basic functions
SENSOR BUTTONS
Sensor buttons for basic functions can be
found on the panel of the appliance. Touch
them gently to operate them.
NAVIGATION IN MENUS
Most settings will be made via menus using
the navigation keys. Make sure the appliance
is connected to a television or projector:
1. Use the arrow keys to navigate up
or down.
2. Select the desired item and press ENTER
or right .
3. Press RETURN or left to return to the
previous menu.
General navigation
ENGLISH
38
Playback functions
FAST FORWARD
FAST REVERSE
During playback, press to fast forward
or to rewind. Each time or is
pressed, the motion speed changes.
Press PLAY to resume normal playback.
PREVIOUS
NEXT
During playback, press to skip to the
previous chapter/track or to skip to the
next chapter/track.
STOP PLAYBACK
To stop the playback temporarily, press
once.
With some discs the player can recall the
location where stopped, such as DVD.
Press PLAY to resume playback from the
location where playback had stopped or
from the beginning of the disc.
To stop the playback completely, press
twice.
PAUSE / PLAY
To pause the playback temporarily, press
once (still mode); sound will be muted. To
resume, press or PLAY again.
SINGLE STEP
1. Press continuously to single step for-
ward to the next frame in the video.
2. Press PLAY to resume normal play-
back.
NOTE
may appear on the TV screen during op-
eration, indicating that the operation is not
permitted by the unit or the disc.
ENGLISH
39
Special functions
SEARCH
During playback, press SEARCH repeatedly
to activate the following repeat functions:
Goto Title - - -
Goto Chapter - - -
Goto Time -- : -- : --
Cancel search
Use number buttons to enter desired set-
tings and confirm with ENTER.
RETURN
During playback of WMA/MP3/JPEG disc,
press RETURN to return to the previous on-
screen menu.
REPEAT
During BD / DVD playback, press REPEAT
repeatedly to activate the following repeat
functions:
1x Repeat O
2x Repeat Title
3x Repeat Chapter
ENGLISH
40
During music file playback, press REPEAT
repeatedly, or navigate through the playback
window to select respective playback op-
tion:
Playback
Play all / file
Random playback
ON SCREEN DISPLAY (OSD)
During playback, press OSD repeatedly to
show the disc information on titles, chap-
ters, elapsed playing time, languages, etc.
depending on the disc inserted.
SUBTITLE
Press to select desired subtitle language or
to deactivate subtitles.
A - B
1. During playback, press A-B at the be-
ginning of the section that should be
repeated ( Repeat A appears on the
screen).
2. Press A-B again at the end of the section
that should be repeated ( Repeat A-B
appears on the screen).
3. To return to normal playback, press A-B
again.
NOTE: This key won't work on most BD
discs.
ANGLE
Playing a multiangle disc, ANGLE ON will be
shown on screen, press ANGLE, then press
to choose other angle to view.
Stop playing, ANGLE OFF will be displayed.
DISC MENU
1. During playback, press MENU to display
the disc menu.
2. Press to select the desired
menu item.
3. Press ENTER to start playback.
NOTE: The operation is valid for DVD discs
possessing multi-layer menu.
POPUP MENU/TITLE MENU
During Blu-ray Disc playback, press POPUP
MENU/TITLE MENU to display the popup
menu/title menu:
1. Press to select an option.
2. Confirm with ENTER.
3. Press POPUP MENU/TITLE MENU to
close the menu.
During DVD playback, press POPUP MENU/
TITLE MENU to display the disc menu.
ENGLISH
41
SETUP
Press SETUP to get back to the root menu.
NOTE: The root menu will display on the
screen automatically, under No Disc or Stop
situations.
AUDIO
Press AUDIO to display information menu.
Press to select the mode of audio
and confirm with ENTER.
NOTE: This function depends on disc.
VOLUME
Press VOL + to increase the volume.
Press VOL – to decrease the volume.
A B C D
The RED, GREEN, YELLOW and BLUE
buttons are used with interactive menus
when operating a BD-Video disc that in-
cludes JavaTM applications (BD-J). For
more information about operating this kind
of disc, please read the instructions that
came with the disc.
RESOLUTION
The output for HD playback can be set to
the following resolutions by pressing the
RESOLUTION button:
HDMI Auto, 1080p, 1080i, 720p, 576p,
576i
NOTE: HDMI Auto detects the highest pos-
sible resolution automatically. 1080p is only
available at HDMI output.
PIP
Some BD and DVD discs contain scenes
recorded with dierent cameras from dier-
ent angles. Press PIP to display the angle
window. Use to select ON or OFF and
confirm with ENTER.
SECONDARY AUDIO
To turn audio on/o with the secondary vid-
eo, press SECONDARY AUDIO to display
information menu. Use to select
ON or OFF and confirm with ENTER.
NOTE: Only the primary video is played dur-
ing search or frame-by-frame play. PIP func-
tionality is also known as BonusView.
MUTE
To switch of the volume temporarily, press
MUTE button. The display will show MUTE
ON. Press MUTE button again to resume at
preset volume.
ENGLISH
42
BD / DVD / CD
PLAYBACK
1. Press , the player turns on and TV
screen will display the start logo. If disc is
already inserted, it will begin to play.
2. Press OPEN/CLOSE to open disc tray
and insert a Blu-ray Disc, DVD or CD
disc with label facing up; press OPEN/
CLOSE again to close disc tray. Playback
will automatically start.
NOTE: Some discs may not start
automatically. If disc starts playback with a
menu, use curser buttons on remote control
to select menu options and press ENTER to
start. To select a menu option directly press
digits.
ATTENTION
Do not insert multiple discs! Do not insert
any objects other than BDs / DVDs / CDs.
EJECT
The disc can be ejected any time by pressing
the button. Remove the disc from the tray
and store it in its case. Press again to
close the disc tray.
BLU-RAY SPECIAL FUNCTIONS
The massive storage capacity of a Blu-Ray
(BD) disc allows a far higher standard of pic-
ture and audio quality and a wealth of spe-
cial eects and enhanced features.
Blu-ray and JAVA
This player features Java support so ena-
bling you to get the most out of the latest
Blu-Ray discs. When a BD disc loads always
explore the title menu to enjoy these extra
features.
Blu-ray and HDMI
HDMI is the only domestic medium capable
of transmitting the huge volumes of data re-
quired by the very high picture resolutions
and advanced digital audio codecs that
make Blu-Ray such an exciting medium.
Playing a Blu-ray disc
Blu-Ray discs play very much like standard
DVDs but with a very much higher level of
interactivity. All the standard features of DVD
play operate likewise but there are some dif-
ferences.
ENGLISH
43
1. Connect USB stick to the USB jack or
insert a disc containing media.
2. The device will be read, after which
MEDIA appears on the screen.
3. The menu items Images, Videos and Mu-
sic are shown shortly after, if correspond-
ing files are located on the device.
ATTENTION
Do not use storage devices that are dam-
aged or have fallen into liquid. Avoid di-
rect sunlight. The use of USB extension
cables is not supported.
PLAYBACK
The content of DVDs, CDs and USB sticks
on which media files are saved, is displayed
on screen. Use the arrow keys to select
Music, Pictures or Video menu (if available).
In the then open menu, use the arrow keys
to select desired storage device, folder
or file. Confirm each press with ENTER. Se-
lected file will be played. Press RETURN to
return to parent folder or menu.
USB / Media files
File playback options:
Play files: Play all tracks from selected
folder.
Start slideshow: Play all images from
selected folder. During slideshow, press
POPUP MENU / TITLE MENU to access
menu with following settings: Slideshow
eects, Slideshow delay.
Slideshow from certain image:
If you want to start slideshow from a certain
picture, select picture and press ENTER.
Press PLAY to pause/start slideshow.
Slideshow with music:
Copy pictures and suitable music tracks to
a USB stick or CD. Begin by starting mu-
sic playback. Press RETURN to go back to
menu and select Pictures. Select desired
folder and start slideshow.
File repeat:
Press repeatedly to select file repeat
function:
Repeat O Normal playback
Repeat File Repeat current file
Repeat All Repeat all files
Random On Play in random order
REMOVING USB STICKS
Press the button. Wait until playback
stops. Disconnect the USB stick from the
port.
ATTENTION
Never remove the USB stick if the appli-
ance is still accessing it.
ENGLISH
44
Setup menu
NAVIGATING THROUGH THE MENUS
The settings menu will be displayed auto-
matically on the screen, press ENTER on
remote control to next menu. It includes Dis-
play, Audio, Language, Parental, System,
Network, BD-Live menu.
Press SETUP on remote control, the setup
menu will be displayed. Use to se-
lect menu and to navigate through respec-
tive menu options. Press ENTER to confirm
the selection and save the setting. Press
to return to previous menu.
Menu structure
DISPLAY SETUP
HDMI Status: To show if the HDMI is con-
nected or not.
HDMI preferred Format: To show HDMI
best format of TV Set.
TV Type: This player supports dierent TV
outputs, including NTSC and PAL systems.
NOTE: If playing the disc of the PAL type,
please select PAL option. If playing the disc
of the NTSC type, please select NTSC op-
tion.
Resolution: To select the resolution output
of the player to match your TV.
TV Type Correct
Resolution Setting
If your TV is a standard-definition PAL TV (American, Asian
SD TV)
480i/576i
If your TV is an enhanced-definition TV (EDTV) 480p/576p
If your TV is a high-definition TV (HDTV) capable of 720p only 720p
If your TV is a high-definition TV (HDTV) capable of 1080i only 1080i
If your TV is HDMI equipped, and if your TV is a high-definiti-
on TV (HDTV) capable of 1080p [any frame rate], and you are
connected to your TV via HDMI
1080p (HDMI)
If your TV is HDMI equipped, and you are connected to your
TV via HDMI, and you wish the BD player to set the output
based on information exchanged between the TV and the
player over the HDMI cable
HDMI auto
ENGLISH
45
NOTE: Setting the player for an output reso-
lution not supported by your TV will result in
unpredictable results. Only the HDMI output
of the player is capable of supporting 1080p
video output at any frame rate. If the HDMI
cable is not connected, the component out-
puts are limited to 1080i.
TV Aspect: Select display aspect ratio for
your TV screen. There are various types of
on-screen displays for dierent disc and TV
requirements.
NOTE: Setting the player for one of the 16:9
settings when connected to a 4:3 TV, or set-
ting the player for one of the 4:3 settings
when connected to a 16:9 TV will result in
unpredictable results. In the standard-defi-
nition (480i/576i/576p/480p) mode, the BD
player have 16:9 and 4:3 aspect ratio. In the
high-definition (720p/1080i/1080p) mode,
the BD player have only 16:9 aspect ratio.
Film Mode (1080p24): Movies are recorded
on film at a rate of 24 pictures, or frames, per
second. Many of the movies on BD discs are
placed on the disc at this frame rate. How-
ever, not all TVs can display 24 progressive
frames/second of video. The UP/DOWN
menu keys can then be used to select O or
On for 50 frames/second output format.
NOTE: Only the HDMI output of the player
is capable of supporting 1080p video output
at any frame rate. The component outputs
are limited to 1080i, regardless of the Film
Mode setting.
Deep Colour: To set the deep colour.
NOTE: HDMI 1.3 supports 10-bit, 12-bit
and 16-bit (RGB or YCbCr) color depths
while 8-bit depths in previous versions. This
expands the colors displayed from millions
to billions, which is much more vivid than the
previous.
AUDIO SETUP
PCM Downsampling: To set the players
digital output PCM sampling rate.
NOTE: Incorrectly setting the digital audio
output’s PCM sampling rate may result in
unpredictable audio playback.
Digital Output: To set the audio outputs.
This DVD player includes four kinds of audio
outputs:
1. PCM: Mixed digital audio sent over HDMI
in PCM (if supported by HDMI device)
and SPDIF in 2-channel PCM format.
2. Bitstream HD: Original bitstream from
disc is passed over HDMI and SPDIF
using highest quality possible. HDMI has
higher quality capabilities with advanced
audio codes like TrueHD and DTS-HD.
BD audio is limited to the soundtrack of
the main movie (i.e. no POP audio, no
audio eects).
3. Bitstream Legacy: Original bitstream
from disc is passed over HDMI and
SPDIF using legacy audio formats. BD
audio is limited to the soundtrack of the
main movie (i.e. no POP audio, no audio
eects).
4. Bitstream mixed: BD audio streams
are mixed and encoded into a single
bitstream. Primarily intended for
customers with SPDIF 5.1CH receivers
who want to enjoy mixed BD audio in
surround sound.
ENGLISH
46
Audio Language: Sets the preferred audio
language as the default language for the
disc. Choose the desired language from the
list.
Subtitle Language: To set the preferred
subtitle language as the default language for
the disc. Choose the desired language from
the list.
NOTE: In Audio Languages and Subtitle
menu not all languages are available on
all disc. Some discs do not allow the user
to select the audio language from the BD-
player setup menus. The audio language
can only be selected from the BD/DVD disc
setup menu. (The menu that appears after
the disc has been inserted).
PARENTAL CONTROL SETUP
Parental Control: A program will be blocked
if the censorship class which it has been as-
signed is above the censorship class cho-
sen by the user. There are up to 8 censor-
ship classes for BD.
NOTE: The PARENTAL is changeable when
PASSWORD MODE is set to OFF.
After setting the level of parental control,
please set the password as ON to lock the
parental settings.
Dynamic Range Control: Only active when
a Dolby Digital signal is detected.
O: Standard Dynamic Range.
On: When Movie soundtracks are played at
low volume or from smaller speakers, the
system can apply appropriate compression
to make low-level content more intelligible
and prevent dramatic passages from getting
too loud.
Auto: If a Dolby TruHD track on the BD disc
is selected, the system turns on the Dynamic
range control for all BD movie soundtracks
except Dolby TruHD.
Stereo Downmix: To set front speakers to
Auto, Stereo (LoRo) or Surround Encoded
(LtRt).
LANGUAGE SETUP
OSD Language (On Screen Display): To
select language for complete setup menu
and on-screen display.
Choose the desired language from the list.
Menu Language: To set the preferred menu
language as the default language for the
disc. Choose the desired language from the
list.
NOTE: Not all languages are available on all
discs. Most discs only have one menu lan-
guage available.
ENGLISH
47
Parental Level: To set dierent censorship
classes assigned to DVDs.
1 [Kid Safe] Suitable for all children.
2 [G] General audiences.
3 [PG] Parental guidance suggested.
4 [PG-13] Not suitable for anyone under
13.
5 [PG-R] Parental guidance recommend-
ed.
6 [R] Not suitable for anyone under
17 unless supervised by a par-
ent or adult guardian.
7 [NC-17] Not suitable for anyone under
17.
8 [Adult] Adults only.
Parental Password: To change password,
input old password first, then enter new
password of 4 digits twice.
IMPORTANT: (Initial password 0000).
SYSTEM SETUP
Optical Disc AutoPlay: There are two op-
tions for Optical Disc AutoPlay.
Disable: Media Launcher must be used to
select optical discs.
Enable: Optical discs playback automatically
without use of Media Launcher.
Screen Saver Duration: To set the time of
entering screen saver status. If the screen
saver duration is o, the screen saver func-
tion is o.
Auto Power Down: Auto Power Down au-
tomatically turns the player o if no settings
are changed after a selected period of time
(5, 10, 20 or 30 minutes).
CEC: This option is used to allow the TV
remote control to control certain functions
of the Blu-Ray player; and for the Blu-Ray
player to control certain functions of the TV.
On: Allow mutual control of devices through
HDMI.
O: Do not allow CEC control.
NOTE: Not all TVs are compatible with your
Blu-Ray Player.
Update Via Network: Download and install
product updates for your player.
Restore Factory Defaults: To reset the
player to the default factory settings.
NOTE: This does reset the Parental Control
Password.
System Information: Select System Infor-
mation, then press ENTER. The System
Information screen opens, showing the rel-
evant software version information.
ENGLISH
48
NETWORK SETUP
Link Status: The link status menu items
show if the current network is connected or
not.
MAC address: The hardware address of the
Ethernet interface is displayed.
IP Mode: The IP Mode option provides three
configuration modes for IP.
Dynamic: Enables DHCP. Recommeded
method for automatic network setup con-
figuration.
Manual: Requires user to configure network
settings such as IP address, subnet mask,
gateway, etc.
IP address and other settings:
If „Manual“ is choosen in the IP Mode set-
ting, the network connection can be adjust-
ed to your requirements. IP addresses for
the Subnet Mask, Gateway, Primary DNS
and Secondary DNS can be set individually.
BD-LIVE SETUP
BD-Live Internet Access: Provides three
options.
Limit Access: Allow BD-Live network access
except when there are Case-1 and Case-2
errors from a DRM-certified network con-
nection. This check is performed at disc in-
sertion.
Always Allow Access: Always allow BD-Live
Internet access regardless of Case-1 and
Case-2 errors.
Prohibit Access: Never allow BD-Live Inter-
net access.
BD-Live Storage: To show the available ca-
pacity for BD-LIVE storage, press ENTER to
display the option for deleting BD-LIVE files.
Erase Blu-ray Storage: To delete any BD-
Live content that has been downloaded
from the internet.
  • Page 1 1
  • Page 2 2
  • Page 3 3
  • Page 4 4
  • Page 5 5
  • Page 6 6
  • Page 7 7
  • Page 8 8
  • Page 9 9
  • Page 10 10
  • Page 11 11
  • Page 12 12
  • Page 13 13
  • Page 14 14
  • Page 15 15
  • Page 16 16
  • Page 17 17
  • Page 18 18
  • Page 19 19
  • Page 20 20
  • Page 21 21
  • Page 22 22
  • Page 23 23
  • Page 24 24
  • Page 25 25
  • Page 26 26
  • Page 27 27
  • Page 28 28
  • Page 29 29
  • Page 30 30
  • Page 31 31
  • Page 32 32
  • Page 33 33
  • Page 34 34
  • Page 35 35
  • Page 36 36
  • Page 37 37
  • Page 38 38
  • Page 39 39
  • Page 40 40
  • Page 41 41
  • Page 42 42
  • Page 43 43
  • Page 44 44
  • Page 45 45
  • Page 46 46
  • Page 47 47
  • Page 48 48
  • Page 49 49
  • Page 50 50
  • Page 51 51
  • Page 52 52
  • Page 53 53
  • Page 54 54
  • Page 55 55
  • Page 56 56
  • Page 57 57
  • Page 58 58
  • Page 59 59
  • Page 60 60
  • Page 61 61
  • Page 62 62
  • Page 63 63
  • Page 64 64
  • Page 65 65
  • Page 66 66
  • Page 67 67
  • Page 68 68
  • Page 69 69
  • Page 70 70
  • Page 71 71
  • Page 72 72
  • Page 73 73
  • Page 74 74
  • Page 75 75
  • Page 76 76
  • Page 77 77
  • Page 78 78
  • Page 79 79
  • Page 80 80
  • Page 81 81
  • Page 82 82
  • Page 83 83
  • Page 84 84
  • Page 85 85
  • Page 86 86
  • Page 87 87
  • Page 88 88
  • Page 89 89
  • Page 90 90
  • Page 91 91
  • Page 92 92
  • Page 93 93
  • Page 94 94
  • Page 95 95
  • Page 96 96
  • Page 97 97
  • Page 98 98
  • Page 99 99
  • Page 100 100
  • Page 101 101
  • Page 102 102
  • Page 103 103
  • Page 104 104
  • Page 105 105
  • Page 106 106
  • Page 107 107
  • Page 108 108
  • Page 109 109
  • Page 110 110
  • Page 111 111
  • Page 112 112
  • Page 113 113
  • Page 114 114

PEAQ PBR110 Owner's manual

Category
Blu-Ray players
Type
Owner's manual

Ask a question and I''ll find the answer in the document

Finding information in a document is now easier with AI