
Quick Start Guide
Quick Start Guide
Guide de Démarrage Rapide
Guía Rápida para Comenzar
US
FR
ES
© 2008 Sony Corporation
Printed in Thailand
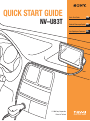
QUICK START GUIDE
NV–U83T

1
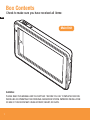
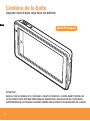
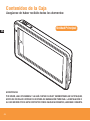
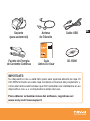
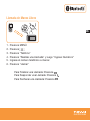
Box Contents
US
Check to make sure you have received all items:
Main Unit
WARNING:
PLEASE READ THIS MANUAL AND THE SUPPLIED “BEFORE YOU USE” COMPLETELY BEFORE
INSTALLING OR OPERATING YOUR PERSONAL NAVIGATION SYSTEM. IMPROPER INSTALLATION
OR USE OF THIS DEVICE MAY CAUSE ACCIDENT, INJURY, OR DEATH.

Quick Start Guide
US
IMPORTANT:
Your nav-u device is ready to use out of the box. The CD-ROM included
in this box contains the owner’s manual and other extras which DO NOT
need to be installed on your nav-u device or computer prior to use.
Register for software updates at: www.sony.com/navusupport
Cradle
USB Cable
DC Power Supply
Traffic Antenna
CD-ROMBefore You Use Guide

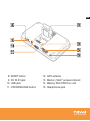
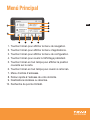
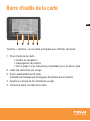
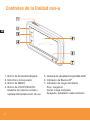
nav-u Unit Controls
3
US
On/Standby button
Built-in Microphone
MENU button
VOICE/POS. button
Shows current position and repeats
last voice guidance instruction
Display window/touch screen
Bluetooth
®
indicator
Battery charge indicator
Red: charging
Green: fully charged
Off: adapter disconnected
1.
2.
3.
4.
5.
6.
7.

Quick Start Guide
US
RESET button
DC IN 5V jack
USB jack
OPEN/RELEASE button
GPS antenna
Memory Stick
®
access indicator
Memory Stick PRO Duo
™
slot
Headphones jack
Display window/touch screen
Bluetooth
®
indicator
Battery charge indicator
Red: charging
Green: fully charged
Off: adapter disconnected
8.
9.
10.
11.
12.
13.
14.
15.

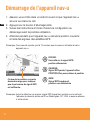
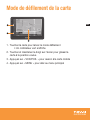
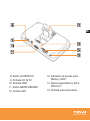
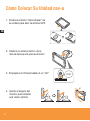
Attaching the Cradle
5
US
ROTATE
3. IMPORTANT:
Press knob rmly and
turn counterclockwise
to lock into position
Dashboard
Mount
Windshield
Mount
2. Select mounting location
Choose a clean, non-porous surface with an unobstructed view of the sky
1. Remove protective cover
Note: Use cover to keep suction cup clean and tacky
when not in use.
Note: Placement limitations may apply. Always check your local laws for any limitations.

Quick Start Guide
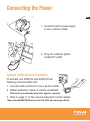
Connecting the Power
US
To activate your FREE 90-day NAVTEQ trial
*
featuring real-time trafc info:
1. Connect trafc antenna to nav-u device cradle.
2. Attach antenna to inside of vehicle windshield.
Trial starts automatically when first signal is received.
3. Refer to page 17 of the owner’s manual for further details.
*See enclosed NAVTEQ brochure for full offer and coverage details
Optional Traffic Antenna Connection
1. Connect the DC power supply
to nav-u device cradle
2. Plug into vehicle’s lighter
socket/DC outlet

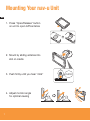
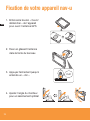
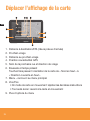
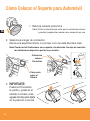
Mounting Your nav-u Unit
7
US
CLICK
2. Mount by sliding antenna into
slot on cradle
3. Push rmly until you hear “click”
4. Adjust monitor angle
for optimal viewing
1. Press “Open/Release” button
on unit to open GPS antenna

Quick Start Guide
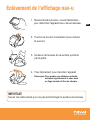
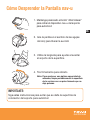
Detaching the nav-u Display
US
1. Press and hold “Open/Release” button
to release nav-u device from cradle
2. Turn knob clockwise to relieve suction
3. Use tab to help lift cradle from surface
4. Peel rmly to release
Note: To maintain best adhesion, periodically
clean suction cup surface with a damp,
lint-free cloth.
IMPORTANT:
Follow these instructions to avoid damaging the cradle’s mounting surface.

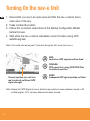
Turning On the nav-u Unit
9
US
1. Ensure that you are in an open area and that the nav-u device has a
clear view of the sky.
2. Press on/standby button
3. Follow the on-screen instructions of the Startup Conguration Wizard
before rst use
4. Wait while the nav-u device calculates current location using GPS
satellite signals.
Note: This could take as long as 10 minutes during the rst use of your nav-u.
Current position icon will turn
red to indicate sufficient GPS
signal strength
Note: Before rst GPS Signal is found, default map position is home address entered in #2,
or Washington, DC if no home address has been entered.
RED:
Locked on GPS signal; position fixed
GREY:
Inadequate GPS signal; position not fixed
ORANGE:
GPS signal lost; using POSITION Plus
to estimate position

Quick Start Guide
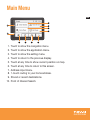
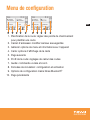
Main Menu
US
6
5
7
8
9
10
Touch to show the navigation menu.
Touch to show the application menu.
Touch to show the setting menu.
Touch to return to the previous display.
Touch at any time to show current position on map.
Touch at any time to return to this screen.
Address input menu.
1-touch routing to your home address.
Stored or recent destinations.
Point of Interest Search.
1.
2.
3.
4.
5.
6.
7.
8.
9.
10.

Searching by Address
11
US
TIP:
Enter just the first few letters of the
state, street, or city; then press “Done”
to select from a list of possible choices.
States can be entered using the standard
2-letter abbreviation (NJ for New Jersey).
TIP:
After the first time the address input is
used, the unit automatically assumes
this state. You can change the state by
pressing “state” on the house number,
street, or city input pages.
1. Touch MENU
2. Touch “Enter Address”
3. Follow the onscreen instructions
to enter the state, house #, and
street names, pressing “Done”
to complete each entry.
4. After touching the desired street,
enter city name or press “Skip”
to see all other matches.
5. Touch “Calculate Route” to
start navigating.
Press to
change
state, if
required.
Note:
See Below

Quick Start Guide
US
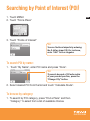
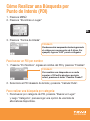
Searching by Point of Interest
(
POI
)
TIP:
You can find local airports by entering
the 3-letter airport ID. For instance,
enter “LAX” for Los Angeles.
TIP:
To search beyond a 100 mile radius
of your present position, press the
“Change City” button.
1. Touch MENU
2. Touch “Find a Place”
3. Touch “Points of Interest”
To search POI by name:
1. Touch “By Name”, enter POI name and press “Done”.
2. Select desired POI from the list and touch “Calculate Route”.
To browse by category:
1. To search by POI category, press “Find a Place” and then
“Category” to select from a list of available choices.

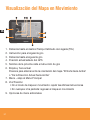
Moving Map Display
13
US
7
8
6
9
Distance to destination/ETA (Estimated Time of Arrival)
Next turn instruction
Distance to next turn
Current position/GPS status
Upcoming street name and turn instruction
Compass and current time
Touch to toggle map orientation between “North Up” or
“Current Direction Up”
Menu – shortcut to Main Menu
Voice/Pos – In moving map mode: repeat last instructions
Any other screen: return to moving map
Additional menu options
1.
2.
3.
4.
5.
6.
7.
8.
9.

Quick Start Guide
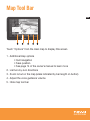
Map Tool Bar
US
Touch “Options” from the main map to display this screen
1. Additional map options
•Quitnavigation
•Saveposition
•Seepage14oftheowner’smanualtolearnmore
2. List turn-by-turn directions
3. Zoom in/out on the map (scale indicated by bar length on button)
4. Adjust the voice guidance volume
5. Hide map tool bar

15
US
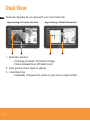
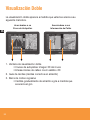
Dual View
1. Dual view window
•Freewayjunctions:3Djunctionimage
•Streetintersections:2Dstaticzoom
2. Lane guide (correct lanes in yellow)
3. Countdown bar
•Graduallychangesfromyellowtogreyasturnapproaches
Approaching a Freeway Junction
Dual view appears as you approach your next maneuver.
Approaching a Street Intersection

Quick Start Guide
US
Map Scrolling Mode
4
3
2
1. Touching the map switches to scrolling mode
•Greencrosshairappears
2. Touch and hold nger to screen to “drag” the map to desired position
3. Press “VOICE/POS.” to return to moving map
4. Press “MENU” to go to the main menu

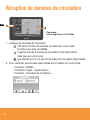
Receiving Traffic Information
17
US
1. Trafc information diamond
:XX is the number of minutes delay on your route, touch for details
i means trafc info available, but not on your route
grey means no trafc info available
2. To see available trafc information at any time:
•TouchMENU
•Touch“Application”tab
•Touch“TrafcInformation”
Note:
see page (6) for
activation information
i
:
10

Quick Start Guide
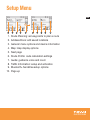
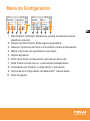
Setup Menu
US
1 3 2 4 5 6 8 7
9
10
Route Planning: set waypoints to plan a route
Address Book: edit saved locations
General: menu options and device information
Map: map display options
Next page
Route Prole: route calculation settings
Guide: guidance voice and zoom
Trafc Information: setup and activation
Bluetooth
®
handsfree setup options
Page up
1.
2.
3.
4.
5.
6.
7.
8.
9.
10.

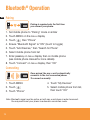
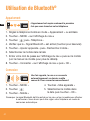
Bluetooth
®
Operation
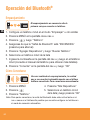
19
US
1. Set mobile phone to “Pairing” mode or similar
2. Touch MENU on the nav-u display
3. Touch , then “Phone”
4. Ensure “Bluetooth Signal” is “ON” (touch to toggle)
5. Touch “Add Devices,” then “Search for Phone”
6. Select mobile phone from list
7. Enter passkey on nav-u display then on mobile phone
(see mobile phone manual for more details)
8. Touch “Connect” on nav-u display, then “OK”
Pairing
Connecting
Once paired, the nav-u unit automatically
connects to the last connected phone.
To connect manually:
Pairing is required only the first time
you connect your phone.
Note: Bluetooth signal must be active on both nav-u and phone in order to connect.
You may need to set your phone to automatic connection mode.
1. Touch MENU
2. Touch
3. Touch “Phone”
4. Touch “My Devices”
5. Select mobile phone from list,
then touch “OK”
Page is loading ...
Page is loading ...
Page is loading ...
Page is loading ...
Page is loading ...
Page is loading ...
Page is loading ...
Page is loading ...
Page is loading ...
Page is loading ...
Page is loading ...
Page is loading ...
Page is loading ...
Page is loading ...
Page is loading ...
Page is loading ...
Page is loading ...
Page is loading ...
Page is loading ...
Page is loading ...
Page is loading ...
Page is loading ...
Page is loading ...
Page is loading ...
Page is loading ...
Page is loading ...
Page is loading ...
Page is loading ...
Page is loading ...
Page is loading ...
Page is loading ...
Page is loading ...
Page is loading ...
Page is loading ...
Page is loading ...
Page is loading ...
Page is loading ...
Page is loading ...
Page is loading ...
Page is loading ...
Page is loading ...
Page is loading ...
Page is loading ...
Page is loading ...
Page is loading ...
Page is loading ...
Page is loading ...
Page is loading ...
-
 1
1
-
 2
2
-
 3
3
-
 4
4
-
 5
5
-
 6
6
-
 7
7
-
 8
8
-
 9
9
-
 10
10
-
 11
11
-
 12
12
-
 13
13
-
 14
14
-
 15
15
-
 16
16
-
 17
17
-
 18
18
-
 19
19
-
 20
20
-
 21
21
-
 22
22
-
 23
23
-
 24
24
-
 25
25
-
 26
26
-
 27
27
-
 28
28
-
 29
29
-
 30
30
-
 31
31
-
 32
32
-
 33
33
-
 34
34
-
 35
35
-
 36
36
-
 37
37
-
 38
38
-
 39
39
-
 40
40
-
 41
41
-
 42
42
-
 43
43
-
 44
44
-
 45
45
-
 46
46
-
 47
47
-
 48
48
-
 49
49
-
 50
50
-
 51
51
-
 52
52
-
 53
53
-
 54
54
-
 55
55
-
 56
56
-
 57
57
-
 58
58
-
 59
59
-
 60
60
-
 61
61
-
 62
62
-
 63
63
-
 64
64
-
 65
65
-
 66
66
-
 67
67
-
 68
68


Ask a question and I''ll find the answer in the document
Finding information in a document is now easier with AI
in other languages
- français: Sony NV U83T Manuel utilisateur
- español: Sony NV U83T Manual de usuario
Related papers
Other documents
-
Standard Horizon CP390i CPF390i Owner's manual
-
Alpine PMD-B200 User manual
-
Audiovox VME 9125 NAV Owner's manual
-
Jensen NAV102 User manual
-
-
MAC Audio 520 DAB User manual
-
-
Kenwood DNX9980HD Quick start guide
-
-
Kenwood DNX 520 VBT - GPS Navigation User manual