Page is loading ...

Please Read and Save this Use and Care Book
Por favor lea este instructivo antes de usar el producto
Veuillez lire et conserver ce guide d’entretien et d’utilisation
SteamAdvantage
™
Iron
Plancha
Fer
Accessories/Parts (USA/Canada)
Accesorios/Partes (EE.UU/Canadá)
Accessoires/Pièces (É.-U./Canada)
1-800-738-0245
USA/Canada 1-800-231-9786
Mexico 01-800-714-2503
www.blackanddecker.com
Models
Modelos
Modèles
❑
AS145
❑
AS150
❑
AS175
Register your product online at www.prodprotect.com/applica,
for a chance to WIN $100,000!
Registre su producto en la Internet en el sitio Web
www.prodprotect.com/applica
y tendrá la oportunidad de GANAR $100,000!
Inscrivez votre produit en ligne à l'adresse www.prodprotect.com/applica
et courez la chance de GAGNER 100 000 $!
AS150Pub10000003298 10/10/06 10:04 AM Page 1

2
1
When using your iron, basic safety precautions should always be followed,
including the following:
❑
Read all instructions before using.
❑ Use iron only for its intended use.
❑ To protect against a risk of electric shock, do not immerse the iron in water
or other liquid.
❑ The iron should always be turned off (refer to “How to Use” section) before
plugging into or unplugging from an outlet. Never yank cord to disconnect
from outlet; instead grasp plug and pull to disconnect.
❑ Do not allow cord to touch hot surfaces. Let iron cool completely before
putting away. Loop cord loosely around cord wrap when storing.
❑ Always disconnect iron from electrical outlet when filling with or emptying
of water and when not in use.
❑ Do not operate iron with a damaged cord or if the iron has been dropped or
damaged. To avoid the risk of electric shock, do not disassemble the iron,
take it to a qualified serviceman for examination and repair. Incorrect
reassembly can cause a risk of electric shock when the iron is used.
❑
Close supervision is necessary for any appliance being used by or near
children. Do not leave iron unattended while connected or on an
ironing board.
❑
Burns can occur from touching hot metal parts, hot water, or steam. Use
caution when you turn a steam iron upside down or use the surge of
steam — there may be hot water in the water tank. Avoid rapid
movement of iron to minimize hot water spillage.
SPECIAL INSTRUCTIONS
❑ To avoid a circuit overload, do not operate another high-wattage appliance
on the same circuit.
❑
If an extension cord is absolutely necessary, a 10-ampere and 120-volt,
or 6-ampere and 220-volt cord should be used. Cords rated for less
amperage may overheat. Care should be taken to arrange the cord
so that it cannot be pulled or tripped over.
IMPORTANT SAFETY
INSTRUCTIONS
SAVE THESE INSTRUCTIONS.
POLARIZED PLUG (120V Models Only)
This appliance has a polarized plug (one blade is wider than the other). To
reduce the risk of electric shock, this plug will fit into a polarized outlet only
one way. If the plug does not fit fully in the outlet, reverse the plug. If it still
does not fit, contact a qualified electrician. Do not attempt to modify the plug
in any way.
TAMPER-RESISTANT SCREW
Warning: This appliance is equipped with a tamper-resistant screw to prevent
removal of the outer cover. To reduce the risk of fire or electric shock, do not
attempt to remove the outer cover. There are no user-serviceable parts
inside. Repair should be done only
by authorized service personnel.
Note: If the power supply cord is damaged, it should be replaced by
qualified personnel or in Latin America by an authorized service center.
AS150Pub10000003298 10/10/06 10:04 AM Page 2

4
3
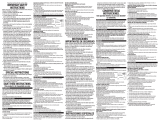
Product may vary slightly from what is illustrated.
1. Spray nozzle
2. Water-fill cover
3. Dry/Steam and self-cleaning selector
4. Spray button
5. Surge-of-Steam button
6. Power and auto shutoff indicator light
7. Comfort-Grip™ handle
8. Heel rest
9. Fabric guide
10. Temperature-ready light
11. Fabric select dial
12. Water window
13. Soleplate
How to Use
This appliance is for household use only.
Before first use, remove any labels, stickers or tags attached to the body or soleplate of the
iron.
Note: Use ordinary tap water for ironing. Do not use water processed through a home
softening system.
1. Press down the water-fill cover to open. Tilt the iron and using a clean measuring cup,
pour water into opening until water reaches the MAX level mark on the water window. Do
not overfill.
2. Press up the water-fill cover to close.
3. Plug in the iron. The power indicator light comes on.
Tip: If unsure of a garment’s fiber, test a small area (on an inside seam or hem) before
ironing.
Important: For optimum performance, let the iron stand until the indicator light goes out
(approximately 60 to 90 seconds) before beginning to iron.
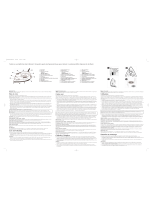
FOR STEAM IRONING
1. Move the selector to the desired steam level (A).
2. Turn the fabric select dial to appropriate setting (between 4 and 6)
for your fabric (B). See fabric guide on the heel rest and read
garment’s label to help you determine fabric type. The temperature
ready light glows until it reaches the appropriate temperature.
It then cycles on and off during ironing.
3. When finished ironing, turn the fabric-select dial to lowest heat
setting, move the selector to ( ) and unplug the iron.
FOR DRY IRONING
1. Make sure selector is set to DRY ( ). You may want to empty the water (see “Emptying
Water Tank After Ironing”).
2. Turn the fabric select dial to the appropriate setting for your fabric. See fabric guide on the
heel rest and read garment’s label to help you determine fabric type.
10-MINUTE AUTO SHUTOFF
If you leave the iron on its heel rest without moving it, the iron will automatically shut off
after 10 minutes. The auto shutoff indicator light blinks to let you know that the iron has
stopped heating. To turn it back on, move the iron until it starts heating again.
SURGE OF STEAM
1. With the water tank filled to the MAX mark, turn the temperature dial to at least setting 4
and let iron stand on its heel rest about 60 seconds.
2. To remove tough wrinkles, pump the surge-of-steam button ( ) a few times at 5-second
intervals for a concentrated blast of steam.
Vertical
1. Hang the garment to be steamed on a clothes hanger. (Curtains or drapes can be steamed
once they are hung.)
2. Move the selector to MAX.
3. Hold the iron close to, but not touching, the fabric.
A
B
AS150Pub10000003298 10/10/06 10:04 AM Page 4

4. Pull the fabric tight in your free hand and pump the surge-of-steam
button ( ) as you move the iron over the fabric (C).
SPRAY
You can use spray at any setting. Check that the water window is
filled with water. Press the spray button ( ). If spray is weak, pump
the button a few times.
EMPTYING WATER TANK AFTER IRONING
1. Turn the fabric select dial to Min. Unplug the iron and allow it to cool.
2. Open the water-fill cover. Empty the water by holding the iron over a sink with the tip
pointing down. Water will empty out of water-fill opening.
Care and Cleaning
This product contains contains no user serviceable parts. Refer service to qualified service
personnel.
CLEANING OUTSIDE SURFACES
1. Make sure iron is unplugged and has cooled completely. Wipe the soleplate and outer
surfaces with a soft cloth dampened with water a mild household detergent. Never use
abrasives, heavy-duty cleansers, vinegar or scouring pads that may scratch or discolor the
iron.
2. After cleaning, iron with steam over an old cloth to remove any residue from the steam
vents.
SELF-CLEANING
To keep the steam vents free of any buildup, about once a month follow these instructions.
1. Fill the iron about 1/3 full so that water level is well below the MAX line. Plug in the iron.
2. Turn the fabric select dial to 6 and stand the iron on its heel rest. Allow it to heat until the
temperature ready light goes out and comes on again.
3. Turn fabric select dial to Min, unplug the iron and hold over a sink with the soleplate
facing down.
4. Move the selector to self-cleaning ( ). Be careful, as hot water and steam will come out of
the steam vents. Continue to hold the selector in the ( ) position until all the water has
emptied. If necessary, rock iron side to side and front to back.
5. When finished, release the selector, stand the iron on its heel rest and plug it in. Heat for
about 2 minutes to dry out any remaining water.
STORING YOUR IRON
1. Unplug the iron and allow it to cool.
2. Check that the selector is set to DRY( ).
3. Wrap the cord loosely around the heel rest and tuck in the plug to secure it.
4. Store vertically on its heel rest to prevent water leaking from the soleplate.
6
5
INSTRUCCIONES IMPORTANTES
DE SEGURIDAD
Siempre que utilice su plancha, debe seguir algunas precauciones básicas
de seguridad, incluyendo las siguientes:
❑
Lea todas las instrucciones antes de utilizar el producto.
❑ Use la plancha únicamente para planchar.
❑ No sumerja la plancha en agua ni en ningún otro líquido para evitar
el riesgo de un choque eléctrico.
❑ Siempre apague la plancha (vea la sección “Como usar”) antes de
conectarla o desconectarla de la toma de corriente. Nunca tire del cable
para desconectarlo, sujete el enchufe para hacerlo.
❑ No permita que el cable entre en contacto con superficies calientes. Permita
que la plancha se enfríe antes de guardarla. Enrolle el cable holgadamente
alrededor del talón de la plancha.
❑ Siempre desconecte la plancha cuando la llene o la vacíe y cuando no esté
en uso.
❑ No haga funcionar la plancha si ésta tiene dañado el cable o si la plancha
se ha dejado caer y se ha estropeado. A fin de reducir a un mínimo el
riesgo de un choque eléctrico, no desarme la plancha. Acuda a una persona
de servicio, calificada para revisar y efectuar las reparaciones necesarias.
El armar la plancha incorrectamente puede ocasionar el riesgo de un
choque eléctrico cuando la plancha esté en funcionamiento.
❑
Se requiere supervisión cuando cualquier unidad electrónica esté siendo
usada cerca de los niños o por ellos mismos. No desatienda la plancha
mientras esté conectada o cuando esté sobre la tabla de planchar.
❑
Pueden ocurrir quemaduras si se tocan las partes metálicas, el agua
caliente, o el vapor. Tome precaución al invertir una plancha de vapor
ya que puede haber agua caliente dentro del tanque. Evite los
movimientos bruscos para no derramar agua caliente.
C
AS150Pub10000003298 10/10/06 10:04 AM Page 6

16
15
Vertical
1. Suspendre le vêtement sur un cintre. (Les rideaux ou les draperies
peuvent être vaporisés lorsqu’ils sont suspendus.)
2. Glisser le sélecteur au niveau MAX.
3. Tenir le fer près du tissu sans y toucher.
4. Tirer fermement sur le tissu de la main libre et pomper le bouton
de jet de vapeur ( ) en déplaçant le fer sur le tissu (C).
PULVÉRISATION
On peut vaporiser à tout réglage. Vérifier que l’indicateur de niveau d’eau est rempli d’eau.
Appuyer sur le bouton pulvérisation ( ). Lorsque celle-ci est faible, pomper le bouton à
quelques reprises.
VIDER LE RÉSERVOIR D’EAU APRÈS LE REPASSAGE
1. Régler le sélecteur de tissu à Min. Débrancher le fer et le laisser refroidir.
2. Ouvrir le couvercle de remplissage. Vider le fer en tenant le fer au-dessus d’un évier
avec le bout vers le bas. L’eau s’écoule par l’orifice de remplissage.
Entretien et nettoyage
L’utilisateur ne peut entretenir aucune composante du produit. En confier l’entretien à du
personnel qualifié.
NETTOYAGE DES SURFACES EXTÉRIEURES
1. S’assurer que le fer est débranché et bien refroidi. En essuyer la semelle et les surfaces
externes à l’aide d’un chiffon doux trempé dans de l’eau et un détergent doux domestique.
Ne jamais utiliser des produits nettoyants abrasifs, de service intensif, du vinaigre ni des
tampons à récurer qui peuvent égratigner ou décolorer le fer.
2. Après le nettoyage, repasser à la vapeur un vieux chiffon afin d’enlever toute trace de
résidu des évents.
AUTONETTOYAGE
Pour garder les évents à vapeur libres de toute accumulation, suivre ces instructions environ
une fois par mois.
1. Remplir le fer seulement au tiers de sorte que le niveau d’eau se trouve bien au-dessous du
niveau maximal (MAX). Brancher le fer.
2. Mettre le sélecteur de tissu à 6 et laisser reposer le fer sur son talon d’appui. Laisser
chauffer jusqu’à ce que le voyant de température s’éteigne et se rallume.
3. Régler le sélecteur de tissu à Min., débrancher le fer et tenir le fer au-dessus d’un évier
avec la semelle vers le bas
4. Glisser le sélecteur à Autonettoyage ( ). Attention, car l’eau chaude et la vapeur sortiront
des évents. Maintenir le sélecteur abaissé à ( ) jusqu’à ce que le fer soit vide. Au besoin,
faire basculer le fer sur les côtés et de l’avant vers l’arrière.
5. Lorsque le fer est vide, relâcher le sélecteur, laisser reposer le fer sur son talon d’appui et le
brancher. Le laisser réchauffer pendant environ 2 minutes afin de bien l’assécher.
RANGEMENT DE VOTRE FER
1. Débrancher le fer et le laisser refroidir.
2. S’assurer de régler le sélecteur à Sec ( ).
3. Enrouler le cordon lâchement autour du talon d’appui et en fixer la fiche.
4. Ranger le fer sur son talon d’appui afin d’empêcher les fuites d’eau sur la semelle.
C
NEED HELP?
For service, repair or any questions regarding your appliance, call the appropriate "800"
number on the cover of this book. Do not return the product to the place of purchase.
Do not mail the product back to the manufacturer nor bring it to a service center. You may
also want to consult the website listed on the cover of this manual.
One-Year Limited Warranty
(Applies only in the United States and Canada)
What does it cover?
• Any defect in material or workmanship; provided; however, Applica’s liability will not
exceed the purchase price of the product.
For how long?
• One year after the date of original purchase.
What will we do to help you?
• Provide you with a reasonably similar replacement product that is either new or factory
refurbished.
How do you get service?
• Save your receipt as proof of the date of sale.
• Check our on-line service site at www.prodprotect.com/applica, or call our toll-free
number, 1-800-231-9786, for general warranty service.
• If you need parts or accessories, please call 1-800-738-0245.
What does your warranty not cover?
• Damage from commercial use
• Damage from misuse, abuse or neglect
• Products that have been modified in any way
• Products used or serviced outside the country of purchase
• Glass parts and other accessory items that are packed with the unit
• Shipping and handling costs associated with the replacement of the unit
• Consequential or incidental damages (Please note, however, that some states do not
allow the exclusion or limitation of consequential or incidental damages, so this
limitation may not apply to you.)
How does state law relate to this warranty?
• This warranty gives you specific legal rights, and you may also have other rights that
vary from state to state or province to province.
¿NECESITA AYUDA?
Para servicio, reparaciones o preguntas relacionadas al producto, por favor llame al
número del centro de servicio en el país donde usted compró su producto. NO devuelva
el producto al fabricante. Llame o lleve el producto a un centro de servicio autorizado.
DOS AÑOS DE GARANTÍA LIMITADA
(No aplica en México, Estados Unidos o Canadá)
¿Qué cubre la garantía?
• La garantía cubre cualquier defecto de materiales o de mano de obra. Applica no se
responsabiliza por ningún costo que exceda el valor de compra del producto.
¿Por cuánto tiempo es válida la garantía?
• Por dos años a partir de la fecha original de compra.
¿Cómo se puede obtener servicio?
• Conserve el recibo original de compra.
• Por favor llame al número del centro de servicio autorizado.
Esta garantía no
cubre:
• Los productos que han sido utilizados en condiciones distintas a las normales
• Los daños ocasionados por el mal uso, el abuso o negligencia.
• Los productos que han sido alterados de alguna manera
• Los daños ocasionados por el uso comercial del producto
AS150Pub10000003298 10/10/06 10:04 AM Page 16
/