Page is loading ...

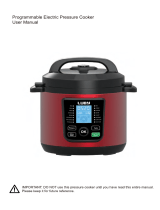
Programmable Electric Pressure Cooker
User Manual
Model:
YBW40P, YBW50P, YBW60P
YBW80P, YBW100P, YBW120P
IMPORTANT: DO NOT use this pressure cooker until you have read this entire manual.
Please keep it for future reference.
Customer Service: 1-844-801-8880
HOME EASY LTD.
1275 Bloomfield Ave., Fairfield, NJ 07004
Customer Service: 1-844-801-8880
E-mail: info@home-easy.net
www.geekcooker.com
www.geekappliances.com


TABLE OF CONTENTS
.............................................. 2
............................................. 4
............................................... 5
.................................6
.........................................17
..................................................18
......................................................19
...........................................21
Pictures in manual are for reference only. Please refer to actual product
1 2
IMPORTANT SAFEGUARDS
When using electrical appliances, basic safety precautions should always
be followed including the following.
1. Read all instructions.
2. DO NOT touch hot surfaces of pressure cooker. Use side handles for carrying.
3. DO NOT place the pressure cooker on or near a hot gas or electric burner, or
in a heated oven.
4. Intended for countertop use only. DO NOT operate this appliance on an unstable
surface.
5. DO NOT use pressure cooker for anything other than intended use.
6. Never deep fry or pressure fry in the cooker with oil.
7. DO NOT let cord hang over edge of table or counter, or touch hot surfaces.
8. DO NOT use cooker in electrical systems other than 110-120V~/60Hz for North
America.
9. DO NOT operate cooker with damaged cord or plug, or after the cooker
malfunctions or has been damaged in any manner.
10. DO NOT open the cooker until the cooker has cooled and all internal pressure
has been released. If the float valve is still up or the lid is difficult to turn, it is an
indication that the cooker is still pressurized - DO NOT force it open.
11. For all pressure cooking programs, the total amount of pre-cooked food and
liquid in the inner pot should not pass the 4/5 line. When cooking food that
expands during cooking such as rice, beans or vegetables, the inner pot should
not pass the 10CUP line. Over filling may risk clogging the steam release and
developing excess pressure. This may also cause leakage, personal injuries, or
damage to the cooker. These fill level warnings do not apply to non-pressure
cooking programs.
12. Make sure the pressure valve handle is in the Sealing position for all the
pressure cooking programs.
13. This appliance should not be used by or near children or by individuals with
disabilities or limited knowledge in using pressure cookers.
14. DO NOT immerse the cooker base in water. To protect against electrical shock,
do not immerse the cord, power plug, or cooker in any liquid.
15. Always attach plug to the cooker first, then plug cord into the wall outlet. To
disconnect, turn controls OFF, then remove plug from the wall outlet. Unplug
from power outlet when not in use and before cleaning. Allow the cooker to cool
before putting on or taking off parts, and before cleaning.
Important Safeguards
Parts and Accessories
Control and Features
General Operating Instructions
Safety and Cooking Tips
Care and Cleaning
Troubleshooting
Manufacturer Warranty
2017 V3.2

TABLE OF CONTENTS
.............................................. 2
............................................. 4
............................................... 5
.................................6
.........................................17
..................................................18
......................................................19
...........................................21
Pictures in manual are for reference only. Please refer to actual product
1 2
IMPORTANT SAFEGUARDS
When using electrical appliances, basic safety precautions should always
be followed including the following.
1. Read all instructions.
2. DO NOT touch hot surfaces of pressure cooker. Use side handles for carrying.
3. DO NOT place the pressure cooker on or near a hot gas or electric burner, or
in a heated oven.
4. Intended for countertop use only. DO NOT operate this appliance on an unstable
surface.
5. DO NOT use pressure cooker for anything other than intended use.
6. Never deep fry or pressure fry in the cooker with oil.
7. DO NOT let cord hang over edge of table or counter, or touch hot surfaces.
8. DO NOT use cooker in electrical systems other than 110-120V~/60Hz for North
America.
9. DO NOT operate cooker with damaged cord or plug, or after the cooker
malfunctions or has been damaged in any manner.
10. DO NOT open the cooker until the cooker has cooled and all internal pressure
has been released. If the float valve is still up or the lid is difficult to turn, it is an
indication that the cooker is still pressurized - DO NOT force it open.
11. For all pressure cooking programs, the total amount of pre-cooked food and
liquid in the inner pot should not pass the 4/5 line. When cooking food that
expands during cooking such as rice, beans or vegetables, the inner pot should
not pass the 10CUP line. Over filling may risk clogging the steam release and
developing excess pressure. This may also cause leakage, personal injuries, or
damage to the cooker. These fill level warnings do not apply to non-pressure
cooking programs.
12. Make sure the pressure valve handle is in the Sealing position for all the
pressure cooking programs.
13. This appliance should not be used by or near children or by individuals with
disabilities or limited knowledge in using pressure cookers.
14. DO NOT immerse the cooker base in water. To protect against electrical shock,
do not immerse the cord, power plug, or cooker in any liquid.
15. Always attach plug to the cooker first, then plug cord into the wall outlet. To
disconnect, turn controls OFF, then remove plug from the wall outlet. Unplug
from power outlet when not in use and before cleaning. Allow the cooker to cool
before putting on or taking off parts, and before cleaning.
Important Safeguards
Parts and Accessories
Control and Features
General Operating Instructions
Safety and Cooking Tips
Care and Cleaning
Troubleshooting
Manufacturer Warranty
2017 V2

3 4
16. For Household use only. Not intended for outdoor use.
17. Extreme caution must be used when moving a pressure cooker containing hot
liquids.
18. This appliance cooks under pressure. Improper use may result in scalding
injuries. Make certain the lid is properly closed before operating. Caution: To
reduce the risk of electric shock, cook only in removable containers (inner pot).
19. Use of accessories and parts that are not recommended or supplied by the
manufacturer may cause the cooker to malfunction or serious hazardous
situations including personal injury. Cook only in GeekChef stainless steel or
ceramic non-stick inner pots for best results. Other brands may not have the
correct curvature to match the heating element.
20. Be aware that certain foods, such as applesauce, cranberries, pearl barley,
oatmeal and other cereals, split peas, noodles, macaroni, rhubarb, and
spaghetti can foam, froth, sputter, and clog the steam release. These foods
should not be cooked under pressure cooking settings unless as directed in
GeekChef cooker recipes.
21. Always check the pressure valve, float valve and anti-block shield for clogging
before use.
22. If this appliance begins to malfunction during use, immediately unplug the cord.
DO NOT use or attempt to repair a malfunctioning appliance!
23. CAUTION HOT SURFACES. This appliance generates heat and escaping
steam during use. Proper precautions must be taken to prevent the risk of
personal injury, fires, and damage to property.
IMPORTANT SAFEGUARDS PARTS AND ACCESSORIES
SAVE THESE INSTRUCTIONS!
FOR HOUSEHOLD USE ONLY.
Sealing
Venting
Pressure Valve
Lid
Float Valve
Anti-block Shield
Lid Filter Plate
Silicon Gasket
Soup Spoon
Rice Paddle
Measuring Cup
Steam Rack
Power Cord
Stainless Steel
Inner Pot
Exterior Pot
LED Display
Control Panel
Base

YBW120P 120V~60Hz 1400W
12Qt
0
-
80kPa
YBW40P 120V~60Hz 800W
4Qt
0
-
80kPa
YBW50P 120V~60Hz 900W
5Qt
0
-
80kPa
YBW60P 120V~60Hz 1000W
6Qt
0
-
80kPa
YBW80P 120V~60Hz 1300W
8Qt
0
-
80kPa
YBW100P 120V~60Hz 1400W
10Qt
0
-
80kPa
5 6
CONTROL AND FEATURES
CONTROL PANEL
PROGRAM SETTING
SPECIFICATIONS
GENERAL OPERATING INSTRUCTIONS
BEFORE THE FIRST USE
Please pay attention to manual and cautions to avoid any injury or property damage.
Please wash the inner pot, lid, lid filter plate and silicon gasket with soapy water.
Rinse with clean water and dry thoroughly.
GETTING STARTED
1. To open lid, grip lid handle and turn clockwise, as indicated on handle, and lift
upward.
Function
Buttons
Default
Time
CookingTime
Range
TimeAdjust
Increment
Temperature
AdjustRange
TemperatureRange
°C°F
Pressure
kPaPSI
SlowCook
6hrs
2~12hrs
30mins
N/A
70~93174~199
<30<4.3
Rice
10mins 1~30mins
1min
N/A
109228
507.2
Poultry
15mins
1min~2hrs
1min
N/A
109228
507.2
SousVide 90mins
1~12hrs
30mins
120°F~175°F
Defaulttemp:140°F
60140
N/A
Sauté 20mins 1~30mins
1min
250°F~390°F
Defaulttemp:355°F
120~200250~390
N/A
Bean
15 mins 5~30mins
1min
N/A
109228
507.2
Soup
30mins 10mins~2hrs
1min
N/A
109228
507.2
Steam
10mins 1~90mins
1min
N/A
109228
507.2
Yogurt
8hrs 6~12hrs 30mins
N/A
40104
N/A
Canning
45 mins
10mins~2hrs
5mins
N/A
116241
82.712
Meat/Stew
15mins 15mins~2hrs
1min
N/A
109228
507.2
Pasta
10mins
1min~1hr 1min
N/A
100212
507.2
Presettime
N/A N/A
30mins
N/A N/A
N/A
Cooking program keys
program starts
The Warm/Cancel key
switches automatic keep warm
function ON and OFF after a
cooking program finishes.
When keep warm function is
ON, the LED light on top the
Warm/Cancel key will also light
up.
Press the Warm/Cancel key to
end a cooking progress at any
time or to return the cooker to
standby mode displaying ----
+ / - keys to adjust cooking
time or cooking temperature
The Time/Temp key
switches the cooking
time setting mode or cooking
temperature setting mode
The Preset Time key
sets the delayed time
before a cooking
Model
Power
Supply
Rated
Power
Capacity
ofInnerPot
Working
Pressure

YBW120P 120V~60Hz 1400W
12Qt
0
-
80kPa
YBW40P 120V~60Hz 800W
4Qt
0
-
80kPa
YBW50P 120V~60Hz 900W
5Qt
0
-
80kPa
YBW60P 120V~60Hz 1000W
6Qt
0
-
80kPa
YBW80P 120V~60Hz 1300W
8Qt
0
-
80kPa
YBW100P 120V~60Hz 1400W
10Qt
0
-
80kPa
5 6
CONTROL AND FEATURES
CONTROL PANEL
PROGRAM SETTING
SPECIFICATIONS
GENERAL OPERATING INSTRUCTIONS
BEFORE THE FIRST USE
Please pay attention to manual and cautions to avoid any injury or property damage.
Please wash the inner pot, lid, lid filter plate and silicon gasket with soapy water.
Rinse with clean water and dry thoroughly.
GETTING STARTED
1. To open lid, grip lid handle and turn clockwise, as indicated on handle, and lift
upward.
Function
Buttons
Default
Time
CookingTime
Range
TimeAdjust
Increment
Temperature
AdjustRange
TemperatureRange
°C°F
Pressure
kPaPSI
SlowCook
6hrs
2~12hrs
30mins
N/A
70~93174~199
<30<4.3
Rice
10mins 1~30mins
1min
N/A
109228
507.2
Poultry
15mins
1min~2hrs
1min
N/A
109228
507.2
SousVide 90mins
1~12hrs
30mins
120°F~175°F
Defaulttemp:140°F
60140
N/A
Sauté 20mins 1~30mins
1min
250°F~390°F
Defaulttemp:355°F
120~200250~390
N/A
Bean
15 mins 5~30mins
1min
N/A
109228
507.2
Soup
30mins 10mins~2hrs
1min
N/A
109228
507.2
Steam
10mins 1~90mins
1min
N/A
109228
507.2
Yogurt
8hrs 6~12hrs 30mins
N/A
40104
N/A
Canning
45 mins
10mins~2hrs
5mins
N/A
116241
82.712
Meat/Stew
15mins 15mins~2hrs
1min
N/A
109228
507.2
Pasta
10mins
1min~1hr 1min
N/A
100212
507.2
Presettime
N/A N/A
30mins
N/A N/A
N/A
Cookingprogramkeys
The Warm/Cancel key
switches automatic keep warm
function ON and OFF after a
cooking program finishes.
When keep warm function is
ON, the LED light on top the
Warm/Cancel key will also light
up.
Press the Warm/Cancel key to
end a cooking progress at any
time or to return the cooker to
standby mode displaying ----
+ / - keys to adjust cooking
time or cooking temperature
The Time/Temp key
switches the cooking
time setting mode or cooking
temperature setting mode
The Preset Time key
sets the delayed time
before a cooking
program starts
Model
Power
Supply
Rated
Power
Capacity
ofInnerPot
Working
Pressure

7 8
2. Remove the inner pot and place cooking ingredients inside. Monitor the level of
the water and ingredients per cooking instructions to ensure they do not exceed
the MAX LINE “4/5” marking on the inner pot (see picture 4). Rice, beans, or other
ingredients that will expand during cooking should not be filled beyond the “10 CUP”
marking (see picture 5).
3. Clean and towel dry the external surface of the inner
pot, place Inner Pot inside the cooker, rotating it slightly
to ensure proper contact with the heating element. Make
sure there is no material between the inner pot and the
exterior pot before you insert it into the cooker (see
picture 6).
4. To close Lid, place lid on pressure cooker, turn handle counter-clockwise to
CLOSE position as indicated on handle, until lid locks in place (see pictures
7 to 11).
Make sure lid is closed and properly aligned before use.
NOTE
INSTALL THE CONDENSATION COLLECTOR
The condensation collector easily picks up any moisture
that my drip off when using your pressure cooker. Simply
align and push the collector into the channels on the back
of the cooker. Empty and clean after each use.
REMOVE AND INSTALL THE LID FILTER PLATE
Silicon Gasket must always be properly positioned on the Lid Filter Plate when
install the Lid Filter Plate to the underside of the lid.
NOTE
INSTALL THE ANTI-BLOCK SHIELD
To install: Position the Anti-Block Shield in place and push down
To remove: Using your thumb, push the side of the Anti-Block
Shield towards the lid rim and lift up with some effort.
The Anti-Block Shield should pop out.
Press downPull up
6
7 8 9 10

7 8
2. Remove the inner pot and place cooking ingredients inside. Monitor the level of
the water and ingredients per cooking instructions to ensure they do not exceed
the MAX LINE “4/5” marking on the inner pot (see picture 4). Rice, beans, or other
ingredients that will expand during cooking should not be filled beyond the “10 CUP”
marking (see picture 5). Liquids and ingredients together should never fill less
than the “4 CUP” marking on the inner pot (see picture 6).
3. Clean and towel dry the external surface of the inner
pot, place Inner Pot inside the cooker, rotating it slightly
to ensure proper contact with the heating element. Make
sure there is no material between the inner pot and the
exterior pot before you insert it into the cooker (see
picture 7).
4. To close Lid, place lid on pressure cooker, turn handle counter-clockwise to
CLOSE position as indicated on handle, until lid locks in place (see pictures
8 to 11).
Make sure lid is closed and properly aligned before use.
NOTE
INSTALL THE CONDENSATION COLLECTOR
The condensation collector easily picks up any moisture
that my drip off when using your pressure cooker. Simply
align and push the collector into the channels on the back
of the cooker. Empty and clean after each use.
REMOVE AND INSTALL THE LID FILTER PLATE
Silicon Gasket must always be properly positioned on the Lid Filter Plate when
install the Lid Filter Plate to the underside of the lid.
NOTE
INSTALL THE ANTI-BLOCK SHIELD
To install: Position the Anti-Block Shield in place and push down
To remove: Using your thumb, push the side of the Anti-Block
Shield towards the lid rim and lift up with some effort.
The Anti-Block Shield should pop out.
Press downPull up

10
1. Never load inner pot above the MAX line. Rotate the inner pot to make certain
that it is seated properly in the exterior pot. Don’t use the hard objects to
knock the Inner Pot.
2. Always be certain the pressure valve is free floating and clear of any
obstructions.
3. Steam and pressure must be released completely from the cooker before the
Lid will open.
4. After use, remove any foreign objects from the silicon gasket and Anti-Block
Shield.
5. Keep the Silicon Gasket clean to avoid odor.
6. Never pull the silicon gasket by force, as the pulling may cause deformation
and affect its function in sealing the pressure.
NOTE
SAFE LID OPENING
Make sure the pressure cooking program has completed or press “Warm/Cancel”
key to turn off the program.
Releasing pressure in one of the following ways.
1.Quick Release:
Turn the Pressure Valve handle to the “Venting” position to let out steam until the
float valve drops down.
2.Natural Release:
Allow the cooker to cool down naturally until the float valve drops down. This
may take up to 15 to 40 minutes, or even more, depending on the amount of
food in the cooker. Place a wet towel on the lid to speed up cooling. After
cooking is finished, turn OFF Keep Warm mode if it is turned ON.
DO NOT open the lid until pressure inside the pot is completely released.
As a safety mechanism, until the float valve drops down, the lid is locked
and cannot be opened.
If the Float Valve is stuck due to food debris or stickiness, you can push
it down with a long stick or pen when you are certain the pressure has been
released by moving the Pressure Valve handle to the venting position.
CAUTION
Please keep hands and face away from the hole on the top of the Pressure Valve
when using Quick Release. The escaping steam is very hot and can cause scalds.
During pressure releasing process, protect your skin by avoiding any contact with
escaping steam or the stainless steel portion of the Lid. Press down gently on Lid
and turn clockwise until Lid meets resistance. Lift carefully and place aside. Avoid
personal injury resulting from hot unit surfaces and dripping liquids.
For food in large liquid volume or starch content (e.g. porridge, congee), use
Natural Release instead as thick liquid may splatter out.
CAUTION
9

11 12
1. Press "Preset Time" key to start delayed cooking, use "+" or "-"
keys to set the delayed hours. The green LED light behind
"Preset Time" key will be light up.
2. Select the desired cooking function (all functions except "Sauté",
"Yogurt" and "Keep Warm").
3. Cooking starts automatically in 5 seconds after the last key is
pressed.
Press "Warm/Cancel" key will cancel the program and take
the cooker to standby mode.
When the cooker is in standby mode, pressing this key
activates the keep-warm program. "Keep Warm" cycle for 8
hours. If the 8 hours auto "Keep Warm" cycle finishes, the
cooker goes into standby mode.
Any function can be stopped immediately by selecting the
"Warm/Cancel" key.
NOTE
HOW TO USE
InstructionsPrograms
Preset Time
Warm/Cancel
Press "Time/Temp" key to set cooking time or temperature, the
LED display will flash at setting mode.
Only the "Sauté" and "Sous Vide" can change the
temperature, the other functions only can be changed the
cooking time.
To increase or decrease cooking time or cooking temperature.
Press and hold the key for faster changes.
+/-
NOTE
Time/Temp
Pressure Cooking
Position the pressure valve handle to Sealing
Yogurt
The "Yogurt" key is to make yogurt and pasteurize milk.
A. Press "Yogurt" key one time to enter Yogurt function, cooking
time will appear on the LED display. Press "Time/Temp" key to
set cooking time, then change cooking duration by pressing "+"
or “-” key. When the process is completed, display appears "yogt".
B. Press "Yogurt" key twice time to enter pasteurize milk function.
The display appear boil, and the temperature is 180F/83C.
When the process is completed, display appears "yogt".
If you want to make yogurt, please let it cool to below 115F/46C
and refer to below point C operation.
C. If you use a container or bottles to make yogurt, add an
adequate amount of yogurt starter or fresh yogurt to container
or bottle. Then place them into inner pot with water. Then press
"Yogurt" key. The LED display will appear "yogt" when the
process is completed.
Steam
The "Steam" key is to steam vegetables, seafood or reheating. Add
3 cups of water into the inner pot using the plastic measuring cup
provided, and use the stainless steel rack provided to elevate the
food above the water.
1. Press "Steam" key.
2. Press "Time/Temp" key to set cooking time, then change
steaming duration by pressing "+" or “-” key.
3. Cooking starts automatically in 5 seconds after the last key is
pressed.
When steaming vegetables and seafood, please note that using
the "Natural Release" method for releasing the steam will likely
overcook the food. You will need to release the steam as soon
as the cooking time has expired using the "Quick Release"
method.
NOTE
InstructionsPrograms

13 14
Rice
The "Rice" key is program for cooking regular rice. Depends on the
rice and water volume, or your desired rice texture, use "Time/Temp"
key to set cooking time, otherwise it cooks automatically.
1. Press "Rice" key.
2. Press "Time/Temp" key to set cooking time, then change cooking
duration by pressing "+" or “-” key.
3. Cooking starts automatically in 5 seconds after the last key is
pressed.
The "Canning" key is for sterilization of utensils and canning of
acidic fruits and vegetables, minimize the possibility of spoilage and
contamination.
1. Press "Canning" key.
2. Press "Time/Temp" key to set cooking time, then change canning
duration by pressing "+" or “-” key.
3. Canning starts automatically in 5 seconds after the last key is
pressed.
Canning
Bean/Chili
The "Bean/Chili" key is specifically for cooking beans and making
Chili. If you want the beans well cooked, please use the "Time/Temp"
key to add cooking time.
1. Press "Bean/Chili" key.
2. Press "Time/Temp" key to set cooking time, then change cooking
duration by pressing "+" or “-” key.
3. Cooking starts automatically in 5 seconds after the last key is
pressed.
InstructionsPrograms
The "Pasta" key is specifically for cooking pasta, noodle and
spaghetti etc.
1. Press "Pasta" key.
2. Press "Time/Temp" key to set cooking time, then change cooking
duration by pressing "+" or “-” key.
3. Cooking starts automatically in 5 seconds after the last key is
pressed.
Pasta
Canning
NOTE
Safe Canning Tips
For more info, please visit the National Center for Home Food
Preservation website: http://nchfp.uga.edu/
Do not use over-ripe fruit. Bad quality degrades with storage.
Do not add more low-acid ingredients (onions, celery, peppers,
garlic) than specified in the recipe. This may result in an
unsafe product.
Do add acid (lemon juice, vinegar or citric acid) especially to
tomato products when directed in the recipe. If necessary, you
can balance the tart taste by adding sugar.
Do not over-season with spices. Spices tend to be high in
bacteria making canned goods unsafe.
Do not add butter or fat. Fats do not store well and may
increase the rate of spoilage.
Thickeners – never use flour, starch, pasta, rice or barley. Use
only USDA recommended Clear Jel.
Poultry
The "Poultry" key is programmed to make poultry dishes. Poultry
meat is generally easier to cook than pork, lamb and beef. Hence
the poultry cooking time is adjusted within 15 minutes range when
using the "Poultry" function key.
1. Press "Poultry" key.
2. Press "Time/Temp" key to set cooking time, then change cooking
duration by pressing "+" or “-” key.
3. Cooking starts automatically in 5 seconds after the last key is
pressed.
Programs Instructions

Meat/Stew
The "Meat/Stew" key is for cooking pork, lamb and beef.
1. Press "Meat/Stew" key.
2. Press "Time/Temp" key to set cooking time, then change cooking
duration by pressing "+" or “-” key.
3. Cooking starts automatically in 5 seconds after the last key is
pressed.
Soup/
Porridge
The "Soup/Porridge" key is to make soup and porridge.
1. Press "Meat/Stew" key.
2. Press "Time/Temp" key to set cooking time, then change cooking
duration by pressing "+" or “-” key.
3. Cooking starts automatically in 5 seconds after the last key is
pressed.
Using "Porridge" program, when it is finished, do NOT put
pressure valve handle in venting position; otherwise the
porridge will splatter through the steam release. Please use
Natural Release.
NOTE
15 16
NOTE
Altitude and Pressure Canning
The temperature at which water will boil can vary depending upon your location in
regards to sea level. The GeekChef ® pressure cooker will operate properly up to a
maximum altitude of 2,000 ft. above sea level. Do not use this unit for pressure
canning above an altitude of 2,000 ft.
Programs Instructions
Slow Cook
Sauté
1. The "Slow Cook" key allows you to use your cooker as a slow
cooker. The Pressure Valve handle should be at the "Venting"
positions.
2. Press "Slow Cook" key.
3. Press "Time/Temp" key to set cooking time, then change cooking
duration by pressing "+" or “-”key.
4. Cooking starts automatically in 5 seconds after the last key is
pressed.
1. The "Sauté" key is used for open lid sautéing, browning or
simmering inside the inner pot. Keep the lid open to avoid
pressure from building up inside the cooker.
2. Press "Sauté" key.
3. "Time/Temp" can be used to change the cooking time and
temperature via "+" or "-" keys.
Press "Time/Temp" key one time is for changing cooking time.
Press "Time/Temp" key twice times is for changing cooking
temperature.
4. Cooking starts automatically in 5 seconds after the last key
is pressed.
5. When the process is completed, the cooker goes into standby
mode.
Do not put the lid on for Sauté program.
NOTE
1. The "Sous Vide" key allows you to use your cooker as a Sous
Vide cooker. The Pressure Valve handle should be at the
"Venting" positions.
2. Press "Sous Vide" key.
3. "Time/Temp" can be used to change the cooking time and
temperature via "+" or "-" keys.
Press "Time/Temp" key one time is for changing cooking time.
Press "Time/Temp" key twice times is for changing cooking
temperature.
4. Cooking starts automatically in 5 seconds after the last key is
pressed.
Non-pressure Cooking
Position the pressure valve handle to Venting
InstructionsPrograms
Sous Vide

The built-in cooking time is suitable for general purpose food. Please use the
cooking time table in the recipe book to determine the appropriate cooking time
based on the specific food, the quantity of food and your texture preference.
You may override pre-programmed time by selecting the “Time/Temp” key.
The pressure is intelligent automatically controlled, no need to adjust manually.
Depend on the food content, the quantity and its temperature (frozen or not), the
preheat cycle can range between 10 to 40 minutes. As the pressure increases
inside the cooker, it is perfectly normal for traces of steam to escape from the
float valve until the float valve pops up.
During this pressurized state, you should not see any steam gushing out
anywhere from the lid. However, from time to time you may see a small smoke
effect coming from the pressure valve and occasionally a little sputtering.
This is perfectly normal. During the cooking operation, the cooker makes low
clicking sounds. This comes from normal operation in switching the heating
element on and off.
To serve the food, press “Warm/Cancel” to stop the keep warm cycle and open
the lid according to the “Safe Lid Opening”.
When opening the lid, the inner pot may appear to be stuck on the lid. This is
caused by contraction of air due to cooling. Please turn the pressure valve
handle to “Venting” to let in air to release the vacuum.
NOTE
17 18
SAFETY AND COOKING TIPS
· Extreme caution should be taken when moving the pressure valve handle to
Venting position. Keep hands and face away from the pressure valve openings.
Failure to comply may result in scalding or serious injury.
• Do not open the lid until pressure inside the cooker is completely released. As a
safety feature, until the float valve drops down the lid is locked and cannot be
opened. DO NOT force lid open.
• When opening the lid, the inner pot may adhere to the lid. This is caused by
vacuum due to cooling. To release the vacuum, move the pressure valve handle
to the Venting position.
• If the float valve is stuck, move the pressure valve to the Venting position. Once
all the steam is released, push the float valve down with a pen or long stick.
• Always add at least 1 cup / 250 ml of water or other liquids so enough steam
can be generated to cook under pressure. These include cooking sauces, wine,
beer, stocks, juices of fruits and vegetables. Oils and oil-based sauces do not
have enough water content and will not account for the required liquid volume.
• Time to pressure and cooking time will vary according to the temperature and
quantity of the ingredients. Food that is cold or frozen will take longer to cook
than food that is at room temperature.
• When using the Preset Time (Delay Start) program, allow sufficient cooling down
time before serving.
• The Preset Time (Delay Start) program is not recommended for porridge, oatmeal
or other foamy and thick liquids. Cooking progresses should be monitored when
cooking these foods.
/