Page is loading ...

TABLEOFCONTENTS
Chapter1SafetyInstructions....................................................................................
1.1SafetyPrecautions................................................................................................
Chapter2Instructions..............................................................................................
2.1Dimensions..........................................................................................................
2.2PartListforBoxA...............................................................................................
2.3PartListforBoxB...............................................................................................
2.4PartListforBoxC...............................................................................................
2.5ComponentsintheHardwareKit..........................................................................
2.6ComponentsontheProduct..................................................................................
Chapter3AssemblyInstructions...............................................................................
STEP1ConnectorInstallation..................................................................................
STEP2WeightPlateInstallation...............................................................................
STEP3WeightStackSticker..................................................................
STEP4CableInstallation..........................................................................................
STEP5AdjustCableInstallation...............................................................................
STEP6PressYokeInstallation.................................................................................
STEP7HandleInstallationt.......................................................................................
STEP8LatPullBarandBracketInstallation.............................................................
STEP9SeatBottomCushionInstallation.................................................................
STEP10ChestCushionInstallation........................................................................
STEP11TowerBackCoversInstallation..................................................................
STEP12FrontTopCoverInstallation.......................................................................
STEP13RearTopCoverInstallation........................................................................
STEP14WaterBottleHolderInstallation..................................................................
STEP15StackFork(Selector)Installation...............................................................
Chapter4OperatingInstructions.............................................................................
4.1OperatingtheProduct..........................................................................................
4.2Testing.................................................................................................................
4.3Maintenance........................................................................................................
-
-
-
-
Application
1
1
2
2
3
4
5
5
6
7
7
11
19
21
22
23
26
28
30
31
32
34
35
36
37
38
38
42
44

Readandfollowallcautionarymessagesandwarningsinthismanual.Obtain
instructionsontheproperuserofthismachinepriortoexercising.Useappropriate
bodypositioningandcontrolledmovements.
Assembleandoperatethisproductonasolid,levelsurface.Donotuseoutdoors
ornearwater.
Neverallowchildrenonorneartheequipment.
Makesureallfastenersareproperlytightenedforsafety.DONOTusetheproduct
iftheunitisdisassembledinanyway.
Keepyourhead,body,limbs,andfingersclearofallmovingparts.
Ifatanytimeduringexerciseyoufeelfaint,dizzy,orexperiencepain,stop
exercisingandconsultyourphysician.
DONOTwearlooseordanglingclothingwhileusingtheequipment.Keepaway
fromallmovingparts.
Usecarewhenmountinganddismountingtheunit.
DONOTuseanyaccessoriesthataren'tspecificallyrecommendedbythe
manufacturer.Aftermarketaccessoriesmightcauseinjuriesorcausetheunittofall.
Closesupervisionisnecessarywhenthisproductisusedby,on,ornear
adolescents,invalidsanddisabledpersons.
Usethisproductonlyforitsintendeduseasdescribedinthismanual.
Neveroperatethisproductifithasbeendamagedinanyway.Ifitisnotworking
properlyorhasbeendroppedordamaged,contactyourdealer.DONOTattempt
tofixabrokenorjammedmachine.Contactaqualifiedfitnessproducttechnician.
Neverdroporinsertanyobjectintoanyopening.
●
●
●
●
●
●
●
●
●
●
●
●
●
CHAPTER1SAFETYPRECAUTIONS-
1.1SAFETYPRECAUTIONS
-1-

-2-
2.1DIMENSIONS
CHAPTER2INSTRUCTIONS-

-3-
2.2PartListforBoxA
No. Description Qty
No.
QtyDescription
1
2
3
4
5
6
7
1
1
1
1
1
1
4
1
1
8
9
AUpperrearcover
Lowerrearcover
Topfrontcover
Reartopcover
Mainframe
5kgweightplate
7.5kgweightplate
Weightplatesticker
(10kg~60kg)
Weightplatesticker
(65kg~100kg)

-4-
2.3PartListforBoxB
No. Description Qty
No.
QtyDescription
21
22
23
24
25
26
27
28
29
30
31
32
33
34
1
1
1
1
1
1
1
1
1
1
1
1
1
Mast
Horizontalbeam
Latpullbarbracket
Chestcushion
Cupholder
Rightsupport
Leftsupport
Seatframe
Seatbottom
Latpullbar
Lefthandle
Righthandle
Pressyoke

-5-
2.5ComponentsintheHardwareKit
Ahardwarekitisprovidedinthepackagingofthisproduct.Pleaseinspectthehardware
kitforthefollowingitems.
Ifyoudiscoveritemsmissingordamagedinshipping,pleasecontacttheSportsArt
ServiceDepartment.Keepthehardwarekitinasecureplaceforfutureuse.Toolsmay
beneededtodisassembletheproductinpreparationformovingorotheractivities.
No. Description Qty
Specification
ToolNeeded
43
44
45
47
48
2.4PartListforBoxC
No. Description Qty
No.
QtyDescription
6
5KgWeightPlate
12
ARearcoversetplate
BRearcoversetplate
MushroomtopPhillips-headscrew
Cableprotector
Rearcoverbracket
L-shapedAllenwrench
L-shapedAllenwrench
L-shapedAllenwrench
L-shapedAllenwrench
Openendwrench
Phillips-headscrewdriver
4
4
24
12
1
2
1
2
1
2
1
M5*L12
SGN-07
(M4)
(M5)
(M6)
(M8)
(13*17)

2.6ComponentsontheProduct
Somecomponentsareinstalledontheproduct.Theseitemswillbeneededfor
productassembly.
-6-
No. Description
Specification ToolNeeded
ψ
ψ
61
62
63
64
65
66
67
68
69
70
71
72
73
74
75
76
77
78
79
80
81
82
83
84
85
86
87
88
89
90
91
92
93
94
95
96
97
Hexbolt
Springwasher
Washer
Locknut
50connector
Upperstackcarriageset
HexboltandPUtube
Flatwasher
Locknut
Guiderod
Stackfork
Innerhexcapscrew
Innerhexcapscrew
Innerhexcapscrew
Springwasher
Curvedwasher
Axle
Flatwasher
Innerhexcapscrew
Bushing
Mushroomtopinnerhexscrew
Flatwasher
Springwasher
Mushroomtopinnerhexscrew
Seatplate
Beveledinnerhexscrew
Chestcushionmountplate
Springwasher
Mushroomtopinnerhexscrew
Beveledinnerhexscrew
Phillipsheadscrew
Hexbolt
ConnectorD
Mushroomtopinnerhexscrew
Flatwasher
Hexlocknut
Wavewasher
∮
M10*L130
M10
16
M10
20
M8
M10*L120
M10*L25
M8*L15
M8
D18*d8.5*t2
D26*d8.3*t3
M8*P1.25*L20
M6*P1.0*L12
D22*d8.2*t2
M8
M8*L25
M8*L20
M8
M8*L25
M8*L20
M6*P1.0*L12
M10*L75
M8*L15
D22*d8.2*t2
M8

-7-
CHAPTER3ASSEMBLYINSTRUCTIONS-
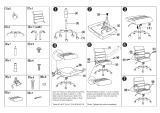
STEP1 ConnectorInstallation

-8-
1-1.First,removehardwarefromthemainframe,mast,horizontalbeam,andseat
frame(61,62,63,64,65,73,92,93)inareas<a1><a2><a3><a4><a5>.Place
hardwareinasecureplace.Donotmixthisandotherhardware.

1-2.Usehardware(61,62,63,64,92,93)tosecurethemainframe(5)totheseatframe
(29).
1-3.Usehardware(62,63,64,73)tosecuretheseatframe(29)tothemast(21).
1-4.Threadthecablethroughthemainframe(5).Attachthehorizontalbeam(22)tothe
mainframe(5)andthemast(21)asshown.
1-5.Usehardware(62,63,64)tolooselysecurethehorizontalbeam(22)tothemain
frame(5)andthemast(21).
-9-

1-6.Connectleftandrightsupports(27,28)tothemainframe(5)andthehorizontal
beam(22).Usehardware(61,62,63,64,65)tolooselysecurethesepieces.After
allpartsaresecured,fullytightenthishardwarealongwithhardwareinsteps1-2~
1-5.
-10-

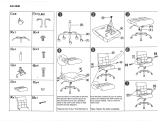
WeightPlateInstallation
STEP2
-11-

-12-
2-1.Holdtheupperstackcarriage(66)andcuttheziptie.Gentlylowertheupperstack
carriage(66)intoplaceasshown.

-13-
2-2.Removehardware(67,68,69).Guidetheguiderods(70)downwardasshown.

-14-
2-3.Tilttheguiderods(70)backward.Thenlifttheupperstackcarriage(66)offthe
guiderodsasshown.Carefullysettheupperstackcarriageaside.

-15-
2-4.Insertandlowerthefourlarge(7.5kg)weightplatesintoplaceontheguiderods
oneatatime(7).Note:Placetheconvexsideoftheweightplatesontop.

-16-
2-5.Insertandlowerthe13small(5kg)weightplates(6)intoplaceoneatatime.
Note:Placetheconvexsideoftheweightplatesontop.
2-6.Insertandlowertheupperstackcarriage(66)intoplace.Note:thestackfork(71)
pointstowardthefront.

-17-
2-7.Tilttheguiderods(70)backintoplace.

-18-
2-8.Lifttheguiderods(70)upintotheirmountingstation.Thensecurethemwith
hardware(67,68,69).

STEP3
-19-
WeightStackStickerApplication
/