Page is loading ...

D51 200 Steam Locomotive: STEP BY STEP
208
™
Stage 97
The couplers
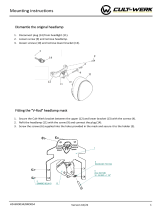
Fitting the drawbar
1
The couplers
Turn the underframe body over, and align the
larger hole of the drawbar with the threaded
hole in the end beam.
Turn the underframe back over. Insert the
drawbar pin under the front of the tender
and into the smaller hole in the drawbar.
Once test-tted, detach the tender.
Tighten pivot screw A
into the hole.
Drawbar pin
Drawbar
Your parts
Pivot screw B
Pivot screw A
Locking pins × 2
Coupler seats × 2
Coupler A
Bolts (2 × 8mm) × 5
Miniature wrench
Screws (2 × 5mm) × 5
Drawbar
Coupler B
Required tools
Screwdriver
Instant adhesive

D51 200 Steam Locomotive: STEP BY STEP
209
™
Fitting the coupler
2
Place the tender upside down. Insert coupler B through the
hole in the coupling buer and align the hole with the one in
the tender base.
Tighten pivot screw B into place.
Insert pivot screw B through the hole in the
coupler and into the hole in the tender.
Turn the tender back
over and insert one of
the locking pins into the
circled hole.
Assembled parts

D51 200 Steam Locomotive: STEP BY STEP
210
™
Painting
When you have completed the undercoating and masking stages,
your model is ready to be painted.
For the black nish, you will need black paint, matt black spray
paint, paint thinner and a brush. For a clear nish, you will
need clear spray and a brush. Always take your time during the
painting process.
Whether you have chosen a clear nish
or a painted black nish for your model,
the spraying process is the same. In the
same way as the primer you applied in the
previous painting stage, you should locate
and hand-paint any areas that will be hard
to reach with the spray.
Make sure that the area you will be
painting in is well ventilated. Before using
spray paint, shake the can well to make
sure that the paint inside is mixed properly.
When spraying, always use a fast but
controlled action, with a sweeping motion
from the elbow, not the wrist. Keep the
can at a distance of about 30cm from the
surface, as this will increase the area you
can paint, as well as reduce any build-up
of paint. If paint does build up, it will take
longer to remove it and prepare the surface
again than it will to paint it correctly in the
rst place.
Spray two or three bursts before
moving on to a dierent area or angle, as
indicated by the photos above and on the
right, and only return to an area that has
already been painted when the paint there
has completely dried. This applies to both
black and clear sprays. When returning to
an area that has already been painted, try
to paint it from a dierent angle, as this will
improve coverage. Spray the entire surface
once and then leave to dry before applying
a second coat. That way, you will be able to
see any uneven areas of paint more clearly.
Spray from about
30cm away, using
long, controlled
sweeping movements
It’s best to change the angle from
which you are spraying after every
few sprays, to avoid a build-up of
paint and an uneven coating.
Always paint in a
well-ventilated area

D51 200 Steam Locomotive: STEP BY STEP
211
™
Hand paint the smaller
detailed parts.
You will need to mask o the wheels and the majority of the underframe. The outlined
sections below should be painted. It is easier to spray them, but you can choose to hand
paint them instead.
Black paint nish
If you have chosen a clear nish for your model, you won’t need to mask any of it. After
cleaning and applying primer, you can spray it with clear paint. You will still need to hand
paint some areas to achieve an even coating.
Clear nish
When the masking has been removed,
you will need to paint the areas that were
masked during the spraying process.
There may still be uneven areas that
were missed when spraying.Touch up
these areas by hand painting.
Hand paint all of the pipes around the
model, because the spray won’t be able to
reach the backs of them.
Parts with a complex shape, such as the
compressor, should be hand painted.
Compressor
The pony truck and tender trucks, and
their wheels, should be painted entirely
black. The trailing truck should be painted
as shown above, with the wheels left
unpainted.
Tank and cooling pipe
Make sure you paint the
backs of parts such as the
sand pipes.
When painting the wheels,
take care that the parts don’t
stick together.
Trailing truck
Pony truck
Motion plate
Trailing truckCylinder plates
If paint gets onto any surface that you don’t
want painted, use a paint thinner to remove
it before it dries.

D51 200 Steam Locomotive: STEP BY STEP
212
™
Stage 98
The reverse bar
Assembling the reverse bar
1
The reverse bar
Place reverse bar parts B and C as shown.
Tighten a 2 x 3mm screw
into the three circled holes.
Your parts
Reverse bar link
Reverse bar B
Reverse bar A
Screws (2 × 3mm) × 15
Screws (2 × 6mm) × 2
Reverse bar guide
Reverser
Reverse bar C
Required tools
Phillips screwdriver
Precision screwdriver

D51 200 Steam Locomotive: STEP BY STEP
213
™
Fitting the reverse bar
3
Assembling the reverse bar (continued)
2
Place the end of reverse bar C into the
hole in the reverser.
Align the holes at the bottom of the
reverser with the two holes in the
running board.
Tighten a 2 x 3mm screw
into each hole.
Place the reverse bar guide up against the
side of the boiler, aligning the holes at its
top with the two circled holes.
Assembled parts
Fitting the reverse bar link
4
Place reverse bar A
onto reverse bar C,
aligning the holes
of both.
Tighten 2 x 3mm screws into the holes.
Direction of reverse bar C
Tighten a 2 x 3mm screw into each hole
from underneath the running board.
Tighten a 2 x 6mm
screw through the
holes of the links.
Place the reverse bar link over the free end of
the left reverse link, with the threaded hole
facing inwards.
Reverse link Threaded hole

D51 200 Steam Locomotive: STEP BY STEP
214
™
Painting the details
If you are painting your model black, then after you have applied the base coat and
it is completely dry, you can begin adding the detail work.
If you have chosen the bare metal nish
for your model, the painting process is
now nished, but for the black nish,
there are a few more steps to complete.
Previous painting steps showed you
how to paint parts during assembly, and
the following steps show you what to
paint when assembly is complete.
Take the cab apart so that you can
reach the inside of it with paint. Spray
all of the inside of the cab black, as even
though some parts will have a bare
metal or painted nish, it is easier to
remove the paint from them rather than
try to mask them.
When painting the wheels, make
sure that you paint only the exposed
areas. Don’t try to paint under the rods.
Instead, rotate the wheels until the
unpainted areas are visible, and then
paint them.
To paint the bottom of the rebox the
same red as the real locomotive, you will
need to mix three paints in equal parts,
as shown on the following page.
The white line extends below the
running boards, from the front of the
boiler to the rear of the cab, and along
the top edge of the tender. Be careful
not to get white paint on the rest of the
model when painting these details. If
you do, remove the white paint from the
surface as quickly as possible and touch
up with the black if necessary.

D51 200 Steam Locomotive: STEP BY STEP
215
™
The paint will adhere
to the surface of
the wheels better
if they have been
degreased and
primed.
The wheels
Use a cotton swab with paint thinner to
remove the black paint from the valves
and meters on the backhead.
Paint the meters and gauges with white paint
to simulate the glass. You can use a cotton
swab or a ne paintbrush for this.
The cab
The rebox
Refer to the photo on the previous page
when painting the white line. Remove
any excess paint with paint thinner.
Paint the
white line
along the
raised strip
at the top of
the tender.
The white line
Rotate the wheels by turning
the motor shaft.
Rotate the wheels to
expose the areas you
want to paint. This
works much better
than trying to paint
them underneath
the rods.
The backhead and seats
painted completely black.
Instead of
removing the
black paint from
the seat, you can
paint over it when
it’s dry, using it as
a base coat.
Meter painted
white
Sandy brown (left)
White (centre)
Character red (right)
The rebox of the actual
locomotive
Hand paint the bottom of the rebox with a small
brush; this should make it easier to control.
To paint the exposed part at the bottom of the rebox, you will need to mix together
three paints in equal parts. It is recommended that you use ‘Mr. COLOR’ paints, as these
are what have been used here, but any matching colours should work.
Stage 24 showed you how to paint the wheels. If you have waited until now to do so, you
can refer back to that stage, as well as following these few steps.
The end of Stage 59 showed you how to paint the backhead and seats of the cab. You
can mask some of the larger parts when painting, but it will probably be easier just to
paint all of the parts black and then use a paint thinner to wipe away unwanted paint.
Using a ne brush, carefully paint the white line below the running board. Apply the
paint from the front end beam to the back of the cab, and along the top edge of
the tender.

D51 200 Steam Locomotive: STEP BY STEP
216
™
Stage 99
The gures and coal Combining the parts
1
To avoid interference with the silicone tube of the
motor, slide the boiler band around the boiler so
that the fastening isn’t positioned in the centre.
Tighten a 2 × 5mm screw (Stage 97) into
each of the four circled holes.
Fit the left gutter holder (Stage 58) to the left
pipe and then tighten two 2 x 4mm screws
(Stage 57) through the holder, the end beam
and into the distribution valve (Stage 57).
The cab and the underframe are now xed
together.
The centre line of the boiler
Reverse bar link
Nut
Place the headlight cable through the
space in the underframe behind the ash
box. The reverse bar link should pass
through the hole in the running board.
Carefully lower the upper part of the
locomotive onto the underframe.
Place the right gutter holder over the
right gutter pipe, and tighten a 2 x 4mm
screw through the circled holes and into
a nut (all parts from Stage 58).
Your parts
Trainspotter
Driver
Fireman
Coal
Required tools
Phillips screwdriver
Socket wrench
Miniature wrench

D51 200 Steam Locomotive: STEP BY STEP
217
™
3
Connecting the reverse bar
2
Align the holes of the reverse bar with
those of the reverse bar link.
Tighten a 2 x 8mm bolt into each hole of
the upper coupler seat.
Place coupler A (Stage 97) into the
coupler seat. Then place the second
coupler seat on top of the rst.
Secure one of the coupling seats to the
front end beam with 2 x 8mm bolts (both
from Stage 97).
Assembled parts
Placing the gures and coal
4
Tighten a 2 × 3mm screw (Stage
98) into each of the three holes.
Make sure the bar is positioned in the
bar guide.
Place the locking pin (Stage 97) into
the circled hole in the coupler.
Place the coal in the tender.
Place the driver on the seat and the
reman in front of the backhead.
Reverse bar link Reverse bar
Reverse bar
guide
Coupler
seats
Coupler seat
Coupler A
Fitting the coupler

D51 200 Steam Locomotive: STEP BY STEP
218
™
Weathering
Though the painting process is now complete, you can give
your model a more authentic and used look by ‘weathering’
it. This eect mimics the blemishes from wear, repair work,
repainting and heat that would appear on the real locomotive.
While this doesn’t look as appealing, it does add a sense of
realism and authenticity to the model.
The steps on the next page explain how to recreate this look,
as well as how to repair any uneven areas of paint.
Here, you can see some weathering eects on the rebox door and the valves. This picture shows the eects of wear and usage on the real locomotive.

D51 200 Steam Locomotive: STEP BY STEP
219
™
Repairing paint
This is a detail shot of the paint on the boiler of D51 200.
Repairing with sandpaper
No matter how carefully or correctly you paint your model,
you are likely to nd some parts where the surface is
uneven, due to excess paint or bubbling. You can repair
the uneven areas of paint by following the steps shown
here on the right.
Locate any areas of
uneven paint.
Make sure the paint is dry,
and then smooth the area
with sandpaper.
Keep sanding until the
paint is removed.
Re-spray the area until it
matches the surrounding
paintwork.
Repairing with paint thinner
Some areas can’t easily be
reached with sandpaper.
Apply paint thinner using
a brush or cotton swab.
Re-spray the aected area. It is harder to repair
cleanly using this method,
so some trace may be left.
Weathering methods
Weathering creates a more accurate reproduction of the
textures of the actual vehicle, but there is no ‘correct’
way to do this, so it will involve some trial and error. One
eective method is to paint over the sprayed matt black
paint with a water-based black paint to create a dierent
texture on the surface.
Reproducing the paint texture
Using water-based paint
The photo above left shows the paintwork of the actual D51200. You should
be able to see that it has been repainted many times. The picture above right
shows the texture reproduced on the model.
The photo above left shows the model’s surface after it was painted with
matt black paint. The photo above right shows the same surface after it was
roughly painted over with a water-based black paint.
The rebox door
Paint over the black rebox door with
a mix of red and white paint, thinned
down to give the desired eect.
The valves and gauges
Paint the bare metal valves and
gauges with thinned black paint to
recreate the look of dirt and grease.
Matt paint Water-based paint
Actual D51 200 Model D51 200

D51 200 Steam Locomotive: STEP BY STEP
220
™
Stage 100
The final parts
Insert the lamp
lenses into lamps
A and B.
Apply instant adhesive to
the back of the lens from the
inside of the lamp.
Before proceeding, make sure you identify
the two types of lamp – A is for the tender
and B is for the front of the locomotive.
Lamps A have a large hole at the back, and
lamps B have a small hole, which won’t t
over the tender’s lamp hooks.
Place the two lamps B over the lamp hooks at
the front of the locomotive.
Place the two lamps A over the lamp hooks
at the rear of the tender.
Large hole Small hole
Lamp A
(tender )
Lamp B
(locomotive main body)
Instant
adhesive
Lamps B
Lamp hooks Lamp hooks
Lamps A
Assembling and tting the lamps
1
Your parts
Number plates × 3
Lamp lenses × 4
Lamps A × 2
Lamps B × 2
Commemorative plate
Tag holders × 4
Maker’s plates × 2
District tags C × 2
District tags B × 2
District tags A × 2
Turbine generator
Required tools
Phillips screwdriver
Cutters
Instant adhesive
Pliers
Screws (2 × 4mm) × 4
Tank
Brass wire
Tender handrails × 2

D51 200 Steam Locomotive: STEP BY STEP
221
™
Fitting the cab number plates
2
Insert the brass wire into the hole
in the corner of the number plate.
Apply instant adhesive to hold it
in place.
When the glue is dry, cut
the brass wire ush with the
front of the plate. Repeat this
for all corners of the plate,
and then for another plate,
so that you have two plates
prepared in this way.
フィギュアはキャブ内に配置します。❸フィギュアB は焚
き口係、❹フィギュアCは運転手です。
The tender handrails
4
This shows how the tender handrail
should appear when shaped.
Insert district tag B or C into
the left tag holder and tag A
into the right. District tag B is
"Nakatsugawa engine depot"
and district tag C represents
the "Umekoji engine depot".
Number plate
Maker’s plate
Tag holders
Glue the second prepared
number plate, the second
maker’s mark and the
other two tag holders to
the right side of the cab.
When inserting the district
tags, make sure they
match those on the left.
Glue the number plate,
the maker’s plate and
two tag holders to the
left side of the cab, in the
positions shown. District tag A
District tag B
or
District tag C
Fitting the tender number plate
3
Place the brass wire into one of
the holes of the number plate.
Cut it o 5mm from the back
of the plate.
Repeat for each corner and x in
place with instant adhesive.
5mm
Instant adhesive
Insert the
four lengths
of wire into
the four
circled holes
at the rear of
the tender.
Position the plate so there
is a gap of 1mm between it
and the tender, and glue it
in place.
1mm Instant
adhesive
Use needle-nose
pliers to bend
the rail 5mm
from the end.
Bend the
other end
while moving
it through
the pliers
to achieve
the rounded
7mm section.
Insert the end of
the 12mm length
into the hole just
inside the wall of the
tender, and the 5mm
length into the hole
in the corner. Fix with
instant adhesive, then
repeat for the other
side of the tender.
Instant
adhesive
Instant adhesive
60mm
5mm
12mm
7mm

D51 200 Steam Locomotive: STEP BY STEP
222
™
Fitting the parts
5
Secure with a 2 x 4mm screw.
Tighten a 2 x 4mm screw
into each hole (circled).
Place the tank over
the two holes in the
running board, below
the generator.
本体左側
Glue the commemorative plate into the hole
in the boiler.
Final adjustments
Your D51 model is now complete! There are just a few nal checks to ensure that it
is ready to be mounted on the base.
You may nd that there is a gap between the running board and some parts of the
boiler or front deck. Follow the process described to the right to x this.
Circled in red are the adjustment screws for
the running board (below). Circled in blue are
the lubrication points for the wheels (right).
Loosen the screws (circled in the top photo), then
adjust the position of the running board and re-
tighten the screws.
When the model is in use, the vibration
may loosen some of the screws, so
it is best to check the screws before
operation. If you nd some have come
loose, you can use a thread-locking
adhesive to hold them in position.
Assembled parts
Before each running of the motor
and wheels, it is best to lubricate
the parts that will be in motion,
such as the rods and pistons.
Align the hole of the turbine
generator with the hole in front
of the right side of the cab.

D51 200 Steam Locomotive: STEP BY STEP
223
™
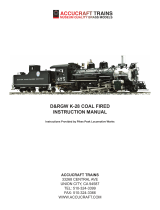
D51 COMPLETED
The boxes below explain the dierent switches on the switchboard, as well as
giving the numbers of the relevant stages to check if you have any issues with
how the parts run.
Headlamp
The CAB switch will turn the
headlight on.
CHECK
Stages 29, 30, 88 and 89.
The CAB switch also
turns the rebox light on,
recreating the light from
the burning coals.
CHECK
Stages 52, 61, 88, 89.
MAIN: Turns on the power supply
RUN: Starts the motor
SOUND: Running sound
WHISTLE: Whistle sounds
CAB: Headlight and rebox light
Wheels
The RUN switch starts
the motor, turning the
shaft, gear and wheels. It
is recommended that you
do not run the wheels for
a long time.
CHECK
Stages 17, 24, 25, 26, 27,
28, 88, 89, 92, 94, 95, 99.
Sound and whistle
The SOUND and WHISTLE
switches add sound to the
movement of your model.
CHECK
Stages 87, 88 and 89.
Glue the lens in place with
the lines positioned vertically.
When all adjustments are complete, you
can place the model onto the display
stand. Connect the motor, headlamp and
rebox wires with the corresponding
wires in the base. Then connect the tender
and locomotive couplers and secure them
with the pin.
Firebox
Motor
Headlamp
Firebox
/