Teka DoubleCook HLD 45.15 Maintenance Guide
- Category
- Microwaves
- Type
- Maintenance Guide
Page is loading ...

2
Guía de Uso
ESPAÑOL
Por favor, antes de utilizar su horno por primera vez, lea atentamente las instrucciones de
instalación y mantenimiento incluidas en su horno.
Dependiendo del modelo, los accesorios incluidos en su horno pueden variar respecto
a los mostrados en las imágenes.
PORTUGUÊS
Antes de utilizar o forno pela primeira vez, leia atentamente as instruções de instalação
e manutenção fornecidas com o forno.
Dependendo do modelo, os acessórios incluídos no forno podem variar em relação às
imagens apresentadas.
ENGLISH
Before using your oven for the first time, please carefully read the installation and
maintenance instructions that come with it.
Depending on the model, the accessories included in your oven may vary from those
shown in the pictures.
FRANÇAIS
Avant la première utilisation de votre four, veuillez lire attentivement les instructions
d’installation et d’entretien fournies avec votre four.
Selon les modèles, il est possible que les accessoires fournis avec votre four soient
différents de ceux indiqués sur les images.
DEUTSCH
Bevor Sie den Backofen zum ersten Mal verwenden, lesen Sie bitte die zu Ihrem Backofen
gehörenden Einbau- und Wartungsanweisungen aufmerksam durch.
Je nach Modell können die Zubehörteile Ihres Backofens von den auf den Abbildungen
dargestellten abweichen.
Page is loading ...
Page is loading ...
Page is loading ...
Page is loading ...
Page is loading ...
Page is loading ...
Page is loading ...
Page is loading ...
Page is loading ...
Page is loading ...
Page is loading ...
Page is loading ...

15
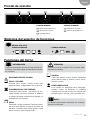
User’s Guide
English
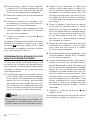
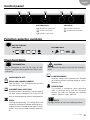
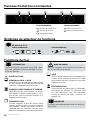
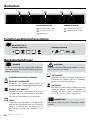
Control panel
TOP CAVITY
4
Function control dial
5
Temperature control dial
BOTTOM CAVITY
1
Temperature control dial
2
Function control dial
3
Electronic clock/timer
1 2 3 4 5
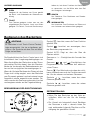
Oven functions
CAUTION
The door must be closed when the Grill function is
used.
LOWER ELEMENT
Heat only comes from the lower part. Suitable
for warming dishes or letting dough or similar
products rise.
DEFROSTING
This function is suitable for slowly defrosting
food. In particular those that are consumed
without the need for heating, for example
creams, pastries, cakes, pies etc.
NOTE
The light remains on with any cooking function.
OVEN SWITCH-OFF
GRILL AND LOWER ELEMENT
Ideal for roasts. This setting can be used with
any size of cuts of meat.
CONVENTIONAL WITH FAN
Suitable for roasts and baking. The fan spreads
the heat evenly throughout the inside of the
oven to reduce cooking time and temperature.
GRILL
Toasting and browning. This setting allows the
surface to be browned without affecting the in-
side of the food. Suitable for flat foods such as
steaks, ribs, fish and open toasted sandwich-
es.
INFORMATION
For a description of how to use each of the
features, see the cooking guide that comes with
your oven.
Function selector symbols
HLD 45.15 Model
TOP CAVITY BOTTOM CAVITY

16
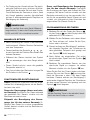
User’s Guide
MELTED CHEESE TOPPINGS
Heat only comes from the upper part. Suitable
for toasting and browning.
WARMING
Heat only comes from the lower part. Suitable
for warming plates and defrosting food.
BOTTOM CAVITY
PIZZA
Suitable for pizzas, following the cooking table
in the instruction manual.
TOAST
Suitable for making toast using only the grid
provided. Suitable for roasting cuts of meat.
When roasting meat, fish and vegtables, we
recommend using this function with the drip
tray.
Using the Oven
CAUTION
The electronic clock features touch control
technology. To operate, simply touch the
glass control symbols with your fingertip.
The touch control sensitivity continuously
adapts to the ambient conditions. Make sure
the glass surface of the control panel is clean
and free of obstacles when plugging in the
oven.
If the clock does not respond correctly when
you touch the glass, unplug the oven for a few
seconds and then plug it in again. Doing this
causes the sensors to adjust automatically so
that they will react once more to fingertip con-
trol.
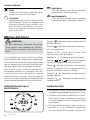
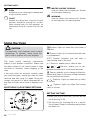
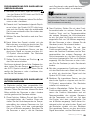
ELECTRONIC CLOCK/TIMER SETTINGS
Symbol: lights up when the clock/timer is
selected.
Symbol: lights up to indicate that the oven
is programmed.
AUTO Symbol: indicates that the oven is
trans-mitting heat to the food.
+ / – Sensors: enable you to select a time.
, y Sensors: enable you to pro-
gramme the electronic clock/timer functions.
Sensor: enables you to change visible infor-
mation and select clock/timer settings between
the top and bottom cavities
Symbols: Lights up when the top cavity
is chosen.
Symbols: lights up when the bottom
cavity is chosen
SETTING THE TIME
• When you plug in the oven, you will see the
clock flashing 12:00.
• Set the clock by touching the + or – sensor.
You will hear 2 beeps confirming that the time
has been set.

17
User’s Guide
English
• To change the time, touch the + and – sym-
bols together until the indicated time flashes
on the display. Change the time by pressing
the + or – sensors. Two beeps will then con-
firm that the new time has been set.
NOTE
The clock light has a night mode so the dis-
play light will dim between 00:00 and 6:00
hours.
MANUAL OPERATION
• After setting the clock, the oven is ready for
use. Select a cooking function and tempera-
ture.
• The
symbols will light up de-
pending on the top and bottom cavity func-
tions.
• During cooking, the
symbol will light up to
indicate that heat is being transmitted to the
food.
• This symbol disappears when the selected
temperature has been reached.
• Set the controls to
to turn off the oven.
ELECTRONIC CLOCK/TIMER SETTINGS
Timer Alarm: The alarm will go off at the pro-
grammed time, even if the oven is not in use.
Cooking Time (top and bottom cavity): This
function allows you to programme the cooking
time, after which the oven will turn off automat-
ically.
Cooking Stop Time (top cavity only): This
setting allows you to programme the time for
cooking to stop, after which the oven will turn
off automatically.
Cooking Time and Cooking Stop Time (top
cavity only): This setting allows you to pro-
gramme the cooking time and cooking stop
time. The oven switches on automatically at the
set time and operates for the selected cooking
time (Cooking Time). It then switches off auto-
matically at the indicated time (Cooking Stop
Time).
PROGRAMMING THE TIMER ALARM
1. Touch the
sensor with your fingertip until
the
symbol starts flashing on the display.
The clock will also flash 00:00.
2. Select the time after which you want the
alarm to sound by pressing the + or – sen-
sor.
3. You will hear 2 beeps to confirm that the
time has been set. The clock will start count-
ing down from the selected time and the
symbol will flash slowly.
4. When the time is up, the alarm will go off and
the
symbol will flash quickly.
5. Touch any sensor to stop the alarm. The
symbol will then disappear.
If you want to change the timer alarm, simply
touch the
sensor with your fingertip and then
press the + or – sensor. You will hear 2 beeps
to confirm that the time has been changed. The
clock will then start counting down from the
new time and the symbol will flash slowly.
NOTE
You cannot see the current time on the dis-
play when the timer alarm is set.
PROGRAMMING COOKING TIME FOR
THE TOP CAVITY
1. Touch the
sensor with your fingertip until
the AUTO symbol starts to flash and 00:00
appears on the display.
2. Select the cooking time by pressing the +
or – sensor.
3. You will hear 2 beeps, the AUTO symbol will
flash slowly and the display will show the
time left before the oven switches off auto-
matically.

18
User’s Guide
3. Melted Cheese Topping Function: select the
Melted Cheese Topping setting on the top
cavity function control dial and the maximum
temperature on the bottom cavity tempera-
ture control dial. A pre-programmed time of
6 min will appear on the clock/timer display.
Use the + or – symbols to change the cook-
ing time according to your liking.
4. For all the above settings, once the cooking
time is up, the oven will turn off, an alarm
will sound and the AUTO symbol will flash
quickly.
5. Touch any sensor to stop the alarm and
to turn off the AUTO symbol. The oven will
switch on again.
6. Warming Function: select the Warming set-
ting on the top cavity function control dial
and a maximum temperature of 90º on the
bottom cavity temperature dial. A pre-pro-
grammed time of 8 min will appear on the
clock/timer display. After this preheating
time, an alarm will sound and the oven will
turn off. Touch any sensor to stop the signal.
The oven will turn on again. Place plates in
the cavity to keep them warm for as long as
you wish.
7. Set the controls to
to turn off the oven.
You can change the cooking time at any time
by pressing on the + or – sensors.
PROGRAMMING THE COOKING STOP TIME
1. Touch the
sensor with your fingertip until
the AUTO symbol starts to flash.
2. Select the cooking stop time by pressing the
+ or – sensor.
3. You will hear 2 beeps, the display will show
the current time and the AUTO symbol will
flash slowly to indicate that the oven will
switch off automatically.
4. Select a cooking function and temperature.
5. When the cooking time is up, the oven will
turn off, an alarm will sound and the AUTO
symbol will flash quickly.
4. Select a cooking function and temperature.
5. Once the cooking time is up, the oven will
turn off, an alarm will sound and the AUTO
symbol will flash quickly.
6. Touch any sensor to stop the alarm and
to turn off the AUTO symbol. The oven will
switch on again.
7. Set the controls to
to turn off the oven.
You can change the remaining cooking time at
any time by touching the
sensor with your
fingertip until the AUTO symbol starts to flash
quickly. Now press the + or – sensor to change
the time.
PROGRAMMING COOKING TIME FOR
THE BOTTOM CAVITY
The oven incorporates pre-programmed set-
tings for the bottom cavity cooking functions.
You can modify these times using the + or –
sensors to select the desired duration.
1. Pizza Function: select the Pizza setting in
the function control dial and the maximum
temperature on the bottom cavity tempera-
ture control dial. A pre-programmed time of
8 min will appear on the clock/timer display.
Use the + or – sensors to modify the cooking
time according to your liking or the instruc-
tions that came with the pizza.
NOTE
It is not necessary to preheat the oven to
cook pre-cooked or frozen pizzas in the bot-
tom cavity.
2. Toast Function: select the Toast setting on
the bottom cavity function control dial and
the maximum temperature on the bottom
cavity temperature control dial. A pre-pro-
grammed time of 3.5 min will appear on the
clock/timer display. Use the + or – symbols
to change the cooking time according to
your liking.

19
User’s Guide
English
11. When the cooking time is up, the oven will
turn off, an alarm will sound, and the AUTO
symbol will flash quickly.
12. Touch any sensor to stop the alarm and
to turn off the AUTO symbol. The oven will
switch on again.
13. Set the controls to
to turn off the oven.
If you want to change the remaining cooking
time while the oven is on, press the
sensor
until the AUTO symbol starts to flash quickly.
Now press the + or – sensor to change the
time.
CHILD SAFETY FUNCTION
This function can be selected at any time while
using the oven.
To activate the function, press the + and – sen-
sors at the same time for several seconds. You
will hear a beep and see the word SAFE on the
display. The clock/timer is locked.
If the oven is off and you activate the child
safety function, the oven will not work even if a
cooking function is selected.
If this function is activated while you are cook-
ing, it will only lock the electronic clock/timer
settings.
If any clock/timer sensor is touched while the
child safety function is on, the word SAFE
will appear on the display. The clock/timer is
locked.
To disable the function, press the + and – sen-
sors at the same time for several seconds until
you hear a beep.
CAUTION
In the event of a power failure, your elec-
tronic clock/timer settings will be erased and
12:00 will flash on the clock display. Reset it
and programme again.
6. Touch any sensor to stop the alarm and
to turn off the AUTO symbol. The oven will
switch on again.
7. Set the controls to
to turn off the oven.
You can change the stop cooking time at any
time by touching the sensor with your finger-
tip until the AUTO symbol starts to flash quickly
and you see the stop time on the display. Now
press the + or – sensor to change the time.
PROGRAMMING COOKING TIME AND
COOKING STOP TIME
1. Touch the
sensor with your fingertip
until the AUTO symbol starts to flash and
00:00
2. Select the cooking time by pressing the +
or – sensor.
3. You will hear 2 beeps, the display will show
the remaining cooking time, and the AUTO
symbol will flash slowly.
4. Touch the sensor until the AUTO symbol
starts to flash quickly. The display will show
the current time and the programmed
cooking time.
5. Select the cooking stop time by pressing
the + or – sensor.
6. This will be confirmed by two beeps. The
current time will show on the display and
the AUTO symbol will remain lit.
7. Select a cooking function and temperature.
8. The oven will remain off and the AUTO light
will be on. The oven is now programmed.
9. When it is time to start cooking, the oven
will turn on and will operate for the pro-
grammed cooking time.
10. While cooking, the display will show the
cooking time remaining and the AUTO
symbol will flash slowly.
Page is loading ...
Page is loading ...
Page is loading ...
Page is loading ...
Page is loading ...
Page is loading ...
Page is loading ...
Page is loading ...
Page is loading ...
Page is loading ...
Page is loading ...
Page is loading ...
Page is loading ...
-
 1
1
-
 2
2
-
 3
3
-
 4
4
-
 5
5
-
 6
6
-
 7
7
-
 8
8
-
 9
9
-
 10
10
-
 11
11
-
 12
12
-
 13
13
-
 14
14
-
 15
15
-
 16
16
-
 17
17
-
 18
18
-
 19
19
-
 20
20
-
 21
21
-
 22
22
-
 23
23
-
 24
24
-
 25
25
-
 26
26
-
 27
27
-
 28
28
-
 29
29
-
 30
30
-
 31
31
-
 32
32


Teka DoubleCook HLD 45.15 Maintenance Guide
- Category
- Microwaves
- Type
- Maintenance Guide
Ask a question and I''ll find the answer in the document
Finding information in a document is now easier with AI
in other languages
- français: Teka DoubleCook HLD 45.15
- español: Teka DoubleCook HLD 45.15
- Deutsch: Teka DoubleCook HLD 45.15
- português: Teka DoubleCook HLD 45.15
Related papers
Other documents
-
Kuppersberg FH 611 Series BUILT-IN ELECTRIC OVEN User guide
-
Bertazzoni F45 CON XT User manual
-
Foster KE multifunzione 9F Specification
-
Foster KE60 MTL INOX Features List
-
AEG KEK442910M User manual
-
 Porter & Charles SOPS60TC User manual
-
Foster FL-F90 MTL Quick start guide
-
Bertazzoni F60CONXE Owner's manual
-
Groupe Brandt HF-135N Owner's manual
-
Groupe Brandt 1H-125BEPOCA Owner's manual
