©2012 Sony Corporation Printed in Malaysia
Precautions
On safety
Before operating the subwoofer, be sure that the
operating voltage of your subwoofer is identical with
that of your local power supply.
Unplug the subwoofer from the wall outlet if it is
not to be used for an extended period of time. To
disconnect the cord, pull the cord by grasping the
plug. Never pull the cord itself.
Should any liquid or solid object fall into the
subwoofer, unplug the subwoofer and have the
subwoofer checked by qualied personnel before
operating it any further.
AC power cord must be changed only at the qualied
service shop.
When turning on or o an amplier or other
equipment
Lower the volume of the amplier to minimum.
To avoid damaging the subwoofer
Be careful in setting the volume control of the
amplier to avoid an excessive input power.
Do not attempt to open the enclosure or remove
speaker units and networks.
Do not press the dust cap intentionally or
unintentionally.
In case color irregularity is observed on the
nearby TV screen
With the magnetically shielded type of the speaker
system, the subwoofer can be installed near a TV set.
However, color irregularity may still be observed on
the TV screen depending on the type of your TV set.
If color irregularity is observed...
tTurn o the TV set once, then turn it on aer 15
to 30 minutes.
If color irregularity is observed again...
tPlace the subwoofer further apart from the TV
set.
When howling occurs
Relocate the speaker or turn down the volume of the
amplier.
On installation
Do not install the subwoofer near heat sources such
as radiators or air ducts, or in a place subject to direct
sunlight, excessive dust, mechanical vibration or
shock.
Good ventilation is essential to prevent internal heat
build-up in the subwoofer. Place the subwoofer in a
location with adequate air circulation. Do not place
the subwoofer on a so surface or too close to a wall
as this may obstruct the ventilation hole on the back.
Use caution when placing the subwoofer on a
specially treated (waxed, oiled, polished, etc.) oor, as
staining or discoloration may result.
Take care to avoid any possible injury on the corners
of the subwoofer.
On cleaning the cabinet
Clean the cabinet with a so cloth lightly moistened
with water. Do not use any type of abrasive pad,
scouring powder or solvent such as alcohol or benzine.
If you have any questions or problems
concerning your subwoofer that is not covered
in this manual, please consult your nearest Sony
dealer.
Installation
Since the human ear cannot detect the direction and
position where the bass sound being reproduced by a
subwoofer (below 200 Hz) comes from, you can install
the subwoofer wherever you like in your room.
To obtain a better bass reproduction, we recommend
you to install the subwoofer on a solid oor where the
resonance is unlikely to occur.
You can obtain a sucient heavy bass reproduction
from a single subwoofer.
However if you use a couple of the subwoofers, you can
obtain an even more eective heavy bass reproduction.
Notes
Always install the subwoofer vertically, keeping a few
centimeters away from the wall.
Do not place an object on the subwoofer or sit on it.
If the subwoofer is installed in the center of a room,
the bass could be extremely weakened. is is due to
the inuence of the standing wave of the room. If this
happened, move the subwoofer away from the center
of a room or eliminate the cause of the standing
wave, by installing a bookshelf on the wall, etc.
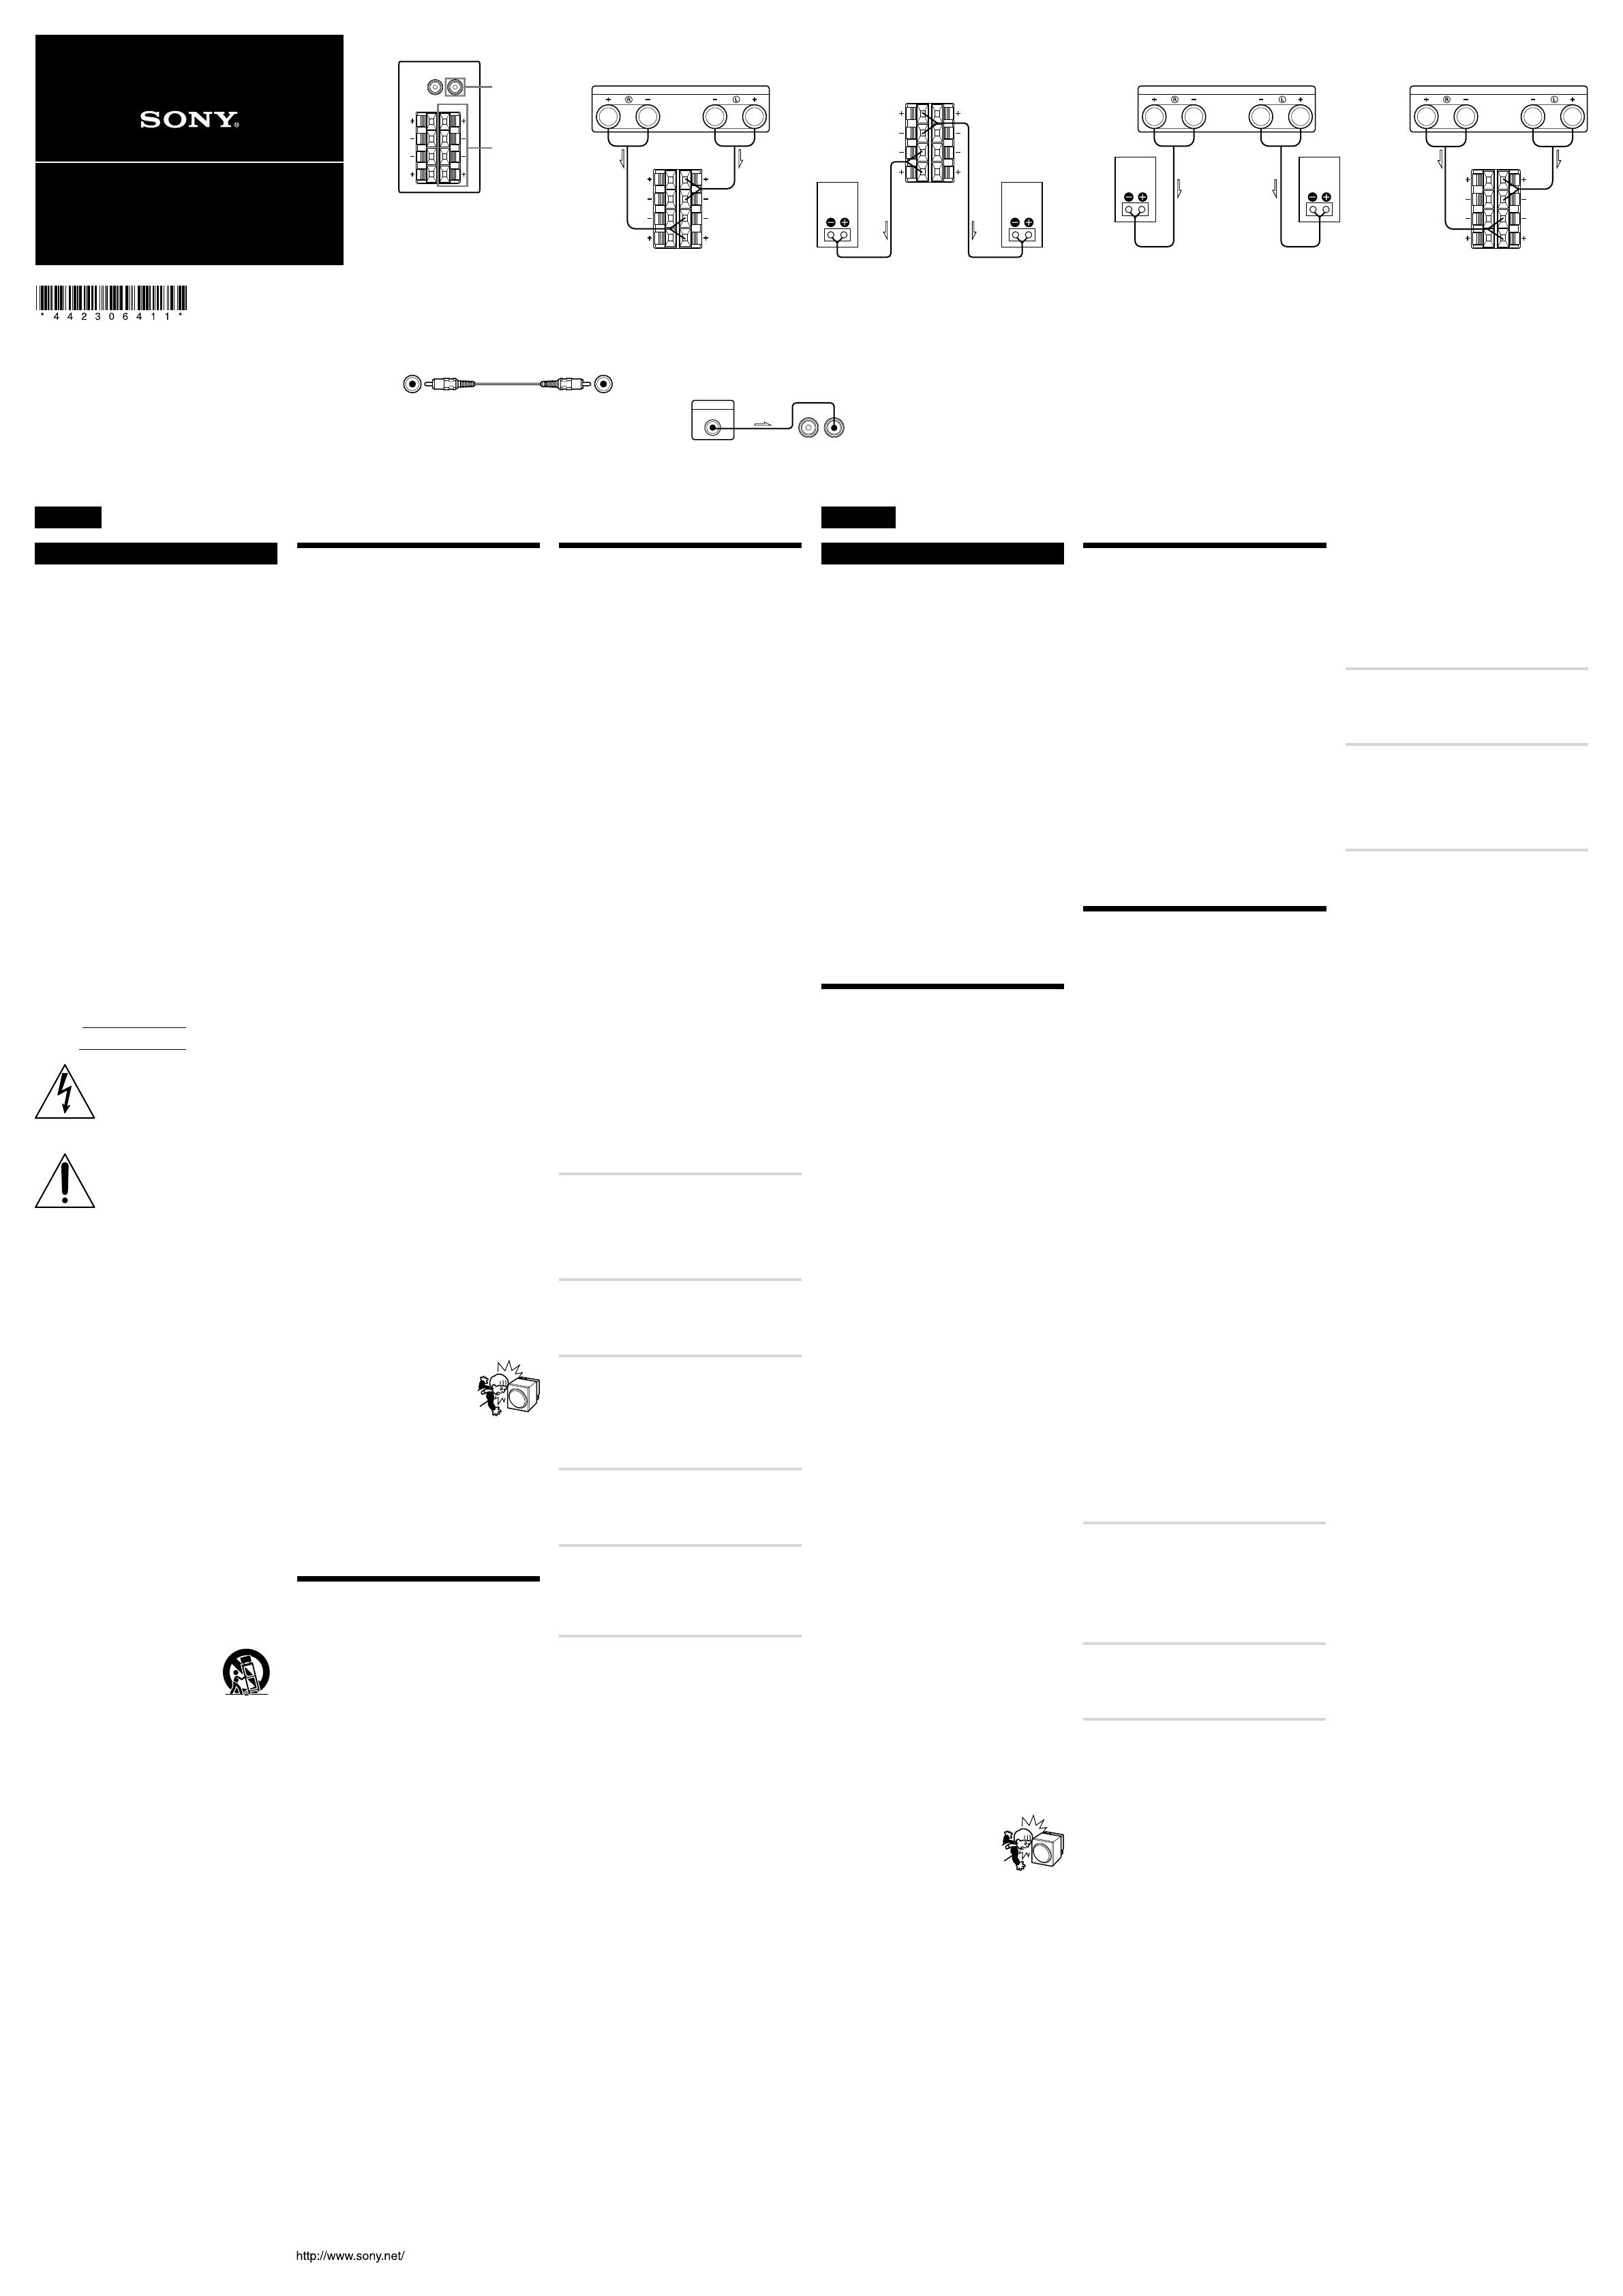
Hooking Up the System
Overview
Use the LINE IN jacks or the SPEAKER IN
terminals of the subwoofer when you connect the
amplier. ()
If your amplier has one of the following types
of output jacks, connect the LINE IN jack and
the amplier’s jack using the supplied audio
connecting cord.
MONO OUT jack
MIX OUT jack
SUBWOOFER output jack(s)
SUPER WOOFER output jack(s)
If your amplier does not have the above
mentioned output jacks, connect the speaker
terminals of the amplier to the SPEAKER IN
terminals instead.
Before you get started
Turn o the power of the amplier and the
subwoofer before making any connection.
Use the audio connecting cords that are
supplied to the respective equipment. If there
are not enough audio connecting cords to
make the necessary connections, you need
to purchase some optional audio connecting
cords.
Be sure to make connections rmly to avoid
noise.
Connect the AC power cord from the
subwoofer to a wall outlet.
You cannot connect the CENTER output jack
for use with Dolby Pro Logic function to the
subwoofer. Bass sound is not output with some
Dolby Pro Logic modes.
Connecting to an amplier with a single
set of speaker terminals
Connect the subwoofer to the amplier and then
connect the front speakers to the subwoofer.
1 Connect the subwoofer to the amplier.
()
Connect the SPEAKER IN terminals of
the subwoofer to the amplier’s speaker
terminals with the speaker cords. Be sure to
connect both L and R channels.
2 Connect the front speakers to the
subwoofer. ()
Connect the speakers to the SPEAKER OUT
terminals of the subwoofer.
Connecting to an amplier with double
(A + B) sets of speaker terminals
If your amplier has double (A + B) sets of
speaker terminals, connect both the subwoofer
and the front speakers to the amplier.
1 Connect the front speakers to the
amplier. ()
Connect the speakers to your amplier’s
SPEAKER A terminals.
2 Connect the subwoofer to the amplier.
()
Connect the SPEAKER IN terminals of the
subwoofer to the amplier’s SPEAKER B
terminals using speaker cords (not supplied).
When using the double (A + B) sets of speakers,
make sure that you select the “A + B” position
with your amplier.
Note
When you are using SPEAKER A terminals only (front
speaker only) or when the power of the amplier is
turned o, turn down the volume or turn o the power
of the subwoofer otherwise, hum noise may be heard.
Connecting to an amplier with a
special jack for a subwoofer
If your amplier has a special jack for a
subwoofer (like a MONO OUT jack, MIX OUT
jack, SUBWOOFER jack or SUPER WOOFER
jack), connect the LINE IN jack of the subwoofer
to one of those jacks using the supplied audio
connecting cord. ()
Hookups
Connect the MONO OUT jack of your amplier
to the LINE IN jack of the subwoofer with the
supplied audio connecting cord. ()
Note
If the output level of your amplier is not large enough,
the sound may not be loud enough. In this case,
connect the speaker terminals of the amplier directly
to the SPEAKER IN terminals of the subwoofer.
—
—
—
—
English
WARNING
To reduce the risk of re or electric shock, do
not expose this apparatus to rain or moisture.
To reduce the risk of re, do not cover the ventilation
opening of the apparatus with newspapers, tablecloths,
curtains, etc.
Do not place the naked ame sources such as lighted
candles on the apparatus.
To reduce the risk of re or electric shock, do not
expose this apparatus to dripping or splashing, and do
not place objects lled with liquids, such as vases, on
the apparatus.
To prevent injury, this apparatus must be securely
attached to the oor/wall in accordance with the
installation instructions.
Do not install the appliance in a conned space, such as
a bookcase or built-in cabinet.
e unit is not disconnected from the mains as long as
it is connected to the AC outlet, even if the unit itself
has been turned o.
As the main plug is used to disconnect the unit from
the mains, connect the unit to an easily accessible
AC outlet. Should you notice an abnormality in the
unit, disconnect the main plug from the AC outlet
immediately.
e mains switch is located on the rear exterior.
For customers in the United States
Owner’s Record
e model and serial numbers are located on the rear of
the unit. Record these numbers in the space provided
below. Refer to them whenever you call upon your Sony
dealer regarding this product.
Model No.
Serial No.
is symbol is intended to alert the user
to the presence of uninsulated
“dangerous voltage” within the
product’s enclosure that may be of
sucient magnitude to constitute a risk
of electric shock to persons.
is symbol is intended to alert the user
to the presence of important operating
and maintenance (servicing)
instructions in the literature
accompanying the appliance.
Important Safety Instructions
1) Read these instructions.
2) Keep these instructions.
3) Heed all warnings.
4) Follow all instructions.
5) Do not use this apparatus near water.
6) Clean only with dry cloth.
7) Do not block any ventilation openings. Install in
accordance with the manufacturer’s instructions.
8) Do not install near any heat sources such as
radiators, heat registers, stoves, or other apparatus
(including ampliers) that produce heat.
9) Do not defeat the safety purpose of the polarized
or grounding-type plug. A polarized plug has two
blades with one wider than the other. A grounding
type plug has two blades and a third grounding
prong. e wide blade or the third prong are
provided for your safety. If the provided plug does
not t into your outlet, consult an electrician for
replacement of the obsolete outlet.
10) Protect the power cord from being walked on
or pinched particularly at plugs, convenience
receptacles, and the point where they exit from the
apparatus.
11) Only use attachments/accessories specied by the
manufacturer.
12) Use only with the cart, stand, tripod, bracket, or
table specied by the manufacturer, or sold with the
apparatus. When a cart is used, use caution when
moving the cart/apparatus combination to avoid
injury from tip-over.
13) Unplug this apparatus during lightning storms or
when unused for long periods of time.
14) Refer all servicing to qualied service personnel.
Servicing is required when the apparatus has been
damaged in any way, such as power-supply cord or
plug is damaged, liquid has been spilled or objects
have fallen into the apparatus, the apparatus has
been exposed to rain or moisture, does not operate
normally, or has been dropped.
To reduce the risk of electric shock, the speaker cord
should be connected to the apparatus and the speakers
in accordance with the following instructions.
1. Disconnect the AC power cord from the MAINS.
2. Strip 10 to 15 mm of the wire insulation of the
speaker cord.
3. Connect the speaker cord to the apparatus and the
speakers carefully so as not to touch the core of
speaker cord by hand.
Also disconnect the AC power cord from the MAINS
before disconnecting the speaker cord from the
apparatus and the speakers.
Installation
Comme l’oreille humaine ne peut pas détecter la
direction ni la position des basses reproduites par un
caisson de grave (en dessous de 200 Hz), vous pouvez
installer le caisson où vous voulez dans la pièce. PourPour
obtenir une meilleure reproduction du grave, il est
toutefois conseillé de l’installer sur un sol ferme, où la
résonnance est peu probable.
Vous pouvez obtenir susamment de grave à partir
d’un seul caisson.
Toutefois, si vous utilisez plusieurs caissons de grave,
les basses seront naturellement plus puissantes.
Remarques
Installez toujours le caisson à la verticale et à
plusieurs centimètres du mur.
Ne pas poser d’objet sur le caisson ni s’asseoir dessus.
Si le caisson est installé au centre d’une pièce, le
son grave est extrêmement aaibli. Ce phénomème
est dû aux ondes stationnaires de la pièce. Le cas
échéant, éloignez le caisson du centre de la pièce,
ou éliminez la cause des ondes stationnaires, en
installant, par exemple, une étagère.
Raccordement du système
Aperçu
Utilisez les prises LINE IN ou les bornes
SPEAKER IN du caisson quand vous raccordez
l’amplicateur. ()
Si votre amplicateur comporte l’un
des modèles de prises de sortie suivants,
raccordez-la à la prise LINE IN et la prise de
l’amplicateur à l’aide du câble de connexion
audio fourni.
Prise MONO OUT
Prise MIX OUT
Prise(s) de sortie SUBWOOFER
Prise(s) de sortie SUPER WOOFER
Si l’amplicateur n’ore aucune des prises de
sortie indiquées, reliez les bornes d’enceintes de
l’amplicateur aux bornes SPEAKER IN.
Avant de commencer
Eteignez l’amplicateur et le caisson de grave
avant de les relier.
Utilisez les cordons audio fournis avec les
diérents appareils. Si vous n’avez pas assez de
cordons pour faire les liaisons nécessaires, vous
devrez acheter des cordons de liaison audio en
option.
Veillez à insérer à fond les ches dans les prises
pour éviter toute source de parasites.
Branchez le cordon d’alimentation secteur du
caisson sur une prise murale.
Vous ne pouvez pas relier la prise de sortie
CENTER à ce caisson pour utiliser la fonction
Dolby Pro Logic. Le son grave n’est pas fourni
par certains modes Dolby Pro Logic.
Raccordement à un amplicateur avec
une seule paire de bornes d’enceintes
Raccordez le caisson de grave à l’amplicateur,
puis les enceintes avant au caisson de grave.
1 Raccordez le caisson de grave à
l’amplicateur. ()
Raccordez les bornes SPEAKER IN
du caisson aux bornes d’enceintes de
l’amplicateur avec les cordons d’enceintes.
Veillez à raccorder les canaux gauche (L) et
droit (R).
2 Raccordez les enceintes avant au caisson
de grave. ()
Raccordez les enceintes aux bornes
SPEAKER OUT du caisson de grave.
—
—
—
—
Raccordement à un amplicateur
avec double paire (A + B) de bornes
d’enceintes
Si votre amplicateur possède une double
paire de bornes d’enceintes (A + B), raccordez
le caisson de grave et les enceintes avant à
l’amplicateur.
1 Raccordez les enceintes avant à
l’amplicateur. ()
Raccordez les enceintes aux bornes
SPEAKER A de votre amplicateur.
2 Raccordez le caisson de grave à
l’amplicateur. ()
Raccordez les bornes SPEAKER IN du
caisson de grave aux bornes SPEAKER B de
l’amplicateur avec des cordons d’enceintes
(non fournis).
Quand vous utilisez la double paire de prises
(A + B), veillez à sélectionner la position
« A + B » sur l’amplicateur.
Remarque
Lorsque vous utilisez les bornes SPEAKER A seulement
(enceintes avant seulement) ou lorsque l’amplicateur
est éteint, réduisez le volume du caisson de grave, ou
éteignez-le, sinon du bruit sera audible.
Raccordement à un amplicateur doté
d’une prise spéciale pour caisson de
grave
Si votre amplicateur comporte une prise
spéciale pour caisson de grave (comme une prise
MONO OUT, MIX OUT, SUBWOOFER ou
SUPER WOOFER), raccordez la prise LINE IN
du caisson à l’une de ces prises à l’aide du câble
de connexion audio fourni. ()
Raccordements
Raccordez la prise MONO OUT de votre
amplicateur à la prise LINE IN du haut-parleur
à l’aide du câble de connexion audio fourni. ()
Remarque
Si le niveau de sortie de l’amplicateur n’est pas
susant, le son peut ne pas être assez puissant. Dans
ce cas, reliez les bornes d’enceintes de l’amplicateur
directement aux bornes SPEAKER IN du caisson.
Français
AVERTISSEMENT
Pour éviter tout risque d’incendie ou de choc
électrique, n’exposez pas l’appareil à la pluie
ou à l’humidité.
Pour eviter tout risque d’incendie, ne couvrez pas les
ailettes de ventilation de cet appareil avec des papiers
journaux, des nappes, des rideaux, etc.
Ne placez de sources de ammes nues telles que des
bougies allumees sur l’appareil.
Pour eviter tout risque d’incendie ou de choc
electrique, n’exposez pas l’appareil a des gouttelettes ou
a des eclaboussures et ne posez pa d’objets contenant
du liquide, comme des vases, sur l’appareil.
Pour eviter les blessures, cet appareil doit etre
fermement xe au sol/mur, conformement aux
instructions d’installation.
N’installez pas l’appareil dans un espace conne, tel
qu’une bibliotheque ou un meuble encastre.
L’appareil n’est pas debranche de la source
d’alimentation secteur tant qu’il reste raccorde a la
prise secteur, meme s’il est eteint.
La che principale etant utilisee pour debrancher
l’appareil de la source d’alimentation secteur, raccordez
l’appareil sur une prise secteur facilement accessible.
Si vous constatez que l’appareil ne fonctionne pas
normalement, debranchez immediatement la che
principale de la prise secteur.
L’interrupteur d’alimentation se trouve au dos a
l’exterieur.
Précautions
Sécurité
Avant d’utiliser le caisson de grave, vériez que sa
tension de fonctionnement est identique à celle du
secteur local.
Si vous prévoyez de ne pas utiliser le caisson pendant
longtemps, débranchez-le de la prise murale. Pour
débrancher le cordon d’alimentation secteur, tirez sur
la che. Ne jamais tirer sur le cordon proprement dit.
Si un liquide ou un solide tombait dans le coret,
débranchez le caisson et faites-le contrôler par un
technicien qualié avant de le remettre en service.
Le cordon d’alimentation secteur doit être changé par
un professionnel seulement.
Avant d’allumer ou d’éteindre l’amplicateur
ou un autre appareil
N’oubliez pas de baisser complètement le volume.
Pour éviter d’endommager le caisson de grave
Réglez avec soin le volume de l’amplicateur pour
éviter toute entrée de son excessive.
Ne pas essayer d’ouvrir le coret ou de modier les
haut-parleurs et les circuits.
Ne pas appuyer sur le cache-poussière, ni
intentionnellement ni par erreur.
Si vous observez des anomalies de couleurs
sur l’écran du téléviseur installé à proximité du
caisson
Le caisson de graves peut être installé près d’un
téléviseur car ce système acoustique est à blindage
magnétique. Mais il est possible d’observer des
anomalies de couleurs avec certains types de téléviseur.
Si vous observez des anomalies de couleurs...
tEteignez le téléviseur, puis rallumez-le 15 à
30 minutes plus tard.
S’il n’y a aucun changement...
tPlacez le caisson de graves un peu à l’écart du
téléviseur.
En cas de réaction acoustique
Changez l’emplacement des enceintes ou baissez le
volume de l’amplicateur.
Installation
Ne pas installer le caisson de grave près d’une source
de chaleur, comme un radiateur ou une bouche d’air
chaud, dans un endroit en plein soleil ou exposé à de
la poussière, des vibrations ou des chocs mécaniques.
Une bonne ventilation est essentielle pour éviter une
surchaue interne du caisson. Installez le caisson
dans un endroit où la circulation d’air est susante.
Ne pas l’installer sur une surface molle ou trop près
d’un mur pour ne pas boucher l’orice de ventilation
à l’arrière du caisson.
Faites attention si le caisson de graves doit être posé
sur une sol traité (ciré, huilé, poli, etc.) car il peut salir
ou décolorer le sol.
Veillez à ne pas vous blesser en heurtant les coins du
caisson.
Nettoyage du coret
Nettoyez le coret avec un chion doux légèrement
imprégné d’eau. Ne pas utiliser de tampons abrasifs,
poudre à récurer ou diluant, comme l’alcool ou la
benzine.
Pour toute question ou problème au sujet
du caisson de grave, veuillez contacter votre
revendeur Sony le plus proche.
Active Subwoofer
SA-W3000
4-423-064-11(1)
LINE
OUT
L L
RR
IN
OUT IN
SPEAKER
LINE IN
SPEAKER IN
Amplifier
Amplificateur
This subwoofer
Caisson de grave
l: Signal ow
Sens du signal
This subwoofer
Caisson de grave
l: Signal ow
Sens du signal
Front
speaker (R)
Enceinte
avant (D)
Front
speaker (R)
Enceinte
avant (D)
Front
speaker (L)
Enceinte
avant (G)
l: Signal ow
Sens du signal
Front
speaker (L)
Enceinte
avant (G)
SPEAKER B
OUT
L L
RR
IN
SPEAKER
Amplifier
Amplificateur
This subwoofer
Caisson de grave
l: Signal ow
Sens du signal
Amplifier
Amplificateur
This subwoofer
Caisson de grave
l: Signal ow
Sens du signal
Amplifier
Amplificateur

