Graco NAUTILUS ELITE User manual

Category
Car seat
Type
User manual
© 2007 Graco ISPC110BB 12/07 US
READ THIS MANUAL
Do not install or use this child restraint until you read and understand the instructions in this manual.
FAILURE TO PROPERLY USE THIS CHILD RESTRAINT INCREASES THE RISK OF SERIOUS
INJURY OR DEATH IN A SUDDEN STOP OR CRASH.
Child Restraint/Booster Seat
Owners Manual
2
Table of Contents
1.0 Warnings to Parents and Other Users
........................4
2.0 Registration Information .........5
2.1 Register Your Child Restraint 5
2.2 Recall Information..........5
2.3 If You Need Help ..........5
3.0 Features ...................6-7
4.0 Assembling the Child Restraint 8-12
5.0 Important Information .......13-14
6.0 Height and Weight Limitations ...15
6.1 WITH Built-in Harness......15
6.2 WITHOUT Built-in Harness ..16
6.3 WITHOUT Back Support....17
7.0 Choosing an Appropriate Vehicle
Seat Location ...............18
7.1 Vehicle Seat Location Requirements
.......................18
7.2 Vehicle Seat Belt Requirements
......................19
7.3 SAFE Vehicle Seat Belt
Systems ................19
7.4 For Built-in Harness Only ...20
7.5 WITH or WITHOUT Built-in
Harness ....................21
7.6 To Install Locking Clip ......22
7.7 UNSAFE Vehicle Belt Systems
.....................23-24
8.0 LATCH......................25
9.0 Using Child Restraint WITH Built-in
Harness .................26-31
10.0 Securing the Child Restraint in Your
Vehicle .....................32
10.1 Using a Child Restraint WITH a
Built-in Harness ..........32
10.2 With a Vehicle Lap or
Lap/shoulder belt ......32-33
10.3 With LATCH ..........34-35
11.0 Securing Your Child in the
Child Restraint ............36-37
3
Table of Contents (cont.)
12.0 Harness Removal .........38-42
13.0 Using Your Child Restraint WITHOUT
Built-in Harness ...........43-45
14.0 Securing Child & Booster Seat in ..
Vehicle ....................46
15.0 Adjusting Head Support........47
16.0 Removing Back Support ....48-50
17.0 Securing Child in Vehicle Belt with
Shoulder Belt Positioning Clip 51-54
18.0 Using the Tether ..............55
18.1 Storing LATCH and Tether..56
19.0 Airplane Use ................57
20.0 Accessories .................58
21.0 Recline Foot ................59
22.0 Care and Maintenance ........60
23.0 To Remove Seat Cover ........61
24.0 Owners Manual Storage .......62
25.0 Replacement Parts and Warranty 64
4
1.0 Warnings to Parents and Other Users
Failure to properly use this child restraint increases the risk of serious injury or death in a sharp
turn, sudden stop or crash. Your child’s safety depends on you installing and using this child
restraint correctly.
Even if using this child restraint seems easy to gure out on your own, it is very important to READ
THE OWNER’S MANUAL and the vehicle owner’s manual.
Your child’s safety depends on:
1. Choosing the correct mode of use for the child restraint depending on your child’s size.
2. Inserting the harness straps (if needed) in the proper slots for your child.
3. Selecting a suitable location for the child restraint in your vehicle.
4. Properly routing the vehicle seat belt or LATCH.
5. Properly securing the child restraint in the vehicle using a seat belt designed to restrain
both the child restraint and your child or by using LATCH. Many seat belts are NOT safe to use
with this child restraint, even though they can easily be threaded through or around the child
restraint!
6. Properly securing your child in the child restraint.
5
2.0 Registration Information
Model Number:
Manufactured in:
Purchase Date:
2.1 Register Your Child Restraint
Please ll in the above information. The model
number and manufactured in (date) can be found
on a label underneath your child restraint. Fill out
the prepaid registration postcard attached to the
harness and mail it today.
Child restraints could be recalled for safety reasons.
You must register this restraint to be reached in a
recall. Send your name, address, and the restraint’s
model number and manufacturing date to:
Graco Children’s Products Inc.
150 Oaklands Blvd. Exton, PA, 19341
or call 1-800-345-4109
or register online at:
http://www. gracobaby.com/carseatregistration
2.2 For Recall Information
Please contact our Customer Service
Department with any questions you may
have concerning parts, use, or
maintenance. When you contact us, please
have your product’s model and manufac-
tured in (date) ready so that we may help
you efciently. These numbers can be
found on a label on the underside of your
child restraint.
USA: 1-800-345-4109
or www.gracobaby.com
Call the U.S. Government’s Vehicle Safety
Hotline at: 1-888-327-4236
(TTY:1-800-424-9153),
or go to http://www.NHTSA.gov
or contact Graco: 1-800-345-4109
or www.gracobaby.com
2.3 If You Need Help
6
3.0 Features
Crotch strap
Harness buckle
Harness
clip
Vehicle belt
guide
Cupholder
Harness
adjuster
lever
(above strap)
Adjustment
strap
Harness
covers
Harness slots
Height adjust
button
Shoulder belt guide
Recline
handle
Storage compartment
(one on each side)
Body support
Head
support
Recline
foot
7
LATCH
Tether
storage bar
Release
buttons
Harness slots
(behind straps)
LATCH
adjuster
Harness
straps
Locking
clip
Tether
strap
Red Rollers
(behind straps)
Strap
guides
(behind straps)
LATCH
LATCH
storage bars
(on each side
of seat)
The locking clip is stored
on the back of the child
restraint. You will need
to use it with certain
types of vehicle seat
belts.
United States Federal
Motor Vehicle Safety
Standards have dened
a new system for
installing child restraints
in vehicles. The system
is called LATCH (Lower
Anchorage and Tether
for CHildren). LATCH
may ONLY be used
IN PLACE of vehicle belt
if vehicle is equipped
with LATCH anchor
points. Please refer to
vehicle owners manual
for LATCH locations in
vehicles.
8
1. Lay child restraint flat on back with armrests
out to either side of base. Grab seat pad fabric in
sitting area to expose the gutters .
MAKE SURE all hands, fingers and other objects
are clear of the gutters.
2. MAKE sure the harness straps are securely
attached within the “T”-shaped slots around the
arms as shown Ë.
With your other hand, raise seat back so that
both arms LOCK into the gutters Ì.
KEEP GUTTERS CLEAR
KEEP GUTTERS CLEAR
Arm
Harness Strap
T-slot
4.0 Assembling the Child Restraint
Adult assembly required.
Ë
Ì
9
3. Arms should CLICK into the gutters.
Seat assembly should appear as shown Í.
4. To attach armrests line up armrest with
slots on seat Î.
Rotate armrest into place until you hear a
“click”. Repeat for other armrest.
CLICK!
CLICK!
Í
Î
10
DO NOT use this
car seat after December
NO use este asiento para
autos después de Diciembre
NE PAS utiliser ce siège
d'auto après décembre
2013
Ð
5. Attach 4 elastic loops from the seat pad under
the seat exactly as shown in Ï .
6. Pull elastic loop on the seat pad through the
vehicle belt guide on side of seat and attach to
hook as shown Ð. Repeat on other side.
Ï
11
7. Squeeze height adjust button Ñ and push
head support into slots Ò on the back support
as shown. Head support will click into the back
support.
You may need to unfasten the hook and loop
attachment tape on both sides at the top of
the back support to allow for easier access to
the slots.
Always use child restraint with head support
installed and properly adjusted.
.
CLICK!
Ò
Ñ
12
8. The assembly is now complete.
13
5.0 Important Information
DO NOT use locking clip in booster mode.
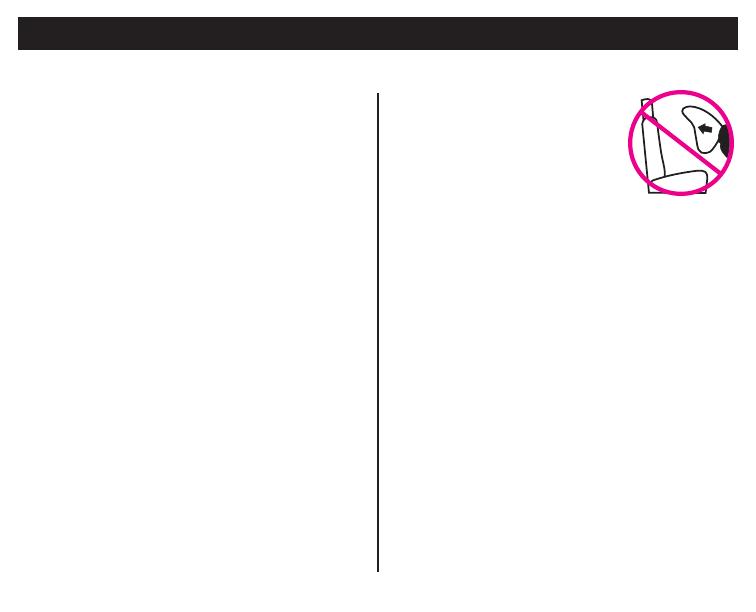
NEVER PLACE THIS
CHILD RESTRAINT IN A
VEHICLE SEATING
LOCATION THAT HAS A
FRONT AIR BAG. If an air bag
inates, it can hit the child and child restraint
with great force and cause serious injury or
death to your child. Refer to your vehicle
owner’s manual for information about side air
bags and child restraint installation.
According to accident statistics,
CHILDREN ARE SAFER WHEN PROPERLY
RESTRAINED IN REAR VEHICLE
SEATING POSITIONS, RATHER THAN
FRONT SEATING POSITIONS. For a
vehicle with a front passenger air bag, refer to
your vehicle owner’s manual as well as these
instructions for child restraint installation.
NEVER LEAVE YOUR CHILD
UNATTENDED.
• NO CHILD RESTRAINT CAN GUARANTEE
PROTECTION FROM INJURY. However,
proper use of this child restraint reduces the
risk of serious injury or death to your child.
DO NOT INSTALL OR USE THIS CHILD
RESTRAINT UNTIL YOU READ AND
UNDERSTAND THE INSTRUCTIONS IN THIS
MANUAL AND IN YOUR VEHICLE OWNER’S
MANUAL. DO NOT let others install or use the
child restraint unless they understand how to
use it.
FAILURE TO PROPERLY USE THIS CHILD
RESTRAINT INCREASES THE RISK OF
SERIOUS INJURY OR DEATH IN A SHARP
TURN, SUDDEN STOP OR CRASH. Your child
can be injured in a vehicle even if you are not
in a crash. Sudden braking and sharp turns
can injure your child if the child restraint is not
properly installed or if your child is not properly
secured in the child restraint.
DO NOT USE LATCH and/or tether in
booster mode.
14
NEVER LEAVE A CHILD RESTRAINT
UNSECURED IN YOUR VEHICLE. An
unsecured child restraint can be thrown around
and may injure occupants in a sharp turn,
sudden stop or crash. Remove it or make sure
that it is securely belted in the vehicle. If not
using LATCH and tether, make sure LATCH
and tether connectors are properly stored on
back of seat.
REPLACE THE CHILD RESTRAINT AFTER
AN ACCIDENT OF ANY KIND. An accident
can cause damage to the child restraint that
you cannot see.
STOP USING
CHILD
RESTRAINT AND
THROW IT AWAY
after the date
molded onto the
bottom of the child
restraint as shown.
DO NOT MODIFY YOUR CHILD
RESTRAINT or use any accessories or parts
supplied by other manufacturers.
NEVER USE CHILD RESTRAINT IF IT HAS
DAMAGED OR MISSING PARTS. Do not use
a cut, frayed or damaged child restraint
harness, LATCH belt or vehicle seat belt.
THE CHILD RESTRAINT CAN BECOME
VERY HOT IF LEFT IN THE SUN. Contact with
these parts can burn your child’s skin. Always
touch the surface of any metal or plastic parts
before putting your child in the child restraint.
THIS CHILD RESTRAINT CONFORMS to
all applicable Federal Motor Vehicle Safety
Standards and is certied for use in motor
vehicles. It is certied for use in Aircraft only
when used with the built-in harness. When used
as a booster without the harness, this restraint
is not certied for use in aircraft.
NEVER GIVE THIS CHILD RESTRAINT to
someone else without also giving them this
manual.
NEVER USE A SECOND-HAND CHILD
RESTRAINT or a child restraint whose history
you do not know.
DO NOT USE THIS child restraint without
properly assembling it.
DO NOT use this
car seat after December
NO use este asiento para
autos después de Diciembre
NE PAS utiliser ce siège
d'auto après décembre
2013
15
FAILURE TO USE CHILD RESTRAINT IN A MANNER APPROPRIATE FOR YOUR CHILD’S
SIZE MAY INCREASE THE RISK OF SERIOUS INJURY OR DEATH. Instructions for the use of
this child restraint differ greatly depending on the size of your child. Be sure you are using the child
restraint in the correct mode and with the correct features for your child.
6.0 Height and Weight Limitations
Your child must meet all requirements:
• Weight: 20 to 65 lbs (mass between 9 and 29.5 kg)
• Height: 27 to 52 inches (69 and 132 cm) in height
At least one year old and can sit upright unassisted
• Shoulders are BELOW top harness slots.
If shoulders are above top harness slots, child
is too large for built-in harness.
6.1 WITH Built-In Harness
16
6.2 WITHOUT Built-in Harness
Your child must meet all requirements:
• Weight: 30 to 100 lbs
(mass between 13.6 and 45 kg)
• Height: 38 to 57 inches
(96 and 145 cm) in height
• approximately 3-10 years of age
• the shoulder belt MUST lie across child’s
shoulder as shown and the lap portion of the
belt is positionned low on the child’s hips.
• Child’s ears are BELOW top of booster seat.
If tops of ears are above top of seat, child is too
large for booster seat.
If child is between 30 and 65 lbs and
shoulders are below the upper harness
slots, we highly recommend use of the
built-in harness for as long as possible
(up to 65 lbs).
17
6.3 WITHOUT Back Support
Your child must meet all requirements:
• weigh between 40 and 100 lbs.
(mass between 18 and 45 kg),
• and are between 40 and 57 inches
(101 and 145 cm) in height,
• approximately 4-10 years of age
• the shoulder belt MUST lie across child’s
shoulder as shown and the lap portion of the
belt is positionned low on the child’s hips.
When sitting on the booster seat, your child’s
ears should be below the top of the vehicle seat
cushion / head rest.
Your Graco booster seat can be used with or
without the back support as long as all
requirements are met.
18
7.0 Choosing an Appropriate Vehicle Seat Location
7.1 Vehicle Seat Location Requirements
Some seating positions in your vehicle may not be safe for this child restraint. Some vehicles do
not have any seating positions that can be used safely with the child restraint. If you are not sure
where to place the child restraint in your vehicle, consult your vehicle owner’s manual or call
Graco Children’s Products Inc.,1-800-345-4109.
Children are safer when properly
restrained in rear vehicle seating positions.
Whenever possible secure the child restraint in
the center position of the seat directly behind
the front seats. However, this position is
sometimes equipped with a lap belt only and
cannot be used when this child restraint is
used without the built-in harness.
• The vehicle seat must face forward.
• Front of child restraint must not hang over
edge of vehicle seat.
IMPROPER PLACEMENT OF THE CHILD RESTRAINT
INCREASES THE RISK OF SERIOUS INJURY OR DEATH.
19
7.2 Vehicle Seat Belt Requirements
7.3 SAFE Vehicle Seat Belt Systems
MANY SEAT BELT SYSTEMS ARE NOT SAFE TO USE
WITH THE CHILD RESTRAINT. THE VEHICLE SEAT BELT
MUST BE DESIGNED TO HOLD THE CHILD RESTRAINT
TIGHTLY AT ALL TIMES. Pay careful attention to these systems; some of the seat belts that
are not safe to use look very much like seat belts that are safe to use. If you are unsure,
consult your vehicle owner’s manual or call Graco Children’s Products Inc., 1-800-345-4109.
THE FOLLOWING BELT SYSTEMS CAN BE USED WITH YOUR CHILD RESTRAINT, IF the
seat location meets all other requirements of these instructions and those in your vehicle owner's
manual. LATCH can be used in place of the following vehicle belt systems if your vehicle is
equipped with LATCH anchor points. Please refer to vehicle owners manual for LATCH locations.
20
7.4 For Built-in Harness Only
Lap Belts - Manually Adjusted
When buckled, the belt is tightened
manually by pulling on the excess belt.
Lap Belts with Automatic Locking
Retractor (ALR)
The automatic locking retractor will not
permit the lap belt to lengthen once it is
buckled. Tighten the belt by feeding the belt
back into the retractor while pushing down
hard on the child restraint.
  • Page 1 1
  • Page 2 2
  • Page 3 3
  • Page 4 4
  • Page 5 5
  • Page 6 6
  • Page 7 7
  • Page 8 8
  • Page 9 9
  • Page 10 10
  • Page 11 11
  • Page 12 12
  • Page 13 13
  • Page 14 14
  • Page 15 15
  • Page 16 16
  • Page 17 17
  • Page 18 18
  • Page 19 19
  • Page 20 20
  • Page 21 21
  • Page 22 22
  • Page 23 23
  • Page 24 24
  • Page 25 25
  • Page 26 26
  • Page 27 27
  • Page 28 28
  • Page 29 29
  • Page 30 30
  • Page 31 31
  • Page 32 32
  • Page 33 33
  • Page 34 34
  • Page 35 35
  • Page 36 36
  • Page 37 37
  • Page 38 38
  • Page 39 39
  • Page 40 40
  • Page 41 41
  • Page 42 42
  • Page 43 43
  • Page 44 44
  • Page 45 45
  • Page 46 46
  • Page 47 47
  • Page 48 48
  • Page 49 49
  • Page 50 50
  • Page 51 51
  • Page 52 52
  • Page 53 53
  • Page 54 54
  • Page 55 55
  • Page 56 56
  • Page 57 57
  • Page 58 58
  • Page 59 59
  • Page 60 60
  • Page 61 61
  • Page 62 62
  • Page 63 63
  • Page 64 64
  • Page 65 65
  • Page 66 66
  • Page 67 67
  • Page 68 68
  • Page 69 69
  • Page 70 70
  • Page 71 71
  • Page 72 72
  • Page 73 73
  • Page 74 74
  • Page 75 75
  • Page 76 76
  • Page 77 77
  • Page 78 78
  • Page 79 79
  • Page 80 80
  • Page 81 81
  • Page 82 82
  • Page 83 83
  • Page 84 84
  • Page 85 85
  • Page 86 86
  • Page 87 87
  • Page 88 88
  • Page 89 89
  • Page 90 90
  • Page 91 91
  • Page 92 92
  • Page 93 93
  • Page 94 94
  • Page 95 95
  • Page 96 96
  • Page 97 97
  • Page 98 98
  • Page 99 99
  • Page 100 100
  • Page 101 101
  • Page 102 102
  • Page 103 103
  • Page 104 104
  • Page 105 105
  • Page 106 106
  • Page 107 107
  • Page 108 108
  • Page 109 109
  • Page 110 110
  • Page 111 111
  • Page 112 112
  • Page 113 113
  • Page 114 114
  • Page 115 115
  • Page 116 116
  • Page 117 117
  • Page 118 118
  • Page 119 119
  • Page 120 120
  • Page 121 121
  • Page 122 122
  • Page 123 123
  • Page 124 124
  • Page 125 125
  • Page 126 126
  • Page 127 127
  • Page 128 128

Graco NAUTILUS ELITE User manual

Category
Car seat
Type
User manual

Ask a question and I''ll find the answer in the document

Finding information in a document is now easier with AI

in other languages