GMC 2019 Acadia User guide

Category
Cars
Type
User guide

This manual is also suitable for

Review this Quick Reference Guide for an overview of some important features in your
GMC Acadia. Some optional equipment described in this guide may not be included in your
vehicle. More information can be found in your Owner’s Manual and at my.gmc.com/learn.
For easy reference, keep this guide with your Owner’s Manual in your glove box.
gmc.com
2019 ACADIA
GETTING TO KNOW YOUR
Certain restrictions, precautions, and safety procedures apply to your vehicle.
Please read your Owner’s Manual for complete instructions.
2
Memory
Seat
Buttons
Instrument
Panel
Illumination
Control
Turn Signal Lever/
Exterior Lamp
Controls/IntelliBeam
Button
F
Windshield
Wipers Lever
Engine
Start-Stop
Button
Driver
Information
Center
Power
Liftgate
Control
Cruise Control/
Forward Collision
Alert
F
/Heated
Steering Wheel
F
Buttons
Power
Mirror/
Window
Controls
Audio Volume
Controls
(behind
steering
wheel)
Driver
Information
Center
Controls/Voice
Recognition
Buttons
Audio Next-
Previous Favorite
Station Controls
(behind steering
wheel)
Steering
Wheel
Adjustment
Lever
Electric
Parking Brake
Switch
INSTRUMENT PANEL
Check Engine
Engine Oil Pressure
Lane Keep Assist
Airbag Readiness
Cruise Control Set
Service Electric
Parking Brake
Traction Control/
StabiliTrak Active
Charging System
Security
Seat Belt Reminder
Brake System Warning
BRAKE
Electric Parking Brake
Symbols
3
Refer to your Owner’s Manual to
learn about the information being
relayed by the lights, gauges
and indicators on the instrument
cluster.
See In Brief in your Owner’s Manual.
Infotainment System
Touch Screen
Infotainment
System Controls
Traction Control
and StabiliTrak
Button
Driver’s Heated/
Ventilated Seat
Buttons
F
Hazard
Warning
Flashers
Button
USB Ports/
Accessory
Power Outlet
Climate
Controls
Passenger’s
Heated/Ventilated
Seat Buttons
F
IntelliBeam Lighting
Lights On Reminder
Antilock Brake System
Warning
Low Tire Pressure
Power Steering Warning
Vehicle Ahead
StabiliTrak Off
2
Passenger Seat Belt
Reminder
F
Optional equipment
4
REMOTE KEYLESS ENTRY TRANSMITTER
Lock
Press to lock all
doors.
Unlock
Press to unlock the
driver’s door. Press
again to unlock all
doors.
Power Liftgate
Press twice to open
or close the liftgate. Press once to stop
power liftgate operation.
Vehicle Locator/Panic Alarm
Press and release to locate your vehicle.
Theexteriorlampswillashandthehorn
will sound.
Press and hold to activate the alarm. Press
again to cancel the alarm.
Note: To change the remote lock, unlock, and
remote start settings, go to Settings > Vehicle
> Remote Lock, Unlock, Start.
Remote Vehicle Start
Press and release the Lock button
and then immediately press and hold the
buttonuntiltheturnsignallampsash
to start the engine from outside the vehicle.
After entering the vehicle, turn on the
ignition.
During a remote start, the engine will
run for 15 minutes. Repeat these steps
to run the engine for an additional 15
minutes. A remote start can be extend-
ed once.
Press and hold the
button until
theparkinglampsturnotocancela
remote start.
Remote Start and Heated/Ventilated
Seats
F
: Select the remote start heated
and ventilated seat options in the Vehicle
Settings to have the heated or ventilated
seats turn on during a remote start. The
seat button indicators do not illuminate
and the temperature of the unoccupied
seat may be reduced during a remote start.
The Keyless Access System enables operation of the doors, ignition and liftgate without
removing the Remote Keyless Entry transmitter from your pocket or purse. The transmitter
must be within 3 feet of the door being unlocked or within 3 feet of the liftgate.
KEYLESS UNLOCKING
With the transmitter within range:
Press the Lock button on the driver’s door handle to unlock the driver’s door; press it
again within 5 seconds to unlock all doors.
Press the Lock button on a passenger door handle to unlock all doors.
Press the touchpad on the liftgate handle to open the liftgate.
KEYLESS LOCKING
Withtheignitiono,thetransmitterremovedfromthevehicle,andalldoorsclosed:
Press the Lock button on any door handle to lock all doors immediately.
If Passive Locking is turned on, all doors will lock automatically after a short delay.
Note: To change the keyless locking and unlocking settings, go to Settings > Vehicle > Remote
Lock, Unlock, Start.
See Keys, Doors and Windows in your Owner’s Manual.
KEYLESS ACCESS SYSTEM
See Keys, Doors and Windows in your Owner’s Manual.
5
KEYLESS (PUSHBUTTON) START
AUTO ENGINE STOP/START OPERATION
The Remote Keyless Entry transmitter must be in the vehicle to turn on the ignition.
STARTING THE ENGINE
With the vehicle in Park or Neutral, press
the brake pedal and then press the
ENGINE START/STOP button to start the
engine. The green indicator on the button
will illuminate.
Note: If the Remote Keyless Entry transmitter
battery is weak, place the transmitter in the
pocket in the center console storage area
to enable the engine to start. Replace the
transmitter battery as soon as possible.
STOPPING THE ENGINE/OFF
Shift to Park and press the ENGINE START/STOPbuttontoturnotheengine.
Power will be available for 10 minutes to operate the audio system until the driver’s door is
opened and to operate the windows and sunroof
F
until any door is opened.
ACCESSORY MODE
WiththeengineoandthebrakepedalNOTdepressed,presstheENGINE START/STOP
button to place the ignition system in the accessory mode. The amber indicator on the
button will illuminate.
See Driving and Operating in your Owner’s Manual.
A fuel-saving stop/start system has been integrated with the 2.5L engine. While driving,
when the brake pedal is applied and the vehicle is at a complete stop, the automatic engine
stop/startsystemmayturnotheengine,dependingonoperatingconditions.Whenthe
engineiso,thetachometergaugewillreadAUTOSTOP.Uponreleasingthebrakepedalor
applying the accelerator pedal, the engine will restart. After parking the vehicle and turning
otheengine,thetachometergaugewillreadOFF.
The engine may remain running or restart when the vehicle is stopped if:
A minimum vehicle speed is not reached.
The engine or transmission is not at the required operating temperature.
The outside temperature is not in the required operating range.
The shift lever is in any gear other than Drive (D).
The battery charge is low.
The current settings for the climate control or defog system have not been reached.
The Auto Stop time is greater than 2 minutes.
See Driving and Operating in your Owner’s Manual.
F
Optional equipment
6
POWER SEAT ADJUSTMENTS
F
A. Seat Adjustment
Move the horizontal control to move the
seat forward or rearward and to tilt, raise
or lower the seat.
B. Seatback Recline Adjustment
Move the vertical control to recline or
raise the seatback.
C. Lumbar Support Adjustment
Press the rear control to adjust the
amount of lumbar support.
SET MEMORY SEAT POSITIONS
F
With the ignition On or in Accessory mode:
1. Adjust the seat and power outside mirrors
to the desired positions.
2. Press and release the SET button on the
driver’s door. A beep will sound.
3. Immediately press and hold button 1
until two beeps sound.
Repeat these steps using button 2 for a
second driver.
To store a seat position for more clearance when exiting the vehicle, repeat these steps
using the
Exit button instead of button 1 or 2.
RECALL MEMORY SEAT POSITIONS
F
Press and hold button 1, 2 or Exit until the seat and mirrors reach the set position.
The memory/exit positions can be programmed to be recalled automatically.
To set the Auto Memory Recall or Easy Exit options, go to Settings > Vehicle > Comfort
and Convenience.
See Seats and Restraints in your Owner’s Manual.
FRONT SEATS
STEERING WHEEL ADJUSTMENT
With the vehicle parked, push down the lever or use the power control
F
on the left side
of the steering column to adjust the steering wheel. The steering wheel can be moved up
or down and in or out. Pull up the lever to lock the steering wheel in place.
See Instruments and Controls in your Owner’s Manual.
F
Optional equipment
A
C
B
7
ENTER OR EXIT THE 3RD-ROW SEATS
1. Remove anything on the 2nd-row seat or the
oorinfrontoforbehindtheseat.
2. Pull the lever on top of the seatback (A) and
pull the seat forward. The driver’s side seat
will tip and slide forward; the passenger’s
side seat will tip, pitch and slide forward.
3. After entering/exiting, push or pull the seat-
back rearward until the seat locks in place.
SLIDE THE 2ND-ROW SEAT
Lift the bar under the seat cushion to slide
the seat forward or rearward.
RECLINE THE 2ND-ROW SEAT
Pull the lever on the side of the seat cushion (B)
and move the seatback to the desired position.
Release the lever.
FOLD THE 2ND-ROW SEATBACK
1. Press the button on the head restraint. It will
fold automatically.
2. Pull the lever on the side of the seat cushion
(B) and fold the seatback forward or, from
the cargo area, pull the top lever (driver’s
side seat) or bottom lever (passenger’s side
seat) located on the driver’s side of the
cargo area (C).
FOLD THE 3RD-ROW SEATBACK
1. Remove anything on the 3rd-row seat or the
oorinfrontoforundertheseat.
2. Pull the strap on the seatback and push the
seatback forward.
3. To raise the seatback, pull the strap on the
seatback or push up the seatback from
inside the vehicle until it locks in place.
Note: The 3rd-row seat can be reclined. It does
not slide.
REAR SEAT REMINDER
A Rear Seat Reminder message may display on
the Driver Information Center when the vehicle is
turnedo.Checktherearseatbeforeexitingthe
vehicle. The system does not actually detect objects in the rear seat; instead, under certain
conditions, it detects when a rear door is opened and closed during a trip, indicating that
there may be something in the rear seat.
REAR SEATS
See Seats and Restraints in your Owner’s Manual.
B
C
A
8
POWER LIFTGATE
OPEN/CLOSE THE POWER LIFTGATE
Press the Power Liftgate button on the
Remote Keyless Entry transmitter twice.
Press the
Power Liftgate knob on the
driver’s door (A).
Press the touchpad (B) on the liftgate
handle to open the liftgate.
Press the button (C) next to the liftgate
latch to close the liftgate.
PROGRAMMING THE LIFTGATE HEIGHT
1. Turn the Power Liftgate knob to the 3/4
mode position.
2. Open the liftgate.
3. Adjust the liftgate manually to the
desired height.
4. To save the setting, press and hold the
button next to the liftgate latch (C) for
3seconds.Theturnsignalswillashwhen
the setting is saved.
HANDS-FREE OPERATION
F
To open or close the liftgate hands-free,
kick your foot straight under the left corner
of the rear bumper. The Remote Keyless
Entry transmitter must be within 3 feet of
the liftgate.
ELECTRIC PARKING BRAKE
To apply the parking brake, press the
Parking Brake switch.
To release the parking brake, turn on the
ignition, press the brake pedal, and then
press the
switch.
Note: The parking brake will release
automatically if the vehicle is running, placed
into gear and an attempt is made to drive.
See Driving and Operating in your Owner’s Manual.
F
Optional equipment
See Keys, Doors and Windows in your Owner’s Manual.
C
A
B
B
9
REAR WIPER
Turn the end of the lever to activate the
rear wiper.
OFF
INT Intermittent
Wipes
ON
Rear Washer Fluid
Push the lever away
from you to spray
washeruidonthe
rear window.
LIGHTING
EXTERIOR LAMPS
Rotate the outer band on the turn signal lever to activate the exterior lamps.
O/On
AUTO Automatic Headlamp System
Automatically activates the Daytime Running
Lamps (DRLs) or the headlamps and other
exterior lamps depending on outside light
conditions.
Parking Lamps
Headlamps
Fog Lamps
Rotatetheinnerbanddowntoturnthefoglampsonoro.
INTELLIBEAM SYSTEM
F
TheIntelliBeamsystemautomaticallyturnsthehigh-beamheadlampson/obasedon
tracconditions.Agreen
indicator displays on the instrument cluster when the system
is on; a blue indicator displays when the high-beam headlamps are on.
Press the
buttonontheendoftheleverwiththelampcontrolintheAUTOor
Headlampspositiontoturntheautomatichigh-beamsystemonoro.
Note: IntelliBeam activates the high-beam headlamps only when driving over 25 mph. The system
is turned o if the fog lamps are turned on.
See Lighting in your Owner’s Manual.
F
Optional equipment
WINDSHIELD WIPERS
Raise or lower the lever to activate the
wipers.
HI Fast Wipes
LO Slow Wipes
INT Intermittent Wipes
Rotate the band
to adjust the delay
between wipes. The
wipers activate more
often as the band is
rotated upward.
OFF
1x Single Wipe
Washer Fluid
Pull the lever toward you to spray washer
uidonthewindshield.
WIPERS AND WASHERS
See Instruments and Controls in your Owner’s Manual.
10
AUTOMATIC CLIMATE CONTROLS
Driver’s
Temperature
Control
A/C
Air Conditioning
Control
Vent Mode
Defrost
Mode
Defog
Mode
Passenger’s
Temperature
Control
Fan Speed
Control/Power
On-Off
Recirculation
Mode
Floor Mode
Bi-level
Mode
SYNC
Link passenger’s
temperature setting to
driver’s temperature
setting
REAR
Rear Window
Defog/Heated
Outside Mirror
F
Control
AUTO
Automatic
Operation
F
Optional equipment
AUTOMATIC OPERATION
PressAUTO.
Set the temperature.
The system automatically controls the fan speed, air delivery, air conditioning and
recirculation to reach the set temperature. Allow time for the system to reach the desired
temperature. If the functions are manually adjusted, full automatic operation is canceled.
REAR CLIMATE CONTROLS
The rear climate control settings can be adjusted using the rear climate control buttons on
the rear of the center console or the infotainment screen. The front climate controls must be
on to use the rear controls.
See Climate Controls in your Owner’s Manual.
AUTO HEATED/VENTILATED SEATS
F
When the vehicle is on, the automatic heated seats and automatic heated steering wheel or
automatic ventilated seats will activate based on the vehicle’s interior temperature. Manually
turnotheheatedorventilatedseatsusingtheseatcontrols.Manuallyturnotheheated
steering wheel using the steering wheel control.
Toturntheautoheatedseatsandautoventilatedseatsonoro,gotoSettings>Vehicle
> Climate and Air Quality > Auto Heated Seats or Auto Cooled Seats.
See Instruments and Controls in your Owner’s Manual.
11
DRIVER INFORMATION CENTER (DIC)
AUDIO STEERING WHEEL CONTROLS
The DIC on the instrument cluster displays a variety of vehicle system information and warn-
ingmessages.Threedierentdisplays
F
are available.
DIC CONTROLS
Usethecontrolsontherightsideofthesteer-
ing wheel to view and move through the DIC
menus.
Press the or button to move
between the display zones. Press the
button to go back to the previous menu.
Press the
or
button to scroll through
the menus.
Press the
button to open a menu, or
to select or reset an item.
SELECT INFO PAGES
1. UsethecontrolstodisplaytheOptions
menu.
2. Scroll to display Info Pages. Press to
view the pages.
3. Scroll through the list of items.
4. Press
to select or deselect an item
to display in the Info menu.
Push to Talk
Press to answer an incoming call or to use
natural voice recognition with the Bluetooth
or OnStar
®
system.
End Call/Mute
Press to end or decline a call.
Press to mute/unmute the vehicle speakers.
Next/Previous Favorite Station
(behind left side of steering wheel)
Press the top or bottom button to go to the next or previous favorite radio station or track.
Volume
(behind right side of steering wheel)
Press the top or bottom button to adjust the volume.
See your Infotainment System Manual.
F
Optional equipment
Uplevel display
F
shown
See Instruments and Controls in your Owner’s Manual.
12
INFOTAINMENT SYSTEM
F
Optional equipment
Interaction
Selector:
Display the
favorites list
TUNE/MENU
Turn the knob to tune
radio stations and
highlight items/press to
open and select items
Applications:
Touch an icon to
open an application
Additional Pages:
Touch to view
additional pages
of applications
(if available)
Power/
Volume
BACK
Return to
previous menu
Home
page
MEDIA
Select the audio
source
TONE
Open the Tone
settings menu
RADIO
Select AM, FM,
SiriusXM
F
SEEK:
Previous or next radio
station or track
TheinfotainmentsystemusesaBluetoothorUSBconnectiontolinktoacompatibledevice,
suchasasmartphone,cellphone,USBashdriveorportableaudioplayer/iPod
®
,andoers
hands-freevoicecontrol.Forassistance,contactCustomerAssistanceat1-855-4-SUPPORT
(1-855-478-7767)orvisitmy.gmc.com/learn.
Refer to your Owner’s Manual for important information about using the infotainment
system while driving.
8-inch diagonal screen
F
shown
13
INFOTAINMENT SYSTEM
SETTING THE TIME
1. Touch Settings on the Home page.
2. Touch Time and Date.
3. Touch Set Time.
4. Touch the arrows to adjust the hours and minutes.
5. Press the BACK button to exit the menu.
STORING FAVORITES
Radiostationsfromallbands(AM,FMorSiriusXM
F
), media (song, artist, etc.), phone
contacts and navigation destinations
F
can be stored in any order on the favorites list.
1. Display the desired radio station, media favorite, contact or destination.
2. Touch the
Interaction Selector at the bottom of the screen to display the favorite
screen buttons.
3. Touch and hold one of the favorite screen buttons until a beep is heard.
4. Repeat the steps to store another favorite item.
Note: To change the number of favorites displayed, go to Settings > Radio.
NATURAL VOICE RECOGNITION
F
Control the music source and make phone calls hands-free (after pairing your Bluetooth-
enabled phone) using the natural voice recognition system.
1. Press the
Push to Talk button on the steering wheel.
2. The radio will play a prompt followed by a beep.
3. After the beep, say what you want it to do using natural speech.
Example Phone command (using your paired phone): “Call Amanda” or
“Call 555-1212”
• ExampleMediaMusicDeviceSearchcommand(whenconnectedtoUSBonly):
“Play artist [name]” or “Play song [name]”
• ExampleRadiocommand:“TuneFM104.3”or“TuneXMClassicVinyl”
Help: Say “Help” for voice recognition assistance
VOICE PASS-THRU
Voice Pass-Thru allows access to the voice recognition commands on a compatible cell
phone; i.e. Siri or Voice Command. Visit my.gmc.com/learn for more information.
To activate phone voice recognition, press and hold the
Push to Talk button on the
steering wheel for 2 seconds.
PORTABLE AUDIO DEVICES
USBportsandaccessorypoweroutletsarelocatedinthevehicletoconnectportableaudio
devices.UsetheUSBportstoconnectandchargemobiledevices.
Connect an iPod
®
, iPhone
®
,MP3Player,oraUSBashdrivetoaUSBport.Searchfor
musicon-screenorbyvoicecommands.SomeUSBportsareforchargingonly.
Touch the Audio icon or press the MEDIA button
F
to select a portable device as the
audio source.
See Infotainment System in your Owner’s Manual.
F
Optional equipment
14
BLUETOOTH® SYSTEM
4G LTE WI-FI® HOTSPOT
Withthevehicle’sbuilt-inWi-Fihotspot,upto7devices(smartphones,tabletsandlaptops)
can be connected to high-speed internet using the 4G LTE signal.
ToretrievetheSSIDandpasswordforthehotspot,gotoSettings>Wi-Fi>ManageWi-Fi
Networks.
Note: For more information on use and system limitations, visit
my.gmc.com/learn
.
See Instruments and Controls in your Owner’s Manual.
Before using a Bluetooth-enabled device in the vehicle, it must be paired with the in- vehicle
Bluetooth system. The pairing process is disabled when the vehicle is moving. Not all devices
will support all functions. Visit my.gmc.com/learn for more information.
PAIR A PHONE
1. To use voice recognition, press the
Push to Talk button on the steering wheel; after
the beep, say “Pair Phone”; or use the infotainment screen to select the Phone icon >
Phones > Pair Device.
2. Startthepairingprocessonthephone.Fromyourphone’sBluetoothsettings,selectthe
name shown on the infotainment screen.
3. Conrmthecodesthatappearontheinfotainmentscreenandthephone.
4. When pairing is complete, the phone screen is displayed. Your phone book may be down-
loaded depending on the phone.
See Infotainment System in your Owner’s Manual.
INFOTAINMENT SYSTEM
APPLE CARPLAY
Apple CarPlay capability is available
through a compatible smartphone using the
Projection icon on the Home page of the info-
tainment system. No app is required.
1. Connect your compatible phone by plug-
gingtheLightningcableintoaUSBdata
port.Useyourdevice’sfactory-provided
Lightning cable. Aftermarket cables may
not work.
2. The Projection icon will change to Apple CarPlay. Touch the Apple CarPlay icon to have
your apps displayed.
ANDROID AUTO
Android Auto capability is available through a compatible smartphone using the Projection
icon on the Home page of the infotainment system.
1. Download the Android Auto app to your phone from the Google Play Store.
2. ConnectyourcompatiblephonebypluggingthephoneUSBcableintoaUSBdataport.
Useyourdevice’sfactory-providedUSBcable.Aftermarketcablesmaynotwork.
3. The Projection icon will change to Android Auto. Touch the Android Auto icon to have
your apps displayed.
See Infotainment System in your Owner’s Manual.
15
F
Optional equipment
VEHICLE PERSONALIZATION
Some features can be customized using the
Settings menus and the infotainment screen
buttons. The Settings menus may include
Time and Date, Language, Radio, Vehicle,
Bluetooth,RearCamera,ReturntoFactory
Settings and others.
1. Press the MENU knob or touch Settings on
the Home page.
2. Select the desired menu item.
3. Select the desired feature and setting.
4. Press BACK to exit each menu.
SUNROOF/SUNSHADE
F
TIRE PRESSURE MONITOR
Press and release the SLIDE switch to express-open the sunroof.
Press and release the Close switch to express-close the sunroof.
To open the sunshade, press the latch button on the handle while pushing up to
unlatch it.
To close the sunshade, pull the handle forward until it latches.
See Keys, Doors and Windows in your Owner’s Manual.
The
Low Tire Pressure warning light on the instrument cluster illuminates when one or
moreofthevehicle’stiresissignicantlyunderinated.Fillthetirestothepropertirepres-
sures listed on the Tire and Loading Information label located below the driver’s door latch.
Current tire pressures can be viewed on the Driver Information Center.
TheTireFillAlertprovidesvisualandaudiblealertstohelpwheninatingatiretotherec-
ommended tire pressure. When the recommended pressure is reached, the horn sounds and
theturnsignalschangefromashingtosolid.
See Vehicle Care in your Owner’s Manual.
See Instruments and Controls in your Owner’s Manual.
UNIVERSAL REMOTE SYSTEM
TheUniversalRemoteSystemontheoverheadconsoleenablesyourvehicletocontrol
3dierentdevices,rangingfromgaragedoorsandgatestohomelighting.Goto
www.homelink.comfordetailedvideosandinstructionsonhowtoprogramtheUniversal
RemoteSystem.Foradditionalassistance,call1-800-355-3515.
See Instruments and Controls in your Owner’s Manual.
16
DRIVER ASSISTANCE SYSTEMS
Safety or driver assistance features are no substitute for the driver’s responsibility to operate the
vehicle in a safe manner. The driver should remain attentive to trac, surroundings and road
conditions at all times. Read your Owner’s Manual for important feature limitations and information.
SAFETY ALERT SEAT
F
The driver’s seat pulses — left side, right side or simultaneously
— to alert the driver of the direction of potential hazards.
Audible alerts or seat pulsing alerts may be selected. To change the alert settings, go to
Settings > Vehicle > Collision/Detection > Alert Type.
LANE CHANGE ALERT WITH SIDE BLIND ZONE ALERT
F
While driving, the system
displays a
warning symbol on the left or right side mirror when a vehicle is detected in
that side blind zone area or rapidly approach-
ingthatarea.Thewarningsymbolashesif
a turn signal is activated when a vehicle has
been detected on the same side.
Toturnonoro,gotoSettings>Vehicle
> Collision/Detection > Lane Change Alert.
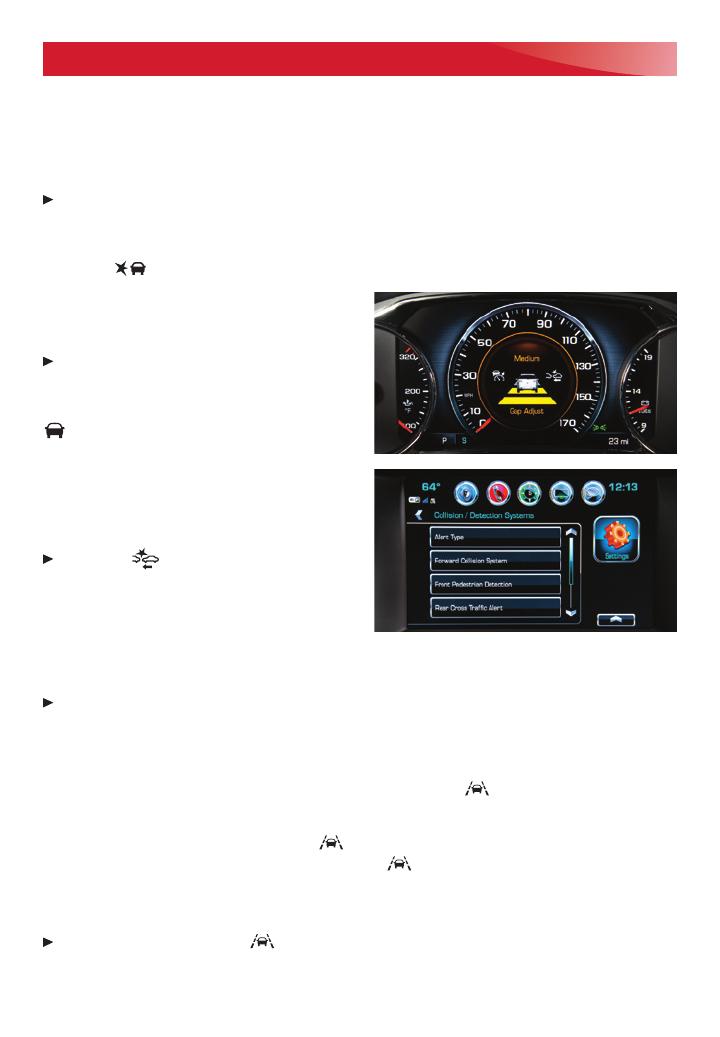
FORWARD COLLISION ALERT
F
The
Vehicle Ahead Indicator is green when a
vehicle is detected and is amber when follow-
ing a vehicle ahead much too closely. When
approaching a vehicle directly ahead too
rapidly,aredalertashesonthewindshield
and the Safety Alert Seat pulses or rapid
beeps sound (if selected).
Press the
Collision Alert button on
the steering wheel to set the alert timing
toFar,Medium,orNear.
FORWARD AUTOMATIC BRAKING
F
In potential front-end imminent collision situations with detected vehicles, the brakes may be
applied, if you have not already done so, to help reduce damage or avoid collisions at very
low speeds with vehicles directly ahead.
TosettheForwardCollisionAlertandForwardAutomaticBrakingsystemstoAlertand
Brake,Alert,orO,gotoSettings>Vehicle>Collision/Detection>ForwardCollision
System.
LANE KEEP ASSIST WITH LANE DEPARTURE WARNING
F
The system may help
you avoid collisions due to unintentional lane departures. The
Lane Keep Assist Indicator
is green if the system is available to assist. If the vehicle approaches a detected lane mark-
ing without using a turn signal in that direction, the system may assist by gently turning the
steering wheel and displaying an amber
.
If active driver steering is not detected, the amber
mayashandtheSafetyAlertSeat
may pulse or beeps may sound (if selected) on the side of the departure direction as the lane
marking is crossed. The Lane Keep Assist system does not continuously steer the vehicle; the
driver needs to steer and be in complete control of the vehicle.
Toturnonoro,pressthe Lane Keep Assist button on the center console.
F
Optional equipment
17
DRIVER ASSISTANCE SYSTEMS
TRACTION CONTROL AND STABILITRAK SYSTEMS
The traction control system
limits wheelspin and the StabiliTrak
®
stability control system assists with directional control
ofthevehicleindicultdrivingconditions.Bothsystemsturnonautomaticallyeverytime
thevehicleisstarted.Turnotractioncontrolifthevehicleisstuckandrockingthevehicle
is required.
Press the
Traction Control/StabiliTrak O button on the center console to turn traction
controlonoro.
FRONT PEDESTRIAN BRAKING
F
During daytime driving, the system detects
pedestrians directly ahead up to a distance of approximately 131 feet and displays an
amber
indicator.Whenapproachingadetectedpedestriantooquickly,aredalertashes
on the windshield and the Safety Alert Seat pulses or rapid beeps sound (if selected). The
system may prepare the brakes or automatically brake the vehicle, if you have not already
done so.
TosettoAlertandBrake,Alert,orO,gotoSettings>Vehicle>Collision/Detection>
FrontPedestrianDetection.
FRONT
F
AND REAR VISION CAMERA
When the vehicle is in Reverse, a view of the
area behind the vehicle displays on the infotainment screen. After shifting from Reverse to
Drive,aviewoftheareainfrontofthevehicledisplays.Vehiclespeedmustbebelow8mph.
SURROUND VISION
F
The Surround Vision system displays a rear or front camera view
along with a view of the area surrounding the vehicle on the infotainment screen when the
vehicle is in Reverse or Drive below 5 mph.
Touch Front or Rear Camera on the camera screen to display the front or rear view.
Touch the
Guidance Lines
buttononthecamerascreentoturntheguidelinesonoro.
FRONT
F
AND REAR
F
PARK ASSIST
During low-speed parking maneuvers, the system
provides “distance to closest object” information on the Driver Information Center and the
Safety Alert Seat pulses or a beep sounds (if selected). When an object is very close, the
Safety Alert Seat pulses or 5 beeps sound (if selected).
REAR CROSS TRAFFIC ALERT
F
When the
vehicle is in Reverse, the system warns of cross-
traccomingineitherdirectionbydisplayinga
red alert on the infotainment screen and the left
or right side of the Safety Alert Seat pulses or
beeps sound (if selected).
ToturntheParkAssistandRearCrossTrac
Alertsystemsonoro,pressthe Park
Assist button on the center console.
F
Optional equipment
See Driving and Operating in your Owner’s Manual.
18
CRUISE CONTROL
AUTOMATIC TRANSMISSION
SETTING CRUISE CONTROL
1. Press the
On/Obutton. The
Cruise Control symbol will illuminate in white on the
instrument cluster.
2. When traveling at the desired speed, press the SET– button to set the speed. The
symbol will illuminate in green on the instrument cluster.
ADJUSTING CRUISE CONTROL
RES+ Resume/Accelerate
Press to resume a set speed. When the
system is active, press to increase speed.
SET– Set/Coast
When the system is active, press to decrease
speed.
Cancel
Press to cancel the Cruise Control without erasing the set speed from memory. Pressing the
brake pedal will also cancel the Cruise Control.
ThesetspeediserasedwhenCruiseControlorthevehicleignitionisturnedo.
ADAPTIVE CRUISE CONTROL
F
The system maintains the Cruise Control set speed and a following gap — the time between
your vehicle and a vehicle detected directly ahead — by accelerating or braking automati-
cally while you continue to steer.
Following Gap
PresstoselectafollowinggapsettingofFar,Medium,orNear.ThisisalsotheForward
Collision Alert
F
setting.
See Driving and Operating in your Owner’s Manual.
ELECTRONIC RANGE SELECT MODE
Electronic Range Select Mode allows you to
choose the top gear limit. It can be used to
limit the vehicle’s speed when driving on a
downhill grade or towing a trailer.
1. Move the shift lever to L (Manual Mode).
2. Press the + (plus) or (minus) button on
the shift lever to increase or decrease the
gear range available. The current gear will
be displayed on the Driver Information
Center.
If vehicle speed is too high or too low for the requested gear, the shift will not occur.
See Driving and Operating in your Owner’s Manual.
F
Optional equipment
19
TRACTION SELECT
The Traction Select system automatically
adjusts various vehicle controls based on driv-
ing preferences, weather and road conditions.
Rotate the Traction Select knob on the
center console to select:
Tour
All-Wheel Drive (AWD models only)
Sport
Snow/Ice (front-wheel drive models only)
O-Road(AWDmodelsonly)
Tow/Haul
The AWD indicator will illuminate when an AWD mode is selected.
If the vehicle is in Tour or AWD mode, it will stay in that mode through future ignition cycles.
See Driving and Operating in your Owner’s Manual.
F
Optional equipment
ACTIVE TOW
F
HILL DESCENT CONTROL
F
REAR VISION CAMERA CENTER GUIDELINE
Active Tow displays a center guideline on the
Rear Vision Camera display to help align the
vehicle’s hitch bar
F
with a trailer coupler.
1. Touch the Camera button on the
infotainment screen.
2. On the Rear Vision Camera display screen,
select the trailer guidance line button to
view the center guideline.
TRAILER VIEW
To check the trailer when driving above 5 mph, touch the Camera button on the infotain-
mentscreen.TheRearViewCameradisplaystherearviewofthevehicle.PressXtoexit
theview.Theviewisexitedautomaticallyafter8seconds.
See Driving and Operating in your Owner’s Manual.
Hill Descent Control sets and maintains vehicle speed from 2–14 mph while descending a
very steep incline in a forward or reverse gear.
Press the
Hill Descent Control button on the center console. Vehicle speed must be
below 31 mph to turn on the system.
Increase or decrease speed by applying the accelerator or brake pedal, or use the Cruise
Control +/– buttons on the steering wheel. The adjusted speed becomes the new set
speed. The
symbolashesontheinstrumentclusterwhenthesystemisactively
applying the brakes to maintain vehicle speed.
See Driving and Operating in your Owner’s Manual.
20
ROADSIDE ASSISTANCE
1-888-881-3302 TTY Users: 1-888-889-2438
As the owner of a new GMC, you are automatically enrolled in the GMC Roadside Assistance
programforupto5years/60,000miles,whicheveroccursrst,atnoexpensetoyou.GMC’s
RoadsideAssistancetoll-freenumberisstaedbyateamoftrainedadvisorswhoare
available24hoursaday,365daysayear,tocontactaserviceproviderforlightservices
(fueldelivery,jump-starts,attireandlock-outs)ormakearrangementstotowyourvehicle
to the nearest GMC dealer for any repairs.
Roadside Assistance and OnStar
®
If you require roadside service and have a current OnStar service plan, press the OnStar
button and the vehicle will send your current GPS location to an OnStar Advisor who will
speak to you, assess your problem, contact Roadside Assistance and relay your exact
location so you will get the help you need.
To learn more about OnStar services, press the blue OnStar button, visit onstar.com, call
1-888-4-ONSTAR(1-888-466-7827),orrefertoyourOwner’sManual.
Get to know your vehicle inside and out with the GMC Owner Center. Check out personal-
ized information, including an online Owner’s Manual and helpful how-to videos, track your
service history and warranty status, review your current OnStar Vehicle Diagnostics report
(active OnStar account required) and more. Create an account today at
my.gmc.com
.
!84139732=A!
The myGMC mobile app connects owners with a compatible mobile device to a
variety of vehicle information and services, such as a searchable Owner’s Manual,
real-time fuel information, OnStar Vehicle Diagnostic information and Roadside
Assistance.
The myGMC mobile app also enables users to send remote commands to the
vehicle — including remotely starting the vehicle and locking/unlocking the doors
— as well as to locate the vehicle on a map and send destinations to the navigation system
(vehicles must be properly equipped).
Download the mobile app from your compatible mobile device’s app store.
MYGMC MOBILE APP
GMC OWNER CENTER
84139732 A
Certain restrictions, precautions and safety procedures apply to your vehicle. Please read your Owner’s Manual
for complete instructions. All information contained in this guide is based on the latest information available at
thetimeofprintingandissubjecttochangewithoutnotice.Copyright2018GeneralMotors.Allrightsreserved.
We recommend always using ACDelco or genuine GM service parts.
  • Page 1 1
  • Page 2 2
  • Page 3 3
  • Page 4 4
  • Page 5 5
  • Page 6 6
  • Page 7 7
  • Page 8 8
  • Page 9 9
  • Page 10 10
  • Page 11 11
  • Page 12 12
  • Page 13 13
  • Page 14 14
  • Page 15 15
  • Page 16 16
  • Page 17 17
  • Page 18 18
  • Page 19 19
  • Page 20 20

GMC 2019 Acadia User guide

Category
Cars
Type
User guide
This manual is also suitable for

Ask a question and I''ll find the answer in the document

Finding information in a document is now easier with AI