Triumph Adler CD 1018 Operating instructions
- Category
- Copiers
- Type
- Operating instructions
This manual is also suitable for

INSTRUCTION HANDBOOK
DIGITAL MULTIFUNCTIONAL SYSTEM
CD 1018
ADVANCED


ADVANCED OPERATION GUIDE iii
Contents
Introduction
Guides included . . . . . . . . . . . . . . . . . . . . . . . . . . . . . . . . . . . . . . . . . . . . . . . . . . . . . . . . . . . . . . . v
Conventions . . . . . . . . . . . . . . . . . . . . . . . . . . . . . . . . . . . . . . . . . . . . . . . . . . . . . . . . . . . . . . . . . .vi
Accessing Menu Items . . . . . . . . . . . . . . . . . . . . . . . . . . . . . . . . . . . . . . . . . . . . . . . . . . . . . . . . . vii
1 Copying Functions
Selecting the Paper Source . . . . . . . . . . . . . . . . . . . . . . . . . . . . . . . . . . . . . . . . . . . . . . . . . . . . 1-1
Selecting the Original Size for Copying. . . . . . . . . . . . . . . . . . . . . . . . . . . . . . . . . . . . . . . . . . . . 1-1
Selecting Original Quality Mode . . . . . . . . . . . . . . . . . . . . . . . . . . . . . . . . . . . . . . . . . . . . . . . . . 1-2
Adjusting Copy Exposure . . . . . . . . . . . . . . . . . . . . . . . . . . . . . . . . . . . . . . . . . . . . . . . . . . . . . . 1-2
Selecting the Number of Copies . . . . . . . . . . . . . . . . . . . . . . . . . . . . . . . . . . . . . . . . . . . . . . . . . 1-3
Zoom Copying. . . . . . . . . . . . . . . . . . . . . . . . . . . . . . . . . . . . . . . . . . . . . . . . . . . . . . . . . . . . . . . 1-3
Selecting Original Placement . . . . . . . . . . . . . . . . . . . . . . . . . . . . . . . . . . . . . . . . . . . . . . . . . . . 1-4
Using Collate Mode. . . . . . . . . . . . . . . . . . . . . . . . . . . . . . . . . . . . . . . . . . . . . . . . . . . . . . . . . . . 1-5
Using Combine Mode . . . . . . . . . . . . . . . . . . . . . . . . . . . . . . . . . . . . . . . . . . . . . . . . . . . . . . . . . 1-5
Continuous Copying . . . . . . . . . . . . . . . . . . . . . . . . . . . . . . . . . . . . . . . . . . . . . . . . . . . . . . . . . . 1-9
Draft Mode . . . . . . . . . . . . . . . . . . . . . . . . . . . . . . . . . . . . . . . . . . . . . . . . . . . . . . . . . . . . . . . . 1-10
Print Override Mode . . . . . . . . . . . . . . . . . . . . . . . . . . . . . . . . . . . . . . . . . . . . . . . . . . . . . . . . . 1-11
File Name Entry . . . . . . . . . . . . . . . . . . . . . . . . . . . . . . . . . . . . . . . . . . . . . . . . . . . . . . . . . . . . 1-11
Sending the Job End Report . . . . . . . . . . . . . . . . . . . . . . . . . . . . . . . . . . . . . . . . . . . . . . . . . . . 1-13
2 Scanning Functions
Using the Scanning Function . . . . . . . . . . . . . . . . . . . . . . . . . . . . . . . . . . . . . . . . . . . . . . . . . . . 2-1
Scanning Documents . . . . . . . . . . . . . . . . . . . . . . . . . . . . . . . . . . . . . . . . . . . . . . . . . . . . . . . . . 2-2
Using the Address Book . . . . . . . . . . . . . . . . . . . . . . . . . . . . . . . . . . . . . . . . . . . . . . . . . . . . . . . 2-4
Selecting Color Scan Mode. . . . . . . . . . . . . . . . . . . . . . . . . . . . . . . . . . . . . . . . . . . . . . . . . . . . . 2-5
Selecting the Original Quality for Scanning. . . . . . . . . . . . . . . . . . . . . . . . . . . . . . . . . . . . . . . . . 2-5
Selecting the Scanning Resolution . . . . . . . . . . . . . . . . . . . . . . . . . . . . . . . . . . . . . . . . . . . . . . . 2-6
Adjusting the Exposure for Scanning . . . . . . . . . . . . . . . . . . . . . . . . . . . . . . . . . . . . . . . . . . . . . 2-6
Selecting the Original Size for Scanning. . . . . . . . . . . . . . . . . . . . . . . . . . . . . . . . . . . . . . . . . . . 2-7
Selecting the Send Size . . . . . . . . . . . . . . . . . . . . . . . . . . . . . . . . . . . . . . . . . . . . . . . . . . . . . . . 2-7
Zoom Scanning . . . . . . . . . . . . . . . . . . . . . . . . . . . . . . . . . . . . . . . . . . . . . . . . . . . . . . . . . . . . . . 2-8
Selecting the Original Placement for Scanning. . . . . . . . . . . . . . . . . . . . . . . . . . . . . . . . . . . . . . 2-8
Continuous Scanning . . . . . . . . . . . . . . . . . . . . . . . . . . . . . . . . . . . . . . . . . . . . . . . . . . . . . . . . . 2-9
Selecting the Image File Format . . . . . . . . . . . . . . . . . . . . . . . . . . . . . . . . . . . . . . . . . . . . . . . . 2-10
Entering the Name of send job . . . . . . . . . . . . . . . . . . . . . . . . . . . . . . . . . . . . . . . . . . . . . . . . . 2-10
Entering the Subject and Body Message of the E-Mail. . . . . . . . . . . . . . . . . . . . . . . . . . . . . . . 2-11
Reporting the End of Scanning . . . . . . . . . . . . . . . . . . . . . . . . . . . . . . . . . . . . . . . . . . . . . . . . . 2-12
Scanning with TWAIN . . . . . . . . . . . . . . . . . . . . . . . . . . . . . . . . . . . . . . . . . . . . . . . . . . . . . . . . 2-13
3 Printer Settings
Parallel Setting . . . . . . . . . . . . . . . . . . . . . . . . . . . . . . . . . . . . . . . . . . . . . . . . . . . . . . . . . . . . . . 3-1
Network Settings . . . . . . . . . . . . . . . . . . . . . . . . . . . . . . . . . . . . . . . . . . . . . . . . . . . . . . . . . . . . . 3-2
Setting the Emulation Mode . . . . . . . . . . . . . . . . . . . . . . . . . . . . . . . . . . . . . . . . . . . . . . . . . . . . 3-6
4 Operation Status
Status Screen . . . . . . . . . . . . . . . . . . . . . . . . . . . . . . . . . . . . . . . . . . . . . . . . . . . . . . . . . . . . . . . 4-1
Checking Jobs Status . . . . . . . . . . . . . . . . . . . . . . . . . . . . . . . . . . . . . . . . . . . . . . . . . . . . . . . . . 4-2
Verifying Job Log. . . . . . . . . . . . . . . . . . . . . . . . . . . . . . . . . . . . . . . . . . . . . . . . . . . . . . . . . . . . . 4-2
Pausing Jobs. . . . . . . . . . . . . . . . . . . . . . . . . . . . . . . . . . . . . . . . . . . . . . . . . . . . . . . . . . . . . . . . 4-2

ADVANCED OPERATION GUIDE iv
Canceling Jobs . . . . . . . . . . . . . . . . . . . . . . . . . . . . . . . . . . . . . . . . . . . . . . . . . . . . . . . . . . . . . . 4-3
Verifying Scanner Status. . . . . . . . . . . . . . . . . . . . . . . . . . . . . . . . . . . . . . . . . . . . . . . . . . . . . . . 4-4
Verifying Printer Status . . . . . . . . . . . . . . . . . . . . . . . . . . . . . . . . . . . . . . . . . . . . . . . . . . . . . . . . 4-4
Verifying the Toner Status . . . . . . . . . . . . . . . . . . . . . . . . . . . . . . . . . . . . . . . . . . . . . . . . . . . . . . 4-4
Verifying Settings for the Cassettes and MP Tray. . . . . . . . . . . . . . . . . . . . . . . . . . . . . . . . . . . . 4-5
Printing Reports . . . . . . . . . . . . . . . . . . . . . . . . . . . . . . . . . . . . . . . . . . . . . . . . . . . . . . . . . . . . . 4-5
Verifying Total Number of Prints and Scans . . . . . . . . . . . . . . . . . . . . . . . . . . . . . . . . . . . . . . . . 4-6
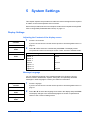
5 System Settings
Display Settings . . . . . . . . . . . . . . . . . . . . . . . . . . . . . . . . . . . . . . . . . . . . . . . . . . . . . . . . . . . . . 5-1
Print Quality Settings. . . . . . . . . . . . . . . . . . . . . . . . . . . . . . . . . . . . . . . . . . . . . . . . . . . . . . . . . . 5-3
Machine Settings. . . . . . . . . . . . . . . . . . . . . . . . . . . . . . . . . . . . . . . . . . . . . . . . . . . . . . . . . . . . . 5-5
Timer Settings . . . . . . . . . . . . . . . . . . . . . . . . . . . . . . . . . . . . . . . . . . . . . . . . . . . . . . . . . . . . . . 5-11
Size Settings . . . . . . . . . . . . . . . . . . . . . . . . . . . . . . . . . . . . . . . . . . . . . . . . . . . . . . . . . . . . . . . 5-16
Editing the Address Book . . . . . . . . . . . . . . . . . . . . . . . . . . . . . . . . . . . . . . . . . . . . . . . . . . . . . 5-21
Printing the Service Pages . . . . . . . . . . . . . . . . . . . . . . . . . . . . . . . . . . . . . . . . . . . . . . . . . . . . 5-24
6 User Login Management
Entering User Login . . . . . . . . . . . . . . . . . . . . . . . . . . . . . . . . . . . . . . . . . . . . . . . . . . . . . . . . . . 6-1
ID management. . . . . . . . . . . . . . . . . . . . . . . . . . . . . . . . . . . . . . . . . . . . . . . . . . . . . . . . . . . . . . 6-1
7 Job Accounting
Managing Accounts. . . . . . . . . . . . . . . . . . . . . . . . . . . . . . . . . . . . . . . . . . . . . . . . . . . . . . . . . . . 7-2
Setting Limitation of Use . . . . . . . . . . . . . . . . . . . . . . . . . . . . . . . . . . . . . . . . . . . . . . . . . . . . . . . 7-2
Deleting an Account . . . . . . . . . . . . . . . . . . . . . . . . . . . . . . . . . . . . . . . . . . . . . . . . . . . . . . . . . . 7-4
Changing Limitation of Use . . . . . . . . . . . . . . . . . . . . . . . . . . . . . . . . . . . . . . . . . . . . . . . . . . . . . 7-4
All Account Management . . . . . . . . . . . . . . . . . . . . . . . . . . . . . . . . . . . . . . . . . . . . . . . . . . . . . . 7-4
Individual Account Management . . . . . . . . . . . . . . . . . . . . . . . . . . . . . . . . . . . . . . . . . . . . . . . . . 7-5
Default Settings. . . . . . . . . . . . . . . . . . . . . . . . . . . . . . . . . . . . . . . . . . . . . . . . . . . . . . . . . . . . . . 7-7
Using Job Accounting . . . . . . . . . . . . . . . . . . . . . . . . . . . . . . . . . . . . . . . . . . . . . . . . . . . . . . . . . 7-8
8 Using EWS (Embedded Web Server)
System Requirements. . . . . . . . . . . . . . . . . . . . . . . . . . . . . . . . . . . . . . . . . . . . . . . . . . . . . . . . . 8-1
Accessing EWS. . . . . . . . . . . . . . . . . . . . . . . . . . . . . . . . . . . . . . . . . . . . . . . . . . . . . . . . . . . . . . 8-2
EWS Pages. . . . . . . . . . . . . . . . . . . . . . . . . . . . . . . . . . . . . . . . . . . . . . . . . . . . . . . . . . . . . . . . . 8-2
Start Page . . . . . . . . . . . . . . . . . . . . . . . . . . . . . . . . . . . . . . . . . . . . . . . . . . . . . . . . . . . . . . . . . . 8-3
Basic Page . . . . . . . . . . . . . . . . . . . . . . . . . . . . . . . . . . . . . . . . . . . . . . . . . . . . . . . . . . . . . . . . . 8-6
Printer Page . . . . . . . . . . . . . . . . . . . . . . . . . . . . . . . . . . . . . . . . . . . . . . . . . . . . . . . . . . . . . . . 8-11
Scanner Page . . . . . . . . . . . . . . . . . . . . . . . . . . . . . . . . . . . . . . . . . . . . . . . . . . . . . . . . . . . . . . 8-12
FAX Page . . . . . . . . . . . . . . . . . . . . . . . . . . . . . . . . . . . . . . . . . . . . . . . . . . . . . . . . . . . . . . . . . 8-14
Jobs Page . . . . . . . . . . . . . . . . . . . . . . . . . . . . . . . . . . . . . . . . . . . . . . . . . . . . . . . . . . . . . . . . . 8-17
Advanced Page. . . . . . . . . . . . . . . . . . . . . . . . . . . . . . . . . . . . . . . . . . . . . . . . . . . . . . . . . . . . . 8-18
9 Optional Equipment
Available Options . . . . . . . . . . . . . . . . . . . . . . . . . . . . . . . . . . . . . . . . . . . . . . . . . . . . . . . . . . . . 9-1
Document Processor. . . . . . . . . . . . . . . . . . . . . . . . . . . . . . . . . . . . . . . . . . . . . . . . . . . . . . . . . . 9-2
Paper Feeder . . . . . . . . . . . . . . . . . . . . . . . . . . . . . . . . . . . . . . . . . . . . . . . . . . . . . . . . . . . . . . . 9-4
Expansion Memory . . . . . . . . . . . . . . . . . . . . . . . . . . . . . . . . . . . . . . . . . . . . . . . . . . . . . . . . . . . 9-4
FAX System . . . . . . . . . . . . . . . . . . . . . . . . . . . . . . . . . . . . . . . . . . . . . . . . . . . . . . . . . . . . . . . . 9-5
Appendix
Paper Selection. . . . . . . . . . . . . . . . . . . . . . . . . . . . . . . . . . . . . . . . . . . . . . . . . . . . . . . .Appendix-1
Function Combination Tables . . . . . . . . . . . . . . . . . . . . . . . . . . . . . . . . . . . . . . . . . . . .Appendix-10
Glossary
Index

ADVANCED OPERATION GUIDE v
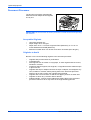
Introduction
Guides included
The following guides are included with this machine. Refer to the guide that
corresponds to your particular objective.
Installation Guide
This Guide contains instructions for assembling and installing the machine.
Operation Guide
This Operation Guide contains explanations on the initial installation and set-up of
this machine, the procedure to connect it to a computer, and the basic procedures
for using this machine as a copier, printer, and scanner as well as for resolving
problems if trouble occurs.
Advanced Operation Guide (This guide)
The Advanced Operation Guide contains explanations on copier, printer, and
scanner functions as well as default settings that can be adjusted on this machine.
This guide is stored on the CD-ROM as a PDF document.
KX Driver User Guide
Describes how to install and set the printer driver. This guide is stored on the CD-
ROM as a PDF document.
Network FAX Driver Operation Guide
Describes how to use the Network FAX Driver to send documents created on a
network computer directly from that computer to the other FAX System. This guide
is stored on the CD-ROM as a PDF document.
Network Tool for Clients Operation Guide
Network Tool for Clients is a network printing utility intended to monitor and configure
the printing system. This guide describes how to install and operate Network Tool for
Clients. This guide is stored on the CD-ROM as a PDF document.
Network Tool for Direct Printing Operation Guide
Network Tool for Direct Printing is a utility that allows you to directly print PDF files
without starting Adobe Acrobat by directly sending a PDF file through the Windows
spooler. This guide describes how to install and operate Network Tool for Direct
Printing. This guide is stored on the CD-ROM as a PDF document.

Introduction
vi ADVANCED OPERATION GUIDE
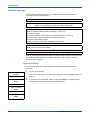
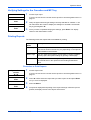
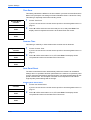
Conventions
This manual uses the following conventions.
Convention Description Example
Italic Typeface Used to emphasise a key word,
phrase or message. In addition,
references to other publications
are displayed in italic typeface.
The screen shows Completed and returns
to the Basic screen.
Notes Used to provide additional or
useful information about a function
or feature. Can also contain
references to other publications.
NOTE: For information about storing the
pin, refer to step 10.
Important Used to provide important
information.
IMPORTANT: Ensure paper is not folded,
curled, or damaged.
Caution Cautions are statements that
suggest mechanical damage as a
result of an action.
CAUTION: Do not pull the cassette out
when holding the front of the machine.
Warning Used to alert users to the
possibility of personal injury.
WARNING: High voltage is present in
the charger section.

Introduction
ADVANCED OPERATION GUIDE vii
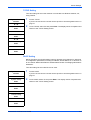
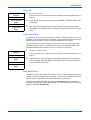
Accessing Menu Items
When you configure the machine, you do so by accessing a menu item and making
your setting from there. Each configuration instruction in this guide tells you to
access the menu item and provides a route map to direct you to that item. An
example of a route map and its significance is shown below.
.
System Menu/
Counter
This represents the control panel button to be pressed.
S or T
Press the up or down button until System Setting is displayed.
System Setting
Enter
S or T
Press the up or down button until Network Setting is displayed.
Network Setting
Enter
S or T
Press the up or down button until TCP/IP Setting is displayed.
TCP/IP Setting
Enter
S or T
Press the up or down button until IP Address is displayed.
IP Address
Enter

Introduction
viii ADVANCED OPERATION GUIDE

ADVANCED OPERATION GUIDE 1-1
1 Copying Functions
Selecting the Paper Source
1
Press Copy. The basic screen is displayed.
2
Press Paper Select.
3
Press S or T to select the required cassette or the MP Tray and press Enter.
For a cassette, the display shows Completed and returns to the basic screen.
For the MP tray, the MP Tray Size screen is displayed. Proceed to the next step.
4
Press S or T to select the paper size required and press Enter. The MP Tray Type
screen is displayed.
If the paper size is not shown, select Others and press Enter then select from the
Others screen.
5
Press S or T to select the media type required and press Enter. The display shows
Completed and returns to the basic screen.
Selecting the Original Size for Copying
1
Press Copy. The basic screen is displayed.
2
Press Original Size.
3
Press S or T to select the size of the original or, if the size of the original is not
shown in the display select Others and press Enter.
For a standard size, the display shows Completed and returns to the basic screen.
For Others proceed to the next step.
4
Press S or T to select the size of the original and press Enter. The display shows
Completed and returns to the basic screen.
Mode Description
Auto Automatically selects and feeds paper from the cassette
or the MP tray, whichever holds the paper size to be
used.
Cassette1 Feeds paper from cassette 1.
Cassette2 Feeds paper from the optional cassette 2 if it is
installed.
MP Tray Feeds paper from the MP tray if the paper size and type
has been registered.

Copying Functions
1-2 ADVANCED OPERATION GUIDE
Selecting Original Quality Mode
The original quality mode selects the copy quality according to the type of originals.
1
Press Copy. The basic screen is displayed.
2
Press Original Quality.
3
PressS or T to select the mode and press Enter. The display shows Completed and
returns to the basic screen.
Adjusting Copy Exposure
The default exposure is Manual.
1
Press Copy. The basic screen is displayed.
2
Press Exposure.
3
Press S or T to select Manual and press Enter.
If you selected Auto, the display shows Completed and returns to the basic screen.
If you selected Manual, the Manual screen is displayed. Proceed to the next step.
4
Press S or T to adjust the required value for the exposure. Press Enter. The display
shows Completed and returns to the basic screen.
Mode Description
Text+Photo Select this mode when the original contains a mixture of
both text and photographs.
Photo Select this mode when the original contains mostly
photographs.
Text Select this mode when the original contains mostly text.
Mode Description
Auto The machine automatically selects the optimal
exposure setting for the original being copied.
Manual The copy exposure setting is selected manually. There
are 7 exposure levels available.

Copying Functions
ADVANCED OPERATION GUIDE 1-3
Selecting the Number of Copies
Leaving more than approximately 30 sheets of standard paper or one sheet of
special paper in the face-up tray and more than approximately 150 sheets of
standard paper in the output tray may damage the machine.
1
Press Copy. The basic screen is displayed.
2
Use the numeric keys to change the number of copies to be made from 1 to 999.
3
To cancel the number of copies entered, press Stop/Clear. The display will be set to
1.
Zoom Copying
The following modes are available for zooming.
1
Press Copy. The basic screen is displayed.
2
Press left Select.
3
Press S or T to select the zoom type required and press Enter. You can choose
100%, Auto, Standard Zoom or Zoom Entry.
For 100% and Auto, the display shows Completed and returns to the basic screen.
The original will be copied on the selected paper size.
For Standard Zoom, press S or T to select the zoom ratio. Press Enter. The display
shows Completed and returns to the basic screen.
Mode Description
100% Makes copies of the same size as the original.
Auto Adjusts the zoom ratio so that the copied image fits
onto the selected copy size.
Standard Zoom Makes copies at one of the fixed zoom ratios. The
following ratios are available:
200%
141% (A5 >> A4)
129% (Statement >> Letter)
115% (B5 >> A4)
100%
90% (Folio >> A4)
86% (A4 >> B5)
78% (Legal >> Letter)
70% (A4 >> A5)
64% (Letter >> Statement)
50%
Zoom Entry Sets the zoom ratio between 50% and 200% in 1%
increment.

Copying Functions
1-4 ADVANCED OPERATION GUIDE
For Zoom Entry, press S or T or use the numeric keys to change the ratio in 1%
increments. Press Enter. The display shows Completed and returns to the basic
screen.
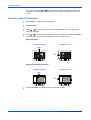
Selecting Original Placement
1
Press Copy. The basic screen is displayed.
2
Press Function.
3
Press S or T to select Orig. Placement and press Enter. The Orig. Placement
screen is displayed.
4
Press S or T to select either Top Edge to Rear or Top Edge to Left and press Enter.
The display shows Completed and returns to the Function screen.
Using the Platen
Using the Document Processor
5
Press right Select. The display returns to the basic screen.
Left
Top Edge to Rear Top Edge to Left
Rear
Top Edge to Rear Top Edge to Left
Rear
Left

Copying Functions
ADVANCED OPERATION GUIDE 1-5
Using Collate Mode
Multiple originals can be scanned into memory in a single operation and the number
of copy sets created.
1
Press Copy. The basic screen is displayed.
2
Press Function.
3
Press S or T to select Collate and press Enter. The Collate screen is displayed.
4
Press S or T to select either On or Off and press Enter. The display shows
Completed and returns to the Function screen.
5
Press right Select. The display returns to the basic screen.
Using Combine Mode
The images from either 2 or 4 originals can be reduced and combined onto a single
copy. The borderline of each original can also be marked with a solid line or a dotted
line.
1
Press Copy. The basic screen is displayed.
2
Press Function.
3
Press S or T to select Combine and press Enter. The Combine screen is displayed.
4
Press S or T to select either 2 in 1 or 4 in 1 and press Enter. The Layout screen is
displayed.
5
Press S or T to select the direction of the layout and press Enter. The Border Line
screen is displayed.
Original Collate: OnCollate: Off
Mode Description
2 in 1 Copies two originals onto one sheet.
4 in 1 Copies four originals onto one sheet.

Copying Functions
1-6 ADVANCED OPERATION GUIDE
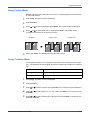
The following illustrations indicate the effects of each direction and layout setting:
2 in 1 > Top Edge to Rear.
2 in 1 > Top Edge to Left
4 in 1 > Top Edge to Rear
Original Copied Image
Left to Right/Top to
Bottom
Right to Left
Original Copied Image
Left to Right/Top to
Bottom
Right to Left
Original Copied image
Top to
Bottom to
Right
Top to
Bottom to
Left
Right to
Left to
Bottom
Left to
Right to
Bottom

Copying Functions
ADVANCED OPERATION GUIDE 1-7
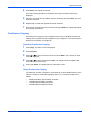
4 in 1 > Top Edge to Left
6
Press S or T to select the type of the borderline and press Enter. The Orig.
Placement screen is displayed. The following illustrations indicate the effects of each
borderline setting
Solid Line
Dotted Line
Original Copied Image
Top to
Bottom to
Right
Top to
Bottom to
Left
Right to
Left to
Bottom
Left to
Right to
Bottom
Copied Image
4 in 1
2 in 1
Copied Image
4 in 12 in 1

Copying Functions
1-8 ADVANCED OPERATION GUIDE
Positioning Mark
7
Press S or T to select the original placement and press Enter. The display shows
Completed and returns to the Function screen.
8
Press right Select. The display returns to the basic screen.
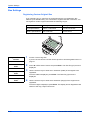
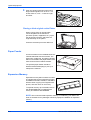
Using the Document Processor with Combine Mode
1
Place the originals in the document
processor.
2
Press Copy. The basic screen is displayed.
3
Select the combine mode. For more information, refer to Using Combine Mode on
page 1-5.
4
Press Start. The originals are scanned automatically and copying in the combine
mode will begin.
Using the Platen with Combine Mode
1
Place the first original to be copied onto the
platen.
2
Press Copy. The basic screen is displayed.
3
Select the combine mode. For more information, refer to Using Combine Mode on
page 1-5.
Copied Image
4 in 12 in 1

Copying Functions
ADVANCED OPERATION GUIDE 1-9
4
Press Start. The original is scanned.
Once the scanning operation is completed, Set original and press Start key is
displayed.
5
Place the next original on the Platen ready for scanning and press Start. The next
original is scanned.
6
Repeat step 5 until all the originals have been scanned.
7
When all the originals have been scanned, press right Select. Accepted will appear
and copying commences.
Continuous Copying
Use Continuous Copying to scan originals into memory in individual sections.The
machine then groups the sections together to form a single job. The copies are then
produced in one batch, as a single job.
Selecting Continuous Copying
1
Press Copy. The basic screen is displayed.
2
Press Function.
3
Press S or T to select Continuous Scan and press Enter. The Continuous Scan
screen is displayed.
4
Press S or T to select On and press Enter. The display shows Completed and
returns to the Function screen.
5
Press right Select. The display returns to the basic screen.
Using Continuous Copying
The maximum number of originals to scan depends on the available memory in the
machine. Number of scannable originals (Letter, 5%, Text+Photo mode) are as
follows:
• 96 MB (standard): Approximately 70 sheets
• 128 MB: Approximately 115 sheets
• 192 MB: Approximately 380 sheets
• 320 MB: Approximately 535 sheets

Copying Functions
1-10 ADVANCED OPERATION GUIDE
1
Place the original on the platen.
2
Press Copy. The basic screen is displayed.
3
Press Start. The first original is scanned.
4
Once the scanning operation is completed, Set original and press Start key is
displayed. Position the next original on the platen and press Start. The next original
is scanned.
5
Repeat step 4 until all originals have been scanned.
6
When all originals have been scanned, press right Select. Accepted will appear and
copying commences.
Draft Mode
Draft mode enables the machine to consume less toner for a page to save your
printing costs. This will cause images to be printed lighter than normal without
affecting print speed. When Draft mode setting is On, the printing image becomes
lighter, but readable.
1
Press Copy. The basic screen is displayed.
2
Press Function.
3
Press S or T to select Draft Mode and press Enter. The Draft Mode screen is
displayed.
4
Press S or T to select On and press Enter. The display shows Completed and
returns to the Function screen.
5
Press right Select. The display returns to the basic screen.

Copying Functions
ADVANCED OPERATION GUIDE 1-11
Print Override Mode
The print override mode allows the current job to be interrupted in order to make
copies of a more urgent job. After the print override processing is completed, the
interrupted job will be resumed.
1
Press Copy. The basic screen is displayed.
2
Press Function.
3
Press S or T to select Print Override and press Enter. The Print Override screen is
displayed.
4
Press S or T to select On and press Enter. The display shows Completed and
returns to Function screen.
5
Press right Select. The basic screen is displayed.
6
Program the functions as required and use the numeric keys to enter the number of
copies required.
7
Place the original on the platen or in the document processor.
8
Press Start. Copying begins immediately and completed copies are delivered to the
output tray.
9
When the job is completed, perform the steps 1 through 4 to select Print Override
mode Off.
File Name Entry
The file name is used for an e-mail report that notifies the end of copying (refer to
Sending the Job End Report on page 1-13). It is also listed in the Status menu for
administration. The file name contains the time stamp or job number.
1
Press Copy. The basic screen is displayed.
2
Press Function.
3
Press S or T to select File Name Entry. Press Enter. The File Name Entry screen
is displayed.
4
Enter the file name between one and 30 characters using the numeric keys (refer to
Character Entry in the Operation Guide) and press Enter. The Additional Info screen
is displayed. The factory default setting for the file name is doc.

Copying Functions
1-12 ADVANCED OPERATION GUIDE
5
Press S or T to select the information that is added to the file name. The following
table shows how the file name is constructed.
6
Press Enter. The display shows Completed and returns to the Function screen.
7
Press right Select. The display returns to the basic screen.
8
After copying is completed, it is stored as a file name. The file name can be
monitored in the Status menu. Refer to Checking Jobs Status on page 4-2.
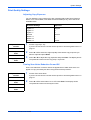
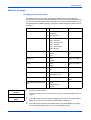
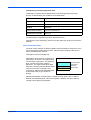
Selected Item File Name Example Description
Date and Time doc04272005145608 Adds the date and time
to the File Name. The
example shows how a
copying job created at
14:56:08 on April 27,
2005 would be named.
The display sequence of
Month, Day, Year can be
changed, refer to Date
Format on page 5-11.
Job No. doc0586 A job number is added to
the file name.
Page is loading ...
Page is loading ...
Page is loading ...
Page is loading ...
Page is loading ...
Page is loading ...
Page is loading ...
Page is loading ...
Page is loading ...
Page is loading ...
Page is loading ...
Page is loading ...
Page is loading ...
Page is loading ...
Page is loading ...
Page is loading ...
Page is loading ...
Page is loading ...
Page is loading ...
Page is loading ...
Page is loading ...
Page is loading ...
Page is loading ...
Page is loading ...
Page is loading ...
Page is loading ...
Page is loading ...
Page is loading ...
Page is loading ...
Page is loading ...
Page is loading ...
Page is loading ...
Page is loading ...
Page is loading ...
Page is loading ...
Page is loading ...
Page is loading ...
Page is loading ...
Page is loading ...
Page is loading ...
Page is loading ...
Page is loading ...
Page is loading ...
Page is loading ...
Page is loading ...
Page is loading ...
Page is loading ...
Page is loading ...
Page is loading ...
Page is loading ...
Page is loading ...
Page is loading ...
Page is loading ...
Page is loading ...
Page is loading ...
Page is loading ...
Page is loading ...
Page is loading ...
Page is loading ...
Page is loading ...
Page is loading ...
Page is loading ...
Page is loading ...
Page is loading ...
Page is loading ...
Page is loading ...
Page is loading ...
Page is loading ...
Page is loading ...
Page is loading ...
Page is loading ...
Page is loading ...
Page is loading ...
Page is loading ...
Page is loading ...
Page is loading ...
Page is loading ...
Page is loading ...
Page is loading ...
Page is loading ...
Page is loading ...
Page is loading ...
Page is loading ...
Page is loading ...
Page is loading ...
Page is loading ...
Page is loading ...
Page is loading ...
Page is loading ...
Page is loading ...
Page is loading ...
Page is loading ...
Page is loading ...
Page is loading ...
Page is loading ...
Page is loading ...
Page is loading ...
Page is loading ...
Page is loading ...
Page is loading ...
Page is loading ...
Page is loading ...
Page is loading ...
Page is loading ...
Page is loading ...
Page is loading ...
Page is loading ...
Page is loading ...
Page is loading ...
Page is loading ...
Page is loading ...
Page is loading ...
Page is loading ...
Page is loading ...
Page is loading ...
Page is loading ...
Page is loading ...
Page is loading ...
Page is loading ...
Page is loading ...
Page is loading ...
Page is loading ...
Page is loading ...
Page is loading ...
-
 1
1
-
 2
2
-
 3
3
-
 4
4
-
 5
5
-
 6
6
-
 7
7
-
 8
8
-
 9
9
-
 10
10
-
 11
11
-
 12
12
-
 13
13
-
 14
14
-
 15
15
-
 16
16
-
 17
17
-
 18
18
-
 19
19
-
 20
20
-
 21
21
-
 22
22
-
 23
23
-
 24
24
-
 25
25
-
 26
26
-
 27
27
-
 28
28
-
 29
29
-
 30
30
-
 31
31
-
 32
32
-
 33
33
-
 34
34
-
 35
35
-
 36
36
-
 37
37
-
 38
38
-
 39
39
-
 40
40
-
 41
41
-
 42
42
-
 43
43
-
 44
44
-
 45
45
-
 46
46
-
 47
47
-
 48
48
-
 49
49
-
 50
50
-
 51
51
-
 52
52
-
 53
53
-
 54
54
-
 55
55
-
 56
56
-
 57
57
-
 58
58
-
 59
59
-
 60
60
-
 61
61
-
 62
62
-
 63
63
-
 64
64
-
 65
65
-
 66
66
-
 67
67
-
 68
68
-
 69
69
-
 70
70
-
 71
71
-
 72
72
-
 73
73
-
 74
74
-
 75
75
-
 76
76
-
 77
77
-
 78
78
-
 79
79
-
 80
80
-
 81
81
-
 82
82
-
 83
83
-
 84
84
-
 85
85
-
 86
86
-
 87
87
-
 88
88
-
 89
89
-
 90
90
-
 91
91
-
 92
92
-
 93
93
-
 94
94
-
 95
95
-
 96
96
-
 97
97
-
 98
98
-
 99
99
-
 100
100
-
 101
101
-
 102
102
-
 103
103
-
 104
104
-
 105
105
-
 106
106
-
 107
107
-
 108
108
-
 109
109
-
 110
110
-
 111
111
-
 112
112
-
 113
113
-
 114
114
-
 115
115
-
 116
116
-
 117
117
-
 118
118
-
 119
119
-
 120
120
-
 121
121
-
 122
122
-
 123
123
-
 124
124
-
 125
125
-
 126
126
-
 127
127
-
 128
128
-
 129
129
-
 130
130
-
 131
131
-
 132
132
-
 133
133
-
 134
134
-
 135
135
-
 136
136
-
 137
137
-
 138
138
-
 139
139
-
 140
140
-
 141
141
-
 142
142
-
 143
143
-
 144
144


Triumph Adler CD 1018 Operating instructions
- Category
- Copiers
- Type
- Operating instructions
- This manual is also suitable for
Ask a question and I''ll find the answer in the document
Finding information in a document is now easier with AI
Related papers
-
Triumph-Adler DCC 2965 User manual
-
Triumph-Adler CDC 1965 User manual
-
Triumph-Adler DC 2435 User manual
-
Utax DC 2726 Operating instructions
-
Triumph-Adler P-C2660 User manual
-
-
Sharp DC 6130 User manual
-
TA Triumph-Adler P-3020 MFP User manual
-
Utax DC 2242 Operating instructions
Other documents
-
 Kyocera Mita TASKalfa 300ci Operating instructions
-
Utax CD 1325 Operating instructions
-
KYOCERA 3060 Operating instructions
-
Olivetti d-Copia 3001MF Owner's manual
-
KYOCERA TASKALFA 300I Operating instructions
-
-
KYOCERA TASKalfa 5500i Operating instructions
-
Utax CD 1435 User manual
-
KYOCERA All in One Printer 7550ci User manual
-
Triumph-Adler DC 2465 Owner's manual
