Sears 200.7121 User manual
- Category
- Car battery chargers
- Type
- User manual
This manual is also suitable for
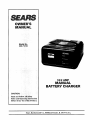
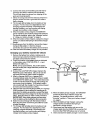
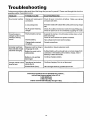
Sears 200.7121 is a 10/2 amp manual battery charger suitable for a wide range of home or light commercial uses. This charger is designed for 12-volt lead-acid batteries, and it features a user-friendly interface with simple controls for easy operation. With its advanced safety features and durability, the Sears 200.7121 is an excellent choice for maintaining and charging batteries in cars, trucks, RVs, boats, and other vehicles.
Sears 200.7121 is a 10/2 amp manual battery charger suitable for a wide range of home or light commercial uses. This charger is designed for 12-volt lead-acid batteries, and it features a user-friendly interface with simple controls for easy operation. With its advanced safety features and durability, the Sears 200.7121 is an excellent choice for maintaining and charging batteries in cars, trucks, RVs, boats, and other vehicles.


-
 1
1
-
 2
2
-
 3
3
-
 4
4
-
 5
5
-
 6
6
-
 7
7
-
 8
8
-
 9
9
-
 10
10
-
 11
11
-
 12
12


Sears 200.7121 User manual
- Category
- Car battery chargers
- Type
- User manual
- This manual is also suitable for
Sears 200.7121 is a 10/2 amp manual battery charger suitable for a wide range of home or light commercial uses. This charger is designed for 12-volt lead-acid batteries, and it features a user-friendly interface with simple controls for easy operation. With its advanced safety features and durability, the Sears 200.7121 is an excellent choice for maintaining and charging batteries in cars, trucks, RVs, boats, and other vehicles.
Ask a question and I''ll find the answer in the document
Finding information in a document is now easier with AI
Related papers
Other documents
-
DieHard 20071221 Owner's manual
-
-
-
-
-
-
-
-
-