Page is loading ...
Page is loading ...
Page is loading ...
Page is loading ...
Page is loading ...
Page is loading ...
Page is loading ...
Page is loading ...
Page is loading ...
Page is loading ...
Page is loading ...
Page is loading ...
Page is loading ...
Page is loading ...
Page is loading ...
Page is loading ...
Page is loading ...
Page is loading ...
Page is loading ...
Page is loading ...

DEAR CUSTOMER
EN
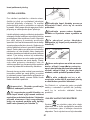
Discovering De Dietrich products means experiencing unique emotions.
The attraction is immediate from the moment you set eyes on the product.
The sheer quality
of the design shines through, thanks to the timeless style and outstanding
finishes which make each component an elegant and refined masterpiece
in its own right, each one in perfect harmony with the others.
Next, comes the irresistible urge to touch it.
De Dietrich’s design makes extensive use of robust
and prestigious materials. By combining state-of-the-art technology with top
quality materials,
De Dietrich
produces beautifully crafted products to help you get the most from the
culinary arts, a passion shared by all lovers of cooking and fine food.
We hope that you enjoy using this new appliance.
Thank you for choosing a De Dietrich product.
18

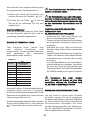
CONTENTS
Safety and important precautions...................................................
20
23
23
23
23
24
25
25
26
26-27
27-28
28-29
30-31
34
33
24
25
26
26
29
32
.........................................................................................
......................................................................................................
...........................................................................................
...........................................................................................
.........................................................................
..............................................................................
......................................................................
...................................................................
........................................................................
......................................................................
......................................................................
................................
.................................................................................
................................................................................
....................................................................
................................................................................................
............................................................................................
......................................................................................
..............................................................................
.....................................................................
Installation
Unpackıng
Installation
Electrical connection
Use
Handling elements
Switching on the device
Switching on a hot plate.
Switching off the hot plate
Residual heat indicator
Switching off the device
Double burner hot plate
Locking of the touch keys of the cooking hob
Flash cooking
Timer function
Safety switch off function
Care
Problems
Environment
Customer service
EN
19

These instructions are also available on the brand’s web site.
Please read this advice carefully before installing and using your appliance. These
instructions are intended to protect your safety and the safety of others. Keep this
manual with the appliance. If you sell or give the appliance to someone else, make
sure that you also give them this manual.
• With a view to constantly improving our products, we reserve the right to make
changes to their technical, functional or aesthetic characteristics in line with
technological progress.
In order to easily locate the make, model number, etc. of your appliance, we
recommend that you note this information on the “After-Sales Service Department
and Customer Support” page.
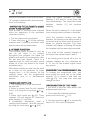
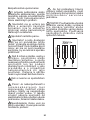
IMPORTANT SAFETY ADVICE AND PRECAUTIONS
This appliance can be used by
children over 8 years old and
persons with reduced
physical, sensory or mental
capabilities or without
experience and knowledge if
they have been correctly
informed or trained in the use
of the appliance in a safe way
and understand the hazards
involved.
Children must not be allowed
to play with the appliance.
Cleaning and maintenance
must not be carried out by
children without supervision.
Children under 8 years old
must be kept away from the
hob unless they are
supervised at all times.
The appliance and its
accessible parts become hot
during use.
Precautions must be taken to
avoid touching the heating
elements.
Metal objects such as knives,
forks, spoons and lids must
not be placed on the cooking
surface as they may become
hot.
Your hob is equipped with a
child safety device that locks
its operation after use or
during cooking (See « Child
Safety use» section).
Your appliance complies with
applicable European
Directives and regulations.
In order to avoid interference
between your cooking hob
and a heart pacemaker, the
pacemaker must be designed
and programmed in
compliance with the
regulations that apply to it. Ask
20

IMPORTANT SAFETY ADVICE AND PRECAUTIONS
the pacemaker manufacturer
or your GP.
Leaving oil or fat to cook
unattended on a hob can be
dangerous and lead to fire.
NEVER attempt to extinguish
a fire with water. Instead,
switch off the appliance, then
cover the flame with a lid or
fire blanket.
CAUTION: cooking must be
monitored. Short cooking
requires constant surveillance.
Danger of fire: do not store
objects in the cooking zones.
If the surface is cracked, turn
off the appliance to avoid the
risk of electric shock.
Do not use your hob until you
have replaced the glass top.
Avoid hard shocks from
cookware: although the
vitroceramic glass worktop is
very sturdy, it is not
unbreakable.
Do not place hot lids flat on
your cooking hob. A suction
effect may damage the
vitroceramic surface. Avoid
dragging cookware across the
surface, which could damage
the decorative finish on the
vitroceramic top in the long
term.
Never use aluminium foil for
cooking. Never place items
wrapped in aluminium foil or
packaged in aluminium dishes
on your cooking hob. The
aluminium will melt and
permanently damage your
appliance.
Do not store cleaning products
or inflammable products in the
cabinet underneath the hob.
If the power cable is damaged,
it should be replaced by the
manufacturer, its after-sales
service department or a
similarly qualified person, so
as to avoid danger.
Ensure that the power cables
of any electrical appliances
plugged in close to the hob are
not in contact with the cooking
zones.
Never use a steam cleaner to
clean your cooking hob.
The appliance is not designed
21

IMPORTANT SAFETY ADVICE AND PRECAUTIONS
to be switched on using an
external timer or separate
remote control system.
After use,
turn off the hob
using its control device and do
not rely on the pan detector.
22

•
1
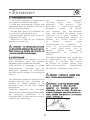
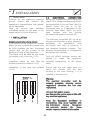
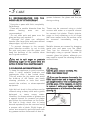
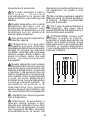
INSTALLATION
1.1 UNPACKING
Remove all the protective packing
pieces. Check and respect the
appliance’s characteristics that appear
on the nameplate
Note the service and standard
references shown on this plate in the
boxes below for future reference.
1. 2 INSTALLATION
Emplacement with cutlery drawer
If you wish to mount furniture or a drawer
under the hob, a separation board must
be fitted between the two. Accidental
contact with the hot surface of the
device’s housing is thus prevented.
The board must be fitted 20 mm under
the bottom cover of the hob. (1.2.1)
Installation above an oven See the
minimum distances scheme (1.2.3)
Installation of the seal see scheme
(1.2.4)
1.3 ELECTRICAL CONNECTION
Before you connect the hob to the mains,
check if the voltage and frequency match
those specified on the hob label, which is
placed under the hob or on the
Guarantee card, or if applicable on the
technical data sheet, which you must
keep together with this manual
throughout the product’s service life.
The electrical connection will be via an
all-pole circuit breaker or plug, whenever
accessible, in accordance with
the current and with a minimum 3
mm distance between contacts. This
ensures disconnection in emergencies
and allows hob cleaning.
Only the official technical service can
handle or repair the appliance,
including replacement of the power
cable.
Ensure that the inlet cable does not
come into contact with the hob
housing or the oven housing, if it is
installed in the same unit.
Warning:
The electrical connection must be
properly grounded, following current
regulations, otherwise the hob may
malfunction.
Unusual high power surges
can damage the control system (like with
any electrical appliance).
Keep the Guarantee Certificate or
the technical data sheet together with
the instructions manual throughout
the product’s service life. These
contain important technical information.
23
green-yellow
blue
brown
grey
black

•
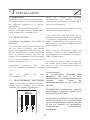
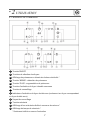
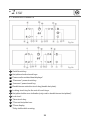
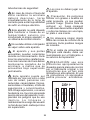
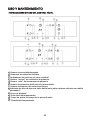
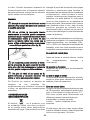
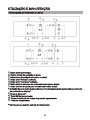
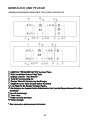
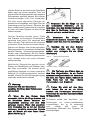
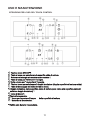
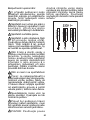
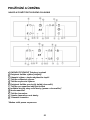
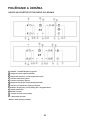
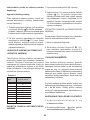
2USE
1 On/off touch key.
2
Hot plate selection touch keys.
c 3
3 Power and/or residual heat displays*.
4 “Decrease” power touch key.
5 “Increase” power touch key.
6
Double burner selection touch key (double hot plate).
7
Locking touch key for the rest of touch keys.
8
8 Hot plate double zone indicatior (only next to double burner hot plates)*.
9
Lock icon*.
10
Timer touch key.
11 *Time set hot plate icon.
12
*Timer display
* Only visible while running.
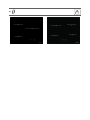
2.1. HANDLING ELEMENTS
Fig. 2a.
Fig. 2b.
24

•
2USE
The manoeuvres are done by means of
the touch keys. You do not need to exert
force on the desired touch key, you only
need to touch it with your fingertip to
activate the required function.
Each action is notified by a beep.
2.2 SWITCHING ON THE DEVICE
When the hob is connected for the first
time, it will be locked and the related
pilot light (9) will be on. To unlock it, first
touch locking touch key (7) until the
pilot light (9) switches off.
1 Touch the switching on touch key
(1) for at least one second.
The Touch Control is activated and a 0
appears with 50% brightness on all the
power displays (3).
If any zone has residual heat indication
before switch on ,the display continue s
showing ''H'' instead of 0.
If you do not take any action in the next
10 seconds the touch control will switch
off automatically.
2.3 SWITCHING ON A HOT PLATE
Once the Touch Control has been
activated by means of the touch key
(1), the power indicators of the hot
plates will display a 0 (3).
1.Press the touch key for the selected
hot plate (2). The related power
indicator ( 3 ) will be activated and
brightness of indicator will increase.
2 Using the touch key or (4/5),
choose the desired power level.
The and touch keys are repetitive,
so if you keep them pressed they
increase or decrease with a 0.5 second
interval.
Only one hot plate can be selected at the
same time
Warning:
To operate a hot plate, it must be
selected first. When you want to use a
hot plate,check the brightness of the
power indicator.After choosing hot plate,
brightness of power indicator should
increase.
Quick switch-on at maximum power:
Once you have selected the hot plate,
press the touch key (4) once. The hot
plate will be activated at full power.
2.4 SWITCHING OFF THE HOT PLATE
1 The hot plate must previously be
selected.
2 Using the touch key (4), lower the
power level to 0.
Quick switch-off alternatives :
i) If user keep finger on the selection
sensor for 2 seconds, the related zone
will be switched off.
ii) When you press touch keys and
(4/5) simultaneously, the hot plate will
switch off quickly.
25

•
2USE
2.5 RESIDUAL HEAT INDICATOR
The power indicator of the hot plate will
display an H when the glass surface
reaches a temperature that could cause
burning.When this risk disappears,
i) the display switches off (if the device is
in stand by),
ii) or displays 0 (if the appliance is still
running).
- SWITCHING ON THE DOUBLE HOT
PLATE
1 The related hot plate must be
selected.
2 Select the desired power (from 1 to 9)
using the touch key or (4/5).
3 Press the double hot plate touch key
(6) to activate the double burner.
When the double zone will be activated,
double zone indicator
(8) light on.
- SWITCHING OFF THE DOUBLE HOT
PLATE
1 The key, by which its double
burnerhot plate was switced on
previously is selected.
2 Press the double hot plate touch
key (6) to deactivate the double
burner. The double burner indicator
(8) will light off and the outer ring will be
deactivated
2.8 LOCKING OF THE TOUCH KEYS
OF THE COOKING HOB
To prevent undesired manipulation you
can lock the entire unit, except for the
on/off touch key, using the locking touch
key (7). This function is useful for
child safety. When the lock is activated,
the lock indicator light (9) comes on.
However, remember when the touch
control is on, the on/off touch key
(1)allows you to switch it off, even if
the lock is activated (the lock indicator
light (9) on).
On the other hand, if the touch control is
switched off, the locking function
does not allow the on/off touch key (1)
to be used.
Warning:
In a first run, H indication may appear in
a short time on the power display. This
showing is related with setup operation
and it does not mean the cooking zone is
hot.
Warning:
H indication is used for the safety
purposes in any case. Even if the power
is cut off for a long time, after power on,
H indication appears.
2.6 SWITCHING OFF THE DEVICE
The device can be switched off at any
time by pressing the general on/off touch
key (1). In standby mode an H will
appear in the zones that are hot. The rest
of the displays will not light up.
2.7 DOUBLE BURNER HOT PLATE
If your cooker has this option, the double
burner hot plate offers the possibility of
using the inside ring or also, in addition,
the outside one, depending on the size of
the pot or pan.
26

•
2USE
To deactivate the locking function, press
the locking touch key (7) once again.
Lock indicator (9) light off and touch
control will be ready for use.
Child Lock
The child lock is different and more
complicated than key lock. User can
activate key lock via one sensor. But
child lock need a sensor sequence. The
Child Lock is being used to prevent
children from turning on the hob.
Activating Child Lock :
1. The hob is switched on via (1) On/Off
touch key,
2. Any zone should not be selected.
When any zone is not selected, (5)
Increase power touch key and (4)
decrease power touch key and minus
sensors is hold for 3 seconds at same
time. At the end of this period, a short
buzzer sound is heard
3. After buzzer signal , the (7) locking
touch key is touched (there is no need to
keep press for a long time) and a long
buzzer sound is heard and the Child
Lock will be activated and all power
display shows “L”.
During Child Lock, if user touch any
sensor (Main sensor included) , “L” will
flash on display.
Warning :
Child lock status is not being stored. If
the energy of the hob is butted, child lock
status could not be preserved.
Deactivating Child Lock :
To be able to deactivate Child Lock, the
Child Lock should be activated before
and all power display show “L”
1. (5) Increase power touch key and
(4) decrease power touch key and
minus sensors is hold for 3 seconds at
same time. At the end of the this period,
a short buzzer sound is heard,
2. After buzzer signal , is touched to the
(7) locking touch key (there is no
need to keep press for a long time) and
a long buzzer sound is heard and the
Child Lock will be de activated and
“Indication will be light off.
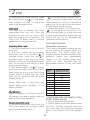
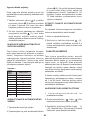
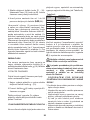
2.9 FLASH COOKING
(Automatic cook start)
This function facilitates cooking as you
do not
need to be present while it is
being done. The touch control pre-
programmes the chosen hot plate at the
maximum power and subsequently
lowers it to the desired power level
(which you have selected) after an
approximate amount of time (see table
1).
-
0
1
2
3
4
5
6
7
8
0
60
180
288
390
510
150
210
270
9
Selected
power
Automatic Cook Start
Function (in seconds)
- SWITCHING THE AUTOMATIC COOK
START FUNCTION ON).
1 The hot plate must be selected.
2 Select power 9 and then press power
touch key (5).After using the touch key
you must lower the continuous cooking
power to the desired level, (for example
6).
27

•
2USE
When the automatic cook function starts
"A" indication flashes with desired power
level on the display.
- SWITCHING THE AUTOMATIC COOK
START FUNCTION OFF
After at least 10 seconds have elapsed
since the beginning of the automatic
cook start function:
1 The hot plate must be selected.
2 Press touch key (5) till the indicator
reaches level 9 and the automatic cook
start function will be deactivated.
2.10 TIMER FUNCTION
This function makes it easier to cook, as
you do not need to be present
throughout the process: the timed hot
plate(s) will switch off automatically after
the set time has lapsed. There is a
separate timer for each hot plate, which
allows all of the hot plates to be timed
simultaneously.
With these models you can use the clock
as a timer for the hotplates for times
ranging from 1 to 99 minutes. All the
cooking areas can be programmed
individually and in a simultaneous
manner.
TIMING ONE HOTPLATE
1 The cooking zone to be timed must
be selected.
2 Select a power level for the hotplate
from 1 to 9 using the touch keys or
(5/4).
3 Press clock touch key (10). Timer
indicator (12) will display 00. Timed hot
plate display (11) will flash.
4 Immediately afterwards, enter a
cooking time between 1 and 99 minutes,
by using the touch keys or (5/4).
When the power indicator (3) stops
flashing, it will start to count down the
time automatically. The respective timed
hotplate disolay (11) will continue
flashing.
When the clock reaches 01, it will switch
from counting down minutes to seconds.
Once the selected cooking time has
elapsed, the heating zone being timed is
turned off and the clock emits a series of
beeps for several seconds. The timer
indicator will display a flashing 00 beside
the hotplate that has been disconnected.
If you wish to time another hotplate at
the same time, repeat steps 3 and 4.
If the heating zone turned off is hot, its
indicator displays an H or otherwise an
0. To turn off the audible signal touch
any sensor.
CHANGING THE PROGRAMMED TIME
To change the progrmmed time, you
must press the touch key of the timed
hotplate (2) to select it and then the
clock (10). You may then read and
change the time.
DISCONNECTION OF THE TIMER
If you want to stop the timer before the
programmed time is up
1 First select the hotplate and then
press clock touch key (10).
2 Use the touch key (4) to recude the
time to 00. The clock is cancelled.
28

•
2USE
Alternative metod :
After zone selection if timer touch key is
pressed for two seconds, the related
timer will be cancelled.
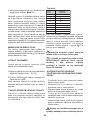
2.11 SAFETY SWITCH OFF FUNCTION
If due to an error one or several hot
plates do not switch off, the appliance
will be automatically disconnected after a
set amount of time (see table 2).
1
2
3
4
5
6
7
8
9
10
5
5
4
3
2
2
2
1
Selected
power
level
MAXIMUM OPERATION
TIME
(in hours)
When the “safety switch off” function has
been triggered, a 0 is displayed if the
glass surface temperature is not
dangerous for the user or an H if there is
a burn risk.
To reconnect the appliance, switch it off
by pressing the on/off key (1) and then
switch it on again.
Keep the control panel of the heating
areas clean and dry at all times.
In case of operating problems or
incidents not mentioned in this manual,
disconnect the appliance and contact the
technical service.
29

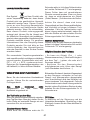
3.1 RECOMMENDATION FOR THE
GOOD USE OF VITROCERAMİC
* Use pots or pans with thick, completely
flat bottoms.
* Pans with a smaller diameter than the
shown heating area are not
recommended.
* Do not slide pots and pans over the
glass as they may scratch it.
* Although the glass can withstand
knocks from large pots and pans without
sharp edges, try not to knock it.
* To prevent damage to the ceramic
glass induction surface, try not to slide
the pots and pans over the glass, and
keep the bottoms of the vessels clean
and in good condition.
Try not to spill sugar or products
containing sugar on the glass while the
surface is hot as these could damage it.
3.2 CLEANING AND MAINTENANCE
To keep the appliance in good condition,
clean it using suitable products and
implements once it has cooled down.
This will make the job easier and avoid
the build-up of dirt Never use harsh
cleaning products or tools that could
scratch the surface, or steam-operated
equipment.
Light dirt not stuck to the surface can be
cleaned using a damp cloth and a gentle
detergent or warm soapy water.
However, for deeper stains or grease use
a special cleaner for ceramic hot plates
and follow the instructions on the bottle.
Dirt that is firmly stuck due to being
burned repeatedly can be removed using
a scraper with a blade. Slight tinges of
colour are caused by pots and pans with
dry grease residue underneath or due to
•
3CARE
grease between the glass and the pot
during cooking.
These can be removed using a nickel
scourer with water or a special cleaner
for ceramic hot plates. Plastic objects,
sugar or food containing a lot of sugar
that have melted onto the surface must
be removed immediately using a
scraper.
Metallic sheens are caused by dragging
metal pots and pans over the glass.
They can be removed by cleaning
thoroughly using a special cleaner for
ceramic glass hot plates, although you
may need to repeat the cleaning process
several times.
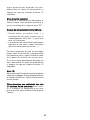
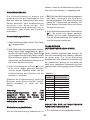
Warning:
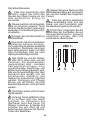
Use the glass scraper carefully. The
blade could cause injury!
If you use the scraper incorrectly, the
blade could break and a fragment could
get caught between the surrounding trim
and the glass. If this happens, do not try
to remove it using your hands, carefully
use tweezers or a knife with a fine edge.
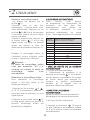
(See fig. 3)
fig. 3
30

•
3CARE
Only use the blade on the ceramic
surface, avoiding the scraper casing
coming into contact with the glass
because this could scratch it.
Use blades in perfect condition.
Immediately replace the blade if it is
damaged in any way.
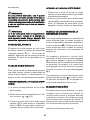
After you have finished with the
scraper, withdraw the blade and lock it.
(See fig. 4)
fig. 4
Blade protected Blade unprotected
Using the scraper
A pot or pan may becomestuck to
the glass due to a product having
melted between them. Do not try to
lift the pot while the hot plate is cold!
This could cause the glass break.
Do not step on the glass or lean
on it as it could break and cause
injury. Do not use the glass as a
surface for putting objects.
BRANDT reserves the right to make
changes to its manuals that it deems
necessary or useful, without affecting
the product’s essential features.
31

•
4PROBLEMS
Before calling the technical service,
perform the verifications specified below
The appliance does not work:
Ensure that the power cable is plugged
in.
The pot sticks to the glass:
If there is molten material between the
pot and the glass, set the hot plate to
maximum power and try to separate
them.
Error F1
If any of the sensors is active more than
10 seconds, this error situation occurs
and error code”F1” is showed. This error
can be related with different roots. One
of them is that there may be an object
(fork, knife…) on the any of the sensor.
Make sure that there is no any object on
the control unit, hob glass is wiped with
a dry cloth. If error situation continue
after this solution, please take out plug
or switch off fuse switch for 10 second.
Error F2
If more than 2 sensors are sensed at
same time, this error situation occurs
and error code”F2” is displayed.
Potential root reasons of the problem :
• There may be an object(pot…) or
water accumulation(overflow liquid from
pot…) that cover more than 2 sensors
• Touch control location may exposure
more heat or steam (from oven bottom
of the hob…)
Please be sure that there is no any object
on the sensors and switched off
all steam
and heat sources. Then,hob glass is wiped
with a dry cloth. If error situation continue
after this solution, please take out plug or
switch off fuse switch for 10 second.
Error FC
Fc message on the control and the hot
plates switch off: Overheating in the
electronics. Let thestove cool for a while.
32

• 5CUSTOMER SERVICE
Any repairs made to your appliance must
be carried out by a qualified professional
authorised to work on the brand. When
making contact, mention the complete re-
ference of your appliance (model, type,
serial number). This information appears
on the manufacturer’s nameplate atta-
ched to your equipment (1.1.1).
33

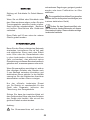
• 6ENVIRONMENT
CARE FOR THE ENVIRONMENT
This appliance’s packaging can be
recycled. Recycle is and so contribute to
protecting the environment, by placing it
in containers provided for the purpose by
local authorities.
Your appliance also contains lots of
recyclable material. This logo
indicates that used appliances
should not be mixed with other
waste.
The recycling of appliances
organised by your manufacturer is
carried out under the best conditions, in
accordance with European Directive
2002/96/EC on the disposal of waste
electronic and electrical equipment.
Contact your local authority or retailer for
information on used appliance collection
points close to your home.
Thank you for helping to protect the
environment.
34
Page is loading ...
Page is loading ...
Page is loading ...
Page is loading ...
Page is loading ...
Page is loading ...
Page is loading ...
Page is loading ...
Page is loading ...
Page is loading ...
Page is loading ...
Page is loading ...
Page is loading ...
Page is loading ...
Page is loading ...
Page is loading ...
Page is loading ...
Page is loading ...
Page is loading ...
Page is loading ...
Page is loading ...
Page is loading ...
Page is loading ...
Page is loading ...
Page is loading ...
Page is loading ...
Page is loading ...
Page is loading ...
Page is loading ...
Page is loading ...
Page is loading ...
Page is loading ...
Page is loading ...
Page is loading ...
Page is loading ...
Page is loading ...
Page is loading ...
Page is loading ...
Page is loading ...
Page is loading ...
Page is loading ...
Page is loading ...
Page is loading ...
Page is loading ...
Page is loading ...
Page is loading ...
Page is loading ...
Page is loading ...
Page is loading ...
Page is loading ...
Page is loading ...
Page is loading ...
Page is loading ...
Page is loading ...
Page is loading ...
Page is loading ...
Page is loading ...
Page is loading ...
Page is loading ...
Page is loading ...
Page is loading ...
Page is loading ...
Page is loading ...
Page is loading ...
Page is loading ...
Page is loading ...
Page is loading ...
-
 1
1
-
 2
2
-
 3
3
-
 4
4
-
 5
5
-
 6
6
-
 7
7
-
 8
8
-
 9
9
-
 10
10
-
 11
11
-
 12
12
-
 13
13
-
 14
14
-
 15
15
-
 16
16
-
 17
17
-
 18
18
-
 19
19
-
 20
20
-
 21
21
-
 22
22
-
 23
23
-
 24
24
-
 25
25
-
 26
26
-
 27
27
-
 28
28
-
 29
29
-
 30
30
-
 31
31
-
 32
32
-
 33
33
-
 34
34
-
 35
35
-
 36
36
-
 37
37
-
 38
38
-
 39
39
-
 40
40
-
 41
41
-
 42
42
-
 43
43
-
 44
44
-
 45
45
-
 46
46
-
 47
47
-
 48
48
-
 49
49
-
 50
50
-
 51
51
-
 52
52
-
 53
53
-
 54
54
-
 55
55
-
 56
56
-
 57
57
-
 58
58
-
 59
59
-
 60
60
-
 61
61
-
 62
62
-
 63
63
-
 64
64
-
 65
65
-
 66
66
-
 67
67
-
 68
68
-
 69
69
-
 70
70
-
 71
71
-
 72
72
-
 73
73
-
 74
74
-
 75
75
-
 76
76
-
 77
77
-
 78
78
-
 79
79
-
 80
80
-
 81
81
-
 82
82
-
 83
83
-
 84
84
-
 85
85
-
 86
86
-
 87
87
-
 88
88
-
 89
89
-
 90
90
-
 91
91
-
 92
92
-
 93
93
-
 94
94
-
 95
95
-
 96
96
-
 97
97
-
 98
98
-
 99
99
-
 100
100
-
 101
101
-
 102
102
-
 103
103
-
 104
104


De Dietrich DPV7550B User manual
- Type
- User manual
- This manual is also suitable for
Ask a question and I''ll find the answer in the document
Finding information in a document is now easier with AI
in other languages
- italiano: De Dietrich DPV7550B Manuale utente
- français: De Dietrich DPV7550B Manuel utilisateur
- español: De Dietrich DPV7550B Manual de usuario
- Deutsch: De Dietrich DPV7550B Benutzerhandbuch
- português: De Dietrich DPV7550B Manual do usuário
- slovenčina: De Dietrich DPV7550B Používateľská príručka
- čeština: De Dietrich DPV7550B Uživatelský manuál
Related papers


Other documents
-
Far TI60ST333/CH Operating instructions
-
Bertazzoni P304IAE User manual
-
Cata IB 633 Owner's manual
-
Teka TT 6315 User manual
-
CONTINENTAL EDISON CETI4Z2BV2 User manual
-
-
AIRLUX ATI322BK Owner's manual
-
Whirlpool AXMT 6634/WH Owner's manual
-
 Maunfeld MVI59.4HZ.2BT-WH White User manual
-
Bertazzoni P60 4 I NE Owner's manual
