
Ferm BV • P.O. Box 30159 • 8003 CD Zwolle • The Netherlands • www.ferm.com 0412-28
UK Subject to change
D Änderungen vorbehalten
NL Wijzigingen voorbehouden
F Sous réserve de modifications
E Reservado el derecho de modificaciones
técnicas
P Reservado o direito a modificações
I Con reserva di modifiche
S Ändringar förbehålles
SF Pidätämme oikeuden muutoksiin
N Rett till endringer forbeholdes
DK Ret til ændringer forbeholdes
H Változtatás jogát fenntartjuk
CZ Změny vyhrazeny
SL Predmet sprememb
PL temat do zmiany
RU äÓÏ·ÌËfl Ferm ÔÓÒÚÓflÌÌÓ Òӂ¯ÂÌÒÚ‚Û
ÂÚ ‚˚ÔÛÒ͇ÂÏÛ ˛ ² ÔÓ‰ÛÍˆË˛.
èÓÁÚÓÏÛ ‚ ÚÂıÌ˘ÂÒË ı‡‡ÍÚÂËÒÚËÍË
ÏÓ„ÛÚ ‚ÌÓÒËÚ¸Òfl ·ÂÁ Ô‰‚‡ËÚÂθÌÓ„Ó
ۂ‰ÓÏÎÂÌËfl.
GR H
www.ferm.com
UK
D
NL
F
E
P
I
S
SF
N
DK
USERS MANUAL 03
GEBRAUCHSANWEISUNG 06
GEBRUIKSAANWIJZING 09
MODE D’EMPLOI 12
MANUAL DE INSTRUCCIONES 15
ISTRUÇÕN A USAR 18
MANUALE UTILIZZATI 21
BRUKSANVISNING 24
KÄYTTÖOHJE 26
BRUKSANVISNING 29
BRUGERVEJLEDNING 32
HASZNÁLATI UTASÍTÁS 35
NÁVOD K POUŽITÍ 38
NOVODILA ZA UPORABO 40
INSTRUKSJĘ OBSŁUGI 43
êìäéÇéÑëíÇé èé ùäëèãìÄíÄñàà 46
O 50
Art.nr. CDM1044
FCS-480K
H
CZ
SL
PL
RU
GR
Page is loading ...

54 Ferm
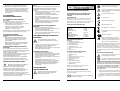
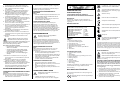
CORDLESS SCREWDRIVER
THE NUMBERS IN THE FOLLOWING TEXT
CORRESPOND WITH THE PICTURES AT PAGE 2
INTRODUCTION
This screwdriver is intended for tightening and
loosening screws and nuts. It has a device for setting the
torque and switching off the rotation.
TECHNICAL SPECIFICATIONS
FEATURES
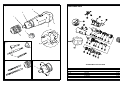
Fig. A & C
1. Hexagonal drive shaft
2. Torque setting ring
3. Direction switch
4. Keyless chuck
5. Battery release button
6. Battery with red charging LED
7. Ring
8. Accessories
PACKAGE CONTENTS
1 Cordless screwdriver
1 Charger
2 Batteries
1 Keyless chuck (max. 6 mm)
1 Magnetic bit holder
1 Adapter bit for socket
44 Accessories
1 Instruction manual
1 Safety instructions
1 Warranty card
Check the machine, loose parts and accessories for
transport damage.
SAFETY INSTRUCTIONS
The following symbols are used in these instructions for
use:
In accordance with essential applicable safety
standards of European directives
Class II machine – Double insulation – You don’t
need any earthed plug.
Denotes risk of personal injury, loss of life or
damage to the tool in case of non-observance of
the instructions in this manual.
Indicates electrical shock hazard.
Read instructions carefully
Indoor use only
Always recycle batteries
Never throw batteries into open fire
In case of failure, the transformer is not dangerous
Thermic protector
Faulty and/or discarded electrical or electronic
apparatus have to be collected at the appropriate
recycling locations.
Carefully read this manual before using the machine.
Make sure that you know how the machine functions and
how to operate it. Maintain the machine in accordance
with the instructions to make sure it functions properly.
Keep this manual and the enclosed documentation with
the machine.
ELECTRICAL SAFETY
Check that your mains voltage corresponds to the
input voltage of the charging adapter.
The charging adapter is double insulated in
accordance with EN-60335; therefore no earth
wire is required.
ADDITIONAL SAFETY INSTRUCTIONS.
If you should come into contact with any acid
from the accumulator block, wash the affected
parts with water immediately. If acid should
come into contact with the eyes, rinse them
immediately with water and seek medical advice as
soon as possible.
1. Before using both the accumulator block and the
battery charger, make sure you have read and
understood the operating instructions and safety
information.
2. Only use the accumulator block with the battery
charger provided – using other chargers could be
dangerous.
3. Keep the accumulator block, tool and battery
charger away from damp and wet conditions.
4. Before using the battery charger, check all wires are
properly connected.
Voltage | 4.8 V
—
---
Voltage charging adaptor | 230 V
Frequency | 50 Hz
Capacity battery | 1.3Ah
Charging time | 3-5 hours
Number of torque | 5
Speed. No load | 190/min
Weight (incl. battery) | 0.67 kg
Vibration | 0.48 m/s
2
Ferm 3

5. If any wires on the charger are damaged, do not use it
until these have been replaced.
6. When the charger is not in use it should not be
plugged in. When unplugging, do not pull the plug out
by the cable.
7. If the charger breaks down or suffers from other
technical problems, take it to a recognised dealership
to be checked before using it again. Any damaged
parts must be replaced.
8. Take care when handling the accumulator block, do
not drop it or knock it against other things.
9. Never attempt to repair the battery charger or
accumulator block yourself; this can be extremely
dangerous. Repairs should always be carried out by a
recognised dealership.
10. Always unplug the charger before cleaning or
carrying out any other maintenance on it.
11. Do not attempt to charge the accumulator block in
temperatures of below 10 degrees or above 40
degrees centigrade.
12. The accumulator block must not be short-circuited.
When an apparatus short-circuits, the strength of
the electric current is increased. This can cause the
apparatus to over heat, catch fire or even explode, causing
damage and also endangering the operator.
To avoid this;
• Firstly do not connect any wires to the poles of the
accumulator block;
• Ensure that no metal objects (nails, coins, paper-clips)
are caught in the opening of the accumulator block;
• do not expose the accumulator block to water or rain.
13. If the accumulator block is broken or can no longer
be recharged it must be properly disposed off.
14. Never throw the accumulator block into water or a
fire – it may explode.
15. When drilling or screwing in walls, floors, etc.,
electricity lines can be hit. Hold the tool at the plastic
handle to prevent an electrical shock. Never hold the
tool at the chuck or another metal part.
16. Turn the drill immediately off after the screw is
fastened. Overloading and damaging the battery or
motor can be prevented this way. Use the torque to
loosen the fastened screw.
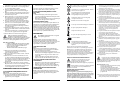
MOUNTING ACCESSORIES
INSERTING AND REMOVING BITS
Fig. C & D
When the ring is mounted, bits can easily be placed into
the hexagonal drive shaft:
• The bits can be placed directly on the tool, or on the
extension piece
• The sockets can be placed with help of the small
adapter piece (square-hexagonal)
Replace the ring by the keyless chuck, for using small
drills (max 6mm).
INSERTING AND REMOVING THE BATTERY
Fig. B
• Place the battery (6) at the bottom of the tool, as
shown in the figure. Ferm the battery until it snaps
into place.
• Ferm the release buttons (5) to remove the battery
from the bottom of the tool.
THE BATTERY LIFE SPAN
The battery life span is limited. If the run time of a loaded
battery shortens considerably, a new battery must be
purchased. If the tool is used irregularly, then charge the
battery at least once every six months for an optimal
result. When the battery is used under extreme hot or
cold circumstances the capacity will be less per charge.
OPERATION
Always observe the safety instructions and appli-
cable regulations.
Firmly hold the machine and ferm the bit with even
pressure into the workpiece. Do not force the machine.
Use only bits that do not yet show any signs of wear.
Worn bits have a negative effect on the efficiency of the
machine.
TORQUE ADJUSTMENT
Fig. E
The machine has different torque settings by means of
which the force for fastening and loosening screws can
be determined.
• Put the torque setting ring (2) at the required torque.
• Preferably select the lowest possible setting to move
the screw. Select a higher torque setting when the
motor is slipping.
• If the battery gets discharged, the motor will not slip
in position 4 or 5. Recharge the battery.
FASTENING AND LOOSENING SCREWS
• Ferm the top half of the direction switch (Fig. A. 3)
down to fasten screws (R).
• Ferm the lower half of the direction switch (Fig. A. 3)
up to loosen screws (L).
CHARGING BATTERIES
The battery that comes with the machine is not
fully charged.
• Only use the battery charger at temperatures
between +10 and +40 °Celsius.
• Only use the battery charger in dry rooms.
CHARGING
• Remove the battery from the machine
• Ferm the adapter plug of the charger into the battery
(near red LED)
• Plug the mains adapter into the (wall) socket
• The charging process starts; the red LED is now on
• If the battery is completely discharged or not used
for a long period, it takes about 24 hours to charge
the battery. Normally it takes about 5 hours.
• Place the battery in the tool after charging.
4 Ferm Ferm 53

MAINTENANCE
Make sure that the machine is not live when
carrying out maintenance work on the motor.
The Ferm machines have been designed to operate over
a long period of time with a minimum of maintenance.
Continuous satisfactory operation depends upon
proper machine care and regular cleaning.
CLEANING
Keep the ventilation slots of the machine clean to
prevent overheating of the engine. Regularly clean the
machine housing with a soft cloth, preferably after each
use. Keep the ventilation slots free from dust and dirt. If
the dirt does not come off use a soft cloth moistened
with soapy water. Never use solvents such as petrol,
alcohol, ammonia water, etc. These solvents may
damage the plastic parts.
LUBRICATION
The machine requires no additional lubrication.
FAULTS
Should a fault occur, e.g. after wear of a part, please
contact your local Ferm dealer.
In the back of this manual you find an exploded view
showing the parts that can be ordered.
ENVIRONMENT
In order to prevent the machine from damage during
transport, it is delivered in a sturdy packaging. Most of
the packaging materials can be recycled. Take these
materials to the appropriate recycling locations.
Take your unwanted machines to your local Ferm-
dealer. Here they will be disposed of in an
environmentally safe way. Battery cells are recyclable.
Take them to your local Ferm-dealer or a local recycling
station. The collected battery packs will be recycled or
disposed of in an environmentally safe way.
GUARANTEE
The guarantee conditions can be found on the separately
enclosed guarantee card.
We declare under our sole responsibility that this
product is in conformity with the following
standards or standardized documents
EN60745-1, EN60745-2-2, EN55014-1,
EN55014-2, EN60335-1, EN60335-2-29,
EN61000-3-2, EN61000-3-3
in accordance with the regulations.
98/37/EEC, 73/23/EEC, 89/336/EEC
from 01-09-2004
ZWOLLE NL
W. Kamphof
Quality department
CE
ı
DECLARATION OF CONFORMITY
(
UK
)
Ferm 5
. E
,
.
• (2)
.
•
.
.
• ,
4 5.
.
!" #$ $%$ & '&.
•
(. A. 3) (R).
•
(. A. 3)
(L).
!( & $$)&
.
•
+10 +40°C.
•
.
!
• .
•
( LED).
•
( ).
• :
LED.
•
,
24 .
, 5 .
•
.
&
.
Ferm
.
.
#$$(
.
,
.
.
,
.
, ,
..
.
%*$&
.
'%+'
..
,
Ferm.
.
'$%%&
,
.
.
.
Ferm. ,
.
.
Ferm
.
.
,
.
EN60745-1, EN60745-2-2, EN55014-1,
EN55014-2, EN60335-1, EN60335-2-29,
EN61000-3-2, EN61000-3-3
.
98/37/EEC, 73/23/EEC, 89/336/EEC
01-09-2004
ZWOLLE NL
W. Kamphof
CE
ı
% '$#$
(
GR
)
52 Ferm
Page is loading ...
Page is loading ...
Page is loading ...
Page is loading ...
Page is loading ...
Page is loading ...
Page is loading ...
Page is loading ...
Page is loading ...
Page is loading ...
Page is loading ...
Page is loading ...
Page is loading ...
Page is loading ...
Page is loading ...
Page is loading ...
Page is loading ...
Page is loading ...
Page is loading ...
Page is loading ...
Page is loading ...
Page is loading ...
Page is loading ...
-
 1
1
-
 2
2
-
 3
3
-
 4
4
-
 5
5
-
 6
6
-
 7
7
-
 8
8
-
 9
9
-
 10
10
-
 11
11
-
 12
12
-
 13
13
-
 14
14
-
 15
15
-
 16
16
-
 17
17
-
 18
18
-
 19
19
-
 20
20
-
 21
21
-
 22
22
-
 23
23
-
 24
24
-
 25
25
-
 26
26
-
 27
27
-
 28
28


Ferm CDM1044 Owner's manual
- Type
- Owner's manual
- This manual is also suitable for
Ask a question and I''ll find the answer in the document
Finding information in a document is now easier with AI
in other languages
- italiano: Ferm CDM1044 Manuale del proprietario
- français: Ferm CDM1044 Le manuel du propriétaire
- español: Ferm CDM1044 El manual del propietario
- Deutsch: Ferm CDM1044 Bedienungsanleitung
- Nederlands: Ferm CDM1044 de handleiding
- português: Ferm CDM1044 Manual do proprietário
- dansk: Ferm CDM1044 Brugervejledning
- polski: Ferm CDM1044 Instrukcja obsługi
- čeština: Ferm CDM1044 Návod k obsluze
- svenska: Ferm CDM1044 Bruksanvisning
- suomi: Ferm CDM1044 Omistajan opas
Related papers
Other documents
-
Ferax FSB-650 User manual
-
Menuett 813-232 User Instructions
-
 Meec tools 013148 User guide
-
 Meec tools 013149 User guide
-
 Meec tools 013147 User guide
-
Workzone WFL-023 User manual
-
 Power Craft PSD-480K User manual
-
Expert E201434 User manual
-
EINHELL Screwmaxx NGS 4.8 Operating instructions
-
ANSMANN ACS 410P Traveller Operating instructions


