Page is loading ...

45424
Printed in Canada 08-06-2011
INSTRUCTIONS & OPERATIONS MANUAL
WHISTLER EPA EXEMPT
US ENVIRONMENTAL PROTECTION
AGENCY 28A CERTIFIED
WOODSTOVES
Verified and tested following
UL 1482 Standards by:
Manufactured by: STOVE BUILDER INTERNATIONAL INC.
250, de Copenhague, Saint-Augustin-de-Desmaures (Quebec), Canada G3A 2H3
Tel: (418) 878-3040 Fax: (418) 878-3001
This manual is available for free download on the manufacturer’s web site. It is a
copyrighted document. Re-sale is strictly prohibited. The manufacturer may update this
manual from time to time and cannot be responsible for problems, injuries, or damages
arising out of the use of information contained in any manual obtained from
unauthorized sources.

2
TABLE OF CONTENTS
INTRODUCTION ................................................................................................................. 3
SPECIFICATIONS .............................................................................................................. 5
INSTALLATION ................................................................................................................... 6
POSITIONING THE STOVE ......................................................................................................... 6
CHIMNEY ..................................................................................................................................... 13
CHIMNEY CONNECTOR ........................................................................................................... 14
DRAFT .......................................................................................................................................... 16
WOODSTOVE UTILISATION ........................................................................................... 20
AVERAGE ENERGY YIELD OF ONE AIR DRIED CORD OF CUT WOOD ......................... 20
TESTING YOUR WOOD ............................................................................................................. 21
THE FIRST FIRES ........................................................................................................................ 21
IGNITION ..................................................................................................................................... 21
ASH DISPOSAL ........................................................................................................................... 22
FAN (BLOWER) OPERATION .......................................................................................... 22
MAINTENANCE ................................................................................................................ 23
GLASS ........................................................................................................................................... 23
GASKETING ................................................................................................................................ 23
PAINT ........................................................................................................................................... 23
CENTURY HEATING LIMITED WARRANTY ................................................................... 24

3
INTRODUCTION
Stove Builder International, one of the most important stove and fireplace manufacturer in
the Unites States, congratulates you on your purchase and wishes to help you get
maximum satisfaction from your wood stove. In the pages that follow, we will give you
advice on wood heating and controlled combustion as well as technical specifications
regarding installation, operation and maintenance of the model you have chosen.
The instructions pertaining to the installation of your wood stove comply with UL-1482
standards.
Read this entire manual before you install and use your new stove. If this stove is
not properly installed, a house fire may result. To reduce the risk of fire, follow the
installation instructions. Failure to follow instructions may result in property
damage, bodily injury, or even death.
Consult your municipal building department or fire officials about restrictions and
installations requirements in your area and the need to obtain a permit.
Make sure you keep this instruction manual. It will always be helpful. We also
suggest that you consult our web site at www.centuryheating.com. It will provide you
with a full range of information, such as how to order replacement parts.
CAUTIONS:
HOT WHILE IN OPERATION. KEEP CHILDREN, CLOTHING AND FURNITURE AWAY. CONTACT MAY
CAUSE SKIN BURNS.
DO NOT USE CHEMICALS OR FLUIDS TO IGNITE THE FIRE.
DO NOT LEAVE THE STOVE UNATTENDED WHEN THE DOOR IS SLIGHTLY OPENED.
DO NOT BURN WASTES, FLAMMABLE FLUID SUCH AS GASOLINE, NAPHTHA OR MOTOR OIL.
DO NOT CONNECT TO ANY AIR DISTRIBUTION DUCT OR SYSTEM.
ALWAYS CLOSE THE DOOR AFTER THE IGNITION.

4
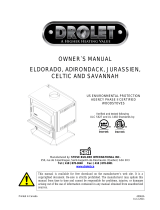
Cast iron flue collar installation:
1. Peel off the tape from the back
of the gasket and attach the
gasket to the rope groove at
the back of the flue collar;
2. Mount flue collar on top of the
stove. Make sure that the
damper holes on each side of
the flue collar are parallel to the
back of the stove;
3. Fix the flue collar with the
hardware supplied;
4. Install the flue damper inside
the flue collar as illustrated.
Firebricks installation:
1. Install the back and side
firebricks.
2. Install the bottom firebricks
17 bricks
4½’’ x 9’’ x 1¼’’
2 bricks
4½’’ x 4½’’ x 1¼’’

5
SPECIFICATIONS

6
INSTALLATION
SAFETY NOTICE
IF THIS STOVE IS NOT PROPERLY INSTALLED, A HOUSE FIRE MAY RESULT. TO REDUCE THE RISK
OF FIRE, FOLLOW THE INSTALLATION INSTRUCTIONS. FAILURE TO FOLLOW INSTRUCTIONS MAY
RESULT IN PROPERTY DAMAGE, BODILY INJURY, OR EVEN DEATH.
CONSULT YOUR MUNICIPAL BUILDING DEPARTMENT OR FIRE OFFICIALS ABOUT RESTRICTIONS
AND INSTALLATIONS REQUIREMENTS IN YOUR AREA.
USE SMOKE DETECTORS IN THE ROOM WHERE YOUR STOVE IS INSTALLED.
KEEP FURNITURE AND DRAPES WELL AWAY FROM THE STOVE.
NEVER USE GASOLINE, GASOLINE-TYPE LANTERN FUEL, KEROSENE, CHARCOAL LIGHTER FLUID,
OR SIMILAR LIQUIDS TO START OR "FRESHEN UP" A FIRE. KEEP ALL SUCH LIQUIDS WELL AWAY
FROM THE STOVE.
IN THE EVENT OF A CHIMNEY FIRE, CALL THE FIRE DEPARTMENT.
DO NOT CONNECT TO ANY AIR DISTRIBUTION DUCT OR SYSTEM.
A SOURCE OF FRESH AIR INTO THE ROOM OR SPACE HEATED SHALL BE PROVIDED WHEN
REQUIRED.
POSITIONING THE STOVE
It is very important to position the wood stove in an area that will favour the most efficient heat
distribution throughout the house. The stove should therefore be installed in the room where the
most time is spent, and in the most spacious room possible. Recall that wood stoves produce
radiating heat, the heat we feel when we are close to a wood stove. A wood stove also functions by
convection, that is through the displacement of hot air accelerated upwards and its replacement with
cooler air at the floor level. The stove’s convection effect is facilitated by the installation of a
blower.

7
CLEARANCES TO COMBUSTIBLES AND FLOOR PROTECTOR
To install your appliance correctly, it is extremely important to respect all clearances to any
combustibles as indicated on your stove’s certification label.
Clearances to combustible materials
(See figure 1.3 to match each letter to a clearance)
CLEARANCES (SINGLE WALL PIPE)
A
24" (610 mm)
B
26" (665 mm)
C
18" (460 mm)
D
27" (690 mm)
E
37" (940 mm)
F
29" (740 mm)
K
48" (1220 mm)
L
84" (213 cm)
CLEARANCES (DOUBLE WALL PIPE)
A
24" (610 mm)
B
26" (665 mm)
C
18" (460 mm)
D
27" (690 mm)
E
37" (940 mm)
F
29" (740 mm)
K
48" (1220 mm)
L
84" (213 cm)

8
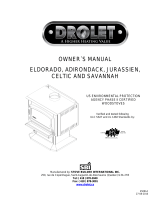
FIGURE 1.3 Clearances to combustible materials and floor protection

9
Floor protector
If the stove is to be installed on top of a combustible floor, it must be guarded by a non
combustible material as shown on figure 1.3 (see the dotted line area).
FLOOR PROTECTOR*
CANADA
USA
G
8’’ (205 mm) – Note 1
N/A (Canada only)
H
8’’ (205 mm)
N/A (Canada only)
I
18’’ (460 mm)
From door opening
16’’ (410 mm)
From door opening
J
N/A (USA only)
8’’ (205 mm)
M
8’’ (205 mm)
N/A (Canada only)
N
N/A (USA only)
Note 2
*Steel with a minimum thickness of 0.015’’ (0.38 mm) or ceramic tiles sealed together
with grout. No protection is required if the unit is installed on a non-combustible floor
(ex: concrete).
Note 1 : The floor protection at the back of the stove is limited to the stove’s required
clearance if such clearance is smaller than 8 inches (205 mm).
Note 2 : Only required under the horizontal section of the connector. Must exceed
each side of the connector by at least 2 inches (51 mm).
Reduced clearances using shielding
You may decrease the clearances by installing heat radiation shields between the walls or
the ceiling and the stove. These heat radiation shields must be installed permanently, and
can include sheet metal, a rigid non-combustible sheet or a masonry wall.
Clearances of not less than 1" (25 mm) and not more than 3" (76 mm) between the
bottom of the shield and the floor and not less than 3" (76 mm) between the top of the
shield and the ceiling must be respected to allow vertical air circulation behind the shield.
The shield must extend 20" (500 mm) above the stove top and 18" (450mm) to each side
of the stove (see graphic 1).
Following the installation of such a heat radiation shield, the clearances mentioned on the
stove certification plate may be reduced as stated in the following table.

10
TYPE OF PROTECTION
Reducing Clearances
With Shielding
Sides and
Rear/Back
Top
Sheet metal, a minimum of 0,024" (0,61mm) spaced out
at least 1" (25mm) by non-combustible spacers
(see graphic 2).
67%
50%
Ceramic tiles, or an equivalent non-combustible material
on fire-proof supports spaced out at least 1" (25 mm) by
non-combustible spacers (see graphic 3).
50%
33%
Ceramic tiles, or an equivalent non-combustible material
on fire-proof supports with a minimum of 0,024" (0,61
mm) sheet metal backing spaced out at least 1" (25 mm)
by non-combustible spacers (see graphic 4)
67%
50%
Brick spaced out at least 1" (25 mm) by non-combustible
spacers (see graphic 5)
50%
N/A
Brick with a minimum of 0,024" (0,61 mm) sheet metal
backing spaced out at least 1" (25 mm) by non-
combustible spacers (see graphic 6).
67%
N/A

11
Graphic 1
A- Minimum clearance required between the appliance and an unshielded combustible
ceiling.
B- 20 in. (500 mm) minimum;
C- 1 in. (25 mm) minimum;
D- Between 1 in. and 3 in. (25 mm and 75 mm);
E- 3 in.(75 mm) minimum;
F- 18 in. (457 mm) minimum.
1- Shielding;
2- Non-combustible spacers;
3- Ceiling protector;
4- Combustible wall;
5- Ceiling;
6- Appliance (side view);
7- Appliance (top view).

12
Graphic 2
A- 1 in.(25 mm) minimum;
1- Combustible wall;
2- Non-combustible spacers;
3- 0.024’’ (0.61mm) sheet metal.
Graphic 3
A- 1 in. (25 mm) minimum;
1- Combustible wall;
2- Non-combustible spacers;
3- Non-combustible support;
4- Ceramic tile or non-combustible material.
Graphic 4
A- 1 in. (25 mm) minimum;
1- Combustible wall;
2- Non-combustible spacer;
3- 0.024’’ (0.61 mm) thick sheet metal;
4- Non-combustible support;
5- Ceramic tile or non-combustible material.

13
Graphic 5
A- 1 in. (25 mm) minimum;
1- Combustible wall;
2- Non-combustible spacers;
3- Brick.
Graphique 6
A- 1 in. (25 mm) minimum;
1- Combustible wall;
2- Non-combustible spacers;
3- 0.024’’ (0.61 mm) thick sheet metal;
4- Brick.
CHIMNEY
Your wood stove may be hooked up with a factory built or masonry chimney. If you are
using a factory built chimney, it must comply with UL 103 standards; therefore it must be a
Type HT (2100°F). It is extremely important that it be installed according to the
manufacturer's specifications.
If you are using a masonry chimney, it is important that it be built in compliance with the
specifications of the National Building Code. It must be lined with fire clay bricks, metal or
clay tiles sealed together with fire cement. (Round flues are the most efficient).
The interior diameter of the chimney flues must be identical to the stove's smoke exhaust.
(6”). A flue which is too small may cause draught problems, while a large flue favours
rapid cooling of the gas, and hence the build-up of creosote and the risk of chimney fires.
Note that it is the chimney and not the stove which creates the draught effect; your
stove's performance is directly dependent on an adequate draught from your chimney.

14
The following recommendations may be useful for the installation of your chimney:
1. Do not connect this unit to a chimney flue serving another appliance.
2. It must rise above the roof at least 3' (0.9 mm) from the uppermost point of
contact.
3. The chimney must exceed any part of the building or other obstruction within a
10' (3.04 m) distance by a height of 2' (0.6 m).
4. Installation of an interior chimney is always preferable to an exterior chimney.
Indeed, the interior chimney will, by definition, be hotter than an exterior
chimney, being heated up by the ambient air in the house. Therefore the gas
which circulates will cool more slowly, thus reducing the build-up of creosote
and the risk of chimney fires.
5. The draught caused by the tendency for hot air to rise will be increased with an
interior chimney.
6. Using a fire screen at the extremity of the chimney requires regular inspection in
order to insure that it is not obstructed thus blocking the draught, and it should
be cleaned when necessary.
7. Clean your chimney every 2 months.
CHIMNEY CONNECTOR
Your chimney connector (commonly called stove pipe) and chimney must have the same
diameter as the stove’s exhaust outlet. The stove pipe must be made of aluminized or
cold roll steel with a minimum 24-gauge thickness (0.021" or 0.53 mm). It is strictly
forbidden to use galvanized steel.
The following recommendations may be useful for the installation of your chimney
connector:
Your chimney connector should be assembled in such a way that the male end
(crimped) faces down to prevent creosote dripping outside the joints. Attach each of
the sections to one another with three equidistant metal screws. Also use three
equidistant metal screws to attach the connector to the stove’s exhaust collar. See
Figure 2.3 (A) and Figure 2.3 (B).
The pipe must be short and straight. All sections installed horizontally must slope
at least ¼ inch per foot, with the upper end of the section toward the chimney. See
Figure 2.3 Detail B.
To insure a good draft, the total horizontal length of the connector should never
exceed 8' to 10' (2.4 to 3.04 m). In the case of vertical installation, the total length
of the connector can be much longer and connected without problem to the
chimney at the ceiling level.

15
There should never be more than two 90 degrees elbows in the whole connector
and chimney system. Never start with a 90
o
elbow. Always go up vertically for at
least 2 feet from the flue spigot before using a 90
o
elbow.
The connector must not pass through any combustible material, nor may it pass
through a concealed space (such as an attic, roof space, or closet). If passing
through a wall, ceiling, or into a masonry chimney, use either chimney components
listed for that specific use, or means acceptable to local authorities having
jurisdiction over the installation.
Installation of a "barometric draft stabiliser" (fireplace register) on a connector is not
recommended.
FIGURE 2.3 (A) Connecting Sections
FIGURE 2.3 (B) Minimum Slope
The assembly should be as short and direct as possible between the stove and
chimney (See figure 2.4 (A)). The use of two 45 degree elbows (See figure 2.4 (C))
is often preferable to a single 90 degree elbow (See figure 2.4 (B)) because less
turbulence is created in the exhaust flow and they result in less horizontal run.

16
(A)
(B)
(C)
FIGURE 2.4 The use of elbows
DRAFT
Your E.P.A Drolet stove’s performance will be optimised if it is installed with a chimney
(flue) system that provides an adequate draft. The draft is the force that moves air from
the appliance up through the chimney and is predominantly affected by the height and
diameter of the chimney, as well as the stack temperatures of the stove. If you test the
draft using a pressure gauge, the reading should be between .05 - .07 inches of water
column (w.c.) at a medium-high fire. A draft measure of less than .03" w.c. will cause
operational difficulties while too much draft (greater than .10" w.c.) will result in over-firing
of the stove. This can result in excessive operating temperatures. In this case, the
installation of elbows totaling no more than 180° (ex.: 2 x 30° elbows, 2 x 45° elbows or 2
x 90° elbows) can be installed to help reduce excessive draft. If the addition of elbows is
not sufficient, a manual damper can be installed in the vertical flue pipe.

17
MASONRY CHIMNEY:
Clay liner
Thimble
Clean out
door

18
FACTORY BUILT THIMBLE:

19
BRICK THIMBLE:

20
WOODSTOVE UTILISATION
Your heating unit was designed to burn wood only; no other materials should be burnt.
Wastes and other flammable materials should not be burnt in your wood stove. Any type
of wood may be used in your stove, but specific varieties have better energy yields than
others. Please consult the following table in order to make the best possible choice.
AVERAGE ENERGY YIELD OF ONE AIR DRIED CORD OF CUT WOOD
Wood species
Energy yield
(millions of BTU/cord)
High energy yield
Oak
29
Sugar Maple
28
Beech
26
Yellow birch
25
Ash
24
Elm
23
Medium energy yield
Larch (Tamarack)
23
Red Maple
23
Douglas red fir
23
Silver birch
22
Alder
18
Poplar
17
Hemlock
17
Low energy yield
Spruce
17
Pine
17
Bass
16
Fir
13
Data provided by Energy, Mines and Resources - Canada
IT IS EXTREMELY IMPORTANT THAT YOU USE DRY WOOD ONLY IN YOUR WOOD
STOVE. The wood must have dried for 9 to 15 months, such that the humidity content (in
weight) is reduced below 20% of the weight of the log. It is very important to keep in mind
that even if the wood has been cut since one, two or even more years, it is not necessarily
dry, if it has been stored in poor conditions; under extreme conditions, it may even rot
instead of drying. The vast majority of the problems related to the operation of a wood
stove are caused by the fact that the wood used was too damp or had dried in poor
conditions. These problems can be:
ignition problems
creosote build-up causing chimney fires
low energy yield
blackened windows
incomplete log combustion
/