Page is loading ...

1
C3 MALVERN CHRONOGRAPH
O W N E R ’ S H A N D B O O K

Your Christopher Ward watch has been designed and engineered by highly talented craftspeople to ensure
not only accurate and precise timekeeping but also to bring a real pride of ownership that only luxury items
of the highest quality can ever hope to deliver.
You have made an investment, a good one, and the aim of this handbook is to help you make the most of that
investment during what I hope will be a lifetime of ownership.
Christopher Ward
TIME ON YOUR SIDE...


Your C3 Malvern chronograph is constructed from the finest components and materials available including
one of Switzerland’s finest quartz movements. As with all watches of this quality, with the right care and
attention, your new Christopher Ward watch has the potential to become an heirloom piece giving further
joy to future generations. It’s for this reason we have created our industry leading approach to after-sales care
which we term the CW360 Watch care Programme. It’s designed to deliver you complete peace of mind
and the best support possible throughout the lifetime of your ownership and has three key elements, namely:
1. 60 DAY FREE RETURNS
Our success depends on you being completely happy with your new Christopher Ward watch. If for any reason you aren’t, you have up to 60
Days to return your watch, absolutely free of charge, and receive a replacement or full refund by return - and without any quibbles from us!
2. FREE 5 YEAR MOVEMENT GUARANTEE
Your watch, at its heart, has a top quality precision engineered Swiss movement – so it’s very unlikely to give you problems with the minimum
amount of care and attention, including a regular service. We recommend you return your watch to us every 3/4 years for a service, so
our expert technicians can keep your fine timepiece in the peak of condition. (We recommend that whenever your quartz battery needs
changing you consider having the watch serviced at the same time to keep it in perfect working order.)
3. SERVICING & REPAIRS...THE CHRISTOPHER WARD WAY...
Our innovative approach to servicing and repairing your Christopher Ward watch means that having your watch serviced or repaired doesn’t
mean months of waiting followed by an exorbitant bill - which is pretty much the experience guaranteed by every other luxury watch brand.
We have developed an easy, quick and affordable expert service and repairs programme that doesn’t cost the earth and has your watch back
where it belongs - on your wrist - in double-quick time.
Visit our website for more details about the CW360 Watch Care Programme.
THE CW360 WATCH CARE PROGRAMME

And here’s a few tips to help keep your watch working perfectly…
• Neverchangethedatebetweenthehoursof8pmand2am–it’salittlelikechanginggearswithoutusing
the clutch – never a good idea.
• Thoroughlyrinseyourwatchinfreshwaterafterimmersioninsaltwater.
• Alwaysensurethecrownisfullytightenedbeforeuseinwater.
• Alwaysadheretothewaterresistanceratingofyourwatchwhichyouwillfindlaterinthishandbook.
• Yourwatchisshockresistanttominorimpactsbutdroppingfromheightontoahardsurfacemaydamage
the movement.

THE C3 MALVERN CHRONOGRAPH
Swiss made
13 Jewel Ronda quartz movement
Precision etched two-piece dial
Split-seconds/stopwatch function
Handfinished316LStainlesssteel/24ctPVD
gold case
Luminescent indices and hands
Screw-in crown and back plate
Anti-reflective sapphire crystal
Straps and bracelet with easy opening
butterfly clasp
Hand polished case with unique engraved serial
number
Water resistant to 5 atm
Technical DaTaFeaTUReS
40mm
10.3mm
Ronda5040.D
316LStainlesssteel/24ctPVD
Gold
+20/-10secondspermonth
18.8Oe
20mm
Diameter:
Height:
Calibre:
Case:
Accuracy:
Magnetic
resistance:
Strap:

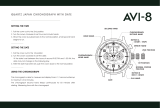
DiSplay elemenTS
Second hand
Minute hand
Hour hand
Minute counter
Centre stop-second
1⁄10 second counter
(hour counter after 30 seconds)
Date
conTRol bUTTonS
Push-button A
Crown
Push-button B
DESCRIPTION OF THE DISPLAY AND CONTROL BUTTONS

SETTING THE TIME
For a superior water resistance your crown is of the
screw-intype.Togettopositionturnthecrown
anti-clockwise until it releases itself.
Pull out the crown to position (the watch stops).
Turnthecrownuntilyoureachthecorrecttime
e.g. 08.45 hr.
Push the crown back into position and screw the
crown in a clockwise direction in order to maintain
waterresistance.Thecrownshouldsitflushtothe
case.
1 2 3
1
1
3

SETTING THE DATE (QUICK
MODE)
Pull out the crown to position (the watch
continues to run).
Turnthecrownclockwiseuntilthecorrectdate
appears.
Pull the crown to position
Push the crown back into position until flush
with the case and screw in.
Please note: The date can not be changed during the
date changing phase between 20.00 hrs and 02.00 hrs
as the watch gearing will already be aligning itself to
change the date. The crown should always be screwed
in after adjustment, and it is best to do so from position
3 to avoid advancing beyond the desired date.
1
1
2 3
3
3
2
1

SETTING THE DATE/TIME
Example:
Date/timeonthewatch: 17th/01.25hr
Present date / time: 4th /20.30hr
Pull out the crown to position (the watch
continues to run).
Turnthecrownclockwiseuntilyesterday’sdate
appears ie. 3rd.
1
1
2
2
2

Pull out the crown to position (the watch stops).
Turnthecrownclockwiseuntilthecorrectdate
ie. 4th appears (after passing through midnight).
Continue to turn the crown until the correct
time20.30hrappears.
Push the crown back into position until flush
with the case and screw in.
1 2 3
3
1

CHRONOGRAPH:
Theminute counter measures 30 minutes per rotation.
Thecentre stop-second measures 60 seconds per rotation.
The1⁄10 second counter measures 1 second per rotation. After 30 seconds this counter works as an hour
counter.Thehourcountermeasures10hoursperrotation.
DiSplay elemenTS
Minute counter
Centre stop-second
1⁄10 second counter
(hour counter after 30 seconds)
conTRol bUTTonS
Push-button A
(Start / Stop)
Push-button B
(Reset)
Please note:
Before using the chronograph functions, please ensure that:
Thecrownisinposition (screwed in).
The3chronographhandsareatzeropositionfollowingactivationofpush-button B.
Should this not be the case, the positions of the hands must be adjusted (see the chapter entitled
‘Adjusting the chronograph hands to zero position’).
1
1

CHRONOGRAPH:
BASIC FUNCTION
(Start / Stop / Reset)
Example:
Start: Press push-button A.
Stop: to stop the timing, press push-button A once
more and read the 3 chronograph
counters: 4 min / 38 sec / 7⁄10 sec.
Zero positioning:
Press push-button B.
(The3chronographhandswillberesettotheir
zero positions).
Example of use:
Timingarunnerover100m.
Push-button A
Push-button B
1
2
3
1
2
3

Push-button B
CHRONOGRAPH:
ACCUMULATED TIMING
Example:
Start: (start timing).
Stop: (e.g. 15 min 5 sec following ).
Restart: (timing is resumed).
Stop: (e.g. 13 min 5 sec following )
=28min10sec
(accumulated measured time is shown)
Reset:
The3chronographhandsarereturnedtotheir
zero positions.
Repeat: as necessary.
Example of use:
Overall time to complete a journey less the coffee
breaks.
Push-button A
5
2
3
1
5
6
4
1
3
1
2
3
4

CHRONOGRAPH:
INTERMEDIATE OR INTERVAL
TIMING
Example:
Start: (start timing).
Display interval:
e.g. 10 minutes 10 seconds (timing continues
in the background).
Making up the measured time:
(the 3 chronograph hands are quickly
advanced to the ongoing measured time).
* Stop: (final time is displayed).
Reset:
The3chronographhandsarereturnedto
their zero positions.
Please note:
* Following , further intervals or intermediates
can be displayed by pressing push-button B.
Example of use: 4 x 100m relay.
Push-button A
*
Push-button B
2
3
1
5
4
3
1
2
4
3
5

ADJUSTING CHRONOGRAPH
HANDS TO ZERO POSITION
Example:
One or several chronograph hands are not in their
correct zero positions and have to be adjusted (e.g.
following a battery change).
Pull out the crown to position (all three
chronograph hands are in their correct or incorrect
zero position).
Keep push-buttons A and B depressed
simultaneouslyforatleast2seconds(thecentre
stop-second rotates by 360° corrective mode is
activated).
Push-button A
Push-button B
321
3
3

Adjusting the centre stop second
Single step A 1 x short
Continuous A long
When correct press button B to set.
Corrective mode for the 1/10 second counter
is now activated.
Adjusting the 1⁄10 second counter hand (position 6h)
Single step A 1 x short
Continuous A long
When correct press button B to set. Corrective mode
for the minute counter is now activated.
Adjusting the minute counter (position 9h)
Single step A 1 x short
Continuous A long
Return the crown to position (flush with the
case).
Terminationofthechronographhands
adjustment can be carried out at any time.
A
B
1 2 3
1

Although your watch has been through vigorous static
pressure testing, it is worth remembering that there are
many variables that can affect the water resistance of
your watch.
For instance, arm movements during swimming and the
sudden impact of diving and watersports will drastically
increase the pressure the watch is under. Wearing your
watch in the bath, shower, or sauna can also have an
effect as a rapid increase in temperature can cause seals
to expand and in extreme cases, malfunction or create
condensation.
For these reasons, the water resistance rating of your
watch (as shown) should only ever be considered a
guideline and we strongly recommend they are always
adhered to.
1 aTm (10 METRES)
Safe to wear your watch while washing
your hands with tap water.
3 aTm (30 METRES)
Washing your car and/or general
hosepipe usage.
5 aTm (50 METRES)
Water resistant to most household
shower units.
10 aTm (100 METRES)
Safe to use while snorkelling in open
water.
30 aTm (300 METRES)
Ideal for experienced divers and those
practising scuba-diving.
50 aTm (500 METRES)
Professional divers, experiencing
prolonged exposure underwater.
100 aTm (1000 METRES)
Professional deep sea diving.
WATER RESISTANCE

STRAPS & BRACELETS
As you would expect, we place as much emphasis on the quality of our straps and bracelets as we do our
watches. We only use the finest leathers for our straps and our premium alligator straps are all ethically
sourcedfromCITESapprovedfarmsinLouisiana.Similarly,weonlyusethefinestmetalsintheconstruction
of our bracelets, all of which are precision engineered for durability, efficiency and comfort.
ThefollowingguidelinesexplainhoweasyitistouseandadjustyourChristopherWardstraporbracelet:
LEATHER STRAP WITH EASY RELEASE BUTTERFLY CLASP
Step 1
Step 2
Step 3
Step 4
Step 5
Step 6
Step 7
Step 8
Locate the clasp
Press the quick-release
Pull open the clasp
Locate the opening
Threadstrapthrough
Secure the strap
Close the clasp
Complete
1
5
2
6
3
7
4
8

QUICK-RELEASE PINS (WHERE APPLICABLE)
Step 1
Step 2
Step 3
Step 4
Locate the release
Dragbuttonback
Detachstrap
Align holes to click a
new strap in position
BRACELET WITH MICRO-ADJUSTMENT
Step 1
Step 2
Step 3
Step 4
Press to release
Expandadjustment
Adjust pin position
Close the clasp
Micro Adjust
DIVER’S EXTENSION (WHERE APPLICABLE)
Press
Step 1
Step 2
Step 3
Step 4
Press to release
Expandadjustment
Adjust pin position
Close the clasp
Diver's
Extension
1
1
1
2
2
2
3
3
3
4
4
4
/