Vision Fitness t9700hrt Owner's manual
- Category
- Treadmills
- Type
- Owner's manual
This manual is also suitable for

OWNER’S
GUIDE
T9700S
AND
T9700HRT
PLATFORM TREADMILLS


ongratulations on choosing a VISION FITNESS Treadmill. You’ve taken
an important step in developing and sustaining an exercise program! Your
Treadmill is a tremendously effective tool for achieving your personal
fitness goals. Regular use of your Treadmill can improve the quality of your
life in so many ways…
Here are just a few of the health benefits of aerobic exercise:
•WeightLoss
•AHealthierHeart
•ImprovedMuscleTone
•IncreasedDailyEnergyLevels
•ReducedStress
•HelpInCounteringAnxietyandDepression
•AnImprovedSelfImage
The key to reaping these benefits is to develop the exercise habit. Your
new Treadmill will help you eliminate the obstacles that prevent you
from getting in your exercise time. Snow and rain and darkness won’t
interfere with your workout when you have your Treadmill in the comfort of
your home. This Owner’s Guide provides you with basic information on
startinganexerciseprogram.Amorecompleteknowledgeofyournew
Treadmill will assist you in realizing your goal of a healthy lifestyle.
Service to your Treadmill should only be performed by your
VISION FITNESS retailer. Please contact your authorized VISION FITNESS
retailer should service be required. If a question or problem arises which
cannot be handled by your VISION FITNESS retailer, please contact us:
VISION FITNESS
1600LandmarkDrive
CottageGrove,WI53527
Ph:1.800.335.4348
Fax:1.608.839.8731
www.visionfitness.com
C

ALL MODELS
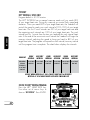
T9700S T9700HRT G E N E R A L
Table of Contents
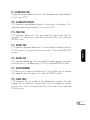
SAFETY INSTRUCTIONS ..................... 4
POWER REQUIREMENTS .................... 5
ASSEMBLY, PLACEMENT .................... 6
MOVING & LEVELING ...................... 7
POWER & EMERGENCY STOP ............ 8
SAFETY MAGNET KEY & CLIP ............. 9
FEEDBACK DISPLAY ........................ 10
FEATURES & QUICK KEYS ............... 14
WORKOUT TOTALS.......................... 15
SPEED & ELEVATION QUICK KEYS .... 16
CONTACT HEART RATE ..................... 17
CHOOSING PROGRAM & AGE .......... 21
CHOOSING A LEVEL ........................ 20
CHOOSING A TIME & WEIGHT ......... 21
PROGRAM DETAILS ......................... 22
USING THE SPRINT 8 PROGRAM ...... 23
PACER PROGRAM DETAILS ............... 24
HRT WEIGHT LOSS & HRT CARDIO ... 25
HRT ENDURANCE ............................ 30
HRT INTERVAL ................................ 34
ABOUT HEART RATE TRAINING .......... 39
WIRELESS CHEST TRANSMITTER ...... 40
CUSTOM PROGRAMS 1-3 ................ 41
CUSTOM PROGRAMS 4 AND 5 ........ 44
A L L M O D E L S
T 9 7 0 0 H R T
CONSOLE
T 9 7 0 0 S
CONSOLE
EASY START ................................... 18
G E N E R A L
USER ENGINEERING MODE .............. 46
AUTO-CALIBRATION ......................... 49
TROUBLESHOOTING ........................ 50
COMMON QUESTIONS .................... 52
TENSIONING THE BELT .................... 53
HOME MAINTENANCE ..................... 54
COMMERCIAL MAINTENANCE ........... 55
HOME WARRANTY .......................... 56
LIMITED USE COMMERCIAL WARRANTY . 58
DEVELOPING A FITNESS PROGRAM ... 60
EXERCISE GUIDELINES .................... 61
BALANCED FITNESS ........................ 62


3
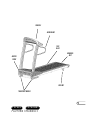
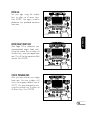
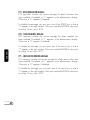
T 9 7 0 0 S
P L A T F O R M T R E A D M I L L S
T 9 7 0 0 H R T
TRANSPORT WHEELS
CONSOLE
HANDLEBARS
SIDE
RAILS
MOTOR
COVER
LEVELERS
RUNNING
BELT

44
ALL MODELS
IMPORTANT PRECAUTIONS
SAVE THESE INSTRUCTIONS
Whenusinganelectricalproduct,basicprecautionsshouldalwaysbefollowed,
including the following: Read all instructions before using this treadmill. It is the
responsibility of the owner to ensure that all users of this treadmill are adequately
informed of all warnings and precautions. If you have any questions after reading
thisguide,contactCustomerTechSupportatthenumberlistedonthebackpanel
oftheOWNER’SGUIDE.
To reduce the risk of burns, fire, electrical shock or injury
to persons:
•Never use the treadmill before securing the safety tether clip to your clothing.
•Ifyouexperienceanykindofpain,includingbutnotlimitedtochestpains,nausea,
dizziness, or shortness of breath, stop exercising immediately and consult your
physician before continuing.
•Whenexercising,alwaysmaintainacomfortablepace.
•Donotwearclothesthatmightcatchonanypartofthetreadmill.
•Alwayswearathleticshoeswhileusingthisequipment.
•Donotjumponthetreadmill.
•Donotoperateunderblanketorpillow.Excessiveheatingcanoccurandcause
fire, electric shock, or injury to persons.
•Atnotimeshouldmorethanonepersonbeontreadmillwhileinoperation.
•Thistreadmillshouldnotbeusedbypersonsweighingmorethan400lbs.Failure
to comply will void the warranty.
•Donotusetreadmillinanylocationthatisnottemperaturecontrolled,suchasbut
not limited to garages, porches, pool rooms, bathrooms, car ports or outdoors.
Failure to comply may void the warranty.
•Topreventelectricalshock,neverdroporinsertanyobjectintoanyopening.
•Thetreadmillshould neverbeleftunattendedwhenpluggedin.Unplugfrom
outlet when not in use and before putting on or taking off parts.
•Keeppowercordawayfromheatedsurfaces.Donotcarrythisunitbyitssupply
cord or use the cord as a handle.
•Disconnectallpowerbeforeservicingormovingtheequipment.Toclean,wipe
surfaces down with soap and slightly damp cloth only; never use solvents.
•Donotuseotherattachmentsthatarenotrecommendedbythemanufacturer.
Attachmentsmaycauseinjury.
•DonotremovetheconsolecoversunlessinstructedbyCustomerTechSupport.
Service should only be done by an authorized service technician.
•Neveroperatethetreadmillwiththeairopeningblocked.Keeptheairopening
clean, free of lint and hair.
•Donotoperatewhereaerosol(spray)productsarebeingusedorwhenoxygen
is being administered.
•Usethetreadmillonlyasdescribedinthisowner’sguide.
WARNING!

5
ALL MODELS
It is essential that your treadmill is used only indoors, in a climate controlled room. If
your treadmill has been exposed to colder temperatures or high moisture climates,
it is strongly recommended that the treadmill is warmed up to room temperature
before first time use. Failure to do so may cause premature electronic failure.
CHILDREN
•AtNOtimeshouldpetsorchildrenundertheageof13beclosertothetreadmill
than 10 feet.
•AtNOtimeshouldchildrenundertheageof13usethetreadmill.
•Childrenovertheageof13ordisabledpersonsshouldnotusethetreadmill
without adult supervision.
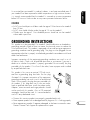
GROUNDING INSTRUCTIONS
This product must be grounded. If a treadmill should malfunction or breakdown,
grounding provides a path of least resistance for electrical current to reduce the
risk of electrical shock. This product is equipped with a cord having an equipment-
grounding conductor and a grounding plug. The plug must be plugged into an
appropriate outlet that is properly installed and grounded in accordance with local
codes and ordinances.
Improper connection of the equipment-grounding conductor can result in a risk
ofelectricshock.Checkwithaqualifiedelectricianorservicemanifyouarein
doubtas towhetherthe productisproperlygrounded.Donotmodifythe plug
provided with the product. If it will not fit the outlet, have a proper outlet installed
by a qualified electrician.
Thisproductisforuseonanominal120-voltcircuit,
and has a grounding plug that looks like the plug
illustrated.Animproperconnectionoftheequipment
grounding conductor can result in a risk of an electrical
shock.Donotmodifytheplugthatwasprovidedwith
this product. If this plug does not fit into your outlet,
have a qualified electrician install the proper outlet.
Adapters,extensioncordsandsurgeprotectorsshould
notbeusedwiththisproduct.Also,aGFIprotected
receptacle should not be used. It is recommended to
usea20ampdedicatedcircuit.
•Connectthisexerciseproducttoaproperlygroundedoutletonly.
•Never operate product with a damaged cord or plug even if it is working properly
•Neveroperateanyproductifitappearsdamaged,orhasbeenimmersedinwater.
ContactCustomerTechSupportforreplacementorrepair.

66
ALL MODELS
ASSEMBLY
VISION FITNESS recommends this Treadmill be assembled and delivered
by qualified personnel. If you have elected to assemble this product
yourself, for your safety please read and follow each of the steps in
the enclosed Assembly Guide. It is recommended, when possible, that
assembly be performed by an authorized VISION FITNESS retailer. If
you have any questions regarding any part or function of your Treadmill,
contact your VISION FITNESS retailer.
PLACEMENT IN YOUR HOME
It is important that you place your Treadmill in a comfortable and inviting
room. Your Treadmill is designed to use minimal floor space. Many
people will place their Treadmills facing the TV or a picture window. If at
all possible, avoid putting your Treadmill in an unfinished basement. To
make exercise a desirable daily activity for you, the Treadmill should be
in an attractive setting.
NOTE: If you place your Treadmill facing out from a wall, you should leave
three feet between the wall and the Treadmill to ensure safe operation.

7
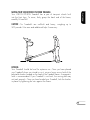
PLATFORM
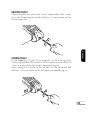
MOVING YOUR VISION FITNESS PLATFORM TREADMILL
Your VISION FITNESS Treadmill has a pair of transport wheels built
into the front legs. To move, firmly grasp the back end of the frame,
carefully lift and roll.
CAUTION: Our Treadmills are well-built and heavy, weighing up to
300pounds!Usecareandadditionalhelpifnecessary.
LEVELING
Your Treadmill should be level for optimum use. Once you have placed
your Treadmill where you intend to use it, raise or lower one or both of the
adjustablelevelerslocatedonthebackoftheTreadmillframe.Acarpenter’s
level is recommended. If your Treadmill is not level, the running belt may
not track properly. Once you have leveled your Treadmill, lock the levelers
in place by tightening the nuts against the frame.

88
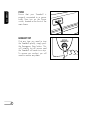
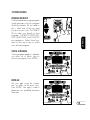
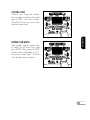
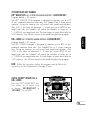
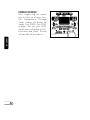
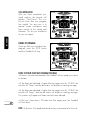
POWER
Ensure that your Treadmill is
properly connected to a power
outlet, then turn on the Power
switch, located at the front of the
main frame.
EMERGENCY STOP
If at any time you need to stop
the Treadmill quickly, simply press
the Emergency Stop button. This
will instantly cut all power and
the Treadmill will come to a stop.
To resume your workout, you will
need to re-enter any data.
8.8.8. 8.8.8.
8888 8888 88 8888
ALL MODELS

9
ALL MODELS
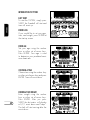
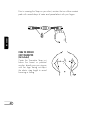
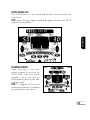
SAFETY MAGNET KEY & CLIP
Your VISION FITNESS Treadmill
will not start unless the Safety
Magnet Key is inserted into the
circle in the console overlay. You
should attach the clip end to your
clothing. If at any time you need to
stop the Treadmill quickly, simply
pull the SafetyMagnetKeyoffthe
console. This will cut all power to
the Treadmill, and it will come to
a complete stop. To resume your
workout,placetheSafetyMagnet
Keybackinplace.Thiswillsend
you back to the start-up mode.
8.8.8. 8.8.8.
8888 8888 88 8888

1010
ALL MODELS
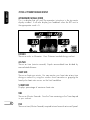
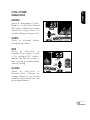
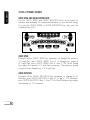
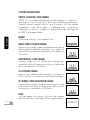
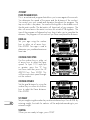
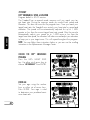
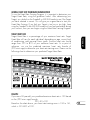
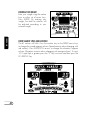
T9700S & T9700HRT FEEDBACK DISPLAY
ALPHANUMERIC MESSAGE CENTER
This is a display that will scroll the operation instructions in the top center
displaywindow.ItwillalsodisplayyourfeedbackwhentheLEDnextto
the appropriate word is lit.
DISTANCE
Shownasmilesorkilometers.ViewDistancetraveledduringworkout.
AVG PACE
Shown as time (minutes:seconds). Equals accumulated time divided by
accumulated distance.
HEART RATE
Shown as beats per minute. You can monitor your heart rate at any time
during a workout by using the wireless chest transmitter or gripping the
hand pulse heart rate sensors on the front handlebar.
% HEART RATE
Displayspercentageofmaximumheartrate.
TIME
ShownasMinutes:Seconds.ViewtheTimeremainingortheTimeelapsed
in your workout.
PACE
Shownastime(Minutes:Seconds)requiredtotravelonemileatcurrentSpeed.

11
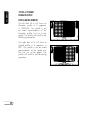
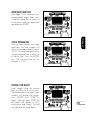
ALL MODELS
T9700S & T9700HRT
FEEDBACK DISPLAY
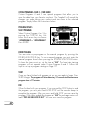
ELEVATION
Shown as percentage of incline,
Elevation is visible in the left-hand
LEDwindow.Indicateshowsteeply
inclined the running surface is to
simulate walking/running on a hill.
CALORIES
Shown as estimated calories
burned during workout.
SPEED
Shown as Miles/Hour or
Kilometers/Hour, Speed isvisible
in the right-hand LED window.
Indicates how fast the running sur-
face is moving to simulate outdoor
walking/running.
AVG SPEED
Shown as Miles/Hour or
Kilometers/Hour. Calculates the
Average Speed of your workout
based on accumulated time and
accumulated distance.

1212
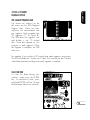
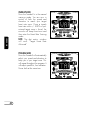
ALL MODELS
T9700S & T9700HRT
FEEDBACK DISPLAY
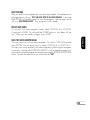
PROFILE MATRIX WINDOW
The left dots #1-6 will show an
Elevation profile in 6 segments
in ORANGE. This profile is not
an exact representation of the
elevation profile, but just a bar
graph. The profile will scroll to the
left during operation.
The right dots #1-6 will show a
Speed profile in 6 segments in
RED. This profile is not an exact
representation of the speed pro-
file, but just a bar graph. The
profile will scroll to the left during
operation.

13
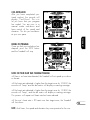
ALL MODELS
T9700S & T9700HRT
FEEDBACK DISPLAY
SPB-SEGMENT PROGRESS BAR
The center two columns on the
dot matrix are the SPB (Segment
Progress Bar). These two bars
represent the accumulated time
per segment. Each program has
20 segments (17 for Sprint 8).
The SPB takes the segment time
and divides it into 10 vertical
dots. More dots appear as you
progress in each segment. When
the segment is complete, the SPB
starts over.
SCAN FUNCTION
To scan the data during your
workout, simply press the ENTER
key. To continuously Scan, press
andholdENTERuntiltheConsole
double-beeps(abouttwoseconds.)
Forexample,ifyourworkoutis20minuteslong,eachsegmentisoneminute.
The SPB will divide the 1 minute into 10 dots, or 6 seconds per dot. The dots
would clear and start counting up as each segment is complete.

1414
ALL MODELS
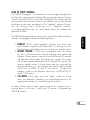
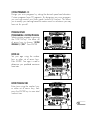
T9700S & T9700HRT FEATURES
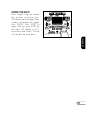
USER LOG-IN
The T9700S and T9700HRT consoles have a special feature that allows
youtoLog-Inandsavealldatafromyourworkout.Tousethisfunction
follow these steps.
PRESS LOG-IN BUTTON
Usethenumberkeysoreitherset
ofarrowkeystochooseauserI.D.
number (1-10). This will appear
in the Alphanumeric Message
Center.ThenpressENTER.
CHOOSE A PROGRAM
(T9700HRT ONLY)
Select the desired program by
using one of the Program Quick-
Keys (see Page 19 for program
setup)orpressSTARTtoenterthe
Manualmode.
SAVE AGE AND WEIGHT
When setting up a program after entering user Log-In, your age and
weightwillbesavedtoyourLog-Innumber.

15
ALL MODELS
TOTALS ARE DISPLAYED
Now your accumulated totals for Distance, Hours, Calories, Average
Speed,andAveragePacearedisplayed.PressENTERtoscrollthedata.
RESET WORKOUT TOTALS
Whenreviewingyourusertotals,simplypressandholdtheSTOPkeyon
the overlay. This will clear the user total information.
PRESS WORKOUT TOTALS BUTTON
Usethenumberkeysoreitherset
of arrow keys to enter your user
I.D. number. This is the same
number that you use to log-in
before you begin working out.
Then press ENTER.
T9700S & T9700HRT FEATURES
WORKOUT TOTALS BUTTON
TousethisfunctionyouwillneedtousethesameuserI.D.numberand
follow these three steps.

1616
ALL MODELS
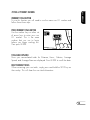
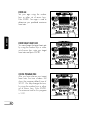
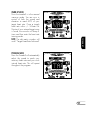
T9700S & T9700HRT FEATURES
QUICK SPEED AND QUICK ELEVATION KEYS
Use the QUICK SPEED and QUICK ELEVATION keys as an option to
increase and decrease the speed and elevation to your desired setting.
First presstheQUICKSPEED orQUICKELEVATIONkey,then pressthe
numberedkeys(0-9).
QUICK SPEED
ExamplesoftheQUICK SPEEDkeyoperation:tochange thespeedto
4.0 mph/kph, press QUICK SPEED, then 4. To change the speed to
4.5mph/kph,pressQUICKSPEED,then4,then5.TheQuickSpeed
keys adjust the speed in 0.1 mph/kph increments. The maximum speed
usingtheQuickSpeedkeysis9.9mph/kph.
QUICK ELEVATION
Examples of the QUICK ELEVATION key operation: to change to 6%
elevation press QUICK ELEVATION, then 6. To go to 10% elevation,
pressQUICKELEVATIONthen1,then0.TheQuickElevationkeysadjust
theelevationin1%increments.
Page is loading ...
Page is loading ...
Page is loading ...
Page is loading ...
Page is loading ...
Page is loading ...
Page is loading ...
Page is loading ...
Page is loading ...
Page is loading ...
Page is loading ...
Page is loading ...
Page is loading ...
Page is loading ...
Page is loading ...
Page is loading ...
Page is loading ...
Page is loading ...
Page is loading ...
Page is loading ...
Page is loading ...
Page is loading ...
Page is loading ...
Page is loading ...
Page is loading ...
Page is loading ...
Page is loading ...
Page is loading ...
Page is loading ...
Page is loading ...
Page is loading ...
Page is loading ...
Page is loading ...
Page is loading ...
Page is loading ...
Page is loading ...
Page is loading ...
Page is loading ...
Page is loading ...
Page is loading ...
Page is loading ...
Page is loading ...
Page is loading ...
Page is loading ...
Page is loading ...
Page is loading ...
Page is loading ...
Page is loading ...
-
 1
1
-
 2
2
-
 3
3
-
 4
4
-
 5
5
-
 6
6
-
 7
7
-
 8
8
-
 9
9
-
 10
10
-
 11
11
-
 12
12
-
 13
13
-
 14
14
-
 15
15
-
 16
16
-
 17
17
-
 18
18
-
 19
19
-
 20
20
-
 21
21
-
 22
22
-
 23
23
-
 24
24
-
 25
25
-
 26
26
-
 27
27
-
 28
28
-
 29
29
-
 30
30
-
 31
31
-
 32
32
-
 33
33
-
 34
34
-
 35
35
-
 36
36
-
 37
37
-
 38
38
-
 39
39
-
 40
40
-
 41
41
-
 42
42
-
 43
43
-
 44
44
-
 45
45
-
 46
46
-
 47
47
-
 48
48
-
 49
49
-
 50
50
-
 51
51
-
 52
52
-
 53
53
-
 54
54
-
 55
55
-
 56
56
-
 57
57
-
 58
58
-
 59
59
-
 60
60
-
 61
61
-
 62
62
-
 63
63
-
 64
64
-
 65
65
-
 66
66
-
 67
67
-
 68
68


Vision Fitness t9700hrt Owner's manual
- Category
- Treadmills
- Type
- Owner's manual
- This manual is also suitable for
Ask a question and I''ll find the answer in the document
Finding information in a document is now easier with AI
Related papers
-
Vision Fitness T10 Owner's manual
-
-
-
-
-
-
-
-
-
Vision Fitness T9800S User manual
