Page is loading ...

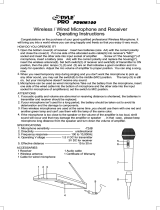
PDKWM806B
UHF Dual Channel Wireless Handheld Microphone
Portable Digital Audio Sound Mixer Receiver Set
with Wireless BT Receiver System, Fixed Frequency
Questions? Issues?
We are here to help!
Phone: (1) 718-535-1800
Email: [email protected]

www.PyleUSA.com
2
www.PyleUSA.com
3
PLEASE READ THIS MANUAL CAREFULLY BEFORE USING AND STRICTLY
OPERATE AND STORE IN ACCORDANCE WITH THE INSTRUCTIONS.
PLEASE SAVE IT FOR YOUR FUTURE REFERENCE.
CAUTIONS
1. Do not use the unit under water, don't expose it to rain. Please store it in a
cool, dry place.
2. Please use and store it in normal temperature. Do ot move it from overheated
to supercooled condition frequently as well as keep away from heat sources
such as heater and oven.
3. When using and storing, please pay attention to dust and moisture.
4. Be careful to violent collision.
5. To avoid acoustical feed-back, do not hold the microphone close to the
loudspeakers.
6. For the best sound pick-up pattern do not hold your hand against the
microphone head.
7. Remove the batteries from the battery compartment when the device is not
used for a long time.
Features:
• Hassle-Free Wireless Microphone System
• Multi-Source Audio Signal Mixing Ability
• Control Audio Levels from External Devices
• Mixer Receiver System for Convenient Sound Level Adjustment
• Wireless BT Music Streaming Ability
• Dual Fixed Frequency System Design
• Adjustable Rotary Controls: Echo, Tone, Volume: Mic 1, Mic 2
• Wired Microphone Support
• (2) 1/4’’ Mic Inputs
• RCA Audio (L/R) & Video Signal Input/Output Jacks
• Rear Panel 1/4’’ Mixed Output
• Adjustable Antennas for Extended Wireless Range
• Includes Handheld Wireless Microphones
• Rugged Microphone Construction & Steel Mesh Grill
• Convenient ON/OFF/MUTE Power Switch
• Battery Operated Mic, Requires (2) 'AA' Batteries, Included
• Ultra-Wide Frequency Range
• Built-in Acoustic Pop Filter
• Ideal for speech, Karaoke, DJ Sound & House Party Audio
Wireless BT Connectivity:
• Simple & Hassle-Free Pairing
• Works with All of Your Favorite Devices
(Smartphones, Tablets, Laptops, Computers, etc.)
• Wireless BT Network Name: 'PYLEUSA'
• Wireless BT Version: 4.2
• Wireless BT Range: 60’ ft
What's in the Box:
• Audio Mixer Receiver
• Wall Power Adapter
• 1/4’’ Audio Cable
• 3.5mm to 2RCA Audio Cable
Technical Specs:
• UHF Fixed Frequency: S12: 517.6MHz(F1) +521.5MHz(F2);
S34: 533.7MHz(F3)+537.2MHz(F4)
• Wireless Operation Range: Up to 165’+ ft.
• Modulation Mode: FM
• Maximum Deviation: +/-75KHz
• Frequency Response: 80-18kHz (+/-3dB)
• Frequency Stability: 20ppm
• Audio Dynamic Range: >90dB
• S/N Ratio: >95dB
• T.H.D: <0.5%
• Mirror Image Rejection: >50dB
• LINE Input Sensitivity: 380mV/-8.5dB
• MIC Input Sensitivity: 5mV/-46dB
• LINE Input Impedance: 20 KΩ
• MIC Input Impedance: 600Ω
• Receiver Power Supply: 110/240V (18V/500mA Power Adapter)
• Mic Element: Dynamic
• Antenna: Built-in Housing
• RF Output: <10mW
• Spurious Emission: <-40dB
• Battery Operated Mic, Requires (2) 'AA' Batteries Each
• Current Dissipation: <120mA
• Microphone Dimensions (L x D): 9.6’’ x 1.5’’ (Each)
• Base Receiver Dimensions (L x W x H): 8.3’’ x 4.4’’ x 1.7’’
• (2) Audio + Video (3RCA) Cables
• (2) Handheld Microphones
• (4) 'AA' Batteries

www.PyleUSA.com
4
www.PyleUSA.com
5
HANDHELD MICROPHONE
1. Grille (capsule inside)
2. Power/low battery Indicator
3. Power ON/OFF/MUTE Switch
4. Battery Compartment/Cover
Operation
1. Open battery cover. Install the provided 2pcs 1.5V AA batteries and then
close the cover. Pay attention to the correct polarity.
2. Slide power switch to "ON" position to turn on the microphone. Power indicator
will ash once and then go o. This indicates correct operation.
3. Now receiver RF indicator should light. Please conrm frequency of
microphone same as the receiver before operation.
4. Slide power switch to center "MUTE" position to mute the sound.
5. During operation if power indicator lights red, this indicates the battery is Iow.
Please replace new battery.
6. If the microphone is not going to be used for any length of time, please slide
power switch to OFF position and remove the battery.
RECEIVER
Front Panel
Rear Panel
1. Main Power: Press to switch the unit power to ON and OFF.
2. ECHO: Rotate the echo knob to your desired level.
3. RF 1: The indicator will light red when wireless microphone 1 is on.
4. AF 1: The indicator will light green when speak to wireless microphone 1.
5. BT: When main power is ON, the indicator will ash blue fast to be ready to
connect BT audio device. After BT audio device is connected the indicator will
light constant blue. When audio device is playing the indicator will ash blue
slowly.
6. RF 2: The indicator will light red when wireless microphone 2 is on.
7. AF 2: The indicator will light green when speak to wireless microphone 2.
8. W/MIC 1: Rotate to adjust the volume of the wireless microphone 1 and wired
dynamic MIC 1.
9. W/MIC 2: Rotate to adjust the volume of the wireless microphone 2 and wired
dynamic MIC 2.
10. TONE: This control is used to adjust the bass, treble quality of the microphone
sound. The bass is decreased and treble is increased when the control turned
clockwise. The bass is increased and treble is decreased when the control
turned counter clockwise.
11. MUSIC: Rotate to adjust the volume of music.
12. MIC IN 1: Insert the 6.3mm plug of wired dynamic MIC into MIC 1 Jack.
13. MIC IN 2: Insert another 6.3mm plug of wired dynamic MIC into MIC 2 Jack.
14. ANT. B: Receiving antenna of the wireless microphone 2.
15. Video input jack (RCA type): Connect this RCA Jack to DVD, Streamer,
Set-Top Box or any other A/V source for video in.
16. Audio input jack (RCA type): Connect this set of RCA Jack to DVD, Streamer,
Set-Top Box or any other A/V or Audio source for audio in.
17. Video output jack (RCA type): Connect this RCA Jack to TV or Screens for
video out.
18. Audio output jack (RCA type): Connect this set of RCA Jack to Active
Speakers, Hi Fi system for audio out(mixed music and MIC signal).
19. AF OUT (6.35): Alternatively connect this jack to MIC IN of your amplier for
audio out (mixed music and MIC signal).
20. DC IN: Connect DC jack of supplied AC / DC adapter to this jack.
21. ANT. A: Receiving antenna of the wireless microphone 1.
1 2
3
4
1
2
4
5
6
7
8 11
12
139 10
3
14
15
21
18 19 2017
16

www.PyleUSA.com
6
www.PyleUSA.com
7
Operation
1. Connect the receiver to A/V source, Speaker and TV (refer to CONNECTION OF
RECEIVER). Then connect the provided AC/DC adapter to the receiver and
turn the receiver power on.
2. Turn the microphones power on. RF indicators on receiver will light.
3. Turn on your AV source, Speaker and TV or other Screen.
4. Adjust Tone, Echo, MIC volume and Music volume to your desired level.
5. Now you are ready to sing!
RECEIVER CONNECTION
Audio Input
You can bring in the music either via Bluetooth or from RCA input on back.
Wireless BT Streaming Input
To play music from your Smartphone etc via BT, turn on Wireless BT function of
your Smartphone and search for “PYLEUSA" and connect.
No password is required. Then you can play music in your Smart phone.
RCA Input on Back
Connect audio source to RCA input jack on the back of receiver with the provided
RCA/RCA cables(white and red) if your audio source has RCA output, such as
DVD player, Set-Top Box, etc.
Or connect audio source to RCA input jack on the back of receiver with the
provided 3.5mm to RCA cables if your audio source has 3.5mm phone out, such
as iPad, Smartphones, Tablets, Laptops, Computers, etc.
Audio Output
Both the ¼ inch AF OUT jack and the L/R RCA output jacks on the back of
receiver output the nal mix of music and microphone. To output the sound
you need to have an additional audio device (speaker, Hi Fi system).
Connect the ¼ inch AF OUT jack on the back of receiver to MIC input jack on
amplier with supplied ¼ inch cable. Or connect the L/R RCA output jacks on
back of receiver to L/R RCA input jacks on active speaker with supplied RCA
cables.
Video Input and Output
Along with the L/R audio input/output jacks, there is a video input and output
jack on the back of receiver. Connect video output of AV source such as DVD
player, Set-Top Box etc. to video input on the back of receiver with the provided
RCA video cable(yellow). Connect video input of TV or other Screen to video
output on the back of receiver with another RCA video cable (provided).
DVD player etc.
with RCA output
White
Red
Computer etc. with
3.5mm phone out
Active Speaker
MIC IN
Passive Speaker
RCA input
OR

www.PyleUSA.com
8
www.PyleUSA.com
9
RCA Video In of TV
or other Screen
RCA Video Out of DVD
or other AV source
Yellow
Yellow
Remarks:
Video input and output on the back of receiver is just a pass through of video
from AV source to TV or Screens. You can also connect video output of AV
source directly to video input of TV or other Screen.
FCC RULES AND REGULATIONS
This device complies with Part 15, Subpart B of FCC rules. Operation is
subject to the following two conditions:
1. This device may not cause harmful interference and
2. This device must accept any interference that is recieved, including any
interference that may cause undesired operation.
Warning:
Changes or modications to this unit not expressly approved by the the party
responsible for compilance could void the user's authority to operate the
equipment.
/