Page is loading ...

1
Revision date: 02.11.15
#113133
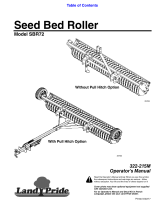
Extension Handle*
#113132 FodderPro 3.0
Hand-Held Seed Spreader
Handle
Extension Handle
Frame
Roller
Adjusters
Adjuster
Spreader Screed
Ski
Ski
*Extension handle is shown attached to the 113132 seed
spreader. Items are sold separately.
©2015 FarmTek®
All Rights Reserved. Reproduction
is prohibited without permission.

2Revision date: 02.11.15
The steps below show how to quickly set the 113132 FodderPro 3.0 Seed Spreader to spread seed at the desired depth. Use pliers to turn wing nuts if needed.
A tape measure or ruler is also needed to set depth.
#113132 FodderPro 3.0 Seed Spreader
End view identifies main parts used for setting desired depth to
spread seed. (Consult fodder system guide for suggested setting.)
2. Beginning at one end, turn thumb nuts to adjust roller height.
1. Set seed spreader on a flat surface and loosen wing nut on
each adjuster at each end.
3. Measure from top of flat surface to underside of roller and
continue adjusting thumb nuts until desired setting is achieved.
(Consult fodder system guide for suggested setting.)
Seed Depth
Adjustable
Nuts
Adjustable Speader Ski
Roller
Wing
Nut
Seed Depth

3
Revision date: 02.11.15
#113132 FodderPro 3.0 Seed Spreader
4. Verify that both ends of spreader ski remain tight against flat
surface.
6. Recheck roller height at both ends. Dimensions must match.
Adjust as needed. Ends of both spreader skis must remain flat
against surface for proper operation—Step 4.
5. Move to the other end and repeat steps to set roller height.
7. Tighten four wing nuts to lock adjusting screws in position.
continued—
Roller

4Revision date: 02.11.15
#113132 FodderPro 3.0 Seed Spreader
8. Loosen two spreader screed wing nuts to allow for spreader
screed adjustments. Use a 7/16" wrench to hold bolt head if
needed. Screed runs between spreader skis.
9. Adjust screed at both ends to be even with bottom of roller.
After dimension is set, tighten wing nuts. Hold bolt head
with a wrench if needed. See labeled diagram on cover for
adjustable screed location.
Set screed even
with roller.
Spreader Ski
Dimension is equal to the
required seed depth.
ATTENTION: Use a tape measure or ruler to set screed position.
Dimension should match dimension used in Step 6.
10. Check all wing nuts to ensure they are tight. Test seed
spreader by spreading seed. Adjust as needed to achieve
desired seed depth for your fodder system and seed variety.
continued—

5
Revision date: 02.11.15
#113133 FodderPro 3.0 Seed Spreader Extension Handle
The 113133 extension handle, when attached to the 113132 hand-held seed spreader, allows you to spread seed in a fodder channel without removing the
channel from the fodder frame. If the 113133 FodderPro 3.0 Seed Spreader Extension Handle was purchased to convert the hand-held spreader, complete the
steps below to attach handle. If extension handle was not purchased, skip this section. Pliers and wrenches (7/16" and 1/2") are required to attach handle.
1. Loosen wing nuts on 1/4" bolts and remove
the handle from seed spreader.
4. Locate handle clevis pin, two (2) flat washers,
and cotter pin removed in Step 2.
2. Remove mounting bracket from 113133
extension handle and set handle aside.
5. Place handle in place and slide clevis pin
through bracket. Insert one flat washer
between handle bracket and mounting bracket
attached to seed spreader.
3. Using the 1/4" fasteners from Step 1, attach
mounting bracket to seed spreader. Hold bolt
heads using a 7/16" wrench while tightening
wing nuts if necessary.
6. Align pin with bracket holes and insert
remaining flat washer between brackets as pin
slides into place. Secure using cotter pin.
ATTENTION: Install flat washers between
brackets.
Use a pliers to bend
cotter pin to secure
clevis pin.

6Revision date: 02.11.15
#113133 FodderPro 3.0 Seed Spreader Extension Handle
7. Remove the 5/16" J-bolt and two 5/16" nuts
from packaging and thread one nut onto bolt.
10. Hold J-bolt with pliers and tighen top nut
against lower nut to secure connection.
8. Insert bolt and nut through eye bolt and
bracket as shown. Adjust nut (previous step)
as needed to allow J-bolt to install as shown
above. Thread remaining nut onto J-bolt.
11. Examine all connections to ensure handle is
properly installed and all connections tight.
9. Ensure that J-bolt end is parallel with handle
and bracket. Tighten lower nut.
ATTACH EXTENSION HANDLE—CONTINUED
ATTENTION: After loading seed in a fodder tray,
set spreader in tray and push in direction shown
(see arrow). Once seed is spread, twist extension
handle to raise roller, lift handle, and pull spreader
back to prevent distrubing the seed. See next
page for additional details.

7
Revision date: 02.11.15
#113133 FodderPro 3.0 Seed Spreader Extension Handle
4
2
Below are basic steps showing how to use the seed spreader with
attached extension handle. Use of hand-held spreader may require
removal of fodder trays from fodder rack to evenly spread the seed.
Complete these steps:
1. Add the measured amount of seed to tray and set
seed spreader in position.
2. Carefully push spreader to spread seed throughout
length of fodder tray.
3. Once spreader reaches end of tray, lift and twist
handle to lift roller off seed layer.
NOTE: Twist handle in the direction that
engages J-bolt in eye bolt.
4. Carefully pull spreader back along tray to
starting position.
5. Repeat steps to spread seed in another tray.
1
Lift
Twist
3
/