Page is loading ...

creative™
4874
coverlock
Instruction manual


1-3
This houshold sewing machine is designed to comply with IEC/EN 60335-2-28 and UL1594
IMPORTANT SAFETY INSTRUCTIONS
When using an electrical appliance, basic safety precautions should always be followed, including the following:
Read all instructions before using this household sewing machine.
DANGER - To reduce the risk of electric shock:
• A sewing machine should never be left unattended when plugged in. Always unplug this sewing machine
from the electric outlet immediately after using and before cleaning.
• Always unplug before relamping. Replace bulb with same type rated 12 V, 5 Watt.
WARNING - To reduce the risk of burns, fi re,
electric shock, or injury to persons:
• This sewing machine is not intended for use by persons (including children) with reduced physical, sensory or mental
capabilities, or lack of experience and knowledge, unless they have been given supervision or instruction concerning
use of the sewing machine by a person responsible for their safety.
• Children should be supervised to ensure that they do not play with the sewing machine.
• Use this sewing machine only for its intended use as described in this manual. Use only attachments
recommended by the manufacturer as contained in this manual.
• Never operate this sewing machine if it has a damaged cord or plug, if it is not working properly, if it has
been dropped or damaged, or dropped into water. Return the sewing machine to the nearest authorised
dealer or service center for examination, repair, electrical or mechanical adjustment.
• Never operate the sewing machine with any air openings blocked. Keep ventilation openings of the
Sewing machine and foot controller free from the accumulation of lint, dust, and loose cloth.
• Keep fi ngers away from all moving parts. Special care is required around the Sewing machine needle.
• Always use the proper needle plate. The wrong plate can cause the needle to break.
• Do not use bent needles.
• Do not pull or push fabric while stitching. It may defl ect the needle causing it to break.
• Wear safety glasses.
• Switch the sewing machine off (“0”) when making any adjustment in the needle area, such as threading
needle, changing needle, threading bobbin, or changing presser foot, etc.
• Always unplug the sewing machine from the electrical outlet when removing covers, lubricating, or when
making any other user servicing adjustments mentioned in the instruction manual.
• Never drop or insert any object into any opening.
• Do not use outdoors.
• Do not operate where aerosol (spray) products are being used or where oxygen is being administrated.
• To disconnect, turn all controls to the off (“0”) position, then remove plug from outlet.
• Do not unplug by pulling on cord. To unplug, grasp the plug, not the cord.
• Hold plug when rewinding into cord reel. Do not allow plug to whip when rewinding.
•
Keep fi ngers away from moving parts, especially the area near the blades.
SAVE THESE INSTRUCTIONS
For the USA and Canada
This sewing machine has a polarized plug (one blade wider than the other). To reduce the risk of electric shock, this plug
is intended to fi t in a polarized outlet only one way. If the plug does not fi t fully in the outlet, reverse the plug. If it still
does not fi t, contact a qualifi ed electrician to install the proper outlet. Do not modify the plug in any way.

1-4
3
4
5
2
1
Technical part
Safety Instructions 1-3
How to use this instruction manual 1-6
Parts of creative 4874 1-10
Summary of stitch programs for the creative 4874 1-13
Technical section, general
Machine cover 2-2
Electrical connection 2-2
Connect the foot control 2-2
Power switch 2-2
Swivel table 2-3
Trim catcher 2-3
Front cover 2-3
Detachable thread stand 2-4
Thread stand 2-4
Thread guide slide 2-4
Foam pads/Cone holders 2-5
Thread run-off disc 2-5
Spool net 2-5
Detachable thread guide 2-5
Hand wheel 2-6
Presser foot lift 2-6
Presser foot 2-7
Changing the presser foot 2-7
Needle position 2-8
Changing a needle 2-9
Threading (stitch programs 01-20) 2-10 - 2-17
Thread guides 2-10
Threading the needle(s) 2-18 - 2-19
Important note on threading 2-20
Changing spools with the machine threaded 2-20
Needle threader 2-21
Summary of threading paths and
threading sequences 2-22
Speed control 2-25
Presser foot pressure 2-25
Thread cutter 2-26
Check spring for edging the thread chain 2-26
Disengage the upper knife 2-27
Engage the upper knife 2-27
Stitch fi nger 2-28
Attach converter 2-29
Disengage the upper looper 2-30
Remove knife guard 2-31
Set seam width 2-32
Setting the stitch length 2-33
Differential feed 2-34
Electronic functions
Set language 3-2
LCD Display 3-2
Button functions 3-4
Save 3-5
Recalling the memory 3-5
Selecting a memory 3-5
Notes on the saving to memory 3-6
Deleting all memories 3-6
Changing settings for tension, stitch length and
differential feed directly without saving 3-7
Error 3-7
Cover stitch
Switching the machine to cover stitch
(progs. 01, 02, 03) 4-2
Threading the cover-stitch looper 4-4
Threading the needle(s) 4-6
Summary of threading paths and their threading
sequences 4-7
Important notes on sewing with the cover stitch 4-7
Sewing table 4-7
Starting to sew 4-8
Preparing the project 4-8
Stopping sewing 4-8
Ruler 4-9
Stitch formation 4-10
Top Cover Stitch
Sewing program sticker 5-2
Detachable thread guide for top/deco cover 5-2
Detachable thread stand 5-2
Stitch program selection 5-3
Top/deco switch lever 5-3
Accessories 5-5
Top cover hook 5-5
Top cover round thread guide 5-6
Top cover triangle thread guide 5-6
Threading the cover-stitch looper 5-7
Table of contents

1-5
Technnical Part
6
7
8
9
Threading the needle(s) 5-9
Top cover thread tension, blue 5-10
Threading the top cover thread 5-10
Summary of threading paths and their threading
sequences 5-11
Starting to sew 5-12
Important notes on sewing with the
top cover stitch 5-12
Sewing table 5-12
Preparing your project 5-12
Stopping sewing 5-13
Stitch formation 5-14
Deco Cover
Sewing for stitch 6-2
Detachable thread stand 6-2
Detachable thread guide for top/deco cover 6-2
Top/deco switch lever 6-3
Stitch program selection 6-3
Accessories 6-6
Decorative thread guide 6-6
Threading the cover-stitch looper 6-7
Threading the needle(s) 6-9
Deco-cover thread tension dials, blue and yellow 6-10
Threading the deco cover threads 6-10
Summary of threading paths and their threading
sequences 6-11
Important notes on sewing with the
Deco Cover Stitch 6-13
Sewing table 6-13
Preparing your project 6-13
Starting to sew 6-14
Stopping sewing 6-14
Stitch formation 6-16
Thread Tension
Correct thread tension 7-2
Correcting stitch formation 7-3 - 7-22
Thread table for 2-, 3-, and 4-thread overlock seams 7-23
Accessories
Standard accessories 8-2
Special accessories 8-5
Care of the machine
Removing the needle plate 9-2
Placing the needle plate 9-2
Oiling the machine 9-2
Cleaning of the machine 9-2
Cleaning rubber feet 9-3
Replacing the upper knife 9-3
Secure the upper knife for heavier fabric 9-3
Changing the light bulb 9-4
What happens if...? 9-5

1-6
Congratulations! You have bought a high-quality product that provides unique
advantages. Your new creative™ 4874 can take any fabric in its stride and will sew
through thick and thin for you.
Your PFAFF® coverlock™ features the very latest in design and technology, and it is just as
easy to use as this instruction manual is to follow.
If you now take a bit of time to study the instruction manual, nothing can go wrong. It is
certainly time well spent, since it is the only way to fi nd out just what your machine can
do, and make full use of all its features.
If you have any further questions, just ask your PFAFF dealer. He is happy to be of service
with any help or advice.
So now let’s get started! We wish you many enjoyable hours creating your very own
fashion ideas!
How to use this instruction manual
To make it as easy as possible to use your creative 4874, we have given this instruction
manual a clear structure. The various chapters cover the following topics:
1. Technical part – This chapter contains pages that describe the individual parts of the
machine, as well as the table of contents and a program summary.
2. Technical section, general – This chapter contains information on all the basic
mechanical functions of your creative 4874. You will also fi nd additional information
in chapters 5 and 7.
3. Electronic functions – This chapter contains information about all the electronic
functions of the machine.
4. Cover stitch – In this chapter, we explain the basic functioning of your creative 4874,
using the coverstitch as an example.
5. Top cover stitch – In this chapter, we describe the basic functioning of your creative
4874 with reference to top cover stitching.
6. Deco cover – In this chapter, we are going to describe the basic functioning of your
creative 4874 using the example of the deco cover stitch.
7. Thread tension – This chapter includes information on correct thread tensions for
all the stitches you can create with your creative 4874. We also provide you with a
number of hints on selecting the correct thread.
8. Accessories – This chapter includes a list of all standard and special presser feet
available for use with your creative 4874.
9. Care of the machine – This chapter includes all the information you need for care and
maintenance of your creative 4874 and suggestions for solving certain problems.
Simple,
up-to-date sewing

1-7
Technnical Part
Technical Part
This chapter contains pages that describe the individual parts of the machine and a
program summary.
Note: Some fabrics have a lot of excess dye which can cause discoloration on other fabric
but also on your sewing machine. This discoloring may be very diffi cult or impossible to
remove.
Fleece and denim fabric in especially red and blue often contain a lot of excess dye.
If you suspect that your fabric/ready-to-wear garment contains a lot of excess dye, always
pre-wash it before sewing/embroidering to avoid the discoloring.

1-8
Parts of creative 4874
1 Needle thread tension
2 Needle thread tension
3 Carrying handle
4 Thread tension / upper
looper
5 Thread tension / lower
looper
6 Thread tension/ double
chain-stitch and cover-
stitch looper
7 Tension buttons + / –
8 Speed control
9 LCD Display
10 Tension release button
11 Stitch program selection
buttons + / –
12 Memory button M
13 Memory selection
button P
14 Stitch length adjustment
buttons + / –
15 Differential feed
adjustment buttons + / –
16 Front cover
17 Knife guard
18 Upper looper
disconnection lever
19 Needle plate
20 Standard presser foot
21 Swivel table
22 Seam width adjustment
knob
23 Viewer for seam width
24 Needle holder
25 Top/deco sewing
program sticker
26 Adjustment knob for
presser foot pressure
27 Detachable thread stand
28 Thread guide slide -
Top / deco cover
29 Color coded thread
guides -Top / deco cover
1
2
7
8
6
5
4
3
9
10
11 12 13 14 15
16
17
18
19
20
21
22
23
24
25
26
27
28
29

1-9
Technnical Part
30
31
32
33
34
35
36
37
38
39
40
41
42
30 Upper looper
31 Lower looper
32 Stitch fi nger
33 Double chainstitch and
cover-stitch looper
34 Threading aid for
double chainstitch and
cover-stitch looper
35 Movable upper knife
36 Fixed lower knife
37 Check spring for edging
the thread chain
38 Needle plate
disconnection lever
39 Knob for lowering the
upper knife
40 Tweezers
41 Converter
42 Allen key

1-10
43
44
45
46
47
48
49
50
51
52
53
54
55
56
57
58
43 Color coded telescoping
thread guides
44 Telescoping thread
guide slide
45 Thread tensions top/
deco cover
46 Rear thread guides top/
deco cover
47 Thread cutter
48 Slots for detachable
thread stand
49 Thread stand
50 Spool pin
51 Cone thread holder
52 Foam pads
53 Power cable socket
54 Foot control socket
55 Power switch
56 Hand wheel
57 Presser foot lifter
58 Rear thread guides

1-11
Technnical Part
Summary of stitch programs for the creative 4874
Program 01
Program 10Program 09
Program 08Program 07
Program 06
Program 05
Program 04
Program 03
Program 02
Program No. Description Use
01 2-needle cover hem, narrow For hemming stretch fabrics and piping, for decorative
effects.
02 2-needle cover hem, wide For hemming stretch fabrics and for decorative effects.
03 3-needle cover hem For hemming highly stretch fabric and for decorative
effects.
04 Chainstitch For sewing together extremely durable fabrics such as
upholstery covers and denim, both without overedge.
May also be used for decorative effects.
05 2-thread fl atlock, narrow As fl atlock seam for sewing stretchy fabrics together
with decorative effect, or for overedging light fabrics.
06 2-thread fl atlock, wide As fl atlock seam for sewing stretchy fabrics together
with decorative effect, or for overedging medium
fabrics.
07 2-thread serging, narrow For overedging light fabrics.
08 2-thread fl at hem For overedging very fi ne fabrics and as decorative edge
fi nish.
09 2-thread fold. rolled hem For overedging very fi ne fabrics and as decorative edge
fi nish.
10 3-thread overedge seam, narrow For edging light, easily fraying fabrics.

1-12
Program 11
Program 20
Program 19Program 18
Program 17
Program 16
Program 15
Program 14
Program 13
Program 12
Program No. Description Use
11 3-thread overedge seam, wide For overedging medium to heavy, easily fraying fabrics.
12 3-thread serging, wide For overedging heavy fabrics not prone to fraying
13 3-thread fl atlock, narrow As fl atlock seam for sewing stretchy fabrics together with
decorative effect and as decorative edge fi nish. Also for
overedging medium weight fabrics.
14 3-thread fl atlock, wide As fl atlock seam for sewing stretchy fabrics together with
decorative effect and as decorative edge fi nish. Also for
overedging medium weight fabrics.
15 2-needle, 3-thread overedge
seam
For sewing together and overedging light, highly
stretchy fabrics.
16 3-thread fl at hem For overedging light to medium fabrics and as decorative
edge fi nish.
17 3-thread fold. rolled hem For overedging light to medium fabrics and as decorative
edge fi nish.
18 4-thread overedge seam For sewing together all fabrics with overedge,
particularly stretch fabrics.
19 4-thread safety stitch, wide For sewing together heavy fabrics with overedge.
20 5-thread safety stitch, wide For sewing together heavy fabrics with overedge.

1-13
Technnical Part
Program 21
Program 25
Program 30
Program 29
Program 28
Program 27
Program 26
Program 24Program 23
Program 22
Program No. Description Use
21 2-needle Top-cover, narrow For hemming stretch fabric and for decorative effects.
22 2-needle Top-cover, wide For hemming stretch fabric and for decorative effects.
23 3-needle Top-cover For hemming highly stretch fabric and for decorative
effects.
24 5-thread Deco-cover For decorative effects and for sewing stretch fabric.
25 6-thread Deco-cover For decorative effects and for sewing stretch fabric.
26 6-thread Deco-cover For decorative effects and for sewing stretch fabric.
27 6-thread Deco-cover For decorative effects and for sewing stretch fabric.
28 6-thread Deco-cover For decorative effects and for sewing stretch fabric.
29 8-thread Deco-cover For decorative effects and for sewing stretch fabric.
30 10-thread Deco-cover For decorative effects and for sewing stretch fabric.

1-14

2-1
Technical section, general
Technical section, general
This chapter contains information on all the basic mechanical functions of your creative
4874. You will also fi nd additional information in chapters 5 and 7.

2-2
Machine cover
The machine cover protects your
machine from dust and dirt. When
you have fi nished sewing, push the thread
guides (28 and 44) down. The thread
stand (49) must be pushed as far as it will
go towards close to the machine; you can
take the thread cones off fi rst, but this is
not essential. Now you can pull the 4874
cover over the machine. The operator’s
manual and accessories can be placed in
the pockets.
Electrical connection
Plug the power cable into socket (53) on
the machine, and the power supply.
Connect the foot control
Insert the foot control plug in the socket
(54) on the machine.
The foot control YC-485 has to be used for
this sewing machine.
Power switch
When the power switch (55) is turned on,
the sewing light and the LCD display will
light up (9).
The machine is now ready for use.
120 V
220 V

2-3
Technical section, general
Swivel table
Push the swivel table (21) to the left. The
converter, the tweezers and the allen key
are located behind the swivel table.
Front cover
Push the front cover (16) to the right as
far as it will go and swing it down. The
top/deco cover sewing program sticker
is behind the front cover. The 5 most
important stitch types and their threading
paths are illustrated in color on the inside
of the front cover.
Trim catcher
Insert the upper catches of the trim catcher
in the upper slots in the front cover (16).
Press the bottom part of the catcher until
the lower catches engage in the lower slots
of the front cover.
Note: As soon as either the
swivel table (21) or the front
cover (16) is opened, the
power supply to the machine
is cut off for safety reasons,
so that you cannot continue
sewing.
Note: As soon as either the
front cover (16) or the swivel
table (21) is opened, the power
supply to the machine is cut
off for safety reasons, so that
you cannot continue sewing.
Perform these steps in reverse order to
remove the trim catcher.

2-4
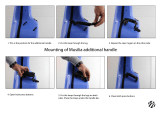
Detachable thread stand
Insert the top catches of the detachable
thread stand (27) into the top slots on the
rear cover and press the bottom portion of
the stand against the cover.
Thread stand
Before placing the spools, you must slide
the thread stand (49) back as far as it will
go.
Place one foam pads (52) and one thread
cone holder (51) on each of the spool pins
(50).
Note: The detachable thread
stand is required for stitch
programs 21 – 30.
Thread guide slide
Pull the thread guide (28 and 44) up as far
as it will go.
To assure optimum thread feed, the two
top slide sections must be rotated slowly
until you hear their locking pommels click
into place.
Push the detachable thread stand to the
right as far as it will go.
Place one foam pad (52) and one cone
holder (51) on each of the spool pins (50).
To remove, push the thread stand to the
left and pull up.

2-5
Technical section, general
Foam pads/Cone holders
If you are using large cones (5,000 – 10,000
mm), the foam pads (52) and the cone
holders (51) will be helpful to you.
With synthetic threads, the foam pads
catch threads that have slipped down and
help to advance the thread fl awlessly.
Cone holders serve to ensure that large
cones are well positioned.
Thread run-off disc
The thread run-off disc in the accessory
box is used for smaller spools. Use the
foam pads (52) and place the spool on the
pin (50). Attach the thread run-off disc as
shown in the illustration.
Spool net
The spool net in the accessory box should
be pulled over the reel from below. Use
for synthetic threads or decorative threads
that can easily unwind from the spool.
After you have done this, you can place the
spool on the foam pad.
Detachable thread guide
For sewing with decorative thread, use the
detachable thread guide in the accessory
box. Place it on the thread guide (44) and
thread as shown in the illustration. Use the
spool net and the foam pad.

2-6
Presser foot lift
Use the presser foot lifter (57) to raise or
lower the presser foot. If you push the
lifter one step up, you will be able to raise
the presser foot to its maximum height of
6.5 mm for particularly thick fabrics.
Note: Once a thread chain has
been formed, the presser foot
no longer needs to be raised as
long as you are working with
the same thread and the same
presser foot. You can simply lift
the front of the presser foot
gently with your thumb. Slide
the fabric under the raised
part of the presser foot. When
the foot control is activated,
the fabric will then be gripped
and advanced by the feed dog
automatically.
Hand wheel
When turning the hand wheel (56) by
hand, e.g. to raise the needle(s) to their
highest position, always turn toward you.
/