
GB
Contents
Adria Caravans 1
Contents
1 Foreword . . . . . . . . . . . . . . . . . . . . . . . . . . . . . . . . . . . . . . . . . . 2
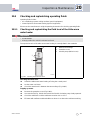
2 Safety . . . . . . . . . . . . . . . . . . . . . . . . . . . . . . . . . . . . . . . . . . . . . 4
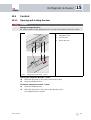
3 Description & equipment . . . . . . . . . . . . . . . . . . . . . . . . . . . . . 12
4 Placing into service . . . . . . . . . . . . . . . . . . . . . . . . . . . . . . . . . 14
5 Before the journey . . . . . . . . . . . . . . . . . . . . . . . . . . . . . . . . . . 15
6 During the journey . . . . . . . . . . . . . . . . . . . . . . . . . . . . . . . . . . 24
7 After the journey . . . . . . . . . . . . . . . . . . . . . . . . . . . . . . . . . . . 25
8 Living in the caravan . . . . . . . . . . . . . . . . . . . . . . . . . . . . . . . . 29
9 Sleeping arrangements . . . . . . . . . . . . . . . . . . . . . . . . . . . . . . 62
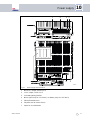
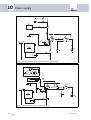
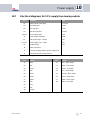
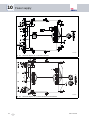
10 Power supply . . . . . . . . . . . . . . . . . . . . . . . . . . . . . . . . . . . . . . 68
11 Gas system . . . . . . . . . . . . . . . . . . . . . . . . . . . . . . . . . . . . . . . 89
12 Water and waste water . . . . . . . . . . . . . . . . . . . . . . . . . . . . . . 95
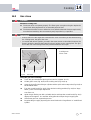
13 Heater & hot water . . . . . . . . . . . . . . . . . . . . . . . . . . . . . . . . . 100
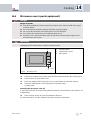
14 Cooking . . . . . . . . . . . . . . . . . . . . . . . . . . . . . . . . . . . . . . . . . 112
15 Refrigerator & freezer . . . . . . . . . . . . . . . . . . . . . . . . . . . . . . 118
16 Toilet . . . . . . . . . . . . . . . . . . . . . . . . . . . . . . . . . . . . . . . . . . . 125
17 Winter camping . . . . . . . . . . . . . . . . . . . . . . . . . . . . . . . . . . . 134
18 Placing out of service . . . . . . . . . . . . . . . . . . . . . . . . . . . . . . . 137
19 Cleaning & care . . . . . . . . . . . . . . . . . . . . . . . . . . . . . . . . . . . 141
20 Inspection & Maintenance . . . . . . . . . . . . . . . . . . . . . . . . . . . 147
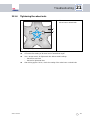
21 Troubleshooting . . . . . . . . . . . . . . . . . . . . . . . . . . . . . . . . . . . 150
22 Technical Data . . . . . . . . . . . . . . . . . . . . . . . . . . . . . . . . . . . . 162
23 Checklists . . . . . . . . . . . . . . . . . . . . . . . . . . . . . . . . . . . . . . . 169
Index . . . . . . . . . . . . . . . . . . . . . . . . . . . . . . . . . . . . . . . . . . . . . . . . . . . 176

GB
Foreword
1
2 Adria Caravans
1 Foreword
You want to get to know new horizons? Count on us to help you!
Congratulations on your new ADRIA Caravan.
We have designed and built your caravan so that travelling with your "home away from home"
will be very enjoyable.
1.1 Before your first journey
• Take your time and read this instruction manual on one of the comfortable seats of your
caravan.
– This instruction manual also contains surprising innovations for experienced users
because the ADRIA design team does not tolerate technical standstill.
• Pay special attention to the "Safety" Chapter (Chapter 2).
– Your own health and that of your passengers can depend on your familiarisation with
the safety regulations and your adequate reaction to critical situations.
• Please also pay attention to the separate instruction manuals for special equipment and
appliances as well as accessories.
• If your ADRIA caravan has special accessories, please observe the enclosed special
approvals and the associated regulations.
1.2 Notes on this instruction manual
• Please understand that we reserve the right to alter the technical system, the form and the
equipment. Our caravans are being continuously developed. Therefore, no claims can be
made against ADRIA on the basis of the contents of these operating instructions. The
equipment which was known and included at the time of going to press is described in this
manual. This instruction manual is valid only insofar as the caravan corresponds to the
state of the equipment described therein.
• The caravan models may have different equipment (standard equipment, special equip-
ment and accessories). The standard equipment is described in this instruction manual. In
this instruction manual, you will also find descriptions of the special equipment and acces-
sories insofar as explanations are required. Please pay also attention to the enclosed sep-
arate instructions of the special equipment or accessory manufacturers.
• Reproduction, copying and translation, including extracts, are not permitted without the
explicit approval of ADRIA. Misprints and errors excepted.
• ADRIA will not be held responsible for damage to the vehicle resulting from the nonobser-
vance of the operating instructions.
© 2012 ADRIA

GB
Foreword 1
Adria Caravans 3
1.3 Warranty registration
In addition to these operating instructions, you will also find a Service and Warranty Booklet in
your Adria caravan. Please perform the warranty registration as specified in the Service and
Warranty Booklet.
1.4 Warranty, service and repair
• Please contact your local ADRIA dealer for all service and repair work as well as special
questions.
– The employees of your authorised workshop will be pleased to provide advice and
assistance.
– Only original parts ensure the quality and operational readiness of your caravan.
– If service work is neglected or performed incorrectly, we will be unable to meet our war-
ranty obligations according to our warranty conditions.
• Please fill in the following data of your caravan:
– These are of special significance when you have questions concerning ordering original
parts.
• For the data of your caravan, see the nameplates.
Tab. 1 Vehicle data
We wish you unlimited enjoyment in your leisure time with your new ADRIA caravan.
Executive Board
Vehicle data
Model:
Year of construction:
Vehicle identification number: _ _ _ _ _ _ _ _ _ _ _ _ _ _ _ _ _
Bodywork key number: FW _ _ _

GB
Safety
2
4 Adria Caravans
2 Safety
2.1 Safety instructions
This Section contains safety instructions that must be followed when operating the vehicle.
2.1.1 Explanation of symbols
This type of safety warning warns of an imminently pending danger that could jeopardise the
life and health of persons. Nonobservance of these safety instructions can cause severe dam-
age to health up to life-threatening or fatal injuries.
This type of safety warning warns of a possible danger for persons. This type of warning
must be exactly followed to prevent hazards to persons or severe material damage.
This type of safety warning warns of possible material damage. This type of warning must be
exactly followed to prevent material damage.
Notes of this kind provide additional information with respect to technical requirements. This
type of information facilitates the handling of the vehicle for the user.
Important!
We point out explicitly that we will not assume any liability for damage and malfunctions
resulting from the nonobservance of this instruction manual.
Danger!
Type of danger
Avoidance
Warning!
Type of danger
Avoidance
Caution!
Type of danger
Avoidance
Important!
Important

GB
Safety 2
Adria Caravans 5
2.2 General safety instructions
• Safely store all objects before starting to drive. Securely close all flaps, doors, windows and
hatches. Keep liquids in leak-proof containers.
• When staying in the vehicle, always keep the forced ventilation and the mushroom ventila-
tor open and never covered, as there is a risk of suffocation by increased carbon monoxide.
• Always keep the instruction manuals for the vehicle and all installed appliances (e.g.
cooker, refrigerator, toilet) and additional equipment (e.g. bike racks) in the vehicle and
observe them.
• Never leave children in the vehicle unattended.
• Pay attention to the vehicle height while driving.
• When leaving the vehicle, securely close all windows, doors and roof hoods.
• Pay attention to the clearance height of the entrance door.
2.3 Safety instructions for driving on public roads
• The vehicle muss be registered.
• The driver of the vehicle must have the required driving license.
• The installation of accessories changes the dimensions, the total weight as well as the road
behaviour of the vehicle. Some of this equipment is subject to entry in the vehicle docu-
ments.
• When loading the vehicle, pay attention to the gross weight rating and the gross axle weight
rating (see motor vehicle registration certificate, part I)
• Distribute the additional load evenly within the vehicle (Chapter 5.4).
• Check the tyre pressure and tighten the wheel nuts before starting to drive. Check the firm
seating of the wheel nuts after 50 kph and then in regular intervals.
• Check the function of the brakes and the signal and lighting system.
• Empty the waste water tank.
• Close all doors, cupboard doors, drawers and flaps as well as all windows and roof hoods.
Latch the refrigerator door securing device.
• Safely stow away loose pieces of equipment.
• Put the antennas in park position.
• Switch off the awning light.
• Retract the entrance step.
• Close and lock all outer doors and flaps.
• In winter, clear the roof from snow and ice before starting the journey.
• During the journey, persons or pets are not allowed to stay in the caravan.
• From a technical point of view, ADRIA caravans are designed for a permissible maximum
speed of 100 kph. This maximum speed must not be exceeded, not even when a higher
speed is allowed in the country being visited. Always pay attention to speed restrictions in
individual countries which may be different..
• When parking the vehicle, apply the parking brake up to the maximum possible end posi-
tion.
• Place wheel chocks in front of the wheels when parking the vehicle on inclines or slopes.
• Have the vehicle brake system checked and repaired by an authorised workshop only.
• When the vehicle is transported by rail or on a lorry, it must be loaded in the driving direc-
tion.

GB
Safety
2
6 Adria Caravans
2.3.1 Driving with the caravan
• Drive according to your abilities taking the larger dimensions and the higher weight of the
vehicle combination into consideration. You need time for familiarisation.
• Always take corners in a large radius and slowly. The cornering behaviour as compared
with a passenger car changes because of the length of the car/caravan combination and its
weight.
• At driveways and crossings, the car/caravan acceleration is significantly lower than that of
a passenger car.
• Due to the higher weight, the vehicle braking distance is much longer than that of a passen-
ger car.
• Pay attention to the greater height of the vehicle at gateways and trees on the side of the
road.
• When driving in reverse, always have a second person assist you.
• Due to the vehicle height, the vehicle is more sensitive to crosswind.
2.4 Official technical inspections
2.4.1 General inspection of caravan
As with any vehicle, the caravan must be officially inspected at regular intervals. For detailed
information, see your Service and Warranty Booklet.
2.4.2 Checking the gas system
The liquid gas system was inspected at the factory by a technical expert. The gas system must
be inspected again every two years and after making any modifications and repairs. Always
have a gas leak test performed on this occasion. The vehicle operator is responsible for initi-
ating the inspection. Upon delivery of the vehicle, the operator must be informed in writing of
his/her duty to have the gas system inspected. The correct condition of the gas system is con-
firmed with a gas inspection certificate and possibly, depending on national regulations, an
associated gas inspection sticker.
Important!
When driving in foreign countries, also pay attention to the regulations of the respective
country.

GB
Safety 2
Adria Caravans 7
2.5 Safety instructions for the gas system
Danger!
Poisoning by gas
If it smells of gas or you suspect that gas is escaping, perform the following:
Clear the danger area!
Close the shut-off valve on the gas cylinder!
Avoid ignition sources and open flames and do not smoke!
Ventilate the rooms!
Inform the camping site manager, and the fire brigade when necessary!
Danger!
Risk of suffocation
Never cover the forced ventilation in the roof hoods and in the floor area nor the mush-
room ventilators in order to ensure continuous exchange of air in the vehicle.
Caution: Snowfall in winter!
Warning!
Injuries or material damage
Subsequently installed, gas-operated additional appliances must be designed for an
operating pressure of 30 mbar.
The liquid gas system was inspected at the factory by a technical expert.
The gas system must be inspected again every two years and after making any
modifications and repairs (Chapter 2.4.2).
Installations and modifications to the gas system may be performed only by an
authorised workshop.
The gas system may be put into service again only after inspection by a technical
expert!

GB
Safety
2
8 Adria Caravans
2.5.1 Gas stove
2.5.2 Gas cylinder compartment
Check each time before using the gas:
Store the gas cylinders exclusively in the gas cylinder compartment. They must stand
upright and fastened so that they are unable to turn or tilt.
The gas cylinder compartment must be sealed against the interior of the vehicle and
must have a vent hole in or directly above the floor plate. This vent hole must have a
minimum cross-section of 100 cm
2
and must not be covered.
Use only pressure regulators with safety valves! Other regulators are not allowed!
Carefully connect the regulator on the gas cylinder by hand. The screw connections on
the gas regulator have left-hand threads. Do not use tools such as wrenches or pliers.
For temperatures below 5°C, a de-icing system for r egulators (e.g. accessory Eis-Ex)
must be used.
Do not operate or store any current-storage devices (e.g. batteries) or devices that could
be the source of ignition in the gas cylinder compartment.
Electric lines routed through the gas cylinder compartment have to be insulated and
must not be connected with terminals; have the work performed by an authorised work-
shop.
Do not use the gas cylinder compartment as storage space.
Secure the gas cylinder compartment against unauthorised access.
2.5.3 Gas appliances in general
Pay attention to the following when operating the gas system:
The regulators and the exhaust gas routing must be inspected every two years! The
inspection must be confirmed on the inspection certificate according to the DVGW [Ger-
man Technical and Scientific Association on Gas and Water] worksheet G 607. The
operator has to initiate the inspection.
Danger!
Risk of suffocation
In regular operation of the gas stove there exists acute danger to life due to lack of oxy-
gen and the possibly generated odourless and toxic carbon monoxide (CO)!
Always ensure good ventilation when the gas stove is in operation. Always keep a win-
dow, a roof hood or the doors open.
Never use the gas stove for heating.
Danger!
Risk of poisoning
If a flame of the gas stove extinguishes, unburned gas flows out for a short time until
the flame failure device reacts and, together with the oxygen, generates an explosive
mixture inside the vehicle!
Watch the flames while using the burner!
When finished, shut the respective quick-action stop valve.

GB
Safety 2
Adria Caravans 9
The exhaust gas pipe must be fitted tightly to the gas heater and to the cowl, and must
be sealed. It may not show any evidence of damage.
The exhaust gas routing of the gas heater must be installed ascending over its complete
length and fitted tightly with clamps. If required, install exhaust gas pipe supports.
Before placing the gas heater into service, always clear dirt and snow from the cowl and
combustion air inlets. This prevents increased, unacceptable carbon monoxide content
in the exhaust gas.
Radiant heaters and appliances drawing combustion air from the interior of the vehicle
are not to be used for heating the vehicle!
When gas appliances are switched on that require the control knob to be pressed for
lighting (e.g. gas stove), it must spring back automatically immediately after release.
If no gas is being consumed during the journey, the shut-off valves on the gas cylinders
must be closed.
Close the respective quick-action stop valve when gas-operated appliances are not
used.
Close the shut-off valve on the gas cylinder when the vehicle will not be used for a longer
period.
Operate the gas system only with propane gas, butane gas or a mixture of both. Pro-
pane gas is capable of gasification down to -32°C, whereas butane gas gasifies only to
approx. 0°C.
Gas appliances are not to be operated during refuelling, in a garage or on a ferry.
Observe the relevant regulations in foreign countries!
2.6 Safety instructions for the electrical system
Pay attention to the following when operating the electrical system:
Installations and modifications of the electrical system have to be performed by qualified
personnel.
Prior to carrying out work on the electrical system, switch off all appliances and lights,
disconnect the battery and disconnect the 230 V power cable from the mains.
Replace defective fuses only when the cause of the defect is known and has been rem-
edied. Use only original fuses with the values specified in the instruction manual from
the respective manufacturer.
Do not bridge or repair fuses.

GB
Safety
2
10 Adria Caravans
2.7 Fire prevention
2.7.1 General fire prevention
2.7.2 What to do in the case of fire
Correct behaviour:
Evacuate all passengers.
Close the shut-off valve on the gas cylinder.
Switch off the electrical power supply; disconnect the vehicle from the mains.
Call the fire brigade, sound the alarm.
Fight the fire, if possible.
Danger!
Fire risk
Only authorised and qualified personnel may perform service work and modifications to
the gas system and the electrical system.
Never leave children in the vehicle unattended.
Do not use portable heating or cooking appliances.
Keep flammable materials clear of cooking and heating appliances.
Acquaint yourself with the position and operation of the emergency exits in the vehicle.
Always keep escape routes clear.
Empty ashtrays into the waste bin only when the ashes are cold.
Important!
Always have a dry powder fire extinguisher (special accessory) filled with 1 kg minimum in
your vehicle.
The fire extinguisher must be close at hand.
Read the instruction manual carefully and keep it close at hand.
Have the fire extinguisher checked at regular intervals by qualified personnel;
observe the test seal.

GB
Safety 2
Adria Caravans 11
2.8 Safety instructions for the roof
2.9 Safety instructions for rear carrier systems (special acces-
sories)
2.10 Environmental tips
For the protection of our environment, always pay attention to the following:
Always turn off the engine when the vehicle stands still. The operating temperature is
reached most quickly while driving.
Never dispose of any kind of waste water and waste in the open countryside.
Empty the waste water tank and the toilet only at special waste disposal stations. These
waste disposal stations are available at camping sites. Request information from local
authorities.
Use environmentally-friendly chemical additives for the toilet.
Separate household waste and dispose of this waste in special waste disposal stations.
When staying in towns and communities for longer periods, always stay at camping
sites. Obtain information about car parks and camping sites in time before starting the
journey.
Always collect waste oil, lubricants and cleaning agent in suitable containers and dis-
pose of them properly.
Warning!
Risk of injury and damage to the vehicle roof
The roof of the vehicle is not designed for the weight of standing persons.
The roof of the vehicle is not capable of supporting walking persons.
Clear snow and ice from the roof and from the roof hoods.
Use a ladder which is placed against the roof edge for this purpose.
Warning!
Risk of injury and damage to the vehicle
Pay attention to the statutory regulations for the installation of a rear carrier.
When the rear lighting of the vehicle is covered, a second set of lights must be installed.
Do not exceed the permissible carrying weight of the rear carrier.
The load must not project by more than 40 cm on the sides. Do not allow sharp or
pointed objects to project.
The load must be stored safely and specially secured against falling down.
When the rear carrier is used, the load distribution of the vehicle as well as its drive and
brake behaviour change.
Important!
Have the installation of a rear carrier performed by an authorised workshop only. Ask your
ADRIA dealer for advice.

GB
Description & equipment
3
12 Adria Caravans
3 Description & equipment
3.1 About this instruction manual
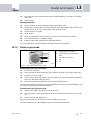
In the diagrams for explanation of the equipment, "black arrows" always stand for switching off
or closing an equipment part and "white arrows" for switching on or opening.
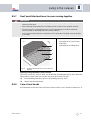
3.2 Bodywork
The bodywork of the vehicle is made in "sandwich construction". The "sandwich" structure con-
sists of 3 layers with a total thickness of up to 40 mm:
• Outer skin: Polyester (glass-fibre reinforced plastic) or aluminium
• Insulation: Styrofoam
• Inner wall: Wooden panels
The 3 layers are glued with special adhesive which penetrates in the styrofoam and ensures
the bonding of the layers. This layer structure provides optimum heat insulation of the vehicle.
To improve road safety, a 3rd brake light is installed in the upper rear area.
3.3 Gas cylinder compartment
The lockable gas cylinder compartment is sealed and insulated with respect to the interior
(Chapter 11.2).
3.4 Interior furnishings
All pieces of furniture are made from high-quality materials and securely attached. Sufficient
storage space is available in the living area and in the kitchen unit.
The furniture surfaces can be easily cleaned with commercially available cleaning agents
(Chapter 19.2).
Depending on the model, the vehicle has firmly installed beds and/or seating groups that can
be easily converted for sleeping. (Chapter 9).
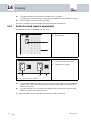
3.5 Kitchen
The kitchen unit consists of cooking stove, oven (special equipment), microwave oven (special
equipment), sink and a refrigerator/freezer (Chapter 14).
Adequate storage space is provided.
An exhaust hood with or without lighting above the kitchen unit is available as special equip-
ment.
3.6 Bathroom unit
Each vehicle contains a bathroom unit (Chapter 8.10) with sink, toilet (Chapter 16) and,
depending on the layout plan, also a shower. The folding door, swinging door or curtain must
be closed when taking a shower (Chapter 8.10).
3.7 Heater
The vehicle has - in some cases as special equipment - a heater with hot-air blower or warm
water heater (Chapter 13).


GB
Placing into service
4
14 Adria Caravans
4 Placing into service
4.1 Registering the vehicle
Before the first journey, the vehicle must be registered according to national regulations and a
license plate fitted. Vehicles may be operated in road traffic only when insurance cover exists.
An EC approval exists for the vehicle.
4.2 Placing the vehicle into service for the first time
Pay attention to the following when placing the vehicle into service:
Familiarise yourself with your vehicle before the first journey.
Get used to the driving characteristics and dimensions of your vehicle during a short
weekend trip.
Drive slowly and carefully in the beginning.
Warning!
Make sure to follow the safety instructions
Carefully read and follow the safety instructions (Chapter 2.1) before placing the vehi-
cle into service.
Insurance coverage and warranty claims to the manufacturer become void when the
safety instructions are not observed and followed.
Warning!
Accident hazard
After the first 50 km, retighten the wheel nuts and then regularly check the seating of
the wheel nuts.
Check the tyre pressure before each journey.

GB
Before the journey 5
Adria Caravans 15
5 Before the journey
5.1 Wheel arch insert
5.2 Coupling the caravan
Couple the caravan. The tow ball and cup must grip each other and not just lay over
each other. The cup must clamp the complete tow ball.
Hang the breakaway cable around the ball head of the tow ball or in the fastening lug of
the towing vehicle when using a removable tow bar. Always check the cable length: A
longer cable must not drag on the ground and apply the brakes. A shorter cable must
not apply the brakes when going around corners.
Crank the jockey wheel in completely and then pull it up as high as possible in the
mounting. Position the running wheel parallel to the driving direction and pointing
towards the towing vehicle.
Connect the light/power plug to the socket of the towing vehicle. Make sure the plug
locks in properly.
Run the light/power supply cable in a loose loop over the coupling. Make sure the cable
does not drag on the ground and is not tensioned.
Make sure the ball of the tow bar is locked completely in the coupling. The green safety
marking on the coupling must be visible.
Warning!
Danger of injuries from parts flying around
Remove the wheel arch inserts before driving with the caravan and stow them away
safely.
Warning!
Risk of injury when coupling and manoeuvring
Make sure nobody is between the towing vehicle and caravan when manoeuvring and
coupling.
Caution!
Risk of damage to the coupling
Do not couple or uncouple the caravan with the overrun device shaft pressed in.
Observe the maximum allowable nose weight and the maximum allowable rear axle
load of the towing vehicle. Refer to the vehicle documents belonging to the towing vehi-
cle and the caravan for the allowable limits. These must not be exceeded.
Do not use the stabilizer lever on couplings as manoeuvring assistance (if fitted).
Do not grease friction pads. Greasy friction pads cannot create the weaving stabilizing
effect. This weaving stabilizing effect is only ensured when the tow ball on the towing
vehicle is kept clean and free from grease.
Do not lubricate the cup of the AKS safety coupling.
Do not lubricate the ball on the tow bar.
Make sure the friction pads remain free from oil and grease when lubricating moving
parts of the safety coupling.

GB
Before the journey
5
16 Adria Caravans
Check that all corner steadies have been fully raised.
Check the caravan lights when the towing vehicle is coupled.
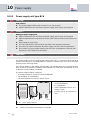
5.2.1 Couplings
5.2.1.1 Couplings AK 150 V/160/200 V/251 S/300
The coupling mechanism has an "open" position which means the coupling remains open until
the tow ball locks completely into the cup.
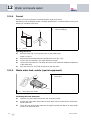
Coupling the vehicle:
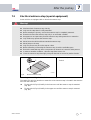
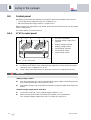
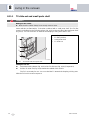
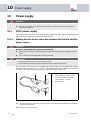
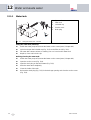
Check that the coupling is open.
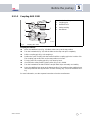
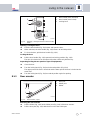
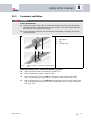
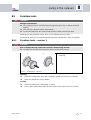
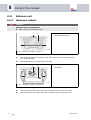
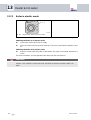
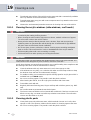
Position the open coupling Fig. 1) onto the tow ball of the towing vehicle until it fully
engages with a click.
To help, press the coupling grip (Fig. 1/2) down by hand.
Check that the safety marking (green band) (Fig. 1/1) is visible.
For more information, see the separate instructions from the manufacturer.
Warning!
Risk of weaving
Before coupling, make sure the tow ball on the towing vehicle is free from oil and
grease.
Clean off any dirt before coupling.
Fig. 1 Couplings AK 300 and AK 160
1 Safety marking
2 Coupling grip
10100016
1
2

GB
Before the journey 5
Adria Caravans 17
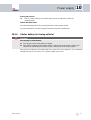
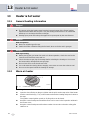
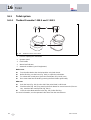
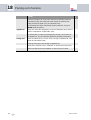
5.2.1.2 Coupling AKS 1300
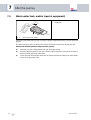
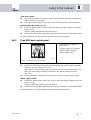
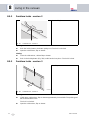
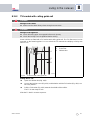
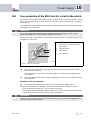
Coupling the vehicle:
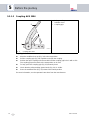
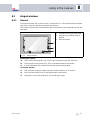
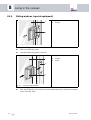
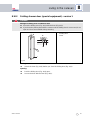
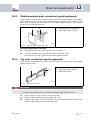
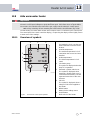
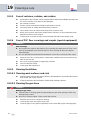
Move the stabilizer lever (Fig. 2/3) fitted at the side up to the top position.
Turn the handwheel (Fig. 2/5) anticlockwise to the stop and open completely.
Pull the coupling grip (Fig. 2/2) straight up.
Position the open coupling onto the tow ball until the coupling grip locks in with a click.
The coupling grip moves back to the start position on its own.
To help, press the coupling grip (Fig. 2/2) down by hand.
Check that the safety marking (green point) (Fig. 2/4) is visible.
Turn the handwheel clockwise until the torque limiter slips noticeably and audibly.
Press the stabilizer lever down to the lowest position. The marking on the stabilizer lever
must be positioned directly below the "locked" marking (Fig. 2/1) of the stabilizer hous-
ing.
For more information, see the separate instructions from the manufacturer.
Fig. 2 Coupling AKS 1300
1 "Locked" marking
2 Coupling grip
3 Stabilizer lever
4 Safety marking
5 Handwheel
10100017
1
2
3
3
5
4

GB
Before the journey
5
18 Adria Caravans
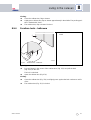
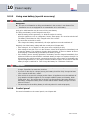
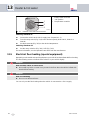
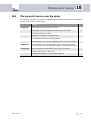
5.2.1.3 Coupling AKS 3004
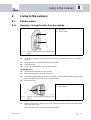
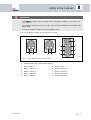
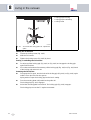
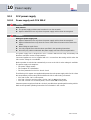
Coupling the vehicle:
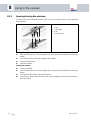
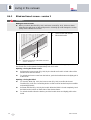
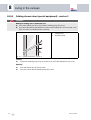
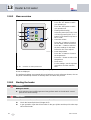
Move the stabilizer lever up (Fig. 3/2) to the top position.
Pull the coupling grip (Fig. 3/3) upwards and open the coupling.
Position the open coupling onto the tow ball until the coupling grip locks in with a click.
The coupling grip moves back to the start position on its own.
To help, press the coupling grip (Fig. 3/3) down by hand.
Check that the safety marking (green band) (Fig. 3/1) is visible.
Press the stabilizer lever (Fig. 3/2) down to the lowest position.
For more information, see the separate instructions from the manufacturer.
Fig. 3 Coupling AKS 3004
1 Safety marking
2 Stabilizer lever
3 Coupling grip
10100111
3
2
1

GB
Before the journey 5
Adria Caravans 19
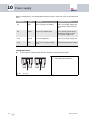
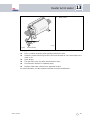
5.2.2 Coupling BPW WS 3000 D
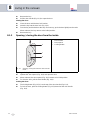
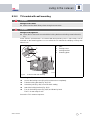
Coupling the vehicle:
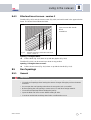
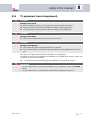
Move the stabilizer lever (Fig. 4/1) to the uncoupling position (Fig. 4/2).
Position the open coupling onto the tow ball and, if necessary, press down by hand until
the coupling grip locks in with a click. The stabilizer handle moves approx. 10° down to
the coupling position (Fig. 4/3).
To activate the stabilizer device, press the stabilizer lever (Fig. 4/1) down to the bottom,
horizontal position (Fig. 4/4) to the stop.
Check that the tow ball is completely retracted and not visible when coupled.
For more information, see the separate instructions from the manufacturer.
5.3 Uncoupling the caravan
Uncoupling the vehicle:
Apply the caravan parking brake.
Secure the vehicle against rolling away with wheel chocks.
Disconnect the light/power supply plug from the towing vehicle socket and secure
safely.
Release the overrun brake cable from the tow bracket on the towing vehicle.
Crank the jockey wheel down. The wheel must be firmly on the ground.
If necessary, also open the stabilizer lever of the stabilizer device.
Fig. 4 Coupling BPW WS 3000 D
1 Stabilizer lever
2 Uncoupling position
3 Coupling position
4 Stabilizer device active
Warning!
Risk of injury during uncoupling
Always apply the parking brake before uncoupling.
Secure the vehicle against rolling away before uncoupling the vehicle.
10100112
1
2
3
4

GB
Before the journey
5
20 Adria Caravans
Stretch the overrun device, drive the towing vehicle slightly away when necessary, until
the folding bellow over the overrun device is no longer pressed together.
Release the coupling with the hand grip. Use the jockey wheel to lift the coupling from
the tow ball until the ball is completely free.
Drive the towing vehicle away.
5.4 Loading the vehicle
Pay attention to the following when loading the vehicle:
• Unladen weight = mass in ready-to-drive condition according to EN 1646-2 (Chapter 22.2).
• Additional equipment installed in the factory and options increase the unladen weight and
reduce the additional load.
• Determine the maximum additional load according to part 1 of the registration certificate
and the list in the "Technical data" Chapter (as from Chapter 22.2).
• The additional load refers to the luggage.
• On vehicles with standard equipment, the outside of the roof and the rear area are not to
be loaded.
– Never exceed a height of 4 m and a width of 2.55 m with additional attachments.
– Attach and secure the roof and rear loads so that they do not slip, are unaffected by the
wind and are streamlined. Do not use rubber expanders!
• In order not to endanger other road users, objects must not project beyond the vehicle sil-
houette on the side or rear.
– Do not overload the vehicle. For weight information and Tables, see Chapter 22.2 and
the registration certificate, part I.
• Pay attention to the correct axle load distribution. Roadability and tyre wear are directly
affected by the axle load. Pay attention to the maximum axle loads (see registration certif-
icate part I).
• Load the vehicle evenly on the right and left. The driving characteristics deteriorate when
loading is uneven.
• Store heavy objects (e.g. tinned food, cutlery, dishes) in low-lying storage compartments
and secure them against slipping.
• Stack light objects, e.g. clothes, in higher storage compartments or in the compartments
below the seats.
Warning!
Risk of injury and severe damage to the vehicle
When a tyre bursts, the vehicle can get out of control.
Do not exceed the vehicle gross weight rating.
Check the tyre pressure (Chapter 22.1) at regular intervals. Tyres can burst when the
tyre pressure is too low.
Warning!
Danger of overloading
The gross weight rating entered in the vehicle documents must not be exceeded. Tyres
can also burst when the vehicle is overloaded.
A warranty claim to the manufacturer and the insurance coverage become void.
Page is loading ...
Page is loading ...
Page is loading ...
Page is loading ...
Page is loading ...
Page is loading ...
Page is loading ...
Page is loading ...
Page is loading ...
Page is loading ...
Page is loading ...
Page is loading ...
Page is loading ...
Page is loading ...
Page is loading ...
Page is loading ...
Page is loading ...
Page is loading ...
Page is loading ...
Page is loading ...
Page is loading ...
Page is loading ...
Page is loading ...
Page is loading ...
Page is loading ...
Page is loading ...
Page is loading ...
Page is loading ...
Page is loading ...
Page is loading ...
Page is loading ...
Page is loading ...
Page is loading ...
Page is loading ...
Page is loading ...
Page is loading ...
Page is loading ...
Page is loading ...
Page is loading ...
Page is loading ...
Page is loading ...
Page is loading ...
Page is loading ...
Page is loading ...
Page is loading ...
Page is loading ...
Page is loading ...
Page is loading ...
Page is loading ...
Page is loading ...
Page is loading ...
Page is loading ...
Page is loading ...
Page is loading ...
Page is loading ...
Page is loading ...
Page is loading ...
Page is loading ...
Page is loading ...
Page is loading ...
Page is loading ...
Page is loading ...
Page is loading ...
Page is loading ...
Page is loading ...
Page is loading ...
Page is loading ...
Page is loading ...
Page is loading ...
Page is loading ...
Page is loading ...
Page is loading ...
Page is loading ...
Page is loading ...
Page is loading ...
Page is loading ...
Page is loading ...
Page is loading ...
Page is loading ...
Page is loading ...
Page is loading ...
Page is loading ...
Page is loading ...
Page is loading ...
Page is loading ...
Page is loading ...
Page is loading ...
Page is loading ...
Page is loading ...
Page is loading ...
Page is loading ...
Page is loading ...
Page is loading ...
Page is loading ...
Page is loading ...
Page is loading ...
Page is loading ...
Page is loading ...
Page is loading ...
Page is loading ...
Page is loading ...
Page is loading ...
Page is loading ...
Page is loading ...
Page is loading ...
Page is loading ...
Page is loading ...
Page is loading ...
Page is loading ...
Page is loading ...
Page is loading ...
Page is loading ...
Page is loading ...
Page is loading ...
Page is loading ...
Page is loading ...
Page is loading ...
Page is loading ...
Page is loading ...
Page is loading ...
Page is loading ...
Page is loading ...
Page is loading ...
Page is loading ...
Page is loading ...
Page is loading ...
Page is loading ...
Page is loading ...
Page is loading ...
Page is loading ...
Page is loading ...
Page is loading ...
Page is loading ...
Page is loading ...
Page is loading ...
Page is loading ...
Page is loading ...
Page is loading ...
Page is loading ...
Page is loading ...
Page is loading ...
Page is loading ...
Page is loading ...
Page is loading ...
Page is loading ...
Page is loading ...
Page is loading ...
Page is loading ...
Page is loading ...
Page is loading ...
Page is loading ...
Page is loading ...
Page is loading ...
Page is loading ...
Page is loading ...
Page is loading ...
Page is loading ...
Page is loading ...
Page is loading ...
-
 1
1
-
 2
2
-
 3
3
-
 4
4
-
 5
5
-
 6
6
-
 7
7
-
 8
8
-
 9
9
-
 10
10
-
 11
11
-
 12
12
-
 13
13
-
 14
14
-
 15
15
-
 16
16
-
 17
17
-
 18
18
-
 19
19
-
 20
20
-
 21
21
-
 22
22
-
 23
23
-
 24
24
-
 25
25
-
 26
26
-
 27
27
-
 28
28
-
 29
29
-
 30
30
-
 31
31
-
 32
32
-
 33
33
-
 34
34
-
 35
35
-
 36
36
-
 37
37
-
 38
38
-
 39
39
-
 40
40
-
 41
41
-
 42
42
-
 43
43
-
 44
44
-
 45
45
-
 46
46
-
 47
47
-
 48
48
-
 49
49
-
 50
50
-
 51
51
-
 52
52
-
 53
53
-
 54
54
-
 55
55
-
 56
56
-
 57
57
-
 58
58
-
 59
59
-
 60
60
-
 61
61
-
 62
62
-
 63
63
-
 64
64
-
 65
65
-
 66
66
-
 67
67
-
 68
68
-
 69
69
-
 70
70
-
 71
71
-
 72
72
-
 73
73
-
 74
74
-
 75
75
-
 76
76
-
 77
77
-
 78
78
-
 79
79
-
 80
80
-
 81
81
-
 82
82
-
 83
83
-
 84
84
-
 85
85
-
 86
86
-
 87
87
-
 88
88
-
 89
89
-
 90
90
-
 91
91
-
 92
92
-
 93
93
-
 94
94
-
 95
95
-
 96
96
-
 97
97
-
 98
98
-
 99
99
-
 100
100
-
 101
101
-
 102
102
-
 103
103
-
 104
104
-
 105
105
-
 106
106
-
 107
107
-
 108
108
-
 109
109
-
 110
110
-
 111
111
-
 112
112
-
 113
113
-
 114
114
-
 115
115
-
 116
116
-
 117
117
-
 118
118
-
 119
119
-
 120
120
-
 121
121
-
 122
122
-
 123
123
-
 124
124
-
 125
125
-
 126
126
-
 127
127
-
 128
128
-
 129
129
-
 130
130
-
 131
131
-
 132
132
-
 133
133
-
 134
134
-
 135
135
-
 136
136
-
 137
137
-
 138
138
-
 139
139
-
 140
140
-
 141
141
-
 142
142
-
 143
143
-
 144
144
-
 145
145
-
 146
146
-
 147
147
-
 148
148
-
 149
149
-
 150
150
-
 151
151
-
 152
152
-
 153
153
-
 154
154
-
 155
155
-
 156
156
-
 157
157
-
 158
158
-
 159
159
-
 160
160
-
 161
161
-
 162
162
-
 163
163
-
 164
164
-
 165
165
-
 166
166
-
 167
167
-
 168
168
-
 169
169
-
 170
170
-
 171
171
-
 172
172
-
 173
173
-
 174
174
-
 175
175
-
 176
176
-
 177
177
-
 178
178
-
 179
179


Ask a question and I''ll find the answer in the document
Finding information in a document is now easier with AI
Other documents
-
partyrent com 1764 User manual
-
Arrow CP1010 User manual
-
Dometic RMD8**1 Operating instructions
-
Intermetro LEC9900A Datasheet
-
 RIDGE RYDER RR20LPT User manual
-
PEARL Water Hose Kit For VX141MS Owner's manual
-
AUKEY 2021 Upgraded AUKEY Phone Car Holder User guide
-
Presto 07050 User manual
-
Anova Precision® Oven Lift User guide
-
Smeg KTS75BC Owner's manual
