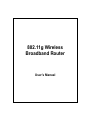
Eusso UGL2454-RTK Owner's manual
- Category
- Routers
- Type
- Owner's manual
This manual is also suitable for

802.11g Wireless
Broadband Router
User’s Manual

FCC Certifications
Federal Communication Commission Interference Statement
This equipment has been tested and found to comply with the limits for a
Class B digital device, pursuant to Part 15 of the FCC Rules. These
limits are designed to provide reasonable protection against harmful
interference in a residential installation. This equipment generates, uses
and can radiate radio frequency energy and, if not installed and used in
accordance with the instructions, may cause harmful interference to radio
communications. However, there is no guarantee that interference will
not occur in a particular installation. If this equipment does cause
harmful interference to radio or television reception, which can be
determined by turning the equipment off and on, the user is encouraged
to try to correct the interference by one of the following measures:
-Reorient or relocate the receiving antenna.
-Increase the separation between the equipment and receiver.
-Connect the equipment into an outlet on a circuit different from that
to which the receiver is connected.
-Consult the dealer or an experienced radio/TV technician for help.
This device complies with Part 15 of the FCC Rules. Operation is subject
to the following two conditions: (1) This device may not cause harmful
interference, and (2) this device must accept any interference received,
including interference that may cause undesired operation.
FCC Caution: Any changes or modifications not expressly approved by
the party responsible for compliance could void the user's authority to
operate this equipment.
IMPORTANT NOTE:
FCC Radiation Exposure Statement:
This equipment complies with FCC radiation exposure limits set forth for
an uncontrolled environment. This equipment should be installed and
operated with minimum distance 20cm between the radiator & your body.
This transmitter must not be co-located or operating in conjunction with
any other antenna or transmitter.
IEEE 802.11b or 802.11g operation of this product in the U.S.A. is
firmware-limited to channels 1 through 11.

CE Mark Warning
This equipment complies with the requirements relating to
electromagnetic compatibility, EN 55022 class B for ITE, the
essential protection requirement of Council Directive 89/336/EEC
on the approximation of the laws of the Member States relating to
electromagnetic compatibility.
Company has an on-going policy of upgrading its products and it
may be possible that information in this document is not up-to-date.
Please check with your local distributors for the latest information.
No part of this document can be copied or reproduced in any form
without written consent from the company.
Trademarks:
All trade names and trademarks are the properties of their
respective companies.
Copyright © 2006, All Rights Reserved.

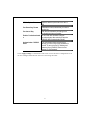
Table of Contents
Unpacking Information ············································································· 1
Introduction To Wireless Router ······························································ 2
General Description················································································· 2
Key Features ························································································· 3
The Front Panel······················································································ 4
System LEDs ················································································· 4
Port LEDs (Wireless) ······································································· 4
Port LEDs (WAN)············································································ 4
Port LEDs (LAN) ············································································· 5
The Rear Panel ······················································································ 5
Power Connection··········································································· 5
Placement (Optional) ······································································· 5
Restore Default Button ····································································· 6
Installing And Using Wireless Router······················································ 7
Network configuration setup··································································· 7
Computer configuration setup································································· 8
Management··························································································· 10
Wireless Router configuration setup······················································ 10
Setup Wizard ····················································································· 12
Operation Mode·················································································· 16
Wireless ···························································································· 17
Basic Settings············································································· 17
Advanced Settings ······································································ 20
Security ····················································································· 22
Access Control ··········································································· 24
WDS Setting··············································································· 25
TCP/IP Setting···················································································· 26

LAN Interface Setup ···································································· 26
WAN Interface Setup··································································· 27
Static IP Mode···························································································· 27
Firewall Configuration····································································· 31
Port Filtering··············································································· 31
IP filtering··················································································· 32
MAC filtering··············································································· 33
Port forwarding ··········································································· 34
URL Filtering ·············································································· 35
Virtual DMZ················································································ 36
Management ······················································································ 37
Status························································································ 37
Statistics ···················································································· 39
DDNS························································································ 39
Time Zone Setting······································································· 40
System Log················································································ 40
Upgrade Firmware ······································································ 41
Save and Reload Settings···························································· 42
Password··················································································· 42
Product Specifications ··········································································· 43

1
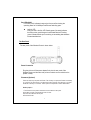
Unpacking Information
Thank you for purchasing the product. Before you start, please check all the contents
of this package.
The product package should include the following:
1. One Wireless Router
2. One power adapter
3. One User Manual (CD)
4. One detachable antenna

2
Introduction To Wireless Router
General Description
The Wireless Router built-in with 4-port 10/100Mbps Fast Ethernet Switch is
the latest generation of Wireless router product for Home/Office and SOHO users.
This full-feature and self-contained compact Wireless Router will be fully for
broadband access in both of LAN and Wireless environment. This device has
been specifically designed to provide LAN and Wireless users the most
cost-effective method with multiple accesses to the Internet at the cost of a single
public IP address(IP Sharing)and enjoy the true Plug-and-Play installation.
Moreover, the built-in 4-port 10/100Mbps switch lets users plug the network cable
into the device without buying additional switch.
This device is also an Access Point. It has a built-in wireless LAN. Users
can connect to Internet using wireless network interfaces anywhere within the
range of its radio transmission. It’s ideal for SOHO users who require instant and
convenient access to Internet without the restriction of connecting cables.
The friendly WEB-based graphics interface for setup makes any
inexperienced users soon enter plug-and–play operation. Embedded DHCP
server simplified IP address management and no MIS people needed for daily
technical services. What is more, NAT/firewall is also implemented on this
compact Router Box for protecting whole LAN from outside attack.

3
Key Features
The switch provides the following key features:
Complies with IEEE 802.11b/g wireless standards
Provides one 802.11b/g wireless Reverse SMA detachable antenna
High speed transfer data rate up to 54Mbps
Supports turbo mode for 72Mbps data transfer
Supports wireless data encryption with 64/128-bit WEP, WPA (TKIP with IEEE
802.1x), WPA2 and AES functions
Supports system log
Supports authentication for wireless connectivity based on ESSID
Provides MAC access control and hidden SSID function
WDS supported with WEP, TKIP and AES encryption
Channel : USA 11, Europe 13
Supports NAT/NAPT IP Sharing
Supports Static IP, PPPoE, PPTP, & DHCP client
SPI Anti-DoS Firewall; Virtual DMZ; DNS relay; UPnP
Provides DHCP server
Supports ALG for FTP, NetMeeting, DDNS (DynDNS, TZO)
Supports firmware upgrade function via Web
Compliant with FCC Part 15.247 for US, ETS 300 328 for Europe
Flash : 2MB NOR type, SDRAM : 8MB
Certifications : FCC Class B, CE Mark

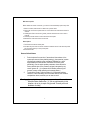
4
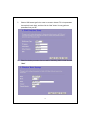
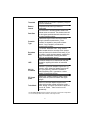
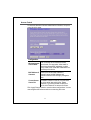
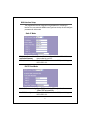
The Front Panel
The front panel of the Wireless Router is shown below.
System LEDs
System LED indicators locate on the front panel for showing the operating
status of the whole device.
PWR (Power) LED
This indicator lights green when the Wireless Router is receiving power;
otherwise, it is off.
Status LED
The LED will be dark for a few seconds when the system is started.
After that, the LED will blink periodically to show the Wireless Router
is working normally. If the LED stays green/dark that means the
system failed, you need to contact your agent or try to reboot the
system.
Port LEDs (Wireless)
ACT LED
I. When Wireless AP is ready for data transmitting and receiving,
it is steady green.
II. When the data is transmitting or receiving, it is blinking green.
Port LEDs (WAN)
Port LED (WAN) indicators locate on the front panel for showing the
operating status of WAN port.
Act/Link LED
The LED stays light (green) means the port has good linkage
to its associated devices.
The LED will blink green when there is traffic transverse the port.

5
Port LEDs (LAN)
Port LEDs (LAN) indicators locate on the front panel for showing the
operating status of 10/100Mbps Fast Ethernet switching ports.
Act/Link LED
Every port has a Act/Link LED. Steady green (link state) indicates
that the port has good linkage to its associated devices. Flashing
green indicates that the port is receiving or transmitting data between
its associated devices.
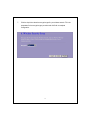
The Rear Panel
The rear panel of the Wireless Router is shown below
Power Connection
Plug the circle end of the power adapter firmly into the rear panel of the
Wireless Router, and the other end put into an electric service outlet then the
system is ready.
Placement (Optional)
There are three ways to place the Router. The first way is to place the Router horizontally
on a surface. The second way is to attach the router to the wall. The third way is to stand
the Router vertically on a surface. These options are explained in further detail below.
Desktop Option
1. The Router has one plastic stand that can be divided into two parts.
2. Combine one part of stand with the side of router.
3. Do the same with the second part.
4. Place the Router

6
Wall-mount option
Before attach this router on the wall, you have to finish the desktop option steps first.
1. Select a location with access for cables and a power outlet.
2. Unplug the unit. Place it upside down on a flat surface and mark the two holes for
anchors.
3. Installing the Wall mount anchor (plastic) into the wall with tools such as drill or
hammer.
4. Insert the provided screws in each hole of the stand parts.
5. Attaches the unit to the anchors on the wall.
Stand Option
1. The Router includes two stand parts.
2. Combine two parts into one stand. Combine it with the side of router near the power
port. Push the stand up to snap it into place.
3. Place the Router.
Restore Default Button
1. Push the button for more than 5 seconds and then release it, the
system will return to factory default setting. In the meantime, system
rewrites flash to default value and Status LED halts for a while.
Approximately 60 seconds later, the Status LED blinks green
periodically, now the whole system parameters have returned to
factory default value. If the process has been interrupted by any
reason (power off…), the system will fail. Before performing the
process, ensure a safe operating environment please!
2. To reboot the Router, Press the button for 2-5 seconds and then
release it, and all the setting won’t be erased. Wait for the Router to
complete the reboot, and then you can start to use it.
Warning:Incomplete factory setting recovery procedure will cause the
Wireless Router malfunction!If you are unfortunately in this
situation, do not try to repair it by yourself. Consult your local
distributor for help!

7
Installing And Using Wireless Router
This Chapter provides a step-by-step guide to the installation and configuration
of the Wireless Router. We suggest you go over the whole chapter and then do
more advanced operation.
Network configuration setup
Steps to build up the network:
Connect the ADSL or Cable modem to the Ethernet WAN port on the back of
the Wireless Router by using the UTP cable.
Connect the phone line from the wall socket to the line-in port on the ADSL
modem, or the coaxial cable to the line-in port on the Cable modem.
Plug-in the power adapter to the modem and turn on the power. Install the
Ethernet card into the computer by referring to the User Guide that came with
the card.
Connect the computer to the Wireless Router by using standard twisted-pair
Ethernet cable from the computer’s Ethernet card to an 10/100Mbps Ethernet
port on the back of the Wireless Router.
Plug-in the power adapter to the Router and the other side to the wall outlet.

8
Computer configuration setup
In order to communicate with this Wireless Router, you have to configure the IP
addresses of your computer to be compatible with the device. The router supports
DHCP server and it is enabled as default. Users that configure your IP address as
“Obtain an IP address automatically” may skip the following IP configuration
instruction.
Note:
1. The default network setting of the device:
IP address: 192.168.1.1
Subnet Mask: 255.255.255.0
DHCP Server: enabled
2. In the following TCP/IP configuration guide, the IP address “192.168.1.2 ” is
assumed to be your IP address if you want to specify IP addresses manually.
Please DO NOT choose 192.168.1.1 for the IP address (192.168.1.1) has been
set as the default IP for this device.
3. The following TCP/IP configuration guide uses windows XP as the presumed
operation system.
Procedures to configure IP addresses for your computer
1. If you are in Classic Start menu view, click StartSettingsControl
PanelNetwork Connections.
If you are in Start menu view, click StartControl Panel Network Connections.
2. Double click “Local Area Connection”

9
3. Choose Internet Protocol (TCP/IP) and click Properties.
4. You may choose “Obtain an IP address automatically”(recommend) to get IP address
automatically or choose “Use the following IP address” to specify IP addresses manually.
Please click the OK button after your configuration.

10
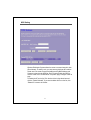
Management
Wireless Router configuration setup
In order to make the whole network operate successfully, it is necessary to
configure the Wireless Router through your computer has a WEB browser
installed. Please follow up the steps listed below.
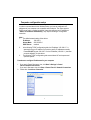
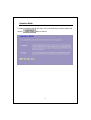
1. Double click the Internet WEB browser icon on your desktop screen
(Netscape Communicator 4.0 and Internet Explorer 3.0 or update version)
2. Type 192.168.1.1 into the URL WEB address location and press Enter.
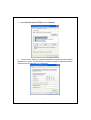
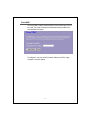
3. The Username and Password Required window appears.
- Enter admin in the User Name location (default value).
- Enter admin in the Password location (default value).
- Click “OK” button

11
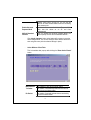
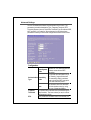
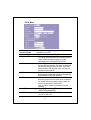
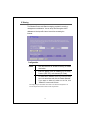
4. The Graphic User Interaface
After the password authorization, the Setup Wizard shows up as the home page of
the Graphic User interface. You may click on each folder on left column of each page
to get access to each configuration page.

12
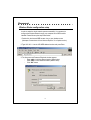
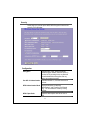
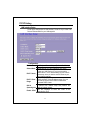
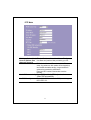
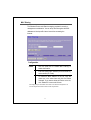
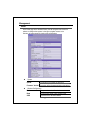
Setup Wizard
If you are using the router for the first time, you may follow the procedures of the setup
wizard to do a step-by-step configuration.
Note: The following instruction does an overall introduction to the Setup Wizard. For detail
information to each item, please refer to instruction of each page.
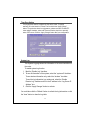
1. To start the Setup Wizard, click the “Next” button to proceed.
2. Select your demanding operation mode and click “Next”.

13
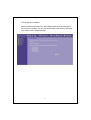
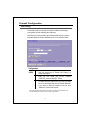
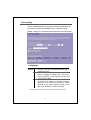
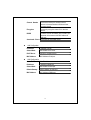
3. Mark the check box to enable synchronizing time by NTP server. Select the religion
you live and a NTP server by clicking the drop list then click “Next”.
4. Specify an IP address and subnet mask for connecting to the router in LAN.

14
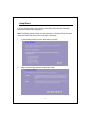
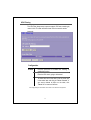
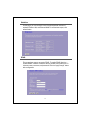
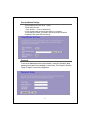
5. Select a WAN access type for the router to connect to Internet. Fill in the parameters
that required in each blank, and then click the “Next” button. You may get those
parameters from your ISP.
6. Select the wireless parameters that are used for associating with this router and click
“Next”

15
7. Click the drop list to select the encryption type for your wireless network. Fill in the
parameters for the encryption type you select and click finish to complete
configuration.
Page is loading ...
Page is loading ...
Page is loading ...
Page is loading ...
Page is loading ...
Page is loading ...
Page is loading ...
Page is loading ...
Page is loading ...
Page is loading ...
Page is loading ...
Page is loading ...
Page is loading ...
Page is loading ...
Page is loading ...
Page is loading ...
Page is loading ...
Page is loading ...
Page is loading ...
Page is loading ...
Page is loading ...
Page is loading ...
Page is loading ...
Page is loading ...
Page is loading ...
Page is loading ...
Page is loading ...
Page is loading ...
-
 1
1
-
 2
2
-
 3
3
-
 4
4
-
 5
5
-
 6
6
-
 7
7
-
 8
8
-
 9
9
-
 10
10
-
 11
11
-
 12
12
-
 13
13
-
 14
14
-
 15
15
-
 16
16
-
 17
17
-
 18
18
-
 19
19
-
 20
20
-
 21
21
-
 22
22
-
 23
23
-
 24
24
-
 25
25
-
 26
26
-
 27
27
-
 28
28
-
 29
29
-
 30
30
-
 31
31
-
 32
32
-
 33
33
-
 34
34
-
 35
35
-
 36
36
-
 37
37
-
 38
38
-
 39
39
-
 40
40
-
 41
41
-
 42
42
-
 43
43
-
 44
44
-
 45
45
-
 46
46
-
 47
47
-
 48
48


Eusso UGL2454-RTK Owner's manual
- Category
- Routers
- Type
- Owner's manual
- This manual is also suitable for
Ask a question and I''ll find the answer in the document
Finding information in a document is now easier with AI
Related papers


Other documents
-
CNET CWR-854 User manual
-
Airlink101 AR675W User manual
-
Longshine LCS-WR5-2214-A User manual
-
Encore electronic ENHWI-G2 User manual
-
Alfa Network AIP-W610 User manual
-
Intellinet Wireless B Router w/ 4 Port 10/100 Switch User manual
-
Netgear FWG114P v2 User manual
-
 MicroNet Technology SP916GK User manual
-
-
