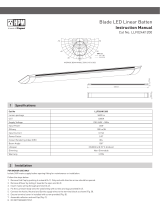
Legrand 643087 Installation guide

Type
Installation guide

Legrand 643087 is a professional flush-mounted smoke alarm designed to provide early warning of fire hazards in residential and commercial buildings. Here are its key capabilities:

  • Advanced Detection: Utilizes photoelectric technology to accurately detect smoke particles, minimizing false alarms caused by dust or steam.

  • Interconnection: Can be interconnected with up to 20 other compatible smoke alarms (models 643084, 643085, or 643087) to create a comprehensive fire alarm system throughout your property.

  • Long-life Battery: Equipped with a non-replaceable 3V lithium battery that provides continuous power for up to 10 years, ensuring reliable operation without the need for frequent battery replacements.

Electronic Unit
Terminal Cover
Ceiling Clamp
Ceiling Clamp
Terminal Markings
Mounting Base
Spacer
Ø110mm
Green LED
Red LED
PROFESSIONAL FLUSH MOUNTED SMOKE ALARM
INSTALLATION INSTRUCTIONS
PROFESSIONAL FLUSH MOUNTED SMOKE ALARM
INSTALLATION INSTRUCTIONS
Warranty
Legrand Australia Pty Ltd will honour all statutory guarantees that you as a
consumer are entitled to rely upon under the Australian and New Zealand
Consumer Laws against a manufacturer, including a guarantee that this
product is of acceptable quality.
To make a claim under any statutory guarantee you should first contact the
supplier, or retailer from whom you purchased this product.
Customer Service
For all Customer Service and Technical Support enquires please call Monday
to Friday during business hours.
Legrand Australia
1300 369 777
www.legrand.com.au
ABN: 31 000 102 661
LE09894AC
Installation:
WARNING: In the interests of safety, a licensed electrician, in accordance with
the relevant requirements of AS/NZS 3000, must install this smoke alarm and
all wiring.
This alarm must be wired to a continuous 230-240V a.c. 50Hz circuit. Ensure
any switching device cannot inadvertently override the unit.
NOTE: See overleaf for recommended locations of alarms
There are four terminals in the supply terminal block, marked I, N, A and
E/LOOP. It is important that the alarm be wired correctly to ensure correct
operation. Incorrect wiring to the smoke alarm will damage the unit and
invalidate the warranty. See wiring diagrams.
A maximum length of 300 metres of wire can be used in interconnecting
smoke alarms. Spacing between interconnected smoke alarms must not
exceed 30m per alarm. Minimum wire cross section 1.00mm2.
Interconnected smoke alarms must be connected to the same final
sub-circuit.
Do not use any wire that could later be confused with the normal house
wires for the interconnect wire. For example, green/yellow earth wire.
Do not connect AC power wires to I interconnect terminal. This may damage
smoke alarms.
Do not connect the I interconnect wire to any device, except the
I interconnect terminal of another 643084, 643085 or 643087 smoke alarm
or interface 643086. Otherwise, smoke alarms will be damaged.
Smoke alarms should be interconnected only within the confines of a
single-family living unit. If smoke alarms are interconnected between
different units, there may be excessive nuisance alarms. Residents may not
be aware that smoke alarms are being tested or that it is a nuisance alarm
caused by cooking, etc.
INSTALLER PLEASE NOTE:
Before you connect the mains power, check wiring polarity.
If the alarm ‘chirps ’ press the Test button to check the battery condition.
If ‘chirps ’ persist return smoke alarm to your supplier.
This smoke alarm is intended for ceiling mount only.
WIRING INSTRUCTIONS:
This smoke alarm can be interconnected with other 643084, 643085 or
643087 smoke alarms. Interconnection with other brands or models may
cause damage or result in a shock or fire risk.
Up to a limit of 20 smoke alarms may be interconnected.
Not interconnectable with HPM 645/3 ionisation smoke alarm.
Develop and Practise a Plan of Escape:
Make a floor plan indicating all doors and windows and at least two escape
routes from each room. Second storey house windows may need a rope or
chain ladder.
Have a family meeting and discuss your escape plan, showing everyone
what to do in case of fire.
Determine a place outside your home where all of you can meet, if a fire
occurs.
Familiarise everyone with the sound of the smoke alarm and practice
leaving your home when they hear it.
Practice a fire drill at least every six months, including drills at night.
Practice allows you to test your plan before an emergency. You may not be
able to reach your children. It is important that they know what to do!
What to do when the Alarm Sounds:
Leave immediately by your plan of escape. Every second counts, so don’t
waste time getting dressed or picking up valuables.
In leaving, don’t open any inside door without first feeling its surface. If hot,
or if you see smoke seeping through cracks, don’t open that door! Instead,
use your alternative exit. If inside door is cool, place your shoulder against
it, open it slightly and be ready to slam it shut if heat and smoke rush in.
Stay close to the floor if air is smoky. Breathe shallowly through a wet cloth
if possible.
Once outside, go to your selected meeting place and make sure everyone
is there.
Call the Fire Brigade from your neighbour’s home - not from yours!
Don’t return to your home until officials say that it is safe to do so. For
additional information on fire safety, contact your local Fire Brigade.
Product Notes:
1. This product must be installed by a licenced electrician.
2. For indoor use only.
3. This product should not be installed in areas exposed to constant vibration, temperature
fluctuations, or areas of high humidity.
4. This product contains no serviceable parts and no attempt should be made to repair this product.
If the product is faulty it should be discarded.
5. Severe electromagnetic interference from other products may cause malfunction of this product.
6. This product is intended for domestic or similar uses. It is not suitable for use in an environment
heavily laden with dust.
7. This product has a 10 year design life from the date of installation. At the end of this time it should
be replaced. The installer should record the date of installation on the label provided and apply
it to the alarm for future reference. It is recommended that if installation date is not recorded on
the alarm, the 10 years will commence from the date of manufacture. The date of manufacture is
coded on every alarm in the form B/N 15 July 2021.
8. This product has been designed to operate in ambient temperatures: 0°C to 40°C.
9. This product is not suitable for marine environments such as areas subject to salt spray and/or
mist.
10. This product is not suitable for installation in hazardous and/or corrosive areas.
11. This product has been designed for domestic or similar uses and is not suitable for a commercial
installation.
12. The material in this product may vary in colour from batch to batch. Colour matching from one
batch to another cannot be guaranteed.
13. Electrical installations periodically receive transient over voltages. This product has been
designed to minimise the effect of such voltages on connected equipment. It may not give
full protection for extreme over voltage transients such as those resulting from a close
lightning strike.
14. This product has been designed to operate on a nominal supply voltage of 230 - 240V a.c. 50 Hz.
15. This product must be installed and used as per these instructions.
16. After installation this product must be tested as required by the appropriate government and/or
staturatory regulations.
17. This product utilises intellectual property in the form of registered designs, trademarks, and/or
patents. Such intellectual property remains the property of Legrand in all cases.
18. Legrand reserves the right to modify the specification of this product at any time.
THIS SMOKE ALARM HAS BEEN TESTED AND PASSED TO AS 3786
DEAR ELECTRICIAN: PLEASE LEAVE THIS MANUAL FOR THE OWNER. THANK YOU FOR CHOOSING THIS SMOKE ALARM.
07/2021
Legrand New Zealand
0800 476 009
www.legrand.co.nz
Avoid These Locations:
Do not place alarm in the following locations:
In the garage, gas released when you start your automobile may cause
false alarms.
In front of forced air supply ducts used for heating and air-conditioning and
other high airflow areas.
In the peak of an “A” frame type of ceiling.
In areas where temperatures may fall below +0ºC or rise above +40ºC.
In dusty areas, dust particles may cause smoke alarm to false alarm or fail
to alarm.
We do not recommend installation in or directly adjacent to areas of
high condensation such as bathrooms & laundries due to potential for
false alarms.
Kitchen/cooking areas.
Battery:
This smoke alarm uses a 3V non replaceable lithium battery to
automatically provide backup power to the alarm if the AC power fails. The
battery will operate the alarm for a minimum of 12 months, though while
operating under battery the unit is consuming energy and will NOT operate
in this mode for 10 years. We recommend not to continually operate this
smoke alarm on battery only.
The 3V non replaceable battery has an estimated 10 year life under normal
working conditions.
The Limitations of Smoke Alarms:
Smoke alarms cannot provide an alarm if smoke does not reach the alarm.
Therefore, smoke alarms may not sense fires starting in chimneys, walls,
on roofs, on the other side of a closed door, or on a different floor.
If the alarm is located outside the bedrooms, or on a different floor, it may
not wake up sound sleepers. A smoke alarm in the bedroom, is therefore
recommended as additional protection.
Smoke alarms have been significant in saving lives in many parts of the
world. However, U.S. Government research indicates that they may not give
early enough warning in up to 35% of fires. Hence, the use of this product
does not act as a substitute for basic prevention.
Although smoke alarms can help save lives by providing early warnings of a
fire, they are not a substitute for an insurance policy.
This smoke alarm alone will not alert the hearing impaired. Use special
purpose smoke alarm with lights or vibrating devices, for those hard
of hearing.
False Alarms:
Dust generated on building construction sites can cause false alarms.
The red plastic bag is intended to protect the smoke alarm during the
building construction phase.
This smoke alarm is designed to minimise false alarms. Smoking will not
normally set off the alarm unless smoke is blown directly into the alarm.
Combustion particles from cooking may set off the alarm if the alarm is
located close to the cooking surface.
Because large quantities of combustion particles are generated from spills
or grilling an alarm with a Hush Control device is preferable near a kitchen
environment.
If the alarm does sound, check for a fire before silencing the alarm. If a fire
is discovered, escape quickly and call the Fire Brigade.
Cat. No: 643087
Supply Voltage: 230-240V a.c.
Frequency: 50Hz
Backup Battery: 3V Lithium battery (non replaceable)
Temperature Range: +0°C to +40°C
Humidity Range: 10-95% at 20°C
Siren Sound Level: > 85 dB at 3 metres
Unit Size: Ø110 x 77mm
Ceiling Cut-out Size: Ø 90mm
Protrusion from ceiling: Ø 25mm
Depth into ceiling: 52 mm
Maxiumum Lifespan: 10 years
IMPORTANT: READ ALL INSTRUCTIONS BEFORE INSTALLATION.
NO USER SERVICEABLE PARTS INSIDE THIS SMOKE ALARM.
Do not attempt to repair the smoke alarm yourself.
Not to be used with non-pure sinusoidal power sources.
Specifications:
PROFESSIONAL PHOTOELECTRIC SMOKE ALARM
INSTALLATION INSTRUCTIONS
Installation:
Terminals at back of mounting base are marked as follows:
A - Active I - Interconnect N - Neutral E/Loop - Earth or Loop
EXAMPLE OF MULTIPLE ALARM WIRING:
When interconnected, all smoke alarms will sound upon activation. However,
only the originating smoke alarm will have flashing Red LED.
WARNING: Connecting the Interconnect terminal to any supply conductor will
result in damage to the alarm, failure to operate or shock hazard and will void
the warranty of the alarm.
WARNING: Under no circumstances must an insulation resistance test be
carried out on a circuit to which a smoke alarm is connected.
The test could cause irreparable damage to the internal circuitry of the smoke
alarm and make it inoperative.
The warranty would be void under such circumstances.
WARNING: Clipping the Electronic Unit in the base will activate the battery.
The battery has been designed to have a lifespan of 10 years in normal
working condition.
Plastic Bag:
1. The smoke alarm is supplied in a plastic bag to protect the electronic unit
from dust during the building construction phase.
2. Legrand recommendation is to place the electronic unit (in the plastic bag)
aside until commissioning of the building. This will protect the electronic
unit from dust.
3. On commissioning, discard the plastic bag and clip the electronic unit into
the mounting base assembly.
4. Once removed, keep the plastic bag away from babies and children to
avoid danger of suffocation.
Mounting Instructions:
BEFORE mounting the smoke alarm, please read the following carefully.
This smoke alarm is made up of 2 sub-assemblies – the mounting base
assembly & the electronic unit.
Legrand recommendation is to place the electronic unit (in the plastic bag) aside
until commissioning of the building.
The electronic unit should only be removed from the plastic bag at the end of the
building construction phase, when the smoke alarm is to be commissioned. The
building construction phase includes sanding, painting preparation, painting,
flooring etc.
1. Select a suitable location on the ceiling for the smoke alarm.
2. Cut a Ø90mm hole in the ceiling.
3. Strip the Active, Neutral & Interconnect (if used) wires back according to the
strip length shown in figure 1.
4. Unscrew the terminal cover to access the terminals.
5. Connect the wires to the correct terminals on the mounting base as shown in
figure 1. Ensure the screws are fully tightened.
6. Break out tabs on terminal cover to suit cable. Screw the terminal cover back
onto the mounting base to prevent accidental contact with live terminals.
7. Insert the mounting base into the hole. Tighten the 2 screws to clamp the
mounting base onto the ceiling. Refer to figure 2.
8. Do not remove the electronic unit from the plastic bag.
Mounting Instructions:
Toggle position indicates unit is not
clamped onto ceiling. In this position,
the Electronic Unit cannot be fitted.
Toggle position indicates unit
is clamped onto ceiling.
Tighten 2 screws to clamp Mounting Base onto ceiling
Commissioning:
1. Remove the electronic unit from the plastic bag.
2. Remove the spacer from the electronic unit.
3. Insert the electronic unit into the mounting base as shown in figure 3. Push
the electronic unit firmly until it latches (clicks) onto the mounting base.
4. Turn on mains power and check the green and red LED function. The green
LED should glow to show main power present. The red LED will pulse every
60 seconds (approximate) to indicate correct operation.
5. Press the Test/Hush button for 5 seconds to check that the alarm works.
Recommended Locations of Alarms:
General requirements for Australia are in National Construction Code.
There maybe additional requirements in your area. Please check for any
special requirements in your area with the relevant regulators.
Install at least one alarm for each separate bedroom. Try to cover the exit
path as the bedrooms are usually farthest from an exit. If there is more than
one sleeping area, install additional alarms in each sleeping area in the
immediate vicinity of bedrooms.
Install at least one alarm to protect any stairway as stairways act like
chimneys for smoke and heat.
Install at least one alarm on every floor level.
Install an alarm in every room where a smoker sleeps as additional protection.
Install an alarm in every room where electrical appliances are operated (i.e.
portable heaters or humidifiers) as additional protection.
Install an alarm in every room where someone sleeps with the door closed
as additional protection. The closed door may prevent the alarm from waking
the sleeper.
Smoke, heat and other combustion products rise to the ceiling and spread
horizontally. Mounting the alarm on the ceiling in the centre of the room
places it closest to all points in the room. Ceiling mounting is preferred in
ordinary residential construction.
When mounting an alarm on the ceiling install it at a minimum of 300mm
from the side wall.
When mounting an alarm at the apex of a sloping ceiling it should be located
a minimum of 500mm from the apex but should not exceed 1500mm
(see diagram).
I
A
N
IA
N
E/LOOP
IA
N
E/LOOP
40mm
10mm
TYPICAL MULTIPLE
FLOOR INSTALLATION
SINGLE FLOOR
BEDROOMBEDROOM
BEDROOM W/C
KITCHEN DINING
BATH
BD/RM HALL BD/RM
KITCHEN
RUMPUS
LOUNGE
ROOM
LOUNGE ROOM
Recommended locations
CEILING / WALL JUNCTION
CEILING
NEVER HERE
BEST
HERE NEVER
HERE
HEAT &
SMOKE
FROM
FIRE
DEAD AIR
SPACE
SIDE WALL
300mm min
300mm min
APEX OF
SLOPING
CEILING
HEAT & SMOKE
FROM FIRE
DEAD
AIR SPACE
1500mm max
500mm min
500mm min
BEST
HERE
BEST
HERE
I
A
N
IA
N
E/LOOP
IA
N
E/LOOP
40mm
10mm
TYPICAL MULTIPLE
FLOOR INSTALLATION
SINGLE FLOOR
BEDROOMBEDROOM
BEDROOM W/C
KITCHEN DINING
BATH
BD/RM HALL BD/RM
KITCHEN
RUMPUS
LOUNGE
ROOM
LOUNGE ROOM
Recommended locations
CEILING / WALL JUNCTION
CEILING
ACCEPTABLE HERE
BEST
HERE NEVER
HERE
HEAT &
SMOKE
FROM
FIRE
DEAD AIR
SPACE
SIDE WALL
300mm min
300mm min
600mm max
APEX OF
SLOPING
CEILING
HEAT & SMOKE
FROM FIRE
DEAD
AIR SPACE
1500mm max
500mm min
500mm min
BEST
HERE
BEST
HERE
Figure 1
Operation, Testing and Maintenance:
OPERATION
The smoke alarm is operational once all wires are properly connected, the
smoke alarm is correctly installed on the mounting base, and the alarm has
been tested. There are two LED indicators. Each of them has a unique function:
Red LED
Stand-by condition: will flash once approximately every 60 seconds to
indicate unit is functioning properly.
Alarm condition: will flash quickly when unit goes into alarm. The flashing
red LED and pulsating alarm will continue until the air is cleared. For
interconnected units, the originating smoke alarm red LED will be flashing.
All other units will sound but not flash.
Green LED
AC Mains-ON Indicator: indicates that the unit is operating with AC power. If
this LED goes out, it indicates that the AC power is off.
False Alarm Hush Control Feature:
This smoke alarm has the capability of being temporarily desensitised for
approximately 10 minutes.
If the smoke alarm is sounding it can be desensitised by pressing the “HUSH/
TEST” button on the smoke alarm cover.
After pressing the “HUSH/TEST” button, the alarm will silence immediately and
red LED will flash every 15 seconds for approximately 10 minutes to indicate
the alarm is in the temporary desensitised condition.
The smoke alarm will automatically reactivate after approximately 10 minutes
and sound the alarm if particles of combustion are still present.
The “HUSH” feature may be used repeatedly until the air has cleared.
TESTING
NOTE: Before testing, make sure that the smoke alarm is connected to AC
power supply (make sure the green LED is ON).
Test alarm by pushing and holding the test “HUSH/TEST” button for 5
seconds. This should sound the alarm if all electronic circuitry and horn are
working.
If no alarm sounds, check - wiring, fuses or circuit breaker and make certain
that alarm is connected to a continuous final sub-circuit.
With interconnected units, holding test button down” for 15-20 seconds” on
one unit will cause all connected units to sound.
Continuous chirping or erratic noise or low sound from an alarm may indicate
a defective alarm.
If none of the above, return the unit to place of purchase.
Smoke alarm should be tested on a monthly basis. To accurately test the
integrity of the sensing chamber use a smoke detector (aerosol) tester.
NOTE: After the above alarm test with the ‘HUSH/TEST’ button, the alarm will
be desensitised for about 10 minutes. ONLY DO THE SMOKE AEROSOL TEST
AFTER THIS DESENSITISED PERIOD.
WARNING: Do not apply excessive force on the “HUSH/TEST” button this may
damage the smoke alarm and may void the warranty.
WARNING: Never use an open flame of any kind to test your alarm. You may
damage the alarm or set fire to your home. The built-in test switch enables
testing of all electronic components and the horn.
MAINTENANCE
The smoke alarm is virtually maintenance free. However, under dusty or greasy
conditions, a vacuum cleaner may be used to clean the exterior of unit (including
slots on cover). We recommend using a vacuum cleaner to clean the exterior of
the unit every six months. DO NOT IMMERSE IN OR SPRAY WITH HOUSEHOLD
CLEANERS. If the unit gives a chirping sound every 60 seconds, the Electronic
Unit must be replaced.
Repairs and Services:
If the smoke alarm is defective in any way, do not tamper with the unit. See
warranty section for details. Note: NO USER REPLACEABLE PARTS INSIDE.
Figure 2
Figure 3
Align the
groove of the
electronic unit
to the rib of
the mounting
base
Align the
groove of the
electronic unit
to the rib of
the mounting
base
INSTALLATION
Electromagnetic Interference (EMI):
HPM Smoke alarms are designed to filter external EMI signals. But some
forms of EMI can still aect the performance.
Avoid installing a smoke alarm too close to an electrical noise source (< 1m).
If possible, install the smoke alarm on a separate circuit to all other
electrical circuits.
Common sources of EMI which may cause the smoke alarm to malfunction
include:
Fluorescent luminaires, LED Downlights, CFL lamps, Security Lights,
Solar Inverters, A/C Compressors (Spikes during ON/OFF).
Heat Lamps, Air conditioners, ceiling fans (Electrical noise & Spike
due to Heavy inductive loads at ON/OFF).
Note: Some installations may require an inline EMI filter if the EMI source
cannot be identified.
  • Page 1 1
  • Page 2 2

Legrand 643087 Installation guide

Type
Installation guide

Legrand 643087 is a professional flush-mounted smoke alarm designed to provide early warning of fire hazards in residential and commercial buildings. Here are its key capabilities:

  • Advanced Detection: Utilizes photoelectric technology to accurately detect smoke particles, minimizing false alarms caused by dust or steam.

  • Interconnection: Can be interconnected with up to 20 other compatible smoke alarms (models 643084, 643085, or 643087) to create a comprehensive fire alarm system throughout your property.

  • Long-life Battery: Equipped with a non-replaceable 3V lithium battery that provides continuous power for up to 10 years, ensuring reliable operation without the need for frequent battery replacements.

Ask a question and I''ll find the answer in the document

Finding information in a document is now easier with AI