Page is loading ...
Page is loading ...
Page is loading ...
Page is loading ...
Page is loading ...
Page is loading ...

12 13
EN EN
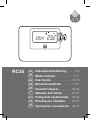
RC35 - USER GUIDE
SETTING-UP THE RC35
PROGRAMMING THE RC35
Features
• Ergonomic user interface featuring an ‘OK-button’.
• Large LCD (Liquid Crystal Display) Screen.
• 7-day heating program to match your lifestyle,
whilst maximising energy savings.
• 6 independent temperature levels
per day (from 5°C to 35°C).
• Holiday button saves energy by letting you
reduce the temperature for 1 to 99 days.
• Built-in Memory holds the user program indefinitely.
Description
The ACV RC35 is a programmable
room thermostat designed to
control your heating system
efficiently, providing comfortable
temperatures when you are at
home and energy savings when
you are away. The following
instructions explain how to
set up, program and operate
your ACV RC35 Programmable
Room Thermostat.
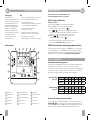
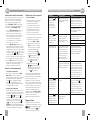
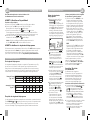
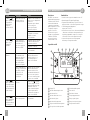
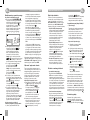
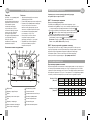
Controls Layout
LCD Screen
Battery Low Indicator
Time Display
Heating Required Indicator
Day Indicator
1
2
3
4
5
Holiday Function Button
Program Buttons
Copy Day Button
Day Select Button
Time Change Buttons
Temperature Display
Temperature Change Buttons
Temperature Enquiry Button
Operating Mode Buttons
Green OK Button
6
7
8
9
10
11
12
13
14
15
This section shows you how to setup and run the thermostat in 2 simple steps:
STEP 1: Setting the Day and Time
To set the Day and Time:
a. Press the DAY button once and the ‘day indicator’ will begin to flash.
b. Press the DAY button until the correct day is reached (Day 1 =
Monday). Press the green button to confirm.
d. Press either of the
or buttons once to enter time setting mode. The LCD screen
flashes the time digits (when the unit is powered for the first time the display shows 12:00).
e. Use the
or buttons to set the correct time then press the green button to
confirm. Each press of the buttons will change the time by one minute and holding
them down will change the time slowly at first and get progressively quicker.
Note: If this mode is entered accidentally then press the AUTO, MAN or OFF buttons to exit.
STEP 2: Running the Built-in Heating Program
The thermostat is now ready for operation. Press the AUTO button and the built-
in heating program will start running. Note: The built-in heating program has been
designed to provide normal comfort requirements, but if you want to customise
the settings please see the next section ‘Programming the RC35’.
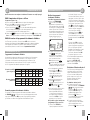
The Built-in Heating Program
The built-in heating program has 6 temperature level changes per day that can be set
between 3.00am and 2.50am the following day - allowing you to maintain the evening
temperature after midnight. Each temperature level can be set between 5°C and 35°C,
and adjusted in 0.5°C increments. The factory default program for heating is as follows.
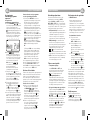
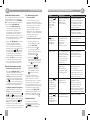
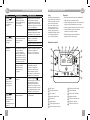
COPY
DAY
DAY
1..6
OFFMANAUTO
1 2 3 4 5 6 7
AUTO
MAN
OFF
14
13
15
1 2 43 5
8
9
10
7
11
12
6
PROGRAM
Reviewing the Heating Program
To review or edit the heating program use the PROGRAM or buttons to navigate
between the 6 individual programming periods for that day. Use the DAY button to step through
each day of the week, so the complete 7 day heating program can be reviewed or edited.
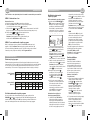
Monday to Friday
(Day 1 to 5)
Period 1 2 3 4 5 6
Time
6:30 8:00 12:00 14:00 18:00 22:30
Temperature
21°C 18°C 21°C 18°C 21°C 16°C
Saturday & Sunday
(Day 6 & 7)
Period 1 2 3 4 5 6
Time
8:00 10:00 12:00 14:00 18:00 23:00
Temperature
21°C 21°C 21°C 21°C 21°C 16°C

14 15
EN EN
PROGRAMMING THE RC35
OPERATING THE RC35
Modifying the Heating Program
To change the heating program:
a. Press either of the PROGRAM
or
buttons to enter the programming mode.
The time / temperature settings for period
1
on Monday (Day 1) will be flashing as
shown. The active period is highlighted by
a flashing square around the numbers at
the bottom of the screen and the selected
day is shown with the day indicator.
b. To adjust the period start time use
the
or buttons, the ‘OK?’
indicator will be displayed to confirm
the change. Holding the button down
will change the time quickly.
Note: If you are pressing the
or buttons and the display flashes
the next period, it means the next
period will be pushed forward.
c. Once the required time is reached press
the green
button to confirm.
Note: If the original time setting did
not require adjustment press the green
button to move to step ‘d’.
d. The temperature setting for period
1
on Monday (Day 1) will now be flashing.
To adjust this press the
or
buttons and confirm the setting again
by pressing the green
button.
e. The next time and temperature period will
now be active. Adjust this by repeating
steps b - d above until all 6 periods are
set for Monday or press the AUTO button
to run the program as set, at any time.
You now have a choice of how to
set the program for the next day:
f. i) Press the COPY DAY button to copy
Monday’s program into Tuesday. The
display will go blank apart from the ‘non
flashing’ day indicator, which indicates
the day copied and the ‘flashing’ target
day to copy the program to. To accept
this day press the green
button. To
select a different target day press the DAY
button until the ‘flashing’ day indicator
is under the required day, then accept
it by pressing the green
button.
Note: Once the target day is confirmed
it becomes the day that is copied if the
COPY DAY button is pressed again.
OR
ii) Press the DAY button to move the
day indicator to Tuesday (Day 2).
The program for that day can then
be adjusted by following steps b to
e. Programs for the remaining days
can be set in the same way, using the
DAY button to move to the next day.
To exit the programming mode select the
desired operating mode by pressing the
AUTO, MAN or OFF buttons. Note: To run the
adjusted program select the AUTO mode.
Disabling / Enabling Time Periods
The thermostat has 6 periods each day
that can be programmed, but you may
not need all of these switch points for
your heating requirements. Therefore, any
period from 2 to 6 can be removed from (or
returned to) the heating program profile.
To disable or enable time periods:
a. To disable unwanted periods go to the
desired period (
2
to
6
) using the
PROGRAM or buttons to navigate,
ensure the correct period is highlighted
with the flashing square symbol. Press and
hold the
button for at least 2 seconds
and the display will indicate the period
has been removed from the program.
b. To enable periods again follow the same
procedure as above, navigating to the
already disabled period. To enable
this period again press and hold the
button for at least 2 seconds.
Choosing the Operating Mode
The thermostat can operate in three different
modes: Automatic, Manual or Off. To set
the operating mode press either of the
AUTO, MAN or OFF buttons. The screen
indicates which mode is currently active
by displaying AUTO, MAN or OFF.
• AUTO (automatic) mode sets the
thermostat to follow the built-in
temperature program (default or
personalised). Operating the thermostat
in this mode is the best way to maintain
a high level of temperature comfort
whilst maximising your energy savings.
• MAN (manual) mode sets the thermostat
to act as a simple thermostat with a
fixed setpoint throughout the day. The
setpoint can be adjusted from 5°C to
35°C by using the
or buttons.
The thermostat will continue to maintain
this temperature until another operating
mode or temperature is selected.
• OFF mode sets the thermostat to control
to a minimum temperature setting
of 5°C (default) that acts as a frost
protection measure for your home.
During Normal Operation
• Temperature Enquiry
In AUTO, MAN and OFF operating
modes the thermostat will display the
current room temperature. To review the
programmed ‘target’ temperature (the
temperature which the thermostat is trying
to maintain) press the
button. This
‘target’ temperature value will be displayed
flashing for 5 seconds before returning
to the current room temperature value.
• Temperature Override
During normal operation (AUTO mode)
the programmed temperature can be
adjusted manually by pressing the
or buttons or the button. The
‘target’ temperature will be displayed
and flash for 5 seconds - during this
time the or buttons can be used
to modify the set value. Note: This
temperature override is cancelled at the
next programmed temperature change.
Using the Special Functions
• HOLIDAY Function
The holiday function allows you to
set a constant temperature (default =
10°C) for a specified number of days
(from 1 - 99 days). This lets you save
energy and related costs when you are
away from home, but resumes normal
operation on the day of your return.
To set the Holiday function:
a. Ensure the thermostat is running in
AUTO or MAN operating modes.
b. Press the holiday
button to
display the holiday days counter
and temperature setting, along
with the holiday indicator
.
c. Press the
or time buttons to
set the holiday time (1 - 99 days) and
press the green
button to confirm.
d. Press the
or buttons to set the
holiday temperature (5°C - 35°C) and
press the green
button to confirm.
The thermostat will now control to the new
temperature for the set number of days that
your home is vacant. At midnight the holiday
counter will be reduced by one until the
selected number of days have passed. The
thermostat will then return to normal operation
as set by the MAN or AUTO mode. To cancel
the HOLIDAY function or to exit the function at
any time press the
button a second time.
Adjusting the Time
To adjust only the time during normal
operation use the or buttons to
adjust the time and press the green
button again to confirm any changes.
1 2 3 4 5 6 7
4 5 6321

16 17
EN DE
TROUBLESHOOTING THE RC35
RC35 - BENUTZERHANDBUCH
Ausstattungsmerkmale
• Ergonomische Benutzerschnittstelle mit „OK-Taste”.
• Große LCD (Flüssigkristallanzeige).
• 7-Tage-Heizprogramm, das genau an Ihren
Lebensstil angepasst ist und dabei eine
größtmögliche Energieersparnis bewirkt.
• 6 unabhängige Temperaturebenen
pro Tag (von 5°C bis 35°C).
• Die Urlaubstaste spart Energie indem
sie es Ihnen ermöglicht, die Temperatur
für 1 bis 99 Tage zu reduzieren.
• Eingebauter Speicher für unbegrenzte
Speicherung des Benutzerprogramms.
Beschreibung
Der ACV RC35 ist ein
programmierbarer Raumthermostat,
der als wirksame Steuerung für Ihre
Heizung entwickelt wurde und sorgt
für eine gemütliche Wärme in Ihrem
Zuhause und gleichzeitig auch für
Energieeinsparungen, wenn Sie einmal
nicht zuhause sind. Die folgenden
Anweisungen beschreiben, wie Sie den
Raumthermostat programmieren und
verwenden, um den besten Komfort
bei geringsten Kosten zu bieten.
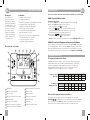
Steuerungslayout
LCD-Anzeige
Anzeige für niedrigen Batteriestand
Zeitanzeige
Anzeige Brenner An
Anzeige Tag
Temperaturanzeige
Tasten Temperaturveränderung
Taste Temperaturabfrage
1
2
3
4
5
6
7
8
9
Tasten Betriebsmodus
Grüne Taste OK
Taste Urlaubsfunktion
Tasten Programm
Taste Kopiere Tag
Taste Wähle Tag
Tasten Zeiteinstellung
10
11
12
13
14
15
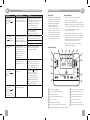
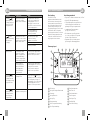
COPY
DAY
DAY
1..6
OFFMANAUTO
1 2 3 4 5 6 7
AUTO
MAN
OFF
14
13
15
1 2 43 5
8
9
10
7
11
12
6
PROGRAM
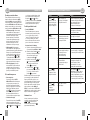
Symptom Possible Cause Remedy
A flashing
symbol appears on
the display within one
minute of the RC35
being powered on.
The RC35 receives power
supply from the heating
appliance, but no information.
1) The RC35 is not connected
to the correct terminals of the
heating appliance. Check if
the wiring is connected to the
OpenTherm connection terminals
of the heating appliance.
2) The heating appliance is
not configured correctly.
Contact your installer.
A
symbol
appears permanently
(not flashing) on
the display.
Communication error due to
an interrupt or short circuit in
the link between the heating
appliance and the RC35.
1) Check if the power supply
cable of the heating
appliance is connected.
2) Check the wiring.
3) Contact your installer.
Display is blank. After installing the RC35
no power to the heating
appliance is supplied and
the rechargeable battery
hasn’t been charged (takes
max 1hr until fully charged).
Check if the power supply cable of
the heating appliance is connected
- otherwise contact your installer.
The power supply or
the communication link
between the RC35 and
the heating appliance
has been interrupted
for more than 8hrs.
Check if the power supply cable of
the heating appliance is connected.
After the power is restored the
time may need to be adjusted -
otherwise contact your installer.
A flashing
symbol appears on
the display after the
RC35 being operating
for a period of time.
The heating appliance
is showing an error
When you press the
button, you
will probably see an error code. This
fault code depends on the type of
heating appliance. Check the manual
of the heating appliance for more
information or contact your installer.
A flashing
symbol appears on
the display and the
room temperature
is replaced by “--”
Internal fault in the
temperature measuring circuit
Contact your installer.
Page is loading ...
Page is loading ...
Page is loading ...
Page is loading ...
Page is loading ...
Page is loading ...
Page is loading ...
Page is loading ...
Page is loading ...
Page is loading ...
Page is loading ...
Page is loading ...
Page is loading ...
Page is loading ...
Page is loading ...

42010941-022 AA
BE
ACV Belgium
Oude Vijverweg, 6
B-1653 Dworp
Tel: +32 2 334 82 40
FR
ACV France
ZAC du Bois Chevrier
122 rue Pasteur
F-69780 TOUSSIEU
UK
ACV UK
St. David’s Business Park
Dalgety Bay
Fife KY11 9PF
Tel: 01383 82 01 00
DE
ACV Wärmetechnik
Gewerbegebiet Gartenstrasse
D-08132 MÜLSEN ST-JACOB
Tel: +49 37 601 311 30
Fax: +49 37 601 311 31
ES
ACV España
C/ de la Teixidora 76
Pol. Ind. Les Hortes
E-08302 MATARÓ
Tel: +34 93 759 54 51
IT
ACV Italia
Via Pana, 92
I-48018
Faenza (RA)
Tel: +39 0546 64 61 44
CZ
ACV - ČR, spol. s.r.o.
Na Křečku 365
CR-109 04 PRAHA 10
Tel: +420 272 083 341
ceskarepublika.info@acv.com
PL
ACV Polska sp. z o.o.
Ul. Witosa 3
87-800 WLOCLAWEK
Tel: +48 54 412 56 00
RU
ACV “ЭйСиВи Рус”
109129, Москва, 8-ая ул.
Текстильщиков, д.11
Tel: +7(499) 272-19-65
mos@acv.com
-
 1
1
-
 2
2
-
 3
3
-
 4
4
-
 5
5
-
 6
6
-
 7
7
-
 8
8
-
 9
9
-
 10
10
-
 11
11
-
 12
12
-
 13
13
-
 14
14
-
 15
15
-
 16
16
-
 17
17
-
 18
18
-
 19
19
-
 20
20
-
 21
21
-
 22
22
-
 23
23
-
 24
24
-
 25
25


Ask a question and I''ll find the answer in the document
Finding information in a document is now easier with AI
in other languages
Related papers
Other documents
-
Atlantic NAVILINK H58 Owner's manual
-
Hitachi Room Unit Operating instructions
-
Honeywell Thermostat CMR707A1049 User manual
-
STIEBEL ELTRON CND 75-200 Operation Instruction
-
Danfoss HC6000 Series Installation guide
-
White Rodgers Thermostat User manual
-
RADSON 51044 User manual
-
-
-
Tecnosystemi SMART PLUS programmable chrono-thermostat Owner's manual