

2
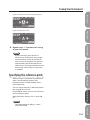
Before using this unit, carefully read the sections entitled: “USING THE UNIT SAFELY” (p. 4) and “IMPORTANT
NOTES” (p. 6). These sections provide important information concerning the proper operation of the unit.
Additionally, in order to feel assured that you have gained a good grasp of every feature provided by your
new unit, Owner’s manual should be read in its entirety. The manual should be saved and kept on hand as a
convenient reference.
© 2011 ROLAND CORPORATION
All rights reserved. No part of this publication may be reproduced in any form without the written permission of
Roland Corporation.
Roland, BOSS, COSM and eBand are either registered trademark of Roland Corporation in the United States and/
or other countries.

3

4
USING THE UNIT SAFELY
Do not open (or modify in any way) the unit or its
AC adaptor.
Do not attempt to repair the unit, or replace
parts within it (except when this manual provides
specic instructions directing you to do so). Refer all
servicing to your retailer, the nearest Roland Service
Center, or an authorized Roland distributor, as listed
on the “Information” page.
Never install the unit in any of the following
locations.
• Subject to temperature extremes (e.g., direct
sunlight in an enclosed vehicle, near a heating
duct, on top of heat-generating equipment);
or are
• Damp (e.g., baths, washrooms, on wet oors);
or are
• Exposed to steam or smoke; or are
• Subject to salt exposure; or are
• Humid; or are
• Exposed to rain; or are
• Dusty or sandy; or are
• Subject to high levels of vibration and shakiness.
Make sure you always have the unit placed so it is
level and sure to remain stable. Never place it on
stands that could wobble, or on inclined surfaces
Use only the specied AC adaptor (PSA Series),
and make sure the line voltage at the installation
matches the input voltage specied on the AC
adaptor’s body. Other AC adaptors may use a dier-
ent polarity, or be designed for a dierent voltage,
so their use could result in damage, malfunction, or
electric shock.
Do not excessively twist or bend the power cord,
nor place heavy objects on it. Doing so can damage
the cord, producing severed elements and short
circuits. Damaged cords are re and shock hazards!
This unit, either alone or in combination with an
amplier and headphones or speakers, may be
capable of producing sound levels that could cause
permanent hearing loss. Do not operate for a long
period of time at a high volume level, or at a level
that is uncomfortable. If you experience any hearing
loss or ringing in the ears, you should immediately
stop using the unit, and consult an audiologist.
Do not place containers containing liquid on
this product. Never allow foreign objects (e.g.,
ammable objects, coins, wires) or liquids (e.g.,
water or juice) to enter this product. Doing so
may cause short circuits, faulty operation, or other
malfunctions.
In the following situations, immediately turn o
the power, disconnect the AC adaptor from the AC
outlet, disconnect the USB cable from the BR-80,
and request servicing by your retailer, the nearest
Roland Service Center, or an authorized Roland
distributor, as listed on the “Information” page.
• The AC adaptor or the power-supply cord has
been damaged; or
• If smoke or unusual odor occurs
• Objects have fallen into, or liquid has been spilled
onto the unit; or
• The unit has been exposed to rain (or otherwise
has become wet); or
• The unit does not appear to operate normally or
exhibits a marked change in performance.
In households with small children, an adult should
provide supervision until the child is capable
of following all the rules essential for the safe
operation of the unit.
Protect the unit from strong impact.
(Do not drop it!)
Used for instructions intended to alert the
user to the risk of injury or material
damage should the unit be used
improperly.
* Material damage refers to damage or
other adverse eects caused with
respect to the home and all its
furnishings, as well to domestic animals
or pets.
Used for instructions intended to alert the
user to the risk of death or severe injury
should the unit be used improperly.
The symbol alerts the user to things that must be
carried out. The specic thing that must be done is
indicated by the design contained within the circle. In the
case of the symbol at left, it means that the power-cord
plug must be unplugged from the outlet.
The symbol alerts the user to important instructions or
warnings.The specic meaning of the symbol is
determined by the design contained within the triangle. In
the case of the symbol at left, it is used for general
cautions, warnings, or alerts to danger.
The symbol alerts the user to items that must never be
carried out (are forbidden). The specic thing that must
not be done is indicated by the design contained within
the circle. In the case of the symbol at left, it means that
the unit must never be disassembled.
About WARNING and CAUTION Notices
About the Symbols
ALWAYS OBSERVE THE FOLLOWING

USING THE UNIT SAFELY
5
Do not force the unit’s power-supply cord to share
an outlet with an unreasonable number of other
devices. Be especially careful when using extension
cords—the total power used by all devices you
have connected to the extension cord’s outlet must
never exceed the power rating (watts/amperes) for
the extension cord. Excessive loads can cause the
insulation on the cord to heat up and eventually
melt through.
Before using the unit in a foreign country, consult
with your retailer, the nearest Roland Service Center,
or an authorized Roland distributor, as listed on the
“Information” page.
Included batteries must never be recharged, heated,
taken apart, or thrown into re or water.
Never expose batteries to excessive heat such as
sunshine, re or the like.
Incorrect handling of batteries, rechargeable
batteries, or a battery charger can cause leakage,
overheating, re, or explosion. Before use, you must
read and strictly observe all of the precautions that
accompany the batteries, rechargeable batteries, or
battery charger.
When using rechargeable batteries and a charger,
use only the combination of rechargeable batteries
and charger specied by the battery manufacturer.
The unit and the AC adaptor should be located so
their location or position does not interfere with
their proper ventilation.
Always grasp only the output plug or the body of
the AC adaptor when plugging into, or unplugging
from, this unit or an outlet.
At regular intervals, you should unplug the AC
adaptor and clean it by using a dry cloth to wipe all
dust and other accumulations away from its prongs.
Also, disconnect the power plug from the power
outlet whenever the unit is to remain unused for an
extended period of time. Any accumulation of dust
between the power plug and the power outlet can
result in poor insulation and lead to re.
Try to prevent cords and cables from becoming
entangled. Also, all cords and cables should be
placed so they are out of the reach of children.
Never climb on top of, nor place heavy objects on
the unit.
Never handle the AC adaptor body, or its output
plugs, with wet hands when plugging into, or
unplugging from, an outlet or this unit.
Before moving the unit, disconnect the AC adaptor
and all cords coming from external devices.
Before cleaning the unit, turn o the power and
unplug the AC adaptor from the outlet (p. 41).
Whenever you suspect the possibility of lightning
in your area, disconnect the AC adaptor from the
outlet.
If used improperly, batteries may explode or leak
and cause damage or injury. In the interest of safety,
please read and observe the following precautions
(p. 38).
• Carefully follow the installation instructions for
batteries, and make sure you observe the correct
polarity.
• Avoid using new batteries together with used
ones. In addition, avoid mixing dierent types
of batteries.
• Remove the batteries whenever the unit is to
remain unused for an extended period of time.
• If a battery has leaked, use a soft piece of cloth or
paper towel to wipe all remnants of the discharge
from the battery compartment. Then install new
batteries. To avoid inammation of the skin, make
sure that none of the battery discharge gets onto
your hands or skin.
Exercise the utmost caution so that none of the
discharge gets near your eyes. Immediately rinse
the aected area with running water if any of the
discharge has entered the eyes.
• Never keep batteries together with metallic
objects such as ballpoint pens, necklaces,
hairpins, etc.
Used batteries must be disposed of in compliance
with whatever regulations for their safe disposal
that may be observed in the region in which you
live.
Keep the included SD card in a safe place out of
children’s reach, so there is no chance of them being
swallowed accidentally.

6
IMPORTANT NOTES
Power Supply
• Do not connect this unit to same electrical outlet that
is being used by an electrical appliance that is con-
trolled by an inverter (such as a refrigerator, washing
machine, microwave oven, or air conditioner), or that
contains a motor. Depending on the way in which the
electrical appliance is used, power supply noise may
cause this unit to malfunction or may produce audible
noise. If it is not practical to use a separate electrical
outlet, connect a power supply noise lter between
this unit and the electrical outlet.
• The AC adaptor will begin to generate heat after long
hours of consecutive use. This is normal, and is not a
cause for concern.
• Before connecting this unit to other devices, turn o
the power to all units. This will help prevent malfunc-
tions and/or damage to speakers or other devices.
Power Supply: Use of Batteries
• When installing or replacing batteries, always turn
o the power on this unit and disconnect any other
devices you may have connected. This way, you can
prevent malfunction and/or damage to speakers or
other devices.
• Batteries are supplied with the unit. The life of these
batteries may be limited, however, since their primary
purpose was to enable testing.
• If operating this product on batteries, please use
alkaline batteries or rechargeable Ni-MH batteries.
Placement
• Using the unit near power ampliers (or other
equipment containing large power transformers) may
induce hum. To alleviate the problem, change the
orientation of this unit; or move it farther away from
the source of interference.
• This device may interfere with radio and television
reception. Do not use this device in the vicinity of
such receivers.
• Noise may be produced if wireless communications
devices, such as cell phones, are operated in the vicin-
ity of this unit. Such noise could occur when receiving
or initiating a call, or while conversing. Should you
experience such problems, you should relocate such
wireless devices so they are at a greater distance from
this unit, or switch them o.
• Do not expose the unit to direct sunlight, place it near
devices that radiate heat, leave it inside an enclosed
vehicle, or otherwise subject it to temperature
extremes. Excessive heat can deform or discolor the
unit.
• When moved from one location to another where the
temperature and/or humidity is very dierent, water
droplets (condensation) may form inside the unit.
Damage or malfunction may result if you attempt to
use the unit in this condition. Therefore, before using
the unit, you must allow it to stand for several hours,
until the condensation has completely evaporated.
• Depending on the material and temperature of the
surface on which you place the unit, its rubber feet
may discolor or mar the surface.
You can place a piece of felt or cloth under the rubber
feet to prevent this from happening. If you do so,
please make sure that the unit will not slip or move
accidentally.
• Do not put anything that contains water on this unit.
Also, avoid the use of insecticides, perfumes, alcohol,
nail polish, spray cans, etc., near the unit. Swiftly wipe
away any liquid that spills on the unit using a dry, soft
cloth.
Maintenance
• For everyday cleaning wipe the unit with a soft,
dry cloth or one that has been slightly dampened
with water. To remove stubborn dirt, use a cloth
impregnated with a mild, non-abrasive detergent.
Afterwards, be sure to wipe the unit thoroughly with
a soft, dry cloth.
• Never use benzine, thinners, alcohol or solvents of
any kind, to avoid the possibility of discoloration and/
or deformation.
Repairs and Data
• Please be aware that all data contained in the unit’s
memory may be lost when the unit is sent for repairs.
Important data should always be backed up SD cards,
SDHC cards, Computer, or written down on paper
(when possible). During repairs, due care is taken to
avoid the loss of data. However, in certain cases (such
as when circuitry related to memory itself is out of
order), we regret that it may not be possible to restore
the data, and Roland assumes no liability concerning
such loss of data.

IMPORTANT NOTES
7
Additional Precautions
• Please be aware that the contents of memory can be
irretrievably lost as a result of a malfunction, or the
improper operation of the unit. To protect yourself
against the risk of loosing important data, we recom-
mend that you periodically save a backup copy of
important data you have stored in the unit’s memory
on an SD card, an SDHC card, or a computer.
• Unfortunately, it may be impossible to restore the
contents of data that was stored in the unit’s memory,
an SD card or an SDHC card once it has been lost.
Roland Corporation assumes no liability concerning
such loss of data.
• Use a reasonable amount of care when using the
unit’s buttons, or other controls; and when using its
jacks and connectors. Rough handling can lead to
malfunctions.
• Never strike or apply strong pressure to the display.
• When connecting / disconnecting all cables, grasp
the connector itself—never pull on the cable. This
way you will avoid causing shorts, or damage to the
cable’s internal elements.
• To avoid disturbing your neighbors, try to keep the
unit’s volume at reasonable levels. You may prefer to
use headphones, so you do not need to be concerned
about those around you.
• When you need to transport the unit, package it
in the box (including padding) that it came in, if
possible. Otherwise, you will need to use equivalent
packaging materials.
• Some connection cables contain resistors. Do not use
cables that incorporate resistors for connecting to
this unit. The use of such cables can cause the sound
level to be extremely low, or impossible to hear. For
information on cable specications, contact the
manufacturer of the cable.
Using SD cards
• Carefully insert the SD card or the SDHC card all the
way in—until it is rmly in place.
• Never touch the terminals of the SD card or the SDHC
card. Also, avoid getting the terminals dirty.
• SD cards and SDHC cards are constructed using
precision components; handle the cards carefully,
paying particular note to the following.
• To prevent damage to the cards from static
electricity, be sure to discharge any static electricity
from your own body before handling the cards.
• Do not touch or allow metal to come into contact
with the contact portion of the cards.
• Do not bend, drop, or subject cards to strong shock
or vibration.
• Do not keep cards in direct sunlight, in closed
vehicles, or other such locations.
• Do not allow cards to become wet.
• Do not disassemble or modify the cards.
Handling CDs / DVDs
• Avoid touching or scratching the shiny underside
(encoded surface) of the disc. Damaged or dirty discs
may not be read properly. Keep your discs clean using
a commercially available disc cleaner.

IMPORTANT NOTES
8
Copyright
• Recording, duplication, distribution, sale, lease,
performance, or broadcast of copyrighted
material (musical works, visual works, broadcasts, live
performances, etc.) belonging to a third party in part
or in whole without the permission of the copyright
owner is forbidden by law.
• Do not use this product for purposes that could
infringe on a copyright held by a third party. We
assume no responsibility whatsoever with regard to
any infringements of third-party copyrights arising
through your use of this product.
• This product can be used to record or duplicate audio
or visual material without being limited by certain
technological copy-protection measures. This is due
to the fact that this product is intended to be used
for the purpose of producing original music or video
material, and is therefore designed so that material
that does not infringe copyrights belonging to others
(for example, your own original works) can be
recorded or duplicated freely.
• The copyright of content in this product (the
sound waveform data, style data, accompaniment
patterns, phrase data, audio loops and image data) is
reserved by Roland Corporation and/or Atelier Vision
Corporation.
• Purchasers of this product are permitted to utilize said
content for the creating, performing, recording and
distributing original musical works.
• Purchasers of this product are NOT permitted to
extract said content in original or modied form, for
the purpose of distributing recorded medium of said
content or making them available on a computer
network.
• MMP (Moore Microprocessor Portfolio) refers to a
patent portfolio concerned with microprocessor
architecture, which was developed by Technology
Properties Limited (TPL). Roland has licensed this
technology from the TPL Group.
• MPEG Layer–3 audio compression technology
is licensed from Fraunhofer IIS Corporation and
THOMSON Multimedia Corporation.
• CD and music-related data from Gracenote, Inc.,
copyright © 2000-2010 Gracenote. Gracenote
Software, copyright © 2000-2010 Gracenote. This
product and service may practice one or more of
the following U.S. Patents: #5,987,525; #6,061,680;
#6,154,773, #6,161,132, #6,230,192, #6,230,207,
#6,240,459, #6,330,593, and other patents issued or
pending. Some services supplied under license from
Open Globe, Inc. for U.S. Patent: #6,304,523.
• Gracenote and CDDB are registered trademarks of
Gracenote. The Gracenote logo and logotype, and
the “Powered by Gracenote” logo are trademarks of
Gracenote.
• Gracenote® is a registered trademark of Gracenote,
Inc. The Gracenote logo and logotype, and the
“Powered by Gracenote” logo are trademarks of
Gracenote.
• The SD logo (
) and SDHC logo ( ) are
trademarks of SD-3C, LLC.
• VST is a trademark of Steinberg Media Technologies
GmbH.
• The screen shots in this document are used in
compliance with the guidelines of the Microsoft
Corporation.
• This product contains eCROS integrated software
platform of eSOL Co.,Ltd. eCROS is a trademark of
eSOL Co., Ltd. in Japan.
• MP3 codec is Copyright © 1995-2010, SPIRIT.

IMPORTANT NOTES
9
• Company names and product names appearing
in this document are registered trademarks or
trademarks of their respective owners.
• The product names mentioned in this document are
registered trademarks or trademarks of their respec-
tive owners. In this manual, these names are used
because it is the most practical way of describing the
sounds that are simulated using COSM technology.
• The explanations in this manual include illustrations
that depict what should typically be shown by the dis-
play. Note, however, that your unit may incorporate a
newer, enhanced version of the system (e.g., includes
newer sounds), so what you actually see in the display
may not always match what appears in the manual.

10
USING THE UNIT SAFELY .....................................................................4
IMPORTANT NOTES .........................................................................6
Quick Start 15
What You Can Do With the BR-80 ........................................................... 16
01 Recording Ideas for Songs (LIVE REC Mode) .............................................. 18
02 Turning Your Idea Into a Song (MTR Mode) .............................................. 22
03 Practicing Along With Your Completed Song (eBand Mode) .............................. 28
04 Connecting the BR-80 to Your Computer ................................................ 32
Getting Ready 33
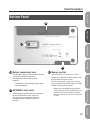
Panel Descriptions ........................................................................ 34
Top Panel ..................................................................................34
Side Panel (left) ............................................................................36
Side Panel (right) ...........................................................................36
Bottom Panel ..............................................................................37
Getting Ready to Use the BR-80 ............................................................ 38
Inserting Batteries ..........................................................................38
Inserting an SD Card .......................................................................39
Connecting the External Equipment to the BR-80 ...........................................40
Turning the Power On/O ..................................................................41
Recording Ideas for Songs (LIVE REC Mode) 43
Recording Flow in LIVE REC Mode .......................................................... 44
Recording/Playback ....................................................................... 45
Switching to LIVE REC Mode ................................................................45
Recording ..................................................................................46
Recording with the Metronome .......................................................46
Playback ...................................................................................47
Playing Back Repeatedly (AB Repeat) ..................................................47
Specifying the Type of Playback (PLAY MODE) .........................................48
Contents

Contents
11
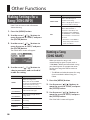
Other Functions .......................................................................... 49
Adjusting the Recording Level ..............................................................49
Setting the Record Mode ...................................................................49
Making Settings for a Song (SONG INFO) ....................................................50
Naming a Song (SONG NAME) ........................................................51
Erasing a Song (SONG ERASE) ...............................................................52
Building Your Ideas Into a Song (MTR Mode) 53
Recording Flow in MTR Mode .............................................................. 54
Recording/Playback ....................................................................... 55
Switching to MTR Mode ....................................................................55
Listen to the Demo Song ...................................................................56
Recording ..................................................................................57
Creating a New Song (SONG NEW) ....................................................57
Selecting a Song (SONG SELECT) ......................................................57
Recording ............................................................................58
Selecting the Track(s) for Recording (REC TRACK) ............................................59
Playback ...................................................................................60
Playing Back Repeatedly (AB Repeat) ..................................................60
Re-Recording Only Over a Mistake (AUTO PUNCH IN/OUT) ...................................61
Recording ............................................................................62
Track Settings (the Mixer Screen) .......................................................... 63
Viewing the Track Levels (Level Meter) ......................................................63
Adjusting the Volume Balance (TRACK LEVEL) ...............................................63
Creating a Stereo Track ...............................................................63
Adjusting the Stereo Position (TRACK PAN) ..................................................64
Mute and Solo Settings (TRACK MUTE & SOLO) ..............................................64
Adjusting the Tone (TRACK EQ) .............................................................64
Making Detailed EQ Settings. . . . . . . . . . . . . . . . . . . . . . . . . . . . . . . . . . . . . . . . . . . . . . . . . . . . . . . . . . 65
Adjusting the Reverb (REVERB SEND) .......................................................65
Making Detailed Reverb Settings .....................................................65
Selecting V-Tracks (V-TRACK). . . . . . . . . . . . . . . . . . . . . . . . . . . . . . . . . . . . . . . . . . . . . . . . . . . . . . . . . . . . . . . . 66
Using Eects .............................................................................. 67
Eect Patches and Categories ...............................................................67
Selecting an Eect .........................................................................68

Contents
12
Using Rhythm ............................................................................ 69
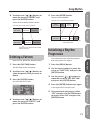
Creating a Rhythm Progression (EDIT) .......................................................69
Inserting a Pattern ....................................................................70
Deleting a Pattern ....................................................................71
Initializing a Rhythm Progression .....................................................71
Changing the Drum Sounds (Kit) ............................................................72
Importing a Rhythm from SMF (SMF IMPORT) ...............................................72
Track Editing (TRACK EDIT) ................................................................ 74
Copying Track Data (TRACK COPY) ..........................................................74
Moving Track Data (TRACK MOVE) ..........................................................76
Erasing Track Data (TRACK ERASE) ..........................................................76
Exchanging Data (TRACK EXCHANGE) .......................................................77
Importing Audio Data (TRACK IMPORT) .....................................................78
Cancelling an Operation (UNDO/REDO) .....................................................78
Returning to the Previous State (UNDO) ...............................................79
Canceling the Undo (REDO) ...........................................................79
Mastering ................................................................................ 80
Putting Multiple Tracks Together (BOUNCE) .................................................80
Mastering (MASTERING) ....................................................................81
Editing the Mastering Eect Settings ..................................................83
Saving the Mastering Eect Settings ..................................................84
Managing Your Songs (SONG) ............................................................. 85
Making Settings for a Song (SONG INFO) ....................................................85
Naming a Song (SONG NAME) ........................................................86
Protecting a Song (SONG PROTECT) ...................................................86
Erasing a Song (SONG ERASE) ...............................................................87
Copying a Song (SONG COPY) ..............................................................87
Saving Space on the SD Card (SONG OPTIMIZE) .............................................88
Practicing Along With a Completed Song (eBand Mode) 89
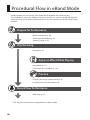
Procedural Flow in eBand Mode ........................................................... 90
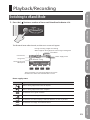
Playback/Recording ....................................................................... 91
Switching to eBand Mode ..................................................................91
Playback ...................................................................................92
Playing Back Repeatedly (AB Repeat) ..................................................92

Contents
13
Recording ..................................................................................93
Using the GUITAR/MIC IN Jack for Recording ..........................................93
Recording with the Built-in Microphones ..............................................93
Playback ................................................................................. 94
Selecting Songs (SONG) ....................................................................94
Changing the Song’s Speed or Pitch (SPEED) ................................................95
Canceling Sounds in the Center (CENTER CANCEL) ..........................................96
Specifying the Type of Playback (PLAY MODE) ...............................................96
Using Eects .............................................................................. 97
Selecting an Eect .........................................................................97
Apply Reverb ..............................................................................97
Other Functions .......................................................................... 98
Making Settings for a Song (SONG INFO) ....................................................98
Naming a Song (SONG NAME) ........................................................98
Erasing a Song (SONG ERASE) ...............................................................99
Registering Your 30 Favorite Songs (BEST 30 EDIT) ..........................................100
Precise Adjustment of the Repeat Segment (AB EDIT) .......................................100
Using the Metronome .....................................................................101
Changing the Song and Eects Simultaneously (PATCH SYNC) ..............................101
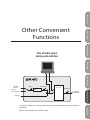
Other Convenient Functions 103
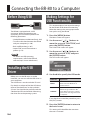
Connecting the BR-80 to a Computer .....................................................104
Before Using USB ..........................................................................104
Installing the USB Driver ...................................................................104
Making Settings for USB Functionality .....................................................104
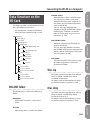
Data Structure on the SD Card .............................................................105
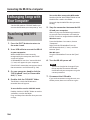
Exchanging Songs with Your Computer ....................................................106
Transferring WAV/MP3 Files ..........................................................106
Exchanging MTR Mode Songs with Your Computer ...................................107
Exchanging eBand Mode Songs with Your Computer .................................107
Saving Data on Your Computer ............................................................107
Using the BR-80 as an Audio Interface ......................................................109
Recording Audio from the BR-80 on Your Computer ..................................109

Contents
14
Detailed Eect Settings ..................................................................110
Editing the Insert Eect Settings (EDIT) ....................................................110
Saving an Eect (WRITE/NAME) ............................................................111
Algorithm List .............................................................................112
For Electric Guitar/ Electric Bass ......................................................112
For Microphone .....................................................................113
For Acoustic Guitar ..................................................................113
Making Overall Settings .................................................................. 114
Adjusting the Input Sensitivity (INPUT) .....................................................114
System Settings (SYSTEM) .................................................................114
Viewing SD Card Usage (SD INFO) ..........................................................115
Initializing an SD Card (FORMAT) ...........................................................115
Initializing the Unit (FACTORY RESET) ......................................................116
Auto Power O Settings ...................................................................117
Tuning Your Instrument .................................................................. 118
Appendix 121
Troubleshooting .........................................................................122
Problems with the Power Supply ...........................................................122
Problems with the Sound ..................................................................122
Problems with the SD Card ................................................................124
Problems with USB ........................................................................124
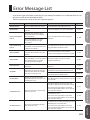
Error Message List .......................................................................125
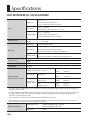
Specications ............................................................................128
Index ....................................................................................130

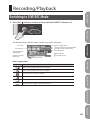
Quick Start
PreparationsQuick Start LIVE REC Mode MTR Mode eBand Mode
Convenient Functions
Appendix

16
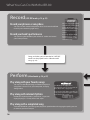
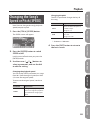
What You Can Do With the BR-80
Record (LIVE REC mode: p. 18, p. 43)
Record your phrases or song ideas
You can use the stereo microphones that’s built into the BR-80
to easily start recording right away.
Record your band’s performance
You can bring the BR-80 to your rehearsal studio and record
your band practice.
Perform (eBand mode: p. 28, p. 89)
Play along with your favorite songs
You can use the eBand Song List Editor to import a
song from a music CD or your computer, and play
along with it.
Play along with internal rhythms
Numerous rhythm patterns are built in, so you can
enjoy playing in a variety of musical styles.
Play along with a completed song
Since the BR-80 lets you change the playback speed without changing the pitch, you can
practice at your own tempo.
The BR-80 packs audio player
functionality and a great selection of
Boss eects into a single unit.
Just connect your guitar, and you can
enjoy playing powerful guitar sounds
while backed by a song.
LIVE REC
You can make high-quality
recordings by simply point-
ing the BR-80’s built-in
microphones toward the
instrument you want to
record.
Even high-volume band
performances in your
rehearsal studio can be
recorded clearly.
Songs and ideas you’ve recorded in “LIVE REC
mode” can be played back as “eBand mode”
songs (p. 94).

17
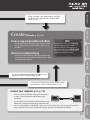
Create (MTR mode: p. 22, p. 53)
Create a song using rhythms and eects
The BR-80 provides everything you need to create
a song: eight tracks, a rhythm track, and an array
of eects.
Master your completed song
You can use the mastering toolkit to add nishing
touches that enhance the tone quality of your song
and give it more impact.
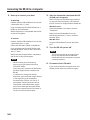
Connect your computer (p. 32, p. 104)
• You can import audio les from your computer,
or copy a song created on the BR-80 to your
computer.
• You can back up the BR-80’s recorded data to your
computer, and recover the backup when desired.
• You can apply eects to the BR-80’s input sound and record the result on your computer, or
play back sounds from your computer through speakers connected to the BR-80.
MTR
The BR-80 is a mobile-sized multi-track
recorder designed for portability.
From recording your performance all
the way to the nal mixdown, the BR-80
is an easy way to get started with the
enjoyment of digital recording.
Songs and ideas you’ve recorded in “LIVE REC
mode” can be imported into a track of “MTR
mode” (p. 78).
You can immediately recall your completed song
and play it back in “eBand mode” (p. 94).
A song you’ve recorded in “eBand mode” can be
imported into a track of “MTR mode” (p. 78).
Quick Start Preparations LIVE REC Mode MTR Mode eBand Mode
Convenient Functions
Appendix

18
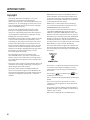
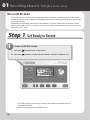
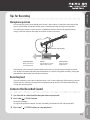
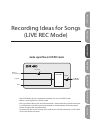
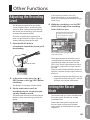
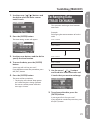
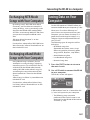
Step 1
Get Ready to Record
01 Recording Ideas for Songs (LIVE REC Mode)
* In LIVE REC mode, you can only record via the stereo microphones that are
built into the BR-80.
* Eects are not applied in LIVE REC mode.
What is LIVE REC Mode?
This mode lets you use the built-in microphones to easily record anywhere anytime. Since stereo
condenser microphones are built in to the BR-80, you can also record acoustic guitar or vocals with
crystal-clear delity.
The BR-80 can operate for plenty of time on batteries, so you can record even in locations where
there’s no AC outlet, such as in a park or on a street. It’s a great way to collect natural sounds or city
noises for use in a song.
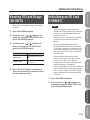
1. Choose LIVE REC mode
1. Press the [ ] button to turn on the power.
2. Press the [ ] button a number of times until the “LIVE REC” indicator is lit.
1

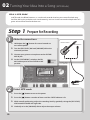
19
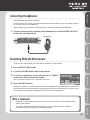
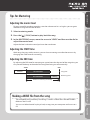
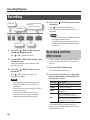
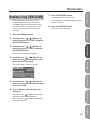
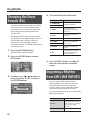
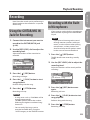
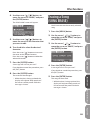
Connecting Headphones
The BR-80 does not contain speakers.
In order to hear the sound, you’ll need to connect an audio device such as monitor speakers
or a stereo system, or headphones.
When recording, you should use headphones in order to avoid acoustic feedback.
1. Connect commercially available stereo headphones to the PHONES/LINE OUT
jack on the side panel (left).
Headphones
Recording With the Metronome
If you use the metronome, you’ll be able to record at a stable tempo.
1. Press the [RHYTHM] button.
2. Use the [VOLUME] dial to adjust the volume.
3. Use the cursor buttons to move the cursor to “TEMPO,”
and use the dial to specify the tempo.
You can set the tempo to any value from 25 to 250.
4. Press the [EXIT] button.
If monitor speakers are connected when you’re recording with the metronome, the sound of
the metronome will be included in the performance that you’re recording. If you don’t want
to record the sound of the metronome, you’ll have to use headphones.
What is feedback?
Feedback is the oscillation (squeal or buzz) that occurs when the microphone is too
close to the speaker.
This occurs when the output of the speaker is input back into the microphone,
amplied, and output once again from the speaker.
Quick Start Preparations LIVE REC Mode MTR Mode eBand Mode
Convenient Functions
Appendix

Recording Ideas for Songs (LIVE REC Mode)
20
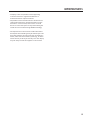
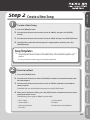
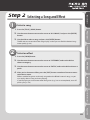
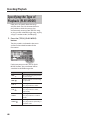
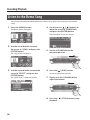
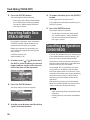
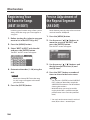
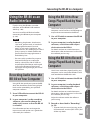
Step 2
Record
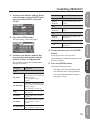
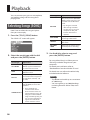
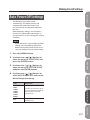
1. Adjust the recording level
1. Press the [ ] (REC) button.
The BR-80 will enter recording-standby mode.
2. While actually performing, use the [REC LEVEL] dial
located on the right side of the BR-80 to adjust the
recording level.
While you perform, make adjustments so that the INPUT
level meter is moving in the range of 12–P (-12–0 dB).
[REC LEVEL] dial
* When adjusting the recording level, you might notice a little noise; this is normal and does
not indicate malfunction.
3. Use the [VOLUME] dial to adjust the volume.
2. Record
1. Press the [ ] (REC) button.
Recording will start.
2. Press the [ ] (STOP) button to stop recording.
When recording stops, a le name will automatically be assigned,
and the data will be saved.
2
1
If the P (PEAK indicator) lights, the
sound will distort.
Adjust so the level meter
moves within this range.
Page is loading ...
Page is loading ...
Page is loading ...
Page is loading ...
Page is loading ...
Page is loading ...
Page is loading ...
Page is loading ...
Page is loading ...
Page is loading ...
Page is loading ...
Page is loading ...
Page is loading ...
Page is loading ...
Page is loading ...
Page is loading ...
Page is loading ...
Page is loading ...
Page is loading ...
Page is loading ...
Page is loading ...
Page is loading ...
Page is loading ...
Page is loading ...
Page is loading ...
Page is loading ...
Page is loading ...
Page is loading ...
Page is loading ...
Page is loading ...
Page is loading ...
Page is loading ...
Page is loading ...
Page is loading ...
Page is loading ...
Page is loading ...
Page is loading ...
Page is loading ...
Page is loading ...
Page is loading ...
Page is loading ...
Page is loading ...
Page is loading ...
Page is loading ...
Page is loading ...
Page is loading ...
Page is loading ...
Page is loading ...
Page is loading ...
Page is loading ...
Page is loading ...
Page is loading ...
Page is loading ...
Page is loading ...
Page is loading ...
Page is loading ...
Page is loading ...
Page is loading ...
Page is loading ...
Page is loading ...
Page is loading ...
Page is loading ...
Page is loading ...
Page is loading ...
Page is loading ...
Page is loading ...
Page is loading ...
Page is loading ...
Page is loading ...
Page is loading ...
Page is loading ...
Page is loading ...
Page is loading ...
Page is loading ...
Page is loading ...
Page is loading ...
Page is loading ...
Page is loading ...
Page is loading ...
Page is loading ...
Page is loading ...
Page is loading ...
Page is loading ...
Page is loading ...
Page is loading ...
Page is loading ...
Page is loading ...
Page is loading ...
Page is loading ...
Page is loading ...
Page is loading ...
Page is loading ...
Page is loading ...
Page is loading ...
Page is loading ...
Page is loading ...
Page is loading ...
Page is loading ...
Page is loading ...
Page is loading ...
Page is loading ...
Page is loading ...
Page is loading ...
Page is loading ...
Page is loading ...
Page is loading ...
Page is loading ...
Page is loading ...
Page is loading ...
Page is loading ...
Page is loading ...
Page is loading ...
Page is loading ...
Page is loading ...
Page is loading ...
Page is loading ...
-
 1
1
-
 2
2
-
 3
3
-
 4
4
-
 5
5
-
 6
6
-
 7
7
-
 8
8
-
 9
9
-
 10
10
-
 11
11
-
 12
12
-
 13
13
-
 14
14
-
 15
15
-
 16
16
-
 17
17
-
 18
18
-
 19
19
-
 20
20
-
 21
21
-
 22
22
-
 23
23
-
 24
24
-
 25
25
-
 26
26
-
 27
27
-
 28
28
-
 29
29
-
 30
30
-
 31
31
-
 32
32
-
 33
33
-
 34
34
-
 35
35
-
 36
36
-
 37
37
-
 38
38
-
 39
39
-
 40
40
-
 41
41
-
 42
42
-
 43
43
-
 44
44
-
 45
45
-
 46
46
-
 47
47
-
 48
48
-
 49
49
-
 50
50
-
 51
51
-
 52
52
-
 53
53
-
 54
54
-
 55
55
-
 56
56
-
 57
57
-
 58
58
-
 59
59
-
 60
60
-
 61
61
-
 62
62
-
 63
63
-
 64
64
-
 65
65
-
 66
66
-
 67
67
-
 68
68
-
 69
69
-
 70
70
-
 71
71
-
 72
72
-
 73
73
-
 74
74
-
 75
75
-
 76
76
-
 77
77
-
 78
78
-
 79
79
-
 80
80
-
 81
81
-
 82
82
-
 83
83
-
 84
84
-
 85
85
-
 86
86
-
 87
87
-
 88
88
-
 89
89
-
 90
90
-
 91
91
-
 92
92
-
 93
93
-
 94
94
-
 95
95
-
 96
96
-
 97
97
-
 98
98
-
 99
99
-
 100
100
-
 101
101
-
 102
102
-
 103
103
-
 104
104
-
 105
105
-
 106
106
-
 107
107
-
 108
108
-
 109
109
-
 110
110
-
 111
111
-
 112
112
-
 113
113
-
 114
114
-
 115
115
-
 116
116
-
 117
117
-
 118
118
-
 119
119
-
 120
120
-
 121
121
-
 122
122
-
 123
123
-
 124
124
-
 125
125
-
 126
126
-
 127
127
-
 128
128
-
 129
129
-
 130
130
-
 131
131
-
 132
132
-
 133
133
-
 134
134
-
 135
135
-
 136
136


Ask a question and I''ll find the answer in the document
Finding information in a document is now easier with AI
Related papers
Other documents
-
Roland VS-2000CD Owner's manual
-
Roland SYSTEM-500 512 Owner's manual
-
-
-
-
-
-
 Cables Direct USB-325 Datasheet
-
Roland R-26 User manual
-
Korg SoundOnSound Owner's manual
