Page is loading ...

Bypass Economizer shown
HE-Series Indoor
Bypass Economizer
Supplemental Manual for Options

1.800.627.44992
Bypass Economizer
OPTION
IMPORTANT
CAUTION
CAUTION
IMPORTANT
This equipment is only for use in completed
structures. Use of this equipment prior to
completion of building construction will void
the warranty. Do not use this equipment for
temporary conditioning of the air.
This equipment is to be installed by follow-
ing Industry Best Practices and all appli-
cable codes. Any damage to components,
assemblies, subassemblies or the cabinet
which is caused by improper installation
practices will void the warranty.
WARNING
Arc flash and electric shock hazard. Disconnect all electric power supplies and wear
protective equipment per NFPA 70E before working within electric enclosure. Lock and tag
the disconnect switch or breaker to prevent accidental re-connection of electric power while
performing service or maintenance operations. Failure to comply can cause serious injury
or death. Customer must provide earth ground to unit, per NEC, CEC and local codes, as
applicable. Before proceeding with installation, read all instructions, verify that all parts are
included and check the nameplate to verify the voltage matches available utility power. The
line side of the disconnect switch on the front of the unit contains live high-voltage. The only
way to ensure there is NO voltage inside the unit is to install and open all local and remote
disconnect switches and then verify that power is off with a voltmeter. Refer to unit electrical
schematic. Follow all local codes.
Risk of damage to the enthalpic core. Improper maintenance procedures may lead to damage
of the enthalpic core.
When performing maintenance of the ERV or the core bypass, organic solvents are not to be
used within the enclosure. In addition, high pressure air is not to be applied to the enthalpic
core.
Risk of damage to the Core Bypass controls.
Whenever a control device is connected to or disconnected from the controls circuits, the
power supply to the ERV must be disconnected. Lock and tag the disconnect switch or circuit
breaker to prevent accidental reconnection of electric power.

31.800.627.4499
Bypass Economizer OPTIONS
Record information as shown below. A permanent record should be maintained so that damper
stop and controls settings can be verified at a later date. In the unlikely event that factory
assistance is ever required, this information will also be needed.
Locate the RenewAire unit label, to be found on either the left or right side of the unit. Record
the following:
Type of Bypass Controls: (check one) Dry Bulb Enthalpic
If controls are dry bulb, record the following:
Low Limit
(setting at time of start-up)
High Limit
(setting at time of start-up)
Show any changes to Low Limit setting (include date and reason for change)
Show any changes to High Limit setting (include date and reason for change)
(Low Limit Factory Setting: 53˚)
(High Limit Factory Setting: 75˚)
NOTE: This page
and the following
page are to be
completed by the
installing contractor. The
completed document is
to be turned over to the
owner after start-up.
If controls are enthalpic, record the following:
Low Limit
(setting at time of start-up)
Show any changes to Low Limit setting (include date and reason for change)
(Low Limit Factory Setting: 53˚)
TYPICAL UNIT LABEL (FOUND ON EITHER LEFT SIDE OR RIGHT SIDE OF THE UNIT)
UNIT INFORMATION
-
Option Code:
Serial Number:
SO #:
UNIT INFORMATION

1.800.627.44994
Bypass Economizer
OPTION
RENEWAIRE ERV OPTION CODE
NOTE: This unit is
an Energy Recovery
Ventilator, or ERV.
It is commonly referred to
throughout this manual as
an ERV.
There are eight different models of RenewAire ERVs that can be ordered with the Bypass
Economizer Option. Every ERV has a unit label that shows the exact model with its options, as
ordered. In the ERV Option Code, units with the bypass economizer option will have a number in
place of a letter for character 18. The individual number indicates which type of bypass controls
are installed and whether any isolation dampers are installed. See Page 3 for instructions on
how to locate the ERV Option Code on the unit label.

51.800.627.4499
Bypass Economizer OPTIONS
1.0 OVERVIEW 8
1.1 DESCRIPTION .........................................................8
1.1.1 Dry Bulb Control .................................................................. 8
1.1.2 Enthalpy Control ..................................................................8
1.1.3 Dampers .............................................................................8
2.0 LAYOUT RECOMMENDATIONS 10
3.0 PERFORMANCE DATA 12
4.0 COMPONENT DESCRIPTION 14
4.1 DRY BULB CONTROLLER .......................................14
4.2 THERMISTOR ........................................................ 14
4.3 LOW LIMIT DRY BULB CONTROLLER ......................14
4.4 OUTDOOR AIR ENTHALPY CONTROLLER ................14
4.5 RETURN AIR ENTHALPY TRANSMITTER .................15
4.6 ROUND DAMPER ..................................................15
4.7 RECTANGULAR DAMPER .......................................15
4.8 DAMPER ACTUATORS ..........................................16
4.8.1 Belimo TFB24-S Damper Actuator ..................................... 16
4.8.2 Belimo LF-24S Damper Actuator ....................................... 16
4.8.3 Ruskin RUS-S24-S Damper Actuator ................................. 16
5.0 INSTALLATION 17
5.1 DRY BULB CONTROL WIRING SCHEMATIC ..............18
5.2 ENTHALPY CONTROL WIRING SCHEMATIC .............19
5.3 MODEL HE07IN DIMENSION DRAWINGS ................20
5.4 MODEL HE10IN DIMENSION DRAWINGS ................22
5.5 MODEL HE1.5XIN DIMENSION DRAWINGS .............24
5.6 MODEL HE2XIN DIMENSION DRAWINGS ................26
5.7 MODEL HE3XIN DIMENSION DRAWINGS ................28
5.8 MODEL HE4XIN DIMENSION DRAWINGS ................30
5.9 MODEL HE6XIN DIMENSION DRAWING ..................32
5.10 MODEL HE8XIN DIMENSION DRAWING ................33
6.0 OPERATION 34
6.1 UNIT START-UP DAMPER ADJUSTMENT ................34
6.1.1 Tools Required for Damper Adjustment ..............................34
6.1.2 Damper Adjustment Procedure ..........................................34
6.2 UNIT START-UP CONTROLS ADJUSTMENT ............. 35
6.2.1 Dry Bulb Control Settings ..................................................35
6.2.2 Enthalpy Control Settings .................................................35
7.0 MAINTENANCE 35
8.0 TROUBLESHOOTING 36
8.1 SEQUENCE OF OPERATION (SOO) ..........................36
9.0 FACTORY ASSISTANCE 37
10.0 WARRANTY 37
TABLE OF CONTENTS

1.800.627.44996
Bypass Economizer
OPTION
TABLE OF ILLUSTRATIONS
Figure 1.1.0 Dry Bulb Controller ..........................................................................................................8
Figure 1.1.1 Low limit dry bulb Controller .............................................................................................8
Figure 1.1.2 Outdoor Air Enthalpy Controller ........................................................................................8
Figure 1.1.3 Return Air Enthalpy Transmitter ........................................................................................8
Figure 1.1.4 Typical ERV Without Core Bypass ..................................................................................... 9
Figure 1.1.5 Typical ERV With Core Bypass .......................................................................................... 9
Figure 2.0.0 HE1.5INH Duct Layout ................................................................................................... 10
Figure 2.0.1 HE2X–4XINH Duct Layout .............................................................................................. 11
Figure 2.0.2 HE2X–4XINV Duct Layout .............................................................................................. 11
Figure 2.0.3 HE6XIN and HE8XIN Duct Layout ................................................................................... 11
FIGURE 3.0.0 Psychometric Chart (Dry Bulb Control) ......................................................................... 12
FIGURE 3.0.1 Psychometric Chart (Enthalpy Control) ......................................................................... 13
FIGURE 4.1.0 Dry Bulb Controller Partial Wiring Schematic ................................................................ 14
FIGURE 4.5.0 Enthalpy Controller Partial Wiring Schematic ................................................................ 15
FIGURE 4.8.0 Chart of Damper Actuators by RenewAire Model .......................................................... 16
FIGURE 4.8.1 Bypass Actuator .......................................................................................................... 16
FIGURE 4.8.2 Face Actuator .............................................................................................................. 16
Figure 5.0.0 Table of Installed Features by Model .............................................................................. 17
Figure 5.1.0 Dry Bulb Control Wiring Schematic ................................................................................. 18
Figure 5.2.0 Enthalpy Control Wiring Schematic ................................................................................ 19
Figure 5.3.0 HE07INH Dimension Drawing (Horizontal Airflow Orientation) .........................................20
Figure 5.3.1 HE07INV Dimension Drawing (Vertical Airflow Orientation) .............................................21
Figure 5.4.0 HE10INH Dimension Drawing (Horizontal Airflow Orientation) .........................................22
Figure 5.4.1 HE10INV Dimension Drawing (Vertical Airflow Orientation) .............................................. 23
Figure 5.5.0 HE1.5XINH Dimension Drawing (Horizontal Airflow Orientation) ...................................... 24
Figure 5.5.1 HE1.5XINV Dimension Drawing (Vertical Airflow Orientation)5.........................................25
Figure 5.6.0 HE2XINH Dimension Drawing (Horizontal Airflow Orientation) ......................................... 26
Figure 5.6.1 HE2XINV Dimension Drawing (Vertical Airflow Orientation) ............................................. 27
Figure 5.7.0 HE3XINH Dimension Drawing (Horizontal Airflow Orientation) ......................................... 28
Figure 5.7.1 HE3XINV Dimension Drawing (Vertical Airflow Orientation) ..............................................29
Figure 5.8.0 HE4XINH Dimension Drawing (Horizontal Airflow Orientation) ......................................... 30
Figure 5.8.1 HE4XINV Dimension Drawing (Vertical Airflow Orientation) ............................................. 31
Figure 5.9.0 HE6XIN Dimension Drawing ...........................................................................................32
Figure 5.10.0 HE8XIN Dimension Drawing ......................................................................................... 33
Figure 6.1.0 Typical Damper Actuator Stop Adjustment ...................................................................... 34
TABLE OF CONTENTS

71.800.627.4499
Bypass Economizer OPTIONS
THIS PAGE IS INTENTIONALLY LEFT BLANK.

1.800.627.44998
Bypass Economizer
OPTION
OVERVIEW
1.0 OVERVIEW
FIGURE 1.1.0 DRY BULB CONTROLLER
FIGURE 1.1.3 RETURN AIR ENTHALPY TRANSMITTERFIGURE 1.1.2 OUTDOOR AIR ENTHALPY CONTROLLER
NOTE: The default
condition of the core
bypass is “OFF”.
When ambient
conditions fall within the
user-applied presets, the
dampers will actuate and
cause the RA stream to
be diverted through the
bypass duct.
FIGURE 1.1.1 LOW LIMIT DRY BULB CONTROLLER
1.1.2 Enthalpy Control
The second control scheme incorporates a more sophisticated level of bypass control. In
addition to the dry bulb controller, the Core Bypass controller measures enthalpy in both the
outdoor air and the return air streams to provide a more precise means of determining the
upper and lower limit shutoff points. See Section 6.2 for detailed controls information.
1.1.3 Dampers
Dampers are used to move the RA air stream through the bypass duct instead of through the
enthalpic core (bypass “ON”) and also to return the airstream to normal operation (bypass
“OFF”). They are also used to balance the airstream during bypass operation by means of
setting the stops on the actuators.
The ERV Bypass Economizer Option is a system that provides energy conservation during
operation of an ERV. It accomplishes this by sensing ambient conditions and it then allows the
RA air stream to move through an alternate duct, bypassing the ERV enthalpic core. This avoids
unnecessary tempering of Supply Air.
The Bypass Economizer Option consists of one extra duct, two electrically actuated dampers
and a control system. The bypass duct is field-supplied, fabricated and installed. See
illustrations on pages 9–11. There are two variations of the control system, one of which uses a
single outdoor air dry bulb controller and sensor, and the second variation which uses a Return
Air enthalpy sensor in conjunction with an OA enthalpy controller and a dry bulb temperature
controller.
1.1.1 Dry Bulb Control
The first control scheme has one thermistor to sense outdoor air temperature. The controller
itself has two user-adjusted setting dials. The adjustable Low Limit setting is the temperature
below which the ERV will operate without the core bypass (normal operation). The adjustable
High Limit setting is the temperature above which the ERV will again go into normal operation
without bypassing the core. In other words, there is a temperature band when the bypass
should be actuated and these two settings determine the upper and lower limits of that
temperature band.
1.1 DESCRIPTION

91.800.627.4499
Bypass Economizer OPTIONS
OVERVIEW
FIGURE 1.1.4 TYPICAL ERV WITHOUT CORE BYPASS
FIGURE 1.1.5 TYPICAL ERV WITH CORE BYPASS

1.800.627.449910
Bypass Economizer
OPTION
LAYOUTS
2.0 LAYOUT RECOMMENDATIONS
NOTE: All duct
installations must
conform to SMACNA
guidelines.
NOTE: All duct
layouts depicted
in this manual are
suggested and may be
modified to accommodate
field conditions.
FIGURE 2.0.0 HE1.5INH DUCT LAYOUT
HE1.5XINH SUGGESTED DUCT LAYOUT—FRONT
SAME PARTS FOR HE1.5XINV, HE07, AND HE10
HE1.5XINH SUGGESTED DUCT LAYOUT—BACK
SAME PARTS FOR HE1.5XINV, HE07, AND HE10

111.800.627.4499
Bypass Economizer OPTIONS
FIGURE 2.0.1 HE2X–4XINH DUCT LAYOUT
HE2XINH SUGGESTED DUCT LAYOUT—FRONT
ROUTING SAME FOR HE3XINH AND HE4XINH (DUCT SIZE CHANGES)
HE2XINH SUGGESTED DUCT LAYOUT—BACK
ROUTING SAME FOR HE3XINH AND HE4XINH (DUCT SIZE CHANGES)
FIGURE 2.0.2 HE2X–4XINV DUCT LAYOUT
HE3XINV SUGGESTED DUCT LAYOUT—FRONT
ROUTING SAME FOR HE2XINV, HE4XINV (DUCT SIZE CHANGES)
HE3XINV SUGGESTED DUCT LAYOUT—BACK
ROUTING SAME FOR HE2XINV, HE4XINV
FIGURE 2.0.3 HE6XIN AND HE8XIN DUCT LAYOUT
HE6XIN AND HE8XIN SUGGESTED DUCT LAYOUT—FRONT HE6XIN AND HE8XIN SUGGESTED DUCT LAYOUT—BACK
LAYOUTS

1.800.627.449912
Bypass Economizer
OPTION
PERFORMANCE DATA
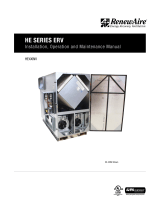
FIGURE 3.0.0 PSYCHOMETRIC CHART (DRY BULB CONTROL)
3.0 PERFORMANCE DATA
LOW LIMIT
HIGH LIMIT
-20 -15 -10 -5 0 5 10 15 20 25 30 35 40 45 50 55 60 65 70 75 80 85 90 95 100 105 110 115
DRY BULB TEMPERATURE - °F
10
20
30
40
50
60
70
80
90
100
110
120
130
140
150
160
0
5
10
15
20
25
30
35
40
45
45
50
50
ENTHALPY - BTU PER POUND OF DRY AIR
Chart by: HANDS DOWN SOFTWARE, www.handsdownsoftware.com
15%
25%
2%
4%
6%
8% RELATIVEHUMIDITY
10% RELATIVEHUMIDITY
20%
30%
40%
50%
60%
70%
80%
90%
HUMIDITY RATIO - GRAINS OF MOISTURE PER POUND OF DRY AIR
BAROMETRIC PRESSURE: 29.921 in. HG
PSYCHROMETRIC
CHART
Normal Temperature
I-P Units
SEA LEVEL
Chart by: HANDS DOWN SOFTWARE, www.handsdownsoftware.com

131.800.627.4499
Bypass Economizer OPTIONS
FIGURE 3.0.1 PSYCHOMETRIC CHART (ENTHALPY CONTROL)
PERFORMANCE DATA
LOW LIMIT
HIGH LIMIT
-20 -15 -10 -5 0 5 10 15 20 25 30 35 40 45 50 55 60 65 70 75 80 85 90 95 100 105 110 115
DRY BULB TEMPERATURE - °F
10
20
30
40
50
60
70
80
90
100
110
120
130
140
150
160
0
5
10
15
20
25
30
35
40
45
45
50
50
ENTHALPY - BTU PER POUND OF DRY AIR
Chart by: HANDS DOWN SOFTWARE, www.handsdownsoftware.com
15%
25%
2%
4%
6%
8% RELATIVEHUMIDITY
10% RELATIVEHUMIDITY
20%
30%
40%
50%
60%
70%
80%
90%
HUMIDITY RATIO - GRAINS OF MOISTURE PER POUND OF DRY AIR
BAROMETRIC PRESSURE: 29.921 in. HG
PSYCHROMETRIC
CHART
Normal Temperature
I-P Units
SEA LEVEL
Chart by: HANDS DOWN SOFTWARE, www.handsdownsoftware.com

1.800.627.449914
Bypass Economizer
OPTION
COMPONENT DESCRIPTION
°F°F
P1
P2 K1
LOAD
VAC
TYPICAL
LOAD
CONNECTION
MODEL NR: BA32X6-95
RANGE: 41 TO 95° F
LINE VOLTAGE: 24 VAC
HIGH LIMIT SETPOINT
LOW LIMIT SETPOINT
COMMON
24 VAC
THERMISTOR
2,252 OHMS @ 25° C
THERMISTOR
FIGURE 4.1.0 DRY BULB CONTROLLER PARTIAL WIRING SCHEMATIC
4.0 COMPONENT DESCRIPTION
The Dry Bulb Controller is the simpler of the two control options. It is connected to a thermistor
that senses the ambient temperature. There are two user-adjusted controls on the dry bulb
controller, one for Low Limit Set Point and a second for High Limit Set Point. When the
temperature sensed by the thermistor is greater than the Low Limit Set Point, it activates the
bypass function. If the temperature drops below the Low Limit Set Point, the bypass function
will switch OFF.” If the temperature rises above the High Limit Set Point, the bypass function
will again switch “OFF”.
The temperature band that falls between the Low Limit Set Point and the High Limit Set Point is
the only time that the bypass function is switched “ON.”
4.1 DRY BULB CONTROLLER
The thermistor is used with all control schemes. It is factory-installed in the ERV and operates
on 24VAC.
4.2 THERMISTOR
The low limit dry bulb controller is the device where the user sets the low limit setpoint. It is
connected to both a thermistor and to the Outdoor Air Enthalpy Controller.
4.3 LOW LIMIT DRY BULB CONTROLLER
The outdoor air enthalpy controller is connected to both the low limit dry bulb controller and
the RA Enthalpy Transmitter. The outdoor air enthalpy controller compares its enthalpy reading
to that of the return air enthalpy transmitter. If the outdoor air enthalpy is less than the return
air enthalpy, and the outdoor air temperature is greater than the low limit setpoint, the bypass
function will switch ON.”
4.4 OUTDOOR AIR ENTHALPY CONTROLLER

151.800.627.4499
Bypass Economizer OPTIONS
FIGURE 4.5.0 ENTHALPY CONTROLLER PARTIAL WIRING SCHEMATIC
°F
P2
TO DAMPERS
ENTHALPY TRANSMITTER
(has built-in enthalpy sensor)
LOW LIMIT SETPOINT
24 VAC
THERMISTOR
LOW LIMIT DRY BULB CONTROLLER
24 VAC
ENTHALPY CONTROLLER
(has built-in enthalpy sensor)
SLIDE SWITCH
(always set to "A")
COMPONENT DESCRIPTION
Rectangular dampers are typically used as either face dampers or bypass dampers, depending
on the field-supplied and installed bypass ductwork. Rectangular bypass dampers are always
used in conjunction with Belimo Damper Actuators and rectangular face dampers are used in
conjunction with Ruskin Damper Actuators, except for HE6XIN and HE8XIN units. See chart of
Damper Actuators on page 16.
NOTE: All duct
installations must
conform to SMACNA
guidelines.
The return air enthalpy transmitter is used in conjunction with the Outdoor Air Enthalpy
Controller. The controller takes enthalpy readings from the transmitter to establish if ambient
conditions fall within the user-defined setpoints to activate or deactivate the bypass. See
Section 6.2 for more details.
4.5 RETURN AIR ENTHALPY TRANSMITTER
Round dampers are typically used in field-supplied and installed 12” round bypass ductwork.
When the damper is shipped loose for field installation, the damper actuator is pre-assembled
to the damper. Whenever a round damper is used, it operates in conjunction with a Belimo
LF24-S Damper Actuator. See chart of Damper Actuators on page 16.
4.6 ROUND DAMPER
4.7 RECTANGULAR DAMPER

1.800.627.449916
Bypass Economizer
OPTION
COMPONENT DESCRIPTION
4.8 DAMPER ACTUATORS
NOTE: All bypass
damper actuators
have a built-in
adjustable stop that
is used for balancing air
flow. See Section 6.0 of
this manual for instruc-
tions on balancing the air
flow at time of start-up.
FIGURE 4.8.1 BYPASS ACTUATOR FIGURE 4.8.2 FACE ACTUATOR
4.8.3 Ruskin RUS-S24-S Damper Actuator
The Ruskin RUS-S24-S damper actuators are used for most rectangular face dampers.
For further information on this specific damper, see the manufacturer’s website:
https://www.ruskin.com/model/rus-s24-s
4.8.1 Belimo TFB24-S Damper Actuator
The Belimo TFB24-S actuators are used for all rectangular bypass dampers.
For further information on this specific damper actuator, see the manufacturer’s website:
https://www.belimo.us/shop/en_US/Actuators/Fail-Safe-Actuators/TFB24-S/p?code=TFB24-S
4.8.2 Belimo LF-24S Damper Actuator
The larger Belimo LF24-S damper actuators are typically used in 12" round bypass damper and
for the 26" X 38" face dampers on the HE6XIN and HE8XIN ERVs.
For further information on this specific damper, see the manufacturer’s website:
https://www.belimo.com/us/shop/en_US/Actuators/Fail-Safe-Actuators/LF24-S-US/
p?code=LF24-S+US
FIGURE 4.8.0 CHART OF DAMPER ACTUATORS BY RENEWAIRE MODEL
RENEWAIRE ERV MODEL FACE DAMPER ACTUATOR BYPASS DAMPER ACTUATOR
HE07IN RUS-S24-S LF24-S
HE10IN RUS-S24-S LF24-S
HE1.5IN RUS-S24-S LF24-S
HE2XIN RUS-S24-S TFB24-S
HE3XIN RUS-S24-S TFB24-S
HE4XIN RUS-S24-S TFB24-S
HE6XIN LF24-S TFB24-S
HE8XIN LF24-S TFB24-S

171.800.627.4499
Bypass Economizer OPTIONS
INSTALLATION
5.0 INSTALLATION
1. Fabricate and install bypass ductwork in accordance with the guidelines shown for each
model in this section of this manual.
2. Install dampers and damper actuators as required, shown on the chart above.
3. Balance the air flow through the bypass duct. See Section 6.1 of this manual. Adjust the
damper actuator stops as needed.
4. Verify the settings on the dry bulb controllers. See Section 6.2 of this manual.
5. Complete the Unit Information on page 3 of this manual.
For every RenewAire ERV with Bypass Economizer Option, controls and dampers are installed at
the factory, with the exception of those components shown below. Bypass ductwork is always
supplied, fabricated and installed by others, in the field. For further information on the needed
bypass ductwork, see the technical data sheet for the specific model, found in this manual in
Section 5.3 through 5.9.
In those cases where a damper(s) must be field-installed, the damper is labeled “BYPASS” and
is already assembled to its actuator. The damper and actuator are then field-installed and the
actuator is plugged into the factory-installed wiring harness using the plug located outside
the unit.
FIGURE 5.0.0 TABLE OF INSTALLED FEATURES BY MODEL
RENEWAIRE
ERV MODEL
CONTROLS
INSTALLED?
CONTROL
WIRING
INSTALLED?
BYPASS
DAMPER
INSTALLED?
FACE
DAMPER
INSTALLED?
RECOMMENDED
BYPASS DUCT
SIZE*
HE07IN Yes Yes Shipped
Loose Yes 12" Round
HE10IN Yes Yes Shipped
Loose Yes 12" Round
HE1.5IN Yes Yes Shipped
Loose Yes 12" Round
HE2XIN Yes Yes Yes Yes 16" X 16"
HE3XINH Yes Yes Yes Yes 30" X 16"
HE3XINV Yes Yes Yes Yes 36" X 14"
HE4XINH Yes Yes Yes Yes 34" X 16"
HE4XINV Yes Yes Yes Yes 42" X 14"
HE6XIN Yes Yes Yes Yes 38" X 16"
HE8XIN Yes Yes Yes Yes 38" X 16"
*Recommended duct sizes are based on ensuring that the pressure drop in the bypass duct is less than the pressure drop
through the core. Equivalent duct sizes at the same pressure drop are acceptable.

1.800.627.449918
Bypass Economizer
OPTION
INSTALLATION
CHANGESNAMEREV. DATE
Description
Family
Config
Dry Bulb Bypass Only
RenewAire
1
A B C D E
New0 11/13/2017 austine
15/18/2018 austine Updated wire colors
28/9/2018 austine Added Wire Color Labels
HE-2_HE-4XJxxx-x11,15xx--xAxTx-xx
2
3
4
5
6
7
8
9
10
11
12
13
HE-2_HE-4XJxxx-x11,15xx--0AxTx-xx_002
1
2
21
23
DAMPER
Face
Relay
24 VAC
13 14
812
4
Face/Bypass
1
2
3
4
5
1
2
S1
S3
DAMPER
Bypass
Exhaust Fan
24V
+
-
SENS
M
Supply Fan
M
Supply Fan
Contactor Overload
24 VAC
A1 A2 95 96
1L1
3L2
5L3
2T1
4T2
6T3
Exhaust
Contactor Overload
24 VAC
A1 A2 95 96
1L1
3L2
5L3
2T1
4T2
6T3
Supply
GND
L3L2
L1
Input Power
115 VAC, 1 Phase
208-230 VAC, 1 Phase
Transformer
COM 24V
F1
Relay
24 VAC
13 14
8
12
4
Exhaust
Relay
24 VAC
13 14
812
4
Supply
BU
RD
YL OR PU BU YL BR PK
BR
OR
PU
BK
RD
BU
RD
BURD
BKBK
BU
RD
BU
RD
BU
RD
RD
YL RD
BU
RD
RD
BK
YL
RD
GY
RD YL
YL
RD
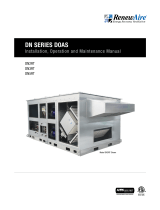
FIGURE 5.1.0 DRY BULB CONTROL WIRING SCHEMATIC
5.1 DRY BULB CONTROL WIRING SCHEMATIC
Dry bulb control is comprised of two dampers and their actuators, a dry bulb controller and a
thermistor. The only user adjustments that are made to this system during normal operation are
the “LOW” and “HIGH” settings on the controller.

191.800.627.4499
Bypass Economizer OPTIONS
CHANGESNAMEREV. DATE
Description
Family
Config
Enthalpy Bypass Only
RenewAire
1
A B C D E
New0 11/13/2017 austine
15/18/2018 austine Updated wire colors
28/9/2018 austine Added Wire Color Labels
HE-2_HE-4XJxxx-x11,15xx--xAxTx-xx
2
3
4
5
6
7
8
9
10
11
12
13
HE-2_HE-4XJxxx-x11,15xx--5AxTx-xx_002
1
2
21
23
DAMPER
Face
Relay
24 VAC
13 14
812
4
Face/Bypass
1
2
3
4
5
1
2
S1
S3
DAMPER
Bypass
Exhaust Fan
M
Supply Fan
M
Supply Fan
24V
+
-
SENS
NC
NO
C
F
Vin 4-20mA
Out
SENS
4-20GND VAC Vout24 IN
SENS
Contactor Overload
24 VAC
A1 A2 95 96
1L1
3L2
5L3
2T1
4T2
6T3
Exhaust
Contactor Overload
24 VAC
A1 A2 95 96
1L1
3L2
5L3
2T1
4T2
6T3
Supply
Input Power
115 VAC, 1 Phase
208-230 VAC, 1 Phase
L1 L2 L3 GND
Transformer
COM 24V
F1
Relay
24 VAC
13 14
8
12
4
Exhaust
Relay
24 VAC
13 14
812
4
Supply
BR
OR
BK
RD
BU YL OR PU BU YL BR PK
PU
BU
RD
BURD
BK BK
BU
RD
BU
RD
BU
RD
RD
YL RD
BU
RD
RD
BK
YL
RD
BU
YL
WH
GN
GY
YL
RD RD
YL
FIGURE 5.2.0 ENTHALPY CONTROL WIRING SCHEMATIC
INSTALLATION
5.2 ENTHALPY CONTROL WIRING SCHEMATIC
Enthalpy control is comprised of two dampers and their actuators, an enthalpy transmitter, an
enthalpy controller that receives data from the enthalpy transmitter, and a low limit dry bulb
controller. The only user adjustment that may be made to this system during normal use is the
“LOW LIMIT” setpoint on the dry bulb controller.

1.800.627.449920
Bypass Economizer
OPTION
INSTALLATION
5.3 MODEL HE07IN DIMENSION DRAWINGS
10
Subject to change without notice: RENEWAIRE.COM | 1.800.627.4499
SPECIFICATIONS & DIMENSIONS
BP
RA
EA
5" Damper
Farme. Typ.
1 3/8" Duct
Flange, Typ.
C
L
15 1/2"
Alternate
7/8" Knockout
Power In
Bottom of Unit
37 5/8" Case
RA
OA
EA
SA
Pressure
Ports (4) Typ.
Leveling
Feet (4)
Door-interlocked
Disconnect Switch
12" Bypass
Location
1 7/8"
5 1/8"
34 1/4"
2 3/4"
50 1/4" Overall
8"
12"x12" Duct Flanges,
Accessory
10"x10" Airflow
Opening
Alternate
7/8" Knockout
Control In
10"x10 7/8" Airflow
Opening
BP
10 5/8"
34 3/8"
2", Typ.
15 7/8"
Case
49 1/2" Case
7/8" Knockouts
Power In and
Control In
7/8" Knockouts
for Potentiometers
(Standard Control)
12"x12" Duct Flanges,
Accessory
EA Damper
Location
Acts as Face
Damper for
Bypass Units
(Optional)
SA Damper
Location
(Optional)
10"x10 7/8"
Airflow
Opening
20 1/4"
Overall
44" Overall
with Dampers
40 1/4" Overall
7 3/4"
36 1/2" Minimum
Service Area
37 3/4" Minimum
Service Area
Door
Swing
LEFT VIEW
FRONT VIEW
RIGHT VIEW
TOP VIEW
12" Round Bypass Duct Connection
(Direct Mount to Damper, By Others)
Face
Damper
Bypass
Damper
BYPASS AIRFLOW SCHEMATIC
TOP VIEW
(OA/SA Airstream Not Shown)
Model: HE07INH [Bypass]
Drawing Type: Unit Dimension
Version: AUG23
ABBREVIATIONS
EA: Exhaust Air to Outside
OA: Outside Air Intake
RA: Room Air to be Exhausted
SA: Supply Air to Inside
BP: Bypass Air Outlet
INSTALLATION ORIENTATION
Unit may be installed in any
orientation.
NOTE
1. UNLESS OTHERWISE SPECIFIED,
DIMENSIONS ARE ROUNDED TO THE
NEAREST EIGHTH OF AN INCH.
2. SPECIFICATIONS MAY BE SUBJECT
TO CHANGE WITHOUT NOTICE.
3. UNITS WITH BYPASS WILL REQUIRE
ADDITIONAL SPACE FOR THE
CONNECTION OF THE BYPASS DUCT
(BY OTHERS).
4. FOR INSTALLATION DETAILS, REFER
TO I&O MANUAL SUPPLEMENT FOR
BYPASS.
5. BYPASS DAMPER SHIPPED LOOSE,
FIELD INSTALLATION REQUIRED.
HE07INH ENERGY RECOVERY VENTILATOR EC MOTOR WITH BYPASS ECONOMIZER
AIRFLOW ORIENTATION
Available as shown:
UNIT MOUNTING & APPLICATION
Can be mounted in any orientation. Airstream cannot
be switched.
FA
OA
EA
RA
HEIN except 6x 8x, LEIN
INH
FIGURE 5.3.0 HE07INH DIMENSION DRAWING (HORIZONTAL AIRFLOW ORIENTATION)
/