Page is loading ...

Instruction
Manual
Para instrucciones en Español,
llamar al: 1-800-837-4044
www.centuryproducts.com
PM-1433AB 6/01
Avoid injury or death -
Read and understand this manual!

TABLE OF CONTENTS
Important Information.....................................1
Warnings.........................................................2
Basic Information.............................................4
Vehicle Seat Belts........................................... 18
• Locking Clip.......................................... 25
Additional Information.................................. 26
• Installation of Anchor Hardware
• Tether Storage
• Care and Cleaning
• Aircraft Use
• Second Hand Car Seat
❃
Before You Begin
❃
Use
❃
Special Information
Height and Weight Limits..................................5
Installation with harness system....................... 6
Installation without harness system.................. 7
Placing Child In Car Seat
with harness system...............................
8
Placing Child In Car Seat
without harness system.......................
10
Operations and Adjustments..............................12
• Harness Tie
• Buckle
• Tether Strap
• Harness Straps
• Changing Harness Strap Slots
Harness System -
removal and re-assembly.....................
16

IMPORTANT INFORMATION
No car seat can guarantee protection from
injury in every situation, but proper use helps
reduce the risk of serious injury or death.
Child restraints (car seats) could be recalled for
safety reasons. You must register this restraint
to be reached in a recall. Fill out the
registration card attached to car seat and mail
today or send your name, address, and the
restraints model number and manufacturing
date to:
Century Products
P.O. Box 551
Elverson, PA 19520-9973
or call 1-888-224-6549
For recall information:
• Call the U.S Government’s Auto Safety
Hotline at 1-800-424-9393
(202-366-0123 in D.C. area)
• www.nhtsa.dot.gov
• Call Century Products at 1-800-837-4044
✔ Read and understand instruction manual and
car seat labels.
✔ A vehicle combination lap/shoulder belt MUST
be used when using car seat without harness
system.
✔ Do not use vehicle “lap-only” belt across front
of child.
✔ Secure children in back seat whenever possible.
✔ Never leave child unattended.
✔ Install car seat securely.
✔ Do not use after date shown on back of
car seat.
✔ Do not allow anyone (babysitter, relatives, etc.)
to use car seat without first understanding all
instructions.
1
❃
Registration Information
❃
Safety First Check List

WARNINGS - Prevent serious injury or death:
Never put a car seat in a front
vehicle seat unless recommended by
vehicle owner’s manual. National
Highway Traffic Safety
Administration (NHTSA) alerts
vehicle owners that according to
accident statistics, children up to
age 12 are safer in the back seat.
For vehicle’s with air bags, refer to
vehicle owner’s manual for child
restraint installation information.
If car seat is in a crash, it must be
replaced. DO NOT use it again! A
crash can cause unseen damage and
using it again could cause serious
injury or death.
Failure to follow these instructions
and car seat labels can result in child
striking the vehicle’s interior during
a sudden stop or accident. Secure
child restraint with a vehicle seat
belt as shown in this manual.
Vehicle seat belt system MUST hold
car seat securely. Not all vehicle seat
belts can be used with a car seat. If
vehicle seat belt does not hold car
seat securely, read “Vehicle Seat
Belts” section.
2

3
DO NOT use car seat if it is damaged
or has missing parts.
DO NOT use accessories or parts
other than those provided by
Century or Graco. Their use could
alter the function of the car seat
and cause serious injury or death.
Never leave child unattended, even
when sleeping.
WARNINGS - Prevent serious injury or death (continued):

DO NOT use after date shown on back of
car seat due to changing requirements and
normal wear and tear.
Look for:
BASIC INFORMATION
This car seat meets or exceeds all applicable
requirements of Federal Motor Vehicle Safety
Standard 213 for use in motor vehicles and
aircraft.
Booster seat (without harness) is not certified
for use in aircraft.
Always secure car seat with a vehicle seat belt,
even when unoccupied. An unsecured car seat
can injure passengers.
Protect vehicle seat. Use a car seat mat, towel
or thin blanket under and behind car seat.
Car seat parts can get very hot in the sun or
warm weather.
To avoid burns, always check before putting
child in car seat.
4
Do not use car seat on rear-facing or
side-facing vehicle seats.
DO NOT USE
THIS CAR SEAT
AFTER DECEMBER
YEAR
❃
Certification
❃
Unoccupied Car Seat
❃
Car Seat Useful Life
❃
Dangerous Vehicle Seats
❃
Vehicle Seat Protection
❃
Warm Weather

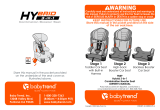
HEIGHT and WEIGHT LIMITS
5
❃
Outgrowing Car Seat
To avoid injuries from whiplash, top of
child’s ears must be below top edge of
headrest.
WARNING
Without Harness System
With
Harness System
Child MUST meet all of the following
requirements:
• Weight is 30 - 40 lbs. (13.6 - 18.1 kg).
• Height is 35 - 43 inches (89 - 109.2 cm) tall.
• Child is able to sit upright unassisted
*
.
• Child’s shoulders are not above top harness
slots.
Child MUST meet all of the following
requirements:
• Weight is 30 - 80 lbs. (13.6 - 36.3 kg).
• Height is 35 - 50 inches (89 - 127 cm) tall.
• Child is able to sit upright unassisted
*
.
• Top of child’s ears are not above top of
headrest.
80 lbs.
(36.3 kg)
30 lbs.
(13.6 kg)
40 lbs.
(18.1 kg)
❃
With Harness System
❃
Without Harness System
*
The American Academy of Pediatrics recommends
that children should be at least one year of age
before being positioned forward facing.

Place forward-facing on vehicle seat.
Thread vehicle seat belts through openings and
buckle belts (fig. a).
Press down firmly in center of car seat to
compress vehicle seat cushion while tightening
vehicle seat belts.
HINT: Use your knee to press down in center
of car seat (fig. b).
Pull front to back and left to right to check for
secure installation (fig. c). Vehicle lap belt
MUST stay tight.
If not secure, see “Vehicle Seat Belts” section.
Attach tether hook (A) to anchor hardware (B)
and tighten strap to remove any slack (fig. d).
If tether anchor hardware (B) is not available,
see “Installation of Anchor Hardware“ section.
INSTALLATION
- with harness system
1
3
4
2
6
(fig. a) (fig. b) (fig. c)
5
(fig. d)
(A)
(B)
Pull to
tighten
Openings
Seat pad
cut out
to show
openings

Place forward-facing on vehicle seating position
with a vehicle lap/shoulder belt.
Tether may be used to stabilize booster seat:
Attach tether hook (A) to anchor hardware
(B) and tighten strap to remove any slack
(fig. a).
If tether anchor hardware (B) is not available,
see “Installation of Anchor Hardware“ section.
If not using tether, see “Tether Storage” section.
INSTALLATION
- without harness system
1
7
2
(fig. a)
(A)
(B)
Pull to
tighten

Adjust harness system:
Harness straps must be through slots at or
just above shoulders.
Place child in car seat with child’s back flat
against back of car seat.
Place harness straps over child’s shoulders and
insert tongues into buckle.
Pull up on tongues to be sure they are locked.
Close harness tie:
Position harness tie at arm pit level.
Check that harness straps are snug with just
enough room to insert one finger between
child’s chest and harness straps (fig. a).
Thigh straps must also be snug (fig. b).
To prevent serious injury or death:
• Vehicle seat belt must be routed
through back of car seat when using
harness system.
• Never place vehicle belt in front of
child when using harness system.
• Do not use strap covers, blankets,
cushions, or padding under harness
straps or child unless provided by
Century or Graco.
• Do not use harness straps that are
loose or unbuckled. They must be
snug and positioned over shoulders
and thighs.
1
2
3
4
8
PLACING CHILD IN CAR SEAT - with harness system
WARNING

9
2
3
(fig. a) (fig. b)
PLACING CHILD IN CAR SEAT - with harness system (continued)

Remove harness system (see “Harness System -
removal and re-assembly” section).
Place child in car seat with child’s back flat
against back of car seat.
Place shoulder belt across child’s chest.
Buckle belt and pull shoulder belt to adjust lap
belt snugly.
Shoulder belt MUST lay across child’s shoulder
in red zone as shown (fig. b). If outside of
red zone, see next steps for Comfort Clip use.
CAUTION:
Some shoulder belts with (emergency
locking) retractors allow a child to pull belt
out and change position of belt. Use of
Comfort Clip helps prevent child from
pulling belt.
Thread shoulder belt through Comfort Clip
exactly as shown (fig. c).
Check to be sure shoulder belt is properly
positioned over shoulder in red zone and snug
against child.
To prevent serious injury or death:
• Shoulder belt MUST be properly
positioned over shoulder (NOT
touching child’s neck and NOT low
off shoulder).
• Lap/shoulder belt MUST be properly
positioned exactly as shown in
illustration.
• DO NOT use shoulder belt loose or
positioned under child’s arms (fig. a).
• Never use a vehicle “lap-only” belt
across front of child.
• DO NOT allow child to slide down in
car seat which could position lap belt
across child’s abdomen and shoulder
belt over neck or face.
• If child will not keep vehicle shoulder
belt properly positioned, DO NOT use
this booster car seat. Use a different
child restraint system.
• Vehicle belts MUST lay flat against child
and MUST not be twisted.
1
2
3
4
10
PLACING CHILD IN CAR SEAT - without harness system
WARNING
5

11
(fig. b) (fig. c)
(fig. a)
PLACING CHILD IN CAR SEAT - without harness system (continued)

OPERATIONS and ADJUSTMENTS
12
Harness Tie:
• To open: Press tab and pull apart (fig. a).
• To close: Snap halves together. Make
sure harness tie is locked by pulling out
on each half.
Buckle:
• To lock: Insert both tongues into buckle.
Pull up on tongues to be sure they are
locked.
• To unlock: Press red button and pull
tongues out of buckle.
Tether Strap (fig. b):
• To tighten: Pull loose end of strap.
• To loosen: Lift adjuster.
1
2
3

13
(fig. a)
2
1
(fig. b)
Tighten
Adjuster
Loosen
OPERATIONS and ADJUSTMENTS (continued)

OPERATIONS and ADJUSTMENTS (continued)
14
Changing Harness Strap Slots:
MUST use slots at or just above shoulders.
A Lift adjuster bar and pull harness straps
out of current slots.
B Change harness strap slots.
Make sure harness straps are threaded
through matching slot of seat pad and
car seat.
It may be necessary to remove seat pad
from top of car seat.
C Thread harness straps behind opening
in metal plate and adjuster bar (fig. d).
D Lift adjuster bar and thread straps over
adjuster bar, creating loop, and down
behind metal plate (fig. e).
E Pull ends of harness straps down (fig. f).
F Adjust harness straps to fit child (see ).
NOTE: Make sure straps are NOT twisted.
5
To prevent serious injury or death:
End of each strap must be at least
2 inches (5 cm) below metal plate (fig. f).
WARNING
4
Harness Straps (fig. c):
A To lengthen: Lift adjuster bar and pull
harness straps from front of car seat to
desired length.
or
To shorten: Lift adjuster bar and pull
ends of harness straps down until all
slack is removed.
B Pull harness straps on front side to lock
adjuster bar.
C When adjusting harness straps, pull
harness straps through tongues in buckle
to remove all slack.
4

(fig. d)
(fig. e)
Metal
Plate
15
OPERATIONS and ADJUSTMENTS (continued)
(fig. f)
(fig. c)
Adjuster
Bar
Loosen
Tighten
Minimum
2 inches

HARNESS SYSTEM - removal and re-assembly
16
Removal:
•Lift adjuster bar and pull both harness straps
out of current slots.
•Pull harness strap out of car seat, harness tie,
and tongues.
Store all parts for future use.
•Push buckle and crotch strap down into
crotch strap opening.
Re-assembly:
When re-assembling harness system, be sure
harness straps are not twisted.
Thread end of harness strap down through slot
in seat pad, under both clips on bottom and
back up through slot in opposite side of
car seat pad.
Thread ends through tongues or shields
(available on some models).
Thread ends through harness tie.
Thread ends through desired slots and adjuster
following instructions in “Operations and
Adjustments” section.
Pull buckle out of of buckle slot.
1
2
3
4
5

17
1
2
4
5
(With Shield
on some models)
3
HARNESS SYSTEM - removal and re-assembly (continued)
Clip
Clip

18
VEHICLE SEAT BELTS
To provide the most secure installation of the
car seat:
• Read the vehicle owner’s manual regarding
car seat installation and seat belt use with
car seat.
• Follow all instruction labels on vehicle seat
belt and car seat.
If car seat is not held securely after following
instructions in this manual, vehicle seat belt
labels, and vehicle owner’s manual:
• Move car seat to another seating location
and try again, or
• Contact vehicle dealer for possible seat
belt modification parts.
Not all vehicle seat belts can be used
with a car seat. The car seat with
harness system must be held securely at
all times by a lap belt (or lap belt
portion of a lap/shoulder belt) that will
not change length while driving.
WARNING
/