Page is loading ...

1
•COMMERCIAL AND HOUSEHOLD
BACKPACK VACUUM CLEANERS
•ASPIRADORA TIPO MOCHILA DE
USO DOMÉSTICO Y COMERCIAL
Model
Model
BP-1400
Electrical Rating
Características Eléctricas
120 V~ 60 Hz
OPERATING INSTRUCTIONS
INSTRUCCIONES DE OPERACIÓN
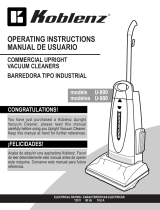
CONGRATULATIONS!
You have just acquired a Koblenz
®
Vacuum
Cleaner, please read this manual carefully before
operating your new vacuum cleaner.
Keep this manual at hand for further references.
¡FELICIDADES!
Acaba de adquirir una Aspiradora Koblenz
®
,
por favor lea este manual antes de conectarla.
Conserve este manual para futuras referencias.
Koblenz Eléctrica, S.A. de C.V.
Av. Ciencia # 28, Fracc. Industrial Cuamatla,
Cuautitlán Izcalli, Edo. de México, México
C.P. 54730 Tel: 5864-0300
Thorne Electric Company
610 Lanark Suite 205, San Antonio TX. 78218
Ph. (210) 590 1226, Fax (210) 590 1258
1-800-548-5741
Pro Duty 1400 W

2 3
IMPORTANT SAFETY INSTRUCTIONS
• WHEN USING AN ELECTRICAL UPRIGHT VACUUM CLEANER, BASIC PRECAUTIONS SHOULD BE FOLLOWED,
INCLUDING THE FOLLOWING.
• READ ALL INSTRUCTIONS BEFORE USING THE VACUUM CLEANER.
SAVE THESE INSTRUCTIONS FOR FURTHER REFERENCE
WARNING
To reduce risk of re, electric shock, or injury:
• Do not use outdoors or on wet surfaces.
• Do not leave vacuum cleaner unattended when plugged in. Turn off switch and unplug the electrical cord when not in
use and before servicing.
• Do not allow to be use as a toy. Close attention is necessary when use by or near children.
• Use only as described in this manual. Use only manufacturer’s recommended attachments.
• Do not use with damaged cord or plug. If vacuum cleaner is not working as it should, has been dropped, damaged, left
outdoors, or dropped into water, return it to a service center before using.
• Do not pull or carry by cord, use cord as a handle, close a door on cord, or pull cord around sharp edges or corners, do
not run vacuum over cord. Keep away from heated surfaces.
• Do not use extension cords or outlets with inadequate current carrying capacity.
• Turn off all controls before unplugging.
• Do not handle plug or vacuum cleaner with wet hands.
• Do not put any object into openings. Do not use with any opening blocked, keep free of dust, lint, hair and anything that
may reduce airow.
• This vacuum cleaner creates suction. Keep hair, loose clothing, ngers and all parts of body away from openings and
moving parts.
• Do not pick up anything that is burning or smoking, such as cigarettes, matches or hot ashes.
• Do not use without dust bag in place.
• Use extra care when cleaning on stairs.
• Do not use to pick up ammable or combustible liquids such as gasoline, or use in areas where they may be present.
• Store your cleaner indoors in a cool, dry area.
• Do not unplug by pulling on cord. To unplug, grasp the plug, NOT THE CORD.
• If the feeding wire (ex) gets damaged, it must be replaced by the manufacturer, by your service agent or by other
qualied personnel, in order to avoid any risks.
THESE MODELS ARE GROUNDED, CONNECT TO A PROPERLY GROUNDED OUTLET ONLY.
SEE GROUNDING INSTRUCTIONS.
GROUNDING INSTRUCTIONS. This appliance must be grounded. If it should malfunction or breakdown, grounding pro-
vides a path of least resistance for electric current to reduce the risk of shock. This appliance is equipped with a cord
having an equipment-grounding conductor and grounding plug. The plug must be inserted into an appropriate outlet that
is properly installed and grounded in accordance with all local codes and ordinances.
WARNING. Improper connection of the equipment-grounding conductor can result in a risk of electric shock. If you are in
doubt as to whether the outlet is properly grounded check with a qualied electrician or service person. Do not modify the
plug provided with the appliance - if it does not t the outlet, have a proper outlet installed by a qualied electrician.
This appliance is for use on a nominal 120 volt circuit, and has a grounded plug that looks like the plug illustrated in sketch A.
A temporary adaptor that looks like the adaptor illustrated in sketches B and C may be used to connect this plug to a 2- pole
receptacle as shown in sketch B if a properly grounded outlet is not available. The temporary adaptor should be used only
until a properly grounded outlet (sketch A) can be installed by a qualied electrician. The green color rigid wire, lug, or the
like extending from the adaptor must be connected to a permanent ground such as a properly grounded outlet box cover.
NOTE: In Canada, the use of temporary adaptor is not permitted by the Canadian Electric Code.
Warning: The power cord on this product contains lead, a chemical known to the State of California to cause birth defects
or other reproductive harm. WASH HANDS AFTER HANDLING.
GROUNDING
OUTLET
GROUNDING
PIN
GROUNDED
OUTLET BOX
METAL
SCREW
ADAPTOR
TAB FOR
GROUNDING
SCREW
(C)(B)(A)
SAFETY PRECAUTIONS
• Do not vacuum water or liquids.
• Do not vacuum up hard or sharp objects, as they may damage the hose, vacuum bag or the vacuum motor.
• Do not drop the vacuum on the oor.
• Do not operate the vacuum while it is standing on high-pile carpet. It is essential that the exhaust airow is not
restricted.
• Do not wash or launder the cloth vacuum bag. It would destroy the ltration capacity of the fabric.
• Do not kink or twist the power cord.
• Do not attempt to service the vacuum yourself. Repair by anyone other than an authorized repair service center
may void the warranty.
MAINTENANCE
• Clean the cloth vacuum bag regularly. After emptying the vacuum bag, turn it inside out and shake as much dust
out of the fabric as possible. Optimum performance is achieved by using a paper vacuum bag with the cloth bag.
• Check the power cord for damage. Always unwind the cable completely.
• Ensure that the vacuum hose, the extension wand and the vacuuming accessories are not blocked.
• Ensure that the electrical outlet and the plug are securely connected. Incorrect connections may cause sparking
and damage to the cable socket.
• Have your Backpack Vacuum served by an authorized repair service center if you suspect any potential problems.
• Use only approved paper vacuum bags.
• Ensure that the exible vacuum bag ring provides a proper seal before vacuuming.
GENERAL DIAGRAM
3
4
5
1. Lid
2. Side latches
3. Back Support
4. ON/OFF switch
5. Pigtail line cord
6. Dust compartment
7. Hose inlet
7
1
6
2

4 5
ADVERTENCIAS
•
AL UTILIZAR SU ASPIRADORA, SE DEBEN SEGUIR LAS SIGUIENTES PRECAUCIONES.
• LEA TODAS LAS INSTRUCCIONES ANTES DE UTILIZAR SU ASPIRADORA.
GUARDE ESTE MANUAL PARA FUTURAS REFERENCIAS
PRECAUCIONES
Para reducir el riesgo de fuego, choque eléctrico o heridas:
• No se use en áreas exteriores o en supercies mojadas.
• No deje la aspiradora sola cuando está conectada. Cuando no esté en uso y antes de darle servicio apague y desconecte
su aspiradora.
• No permita que sea utilizada como un juguete. Cuando utilice su aspiradora cerca de los niños, o sea usada por ellos
favor de tener extremo cuidado.
• Úsese solo como se describe en éste manual. Utilice únicamente accesorios recomendados por el fabricante.
• No se use con el cordón o la clavija dañados. Si la aspiradora no está trabajando como debiera, si se ha caído, dañado,
dejado fuera o le ha caído agua, envíela a un centro de servicio antes de usarse.
• No cargue o jale la aspiradora con el cordón, ni lo use como manija, no jale el cordón sobre orillas o esquinas losas y
manténgalo alejado de supercies calientes.
• No utilice extensiones o enchufes sin capacidad de corriente adecuadas.
• Apague todos los controles antes de desconectar.
• No maneje la barredora o la manija con las manos mojadas.
• No ponga ningún objeto en ninguna de las aberturas, ni se utilice con alguna abertura bloqueada. Mantenga su aspiradora
libre de polvo, cabello, pelusa o cualquier cosa que pueda reducir el paso de aire.
• Esta aspiradora crea succión. Mantenga la ropa, dedos, cabellos y cualquier parte del cuerpo lejos de las aberturas de
las partes movibles.
• No recoja nada que se esté quemando o humeando como cigarros, cerillos o cenizas calientes.
• No se utilice sin la bolsa ltro en su lugar.
• Tenga especial cuidado cuando aspire las escaleras.
• No utilice su aspiradora cerca de, o para recoger líquidos inamables o combustibles como la gasolina.
• Guarde su aspiradora en un lugar seco, fresco e interior.
• No desconecte su aspiradora jalándola por el cable. Para desconectarla jálela de la clavija.
• Si el cordón de alimentación se daña, debe ser reemplazado por el fabricante, su agente de servicio o personal calicado,
a n de evitar cualquier riesgo.
ESTE MODELO TIENE CABLE ATERRIZADO, CONECTE SOLAMENTE A UN CONTACTO ATERRIZADO.
LEA LAS INSTRUCCIONES DE ATERRIZADO.
INSTRUCCIONES DE ATERRIZADO. Este aparato debe ser aterrizado. Si sufre alguna falla, la tierra provee un cambio
a la corriente que evita el riesgo de choque eléctrico. El aparato está equipado con un cable que cuenta con un conductor
y una clavija aterrizada. La clavija deberá conectarse a un contacto adecuado instalado y aterrizado apropiadamente de
acuerdo a las normas eléctricas locales.
ADVERTENCIA. Una conexión inapropiada puede provocar riesgo de choque eléctrico, revise por medio de un electricista
capacitado que el contacto que utilizará esté debidamente aterrizado. No modique la clavija de la máquina, si la clavija
no ajusta en el contacto, instale uno llamando a un electricista capacitado.
Esta máquina está diseñada para utilizarse en un circuito nominal de 120V~ y tiene una clavija aterrizada como se ilustra
en la gura A. Un adaptador como el que se ilustra en las guras B y C puede utilizarse temporalmente para conectar
la clavija a un contacto de dos polos como el que se muestra en la gura B. El adaptador temporal sólo podrá utilizarse
mientras un electricista calicado instala un contacto aterrizado como el que se ilustra en la gura A. La terminal del
adaptador o el cable color verde deberá conectarse a una tierra permanente tal como el tornillo que sujeta la cubierta del
contacto. Siempre que utilice el adaptador deberá sujetarse con un tornillo.
Turn off main power
switch and unplug
unit from wall outlet.
Remove vacuum
hose from top of unit.
Insert new paper
bag making sure
to align lid nozzle
with bag hole and
replace latches.
Release the two latches
and lift off lid.
Separate lid from
paper bag insert
and dispose of
paper bag.
Remove cloth lter
bag, clean, dust
and replace.
OPERATION INSTRUCTIONS
Please read the following operating instructions carefully. They
will help you to get the best performance from this professional
quality vacuum cleaner and to maintain it in optimum
condition.
Follow these simple steps for easy and effective
operation of the Backpack vacuum.
Open the lid and ensure that the cloth bag is correctly located
and the exible ring provides a proper seal when the lid is closed.
For optimum ltration and maximum hygiene, it is advisable to
use a paper vacuum bag in addition to the standard cloth bag.
If you use a paper vacuum bag, simply insert it into the cloth
bag, making sure that the cardboard disk is centered on the
exible sealing ring. When you replace the lid, the short nozzle
in the center of the lid will be forced into the central hole of the
cardboard disk of the paper vacuum bag thus providing a tight
seal. Make sure the paper vacuum bag is tightly secured over
the short nozzle before vacuuming.
Lock the lid down with the two latches. Always ensure that
the vacuum bag is empty before vacuuming. Your Backpack
vacuum has been tted with a thermal overload switch to protect
the motor against damage should the airow be blocked for
extended periods. This may occur if the vacuum bag is overfull
or if the vacuum hose is blocked. The vacuum motor will stop
before it can get too hot. If this happens, empty and thoroughly
clean the vacuum bag or free any blockage and ensure that
adequate airow is restored. The motor will automatically
restart after it has cooled to a safe operating temperature.
1. The vacuum hose is tted into the cuff in the lid. It should not
be necessary to remove the hose in normal operation.
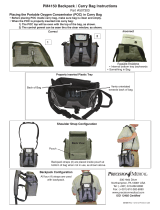
2. Place the Backpack vacuum on your back, adjust the
shoulder straps until you feel comfortable and then tighten the
waist belt. The Backpack vacuum is designed to ride higher on
your back for maximum comfort.
3. Plug the cord into a 110 volt, grounded outlet. Always
unwind the cord completely before vacuuming. It is important
to maintain the power cord in good condition. This unit ships
with a 50’ 16AWG x 3 conductor SJT extension cord. Always
use a 16x3 SJT extension cord when operation this unit.Use
care when pulling the cord around sharp edges and through
doorways.
Never operate the Backpack vacuum if the
power cord is damaged in any way.
4. Attach the extension wand to the hose and t the oor tool or
any of the other vacuuming accessories on the wand.
5. Turn the vacuum on. The toggle switch is located on the
switch box. You may clip the switch box to the waist belt.
HOW TO REPLACE THE PAPER BAG
CONTACTO
ATERRIZADO
CLAVIJA
ATERRIZADA
CUBIERTA DEL
CONTACTO
ATERRIZADO
TORNILLO DE
METAL
ADAPTADOR
TERMINAL PARA
TORNILLO ATERRIZADO
(C)
(B)(A)

6 7
Ponga el interruptor en
la posición de apagado
y desconecte el cable
de línea de la corriente
eléctrica.
Desconecte la
manguera de
la unidad.
Libere ambos seguros y
levante la cubierta
superior.
Separe la bolsa de
papel de la tapa y
deséchela.
Retire la bolsa de tela,
sacúdala para sacar el
polvo y vuelva a colocar
en posición.
Inserte una bolsa de
papel nueva en el
conector de la bolsa
de papel y coloque
nuevamente la tapa
cerrando los seguros.
PRECAUCIONES DE SEGURIDAD
• No aspire agua o líquidos.
• No aspire objetos punzo cortantes o losos.
• No deje caer la aspiradora al piso.
• No opere la aspiradora mientras esté en una alfombra de pelo largo es esencial que la ventilación de salida no
esté obstruida.
• No lave la bolsa de tela, ya que reduce su capacidad de ltración.
• No doble o maltrate el cable de línea.
• No intente reparar la aspiradora.
• Solicite mantenimiento en un Centro de Servicio Autorizado.
PRECAUCIONES DE SEGURIDAD
• Limpie la bolsa de tela regularmente el uso de una bolsa de papel junto con la bolsa de tela optimiza el desempeño
de la aspiradora.
• Revise que el cable de línea no tenga daños, siempre desenrolle el cable completamente.
• Asegúrese que l manguera, los tubos y los accesorios no estén obstruidos.
• Asegúrese que la clavija esté bien conectada en el enchufe.
• Lleve su aspiradora a un centro de Servicio si tiene problemas de funcionamiento.
• Use solamente bolsas de papel originales de fabrica.
• Asegúrese que el aro exible de la bolsa selle bien antes de aspirar.
• Solicite mantenimiento en un Centro de Servicio Autorizado.
DIAGRAMA GENERAL
INSTRUCCIONES DE OPERACIÓN
Por favor lea estas operaciones con cuidado. Le ayudarán
a un mejor manejo y desempeño de su aspiradora.
Siga estas instrucciones para una operación fácil y
efectiva de su aspiradora.
Abra la tapa superior y asegúrese que la bolsa de tela esté
colocada correctamente y que el sello exible de la bolsa no
tenga fugas cuando la tapa esta colocada. Para un mejor
desempeño y ltración se sugiere usar una bolsa de papel
simultáneamente junto con la bolsa de tela.
Si utiliza una bolsa de papel, solo colóquela dentro de la
bolsa de tela, asegurándose que el conector de la tapa y
la entrada de la bolsa estén alineadas. Cuando coloque la
tapa, el conector se insertará en la entrada de la bolsa.
Cierre los seguros de los costados. Siempre asegúrese que
la bolsa esté vacía antes de aspirar. La aspiradora cuenta
con un switch térmico que apagará la aspiradora en caso
de que el ujo de aire no sea suciente, esto evita que el
motor se dañe. Revise que la manguera y accesorios no
estén bloqueados y que la bolsa ltro no esté llena. Si el
motor se sobrecalienta este se apagará, una vez que la
temperatura sea adecuada para el funcionamiento, el motor
se encenderá automáticamente.
1. La manguera de la aspiradora se conecta en el puerto
de succión de la tapa. No es necesario quitar la manguera
durante el aspirado.
2. Coloque la aspiradora en su espalda, ajuste el arnes
de los hombros hasta que este cómodo y luego ajuste el
cinturón de cintura.
3. Conecte la aspiradora en un enchufe a 120 volts
aterrizado. Siempre desenrolle todo el cable antes de usar.
Es importante mantener el cable en buenas condiciones.
Siempre use un cable 16 X 3 SJT al operar esta unidad.
No utilice su aspiradora si el cable de
alimentación esta dañado.
4. Coloque el tubo telescópico a la manguera y coloque
el accesorio de piso/alfombra o cualquiera de los otros
accesorios a la manguera.
5. Encienda la aspiradora, el switch de interruptor incluye
un clip para colocarse en el cinturón.
COMO REEMPLAZAR LA BOLSA DE PAPEL
3
4
5
1. Tapa superior
2. Seguros de la tapa
3. Soporte de espalda
4. Interruptor
5. Cordón de línea (Pigtail)
6. Compartimento de la bolsa
7. Puerto de succión
7
1
6
2

WARRANTY
The Koblenz
®
Backpack vacuum cleaner is warranted to be free from all defects in materials and workmanship
in a period of one year.
The warranty does not cover parts that wear under normal use such as belts, brush rolls, light bulbs, cloth and
paper bags and bumpers.
This warranty shall not apply to damage or malfunction caused by negligence, abuse or product which has been
altered or repaired by an unauthorized person or service center. To validate this warranty, you only need to show
this contracct along with proof of purchase in anyone of the service centers (see enclosed list of authorized
service centers or call 1-800-849-4711 for instructions).
Koblenz
®
will either repair or replace, at its election, all defective machines during the warranty period. The
foregoing obligations are in lieu of all other obligations and liabilities including negligence and state Koblenz’s
entire and exclusive liability and purchaser’s exclusive remedy. Koblenz
®
will in no event be liable for any direct,
indirect, special, incidental or consequential damages or losses whatsoever and Koblenz’s liability under no
circunstances will exceed the contract price for the goods or parts for which liability is claimed.
GARANTÍA
Esta aspiradora Koblenz
®
está garantizada contra defectos en materiales y mano de obra en un periodo de un año.
La garantía no cubre las partes que por uso normal sufran desgaste, como son bolsas, bandas, cepillos, focos
y molduras. La garantía no aplica en el caso que el producto haya sido utilizado con negligencia, abuso o
si el producto ha sido alterado o reparado por una persona o centro de servicio no autorizado. Para hacer
efectiva esta garantía, solo se requiere la presentación del producto y la póliza correspondiente debidamente
sellada por el establecimiento que lo vendió, en cualquiera de los centros de servicio autorizados (vea lista de
Centros de Servicio Autorizados o llame al 1-800-849-4711 para mayores informes). Koblenz
®
podrá reparar
o reemplazar la máquina durante el periodo de garantía. Las obligaciones anteriores son en vez de cualquier
otra obligación incluyendo negligencia y expresan la completa y única obligación de Koblenz
®
así como el único
remedio del comprador. Koblenz
®
bajo ninguna circunstancia será responsable por daños directos, indirectos,
incidentales o consecuenciales, y la responsabilidad de Koblenz
®
no excederá bajo ninguna circunstancia el
valor del producto.
Producto:
Modelo:
No. de Serie:
Nombre del distribuidor:
Calle y Número:
Colonia o Poblado:
Ciudad / Código Postal:
Fecha de entrega:
Sello y Firma:
Fabricado por Koblenz Eléctrica, S.A. de C.V.
Av. Ciencia No. 28, Fracc. Industrial Cuamatla,
Cuautitlán Izcalli, Edo. de México, C.P. 54730
IMPRESO EN MÉXICO
THORNE ELECTRIC Co.
P.O. BOX 18363
SAN ANTONIO, TX.
78218-0363 U.S.A.
SERVICE CENTER AND
PARTS INFORMATION
CALL TOLL FREE:
TEL: 1 (888) 647 1433
CANADIAN CALL
COLLECT:
TEL: (210) 590-1226
FAX: (210) 590-1258
Made in China
HECHO EN CHINA
CENTROS DE SERVICIO
México, D.F. 5203-5525 / 5250-8233
Guadalajara 01800-711-8046 / 01800-711-8047
Monterrey 01800-711-8114 / 01800-712-7714
Para mayores informes sobre un taller autorizado cerca
de su localidad llame sin costo al 01-800 849-4711
SERVICIO Y REFACCIONES EN TODA LA REPÚBLICA
/