
SON_
Network Sharing
Camera
For details on the advanced operations, please access
"'Network Sharing Camera Handbook" contained on
the supplied CD-ROM via a computer.
Instruction Manual
Belore operating the unit, please read this manual thoroughly, and retain it for luture rel_rence.
NSC-GCl/GC3
MemorySlick ,_
© 2007 Sony Corporation 3-273-550-11 (1)

Owner's Record
The model and serial numbers are located
on tile bottom. Record tile serial tmmber in
tile space provided below. Refer to these
numbers whenever you call upon your Sony
dealer regarding this product.
Model No. NSC-GC
Serial No.
To reduce fire or shock hazard, do
not expose the unit to rain or
moisture.
Readthis first
Risk of exploskm if ballm T is replaced by an
incorrect type.
Dispose of used batleries according to tile
instruct k)n.
"Do not incinerate, (or) disassemble; nlay explode
or release toxic nlatcrials. Do llot s]lorl circuil;
may cause burns,"
IIIRECYCLING LITHIUM-ION
BATTERIES
Lithiunl-hm batteries are
recyclable.
gotl can bel l) pre_rve ollr
envh'Olllnent by' relurnhlg your
used recllargeable batteries to
the collectkm and recycling
h)cation nearest you.
For more inR_rmatkm regarding recycling of
recllargeable batteries, call toll tiee
I-8{10-822-8837, or visit bltl)://www.rbrc.org/
Caution: Do not handle danlaged or leaking
Lilhium-lon balleries.
This device conlplies with Part 15 of tile FCC
Rules. Operation is sut!iect to the lollowing two
conditions: (1) This device may not cau_ harmful
interl_rence, and (2) tilts device must accept any
interlcrence received, including imerlcrence tllat
nlay cau_ tlndesircd operalion,
IllCAUTION
YOII arc Catltioned that ally cballges or
modifications not expressly approxed in this
nlanual could xoid your authority to operate this
equil?nlenl.
IliNote:
This equipnlent has been tesled and round to
conlply wifll tile linlits tor a Class B digital
device, pursuanl 1o Part 15 of tile FCC Rules.
These limils are designed to provide reasonable
protection against harnlflfl inlerlbrence ill *_
rcsidenlial inslallalion. This equipnlent generates,
uses, and can radiate radio flcquency enelgy and,
if not installed and used ill accordance with the
instrt/ctions, may cause harlnful inlerlcrence to
radio conltllllnications. However, there is no
guaranlee Ihal haerlerencc will no[ occur ill a
particular installation. If this equipment does
cau_ lmrnlflfl interlerence to radio or lelevision
reception, wbicll can be determined by turning the
equipnlent oll and on, the user is encouraged to
IiT to correct tile inlerlbrence by one or lllOrCof
file lollowing measures:
Reorienl or mlocglle the receiving antenna.
Increase the separalion between the
equipnlent and receiver.
Connect the equipment inlo an outlet (ina
circuit difli:rcnl h'oln that to wldcb tile
receiver is conneclcd.
Consult tile dealer or an experienced ladio/TV
lechnician for hell),
Tile supplied interlace cable must be used wifll tile
equipnlent in order to conlply wifll tile limils lot a
digital device pursuam lo Subparl B of Part 15 of
PCC Rules.

IliNotice for the customers in the
countries applying EU Directives
Tile mmmihcmrer of this product is Sony
Corporation, l-7-I Komm Minato-ku Tokyo, 108-
0075 Japan. Tile Authorized Representalive lor
EIMC and product gaiety is Sony Deutschland
GmbH, Hedellinger Stras,_ 61,70327 Stuttgart,
Germany. For any selwice or guarantee nlatlers
please reler to tile addresses given in _parate
service or guarantee documents,
This product has been lested and fi)und compliant
wifll the limits set om in file EMC Directive fi)r
using conneclion cables shorter lhan 3 inelers (9.8
leer),
IIIAttention
Tile electromagnetic IteMs at tile specilic
hequencies may influence the picture and sound
of this unit.
IIINotice
If static electricity or eleclrolnngnelism callses
dala translPr to discontinue mklway (tail), rcslart
the application or disconnect and connecl the
comnnlnicalion cable/USB, etc.) again.
IliDisposal of Old Electrical &
Electronic Equipment (Applicable
in the European Union and other
European countries with separate
collection systems)
m
This symbol on tile product or on its packaging
indicates that Ibis product shall not be treated as
household waste. Instead it shall be handed over
to the applicable collection poinl lor tile recycling
of electrical and electronic equipment. By
ensuring this product is disposed of correctly, you
will help prevem potential negative consequences
for tile environu/enl and bulnan health, wllich
could otherwise be caused by inappropriate waste
handling of this product, Tile recycling of
materials will help to conserx e natural resources.
For more detailed in%rmalion aboul recycling of
this producl, please conlacl your local Civic
Office, your household waste disposal selwice or
tile shop where you purchased tile product.
A moulded plug complying with BN 1363 is filled
to this equipment lbr your salPly and
convenience.
Should tile filse in the plug supplied need to be
replaced, a fllse of lhe same rating as file supplied
one and approved by ASTA or BSI to BS 1362,
(i.e., marked with an @ or {_?mark) nlusl be
used.
If the plug supplied with this equipment has a
detacllable l/IS cover, be slim to attach die l/ise
cover after you change file lhse. Never use file
plug wilhout the fllse cover. If you should lose lhe
luse cover, please conlacl your nearest Sony
service stalioll,
Noteson usingyourcamera
IIIInternal memory and "Memory
Stick Duo" back up
Do not lurn oI_ tile calncr_l or rcnlo_e "[vIelnoly
Slick Duo" while tile access lamp is lighted, as the
internal memory data or "Memory Stick Duo"
data may be destroyed. Always protect your dala
by making a back up copy.
IIINotes on recording/playback
• Betore you stm't recording, make a trial
recording to ll'_ake slll'e tllz,I tile canleri_ is
working correctly.
• This camera is neilher dusl-proof, nor splash-
proof, nor waler-pwof. Read "Precautions"
(page 29) bek_re operating lbe camera.
• Be carefill not to get tile camera wet. Waler
entering the inside of tile camera may cause
inall/lnclions which 111sortie cases may not be
repairable.

•Donotaimtile camera at tile sun or other bright
light. It may cau_ file malfimction of your
catllera.
• Do nol u_ the camera near a ]()cation thai
generates strong radio waves or enlits radiation.
The camera may nol be able to Jx_cord or play
back properly.
• Using tile canlera in sandy or dusty locations
nlay cause lnalftlnclions.
• If illOisturc condensation occurs, remove il
belore using the camera (page 29).
• Do not shake or strike tile canlera, In addition to
nlalfunctions and an inability to record images,
this nlay render the recording nledium unusable,
or cau_ image data breakdown, damage or loss,
• Clean file flash surlace belftre use. Tile beat of
flash emission may cause dirt on the flash
surlace to become discolored or to stick to tile
flash surlace, resulting in insulflciem light
emission.
• When connecling your camera to anotller device
wilh a cable, be sum 1o insert tile connector plug
in tile correct way. Pushing the plug forcibly
into file terminal will damage the terminal and
nlay result in a malfilnclion of your camera.
• Movies other than those sllot, edited or
conlposed on this camera cannol be played
back.
IiiNotes on the LCD screen and
lens
• The LCD screen is lnanuh_ctulvd using
exn'emely higll-preciskm teclmology so mer
99.99% o1 tile pixels are operational tot
ellective use. However, tllem may be some tiny
black points _md/or bright points (white, red.
blue or green in color) tllat constantly appear on
the LCD semen. These points are normal in the
tllanulacluring process and do not allecl file
recording in any way.
• Do nol hoM file canlera by only holding tile
LCD panel.
IiiNote on disposal/transfer
Wllen using soltwarc enlbedded in tile camera.
personal inlorlnation such as IDs and mail
addresses may be saved on tile internal lnenlory of
the cilnlel-zl. When Iransterring tile c_ltllel21 to
others or on disposal, do so after deleting the
inlorlnation inpul.
IiiAbout changing the language
setting
Tile on-screen displays in each locld language arc
used 1or illustrating file operating procedures.
Change tile screen language belore using your
camera if necessary (page 9).
IiiAbout this manual
• Tile I?hotographs used as exanll?les of pictures in
Ibis Handbook are reproduced inlages, and are
not actual inlages shot using this camera.
• Design and specifications of mColding nledia
and oilier accessories are subject to cllange
without notice.
• The scmenshots are honl Windows XP. The
scenes may vaW depending on file ol)eraling
system of file conlplller.
IiiOn image data compatibility
• This canlera conhwms with DCP (Design lule
Ior Canlera File system) uni_ el'sal stmldard
establislled by JEITA (Japan Electronics and
Inlormation Tcclmology Industries
Association).
• Playback of images recorded with your camera
on other equipment and playback of images
recorded or edited with other equipment on your
camera arc not guaranleed.
IiiWarning on copyright
Television progranls, Iihns, _ideotapes, and other
nlaterials nlay be copyrigllted. Unauthorized
recording of sucll lnalerials nlay be conmu y to tile
provisions of tile copyright h_ws,
IllNo compensation for contents of
the recording
Tile contelltS OI tile rccordillg CallllOt be
conlpensated ftlr if recording or playback is not
possible due to a illall/lllClion (if your canlera or
recording media, etc.

Table of contents
Read this first ............................................................................................ 2
Notes on using your camera .................................................................... 3
Getting started ................................................................................. 6
Checking the accessories supplied ......................................................... 6
1 Charging the built-in battery .................................................................. 7
2 Inserting a "Memory Stick Duo" (not supplied) ..................................... 8
3 Turning the camera on/setting the clock ............................................... 9
To change the language ....................................................................... 9
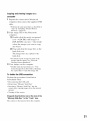
Shooting images easily ................................................................. 10
Useful functions for shooting .................................................................. 11
Viewing/Editing images ................................................................ 13
Changing the settings - Menu/Setup .......................................... 15
Menu items ............................................................................................. 15
Enjoying your computer ............................................................... 16
Viewing "Network Sharing Camera Handbook" (PDF) ........................... 16
What you can do with a Windows computer .......................................... 16
Using your Macintosh computer ............................................................ 20
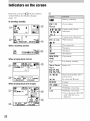
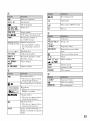
Indicators on the screen ............................................................... 22
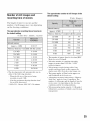
Battery life and memory capacity ................................................ 24
Battery life and the available recording and playback time ................... 24
Number of still images and recording time of movies ............................ 25
Troubleshooting ............................................................................ 26
Battery and power .................................................................................. 26
Shooting movies/still images .................................................................. 26
Viewing images ...................................................................................... 27
Computers .............................................................................................. 27
Precautions .................................................................................... 29
Specifications ................................................................................ 31

Checking theaccessoriessupplied
• AC Adaptor UPA-AC05 (1)/
Power cord (mains lead) ( 1)
• USBcable (1)
• A/V connecting cable (1)
• Hand strap (I)
• CD-ROM "Net-Sharing CAM Application
Soflwalv" (1) (page 16)
Picture Motion Browser (software)
Picture Motion Browser Guide
Nelwork Sharing Camera Handbook (PDF)
• Insmlction Manual (this manual) (1)
Attach the strap and place your hand
through the loop to prevent the camera
from damage by being dropped, etc.

1 Chargingthe built-in battery
• Tile battery is built in wiltlin the camera.
_) Remove the insulation sheet.
OConnect the AC Adaptor to the DC IN jack of the camera, making sure the
power is off.
_) Plug the power cord (mains lead) to a wall outlet (wall socket).
The _/CHG l_mlp lighls on, and charging slarls.
When tile {_/CHG lamp turns o1_,charging is finished (Practical charge).
IiiCharging time
• Time required lo charge a hilly depleted battery at a lemperature of 25°C (77°F). Charging may lake
longer under certain circulllslances or condilk)ns.
• See page 25 for the number of images thai can be recorded.
• Connect the AC Adaptor lo an easily accessible wall outlet (wall socket) close by.
• Even if the _/CHG lamp is not lil, the AC Adaptor is nol disconnected fiom the AC power source (mains)
as long as it is connected to the wall outlet (wall socket). If SOlnClrouble occurs while using the AC
Adaplor, immediately sllut oll the power by disconnecting llle plug liom the wall oullet (wall socket).
• If you do nol operale the camera for a long time, disconnect the AC Adaplor tiom the DC IN jack of lhe
camera and tiom a wall oullet (wall socket).

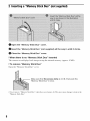
2 Inserting a "Memory Stick Duo" (not supplied)
_) Open the "Memory Stick Duo" cover.
Olnsert the "Memory Stick Duo" (not supplied) all the way in until it clicks.
Close the "Memory Stick Duo" cover.
IiiWhen there is no "Memory Stick Duo" inserted
The can/era recerds/pl:Jys back images using the internal men/er_ (approx. 8 MB).
IIITo remove "Memory Stick Duo"
Open the "Memory Stick Due" crater.
p is not lit, then push the
"Memory Stick Duo" in once.
• Never rcmove "Memory Stick Duo '+ when the access lamp is lit. This may cause damage to data in the
'+Melnoly Stick Duo".

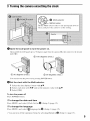
3 Turningthe camera on/setting the clock
Oopen the LCD panel to turn the power on.
Openand lilt the LCD panel upto a90 degrees angle fl'omthe camera (O)).then rotate itto the desired
angle/(_)/-
@ 180degrees (max.)
0 90 degrees (max.) (_) 90 degrees (max.)
Youcan also turn the power on by pressing POWER button.
0 Set the clock with the Multi-selector.
1 Select the date displa> lormat "_ith IdV.
2 Select each item with "_I/P,"and set the numeric value with A/V.
3 Select [OK].
To turn the power off
Press POWER button.
IiiTo change the date and time
Press MENU. and select [CluckSet] in _ (Setup 21/page 15).
IIITo change the language
Press MENU. and select I_Language] in _ (Setup 1)/page 15).
• You can turn off the operation beeps by selecting [Beep] in_ (Setup 1) (page 15).

Focus range
switch
_]_Open the LCD panel to turn the power on.
You can also turn the power on bypressing POWER.
OMake sure the _J:_/l_l (Rec mode) lamp lights up.
Confirm the composition.
Position the subject in the center of the screen.
Start shooting.
V_Then shooting movies:
Press MOVIE.
To stop recording, press MOVIE again.
V_lzen shooting still images:
Press PHOTO.
Movies
Still images
10
• When shooting movies, tile angle of view will change lioln when shooting slill images.
• The shooting mode will automalically stop in either of the I_dlo\ving situalions.
When the file size of the movie being recorded exceeds 2 GB.
After the maximum shooting duration lilne ,'_Ior each file has passed.
:'_NSC-GCI: 2 hours, NSC-GC3:29 minutes
• When shooting movies, tile anti-blur flmction will be sel on.

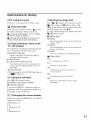
Usefulfunctionsfor shooting
IliWiT Using the zoom
Press T to zoom, press "9¢ to tlndo zoonL
III_ Close-up mode
Slide tile Focus r:mge switch to _ (Close-
up) when shooting a subject close-up.
AIA: Normal shooting (Approx. 1.0 m or farther
(3 feet 33/8 inches or farther))
_: Close-up shooting (Approx. 60 cm to 1.0 m
(1 feet 11 5/8 inches to 3 feet 3 3/8 inches))
III_ Flash (Selecting a flash mode
for still images)
Press ,_ button repeatedl_ until the desired
icon is displayed on tile LCD screen.
(No indicator): Flash Auto
Strobes when there is insullicienl lighl or
backlight (delaull setling)
{_:Flashforced on
fSL: Slow synchro (Flash forced on)
Tim shutler speed is slow in a dark place to
clearly shool tile background thai is oul Of
flash ligla.
_): Flash forced off
• While charging tile flash, _/¢.'HG lamp lights on
and _ra]_ is displayed.
Ili_ Using the self-timer
Press _ (Self-timer) button.
(No indicator): Not using tire self-timer
_): Using the self-timer
If _ou press PHOTO. countdown timer is
displayed, and alter rapid beep sounds are
heard, the camera will shoot.
IIIIDI Changing the screen display
Each time you press IE31button, the display
changes as follows.
_istogram on
IiiSelecting the image size
Press ;.-./-_ (Image size) button to select
[] (Photo Size) or _ (Movie Size) with
4/P" on the Multi-selector. then select the
desired image size with A/V.
To turn off the Image Size menu, press the
;;-"|/'_ button :]gain.
1t:3t(Movie Size):
640(30fps):
Shool high quality nloxies in sizes suited 1or
display on TV
320(30fps):
Shool high qualily movies in sizes suited lot
display on websiles
320(15fps):
Shoot at a small size /or e-mail aliachlnenl
[] (Photo Size):
5M:
For prints up to A4 (8×10")
3:2:
Shool in 3:2 aspect ratio
aM:
For prinls up to 111×[5cnl (4×6") or
13×18 cm (5×7")
2M:
For prints up to 111×[5cm (4×6")
VGA:
Shoot at a small image size lor e-mail
atIac]lt/lenl
11

IiiSelecting a camera mode
Press MENU, then select tile desired item in
(Camera) mode (page 15).
Auto:
Allows easy shooting with tile setlings
a_{iusted automatically.
Program:
Allows you to shoot with the exposure
a_liusted autolnatic_dly (both the sbutter speed
mid tile apellurc xalue). Also you can select
_arious _tting using tbe menu,
Scene Selection:
Allows you 1o shoot with die preset settings
according to the scene.
SceneSelection
.j} Twilight
Shoots night scenes \vitbout losing tile
nigbltime atmosphere.
_J' TwilightPortrait
Shools sharp inlages of people in a dark ph,ce
wilhom losing file nighltime atmosphere.
Soft Snap
Shools images wilh a softer atlnosphere lor
portraits of people+ flowers, etc.
[] Landscape
Shools with tile locus Oll a distant sut!iect.
c-_ Hi-speed Shutter
Shoots lno_.illg sllt_iects O/lldoors or ill ot]ler
bright places.
_'_ Beach
Shoots seaside or lakeside scenes with tile
blueness of the water captured more vividly.
Snow
Shoots snow scenes ill white more clearly.
£.a;,_ Fireworks
Shools fireworks in all lheir splendor.
Candle
Shoots candlelil scenes, without spoiling tile
allnospbere.
12

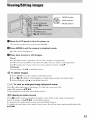
_]_Open the LCD panel to turn the power on.
You can also turn the power on by pressing POWER.
O Press MODE to set the camera to playback mode.
[] (Play mode) lamp lights up,
O Plays back movies or still images.
_lovie:
Press the Multi-selector to pl_@_ack _ movie. (Press it again to slop playback.)
Press • to l_tst lorward, • to rewind. (Press the Multi-selector to return to normal playback,)
Press • _o display fl_e volume control screen, then a_/jtls_ the volume with A/•.
Still image:
Select an image with •/• on the Multi-selector,
l[_ To delete images
1 Press MODE to set the camera to pl_@_ack mode.
2 Press :=_l]_ (Delele) while display in single-image mode or in index mode.
3 Select [Delete] with • on the Mulli-selecler.
III_/<_ To view an enlarged image (playback zoom)
Press (_ while displa)ing _ still im_ge. To undo the zoom, press (_.
At/just the position: •/W/'_I/_,"
Cancel playback zoom: Press the Multi-selector.
III_ Viewing an index screen
Press [] (hldex) button to disphly the index screen '_lille a still inmge is displa_ed.
Select an image with •/V/'_I/_," on the Multi-selector.
To return to the single image screen, press the Multi-selector.
To display the next (previous) index screen, move the yellow frame up/down/left/right with
•/V/_/_'.
13

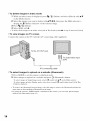
IliTo delete images in index mode
1 Whilean indexscreen is displayed, press "_N/ _ (Delete) andselect [Select]with ,&/V
on tile Multbselector.
2 Select the images you want to delete with ,&fV/_I/IP'. then press tile Multi-selector to
display the _ (Delete) indicator on the selected image.
3 Press !_I/_ (Delete).
4 Select [OK] with P,'.
• To delele all the images in lhe tolder, selecl [All In This Folder] with ,/_- in step 1 instead of [Selecl].
IliTo view images on TV screen
Connect the camera to the TV with the A/V connecting cable (supplied).
To the AN OUT jack
To audio/video input
jacks
A/V connecting cable
IiiTo select images to upload on a website (Sharemark)
1 Press MODE to set the camera to playback mode.
2 Select images to upload on a website and press _ /Sharemark) button.
To select images in Single Image mode, _lect [ff_ mz,rkl with ,Ik/Y on lhe Multi-_leclor,
To select images in Index Display mode, select how to mark [-7_ mark] eilher flom [All In This
Folder] or [Select].
• To remove lhe Shammark fl'om an image, select tile image 1oremove lhe Sharcmark and take tile
same sleps as when marking a Shammark on an image.
• By using the soflwam "PMB Porlable" embedded in lhe camera, you can easily upload images
marked wilh Sharcmarks (page 16).
14

_0) Press MENU to display the menu.
0 Select the desired menu item
with </_. on the Multi-selector.
• Ill REC mode. []/_ is indicated. You
cannot set an item wilh []/_ indicalor ill
gray.
• In PLAY mode. press the Multi-selector
at}m"setting all JlelI].
_) Select a setting with A/_.
_) Press MENU to turn oft the menu.
IllTo select a Setup item
(_) Press MENU.
(_) Select _ (Setup) ittstep 0 and then
press _" on the Multi_selector.
(_) Select the item to set with A/V/4_/_..
Setup 2
l_ _File Number:
IVlenuitems
The available menu items vary depending
OU the c;uilera mode.
The shooting menu is available only in the
shooting tootle, and ll3e viewing menu is
available only in the playback triode.
For details eu the menu items, see
"Network Sharing Camera Handbook"
(PDF).
IiiMenu for shooting
Camera REC Mode
Color Mode Flash Level
EV Saturation
White Bal Sharpness
ISO Setup
P.Quality
IllMenu for viewing
e'l (Folder) _ (Resize)
O,_ (Protect) rl_ (Rotate)
DPOF _ (Divide)
rl_ (Print) _ (Setup)
(Slide)
IiiSetup items
Camera
Function Guide Auto Review
Red Eye Reduction
MemoryStickTool
Format Change REC. Folder
Create REC. Folder Copy
I_ InternalMemoryTool
Format
Setup1
LCD Backlight _Language
Beep Initialize
L_ Setup 2
FiJe Number Video Out
USB Connect Clock Set
15

Viewing"Network Sharing
Camera Handbook"(PDF)
For advanced use of your camera, see
"Network Sharing Camera Handbook"
/PDF).
To view "Network Sharing Camera
Handbook" (PDF), you need to install
Adobe Reader on your computer.
IliFor Windows users
1 Turn on the computer.
2 Place the CD-ROM (supplied) in the
disc drive of your computer.
The select screen for installation appears.
3 Click [Handbook (PDF)].
The installation screen for 'Network
Sharing Camera Handbook" IPDF)
appears.
4 Select the desired language and the
model name of your camera, then click
[Handbook (PDF)I.
Installation starts. When the installation is
complete& the sho_%cut icon of 'Network
Sharing Camera Handbook" appears on
the desktop of your computer.
• The model name of your camera is prinled
<Ill its bottom surtac¢.
5 Click IExitl -"'+ IExit], then rmnovu the
CD-ROM from the disc drive of your
conlputer.
IIIFor Macintosh users
1 Turn on the computer.
2 Place the CD-ROM (supplied) in the
disc drive of your computer.
3 Open the [Handbook] folder in the CD-
ROM. double-click the [GB] lk_lder and
then drag-and-drop the "Handbook.pdF
on the computer.
Double-click "Handbook.pdf' to view the
handbook.
What youcandowith a Windows
computer
Take either of the following ways to
connect the camera with a Windows
computer and el_joy the functions.
IllWhen using various functions
By using the software "Picture Motion
Browser" in the supplied CD-ROM, you
can m_ioy the following operations.
• Upload images on the Web
By pressing _ (Sharemark) bulton (page 14),
you can nlark nlovies m upload on tile Web.
• hnportiug images taken with your camera
to a computer
• Viewing imported images on a computer
• Crealing a disc with edited images
• Changing the language displayed in
"PMB Portable"
IIIWhen using simply outside your
home, etc.
By using the sol'tw:u'e "PMB Portable"
embedded within the camera, you c:m load
images onto computers or upload ima,qes on
the Web. It is also useful when commctiug
the camera to a computer that is not
installed with "Picture Motion Browser".
For details on the functions and operations
of the supplied software, see "Picture
Motion Browser Guide" or Help in the
"PMB Portable".
"PMB Portable" is preset with URL of
several websites at factory setting. Give
your consent to the following on using the
image upload service, etc. (hereon after
referred to as service) provided by the
websites (including those preset) by using
"PMB Portable".
• Depending on websites, registration
procedures or Ices may be required on
using the service.
16

• Follow the tern> and conditions of the
agreement set by the website on using the
service.
• Termination or changes in service may
occur depending oil certain reasons of the
website operator, etc. Iucluding these
situations. Sony is not held responsible for
auy troubles between CllStomers and a
third party or any loss to customers on
using tile service.
• To view the website, you will be
redirected by a server run by Sony thereon
after referred to as Sony server). You may
not be able to access the website because
of server maiuteuauce, etc.
• On termination of the operation of Sony
server, the termination will be informed of
beforehand on Sony websites, etc.
• The URL redirected to by Sony server
may be recorded 12}rimproving filture
Sony products and services. In this case.
only tile URL will be recorded and other
information such as personal data will not
be recorded.
Using a Macintosh computer
For details on using a Macintosh computer.
refer to "Using your Macintosh computer"
(page 20).
IliEnvironment for using "Picture
Motion Browser" and "PMB
Portable"
OS: Microsoft Wimlows 20(_.)Professional
SP4/Windows XP SP2 :-/Windows Vista:
* 64-bit edilions and Starter (Edition) are nol
supported.
• Standard installation is required.
• Operation is nolassured if the above OShas
beenupgraded or in a nnflti-bootenvironment.
CPU: lntel Pentium I11 I GHz or faster is
necessary.
Application: DirectX 9.0c or later (This
product is based on DirectX technology.
It is necessary to have DirectX installed./
Windows Media Player 9 or later
Sound Card: Direct Sound compatible
sound card
Memory: Windows 2000/Windows XP
512 MB or more
Windows Vista
1 GB or more
Hard disk: Disk volume required for
installatiom Approximately 3(X)MB:
Display: DirectX 7 or later-compatible
video card. Mimmum 1.024 x 768 dots.
High Color /16 bit color/
Others: 't' USB port (this must be
provided as standard, Hi-Speed USB
(USB 2.0 compatible) is recommended),
DVD burner (CD-ROM drive is
necessary for installation of "Picture
Motion Browser')
* For "PMB Porlable",lhe disk volume required
on using the program temporarily is
approximately I GB.
fO Note
• Oper_llions _lle 11ol gu_tr_lllleed, e'_'en on
computers tultilling the above system
requirelllents. For exillllple, other ()[)ell or
backgroundapplications currenlly running may
limitproducl perlormance.
17

18
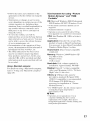
IliInstalling "Picture Motion
Browser"
Yuu need to iust:dl "Picture Mutiou
Browser" tu your Windows computer
before connecting your camera to
the computer. The installation is required
only for the first time.
Contents to be installed and procedures
may differ depending on your OS.
1 Confirm that your camera is not
connected to the computer.
2 Turn on the computer.
0 Notes
• Log on as an Adminismm)r Lot installation,
• Close allapplications running on the
c(nnputer belore installing lhe sol, ware.
3 Place the supplied CD-ROM in the disc
drive of your computer.
The installation screen appears.
Ifthe screen does not appear
@ (:lick [Start], then click [My
Computer]. (Fur Windows 2000.
double<lick [My Computer].)
(_) Duuble-click [SONYPICTUTIL
(E:)]/CD-ROM) (disc drive).*
* Drive names (such as/E:)) may vary
depending on lhe compuler.
4 Click [Install].
5 Select the language for the application
to be installed, then click [Next].
6 Check your area and cuuntry/region,
then click [Next].
7 Read [License Agreement], select 11
accept the terms (if the license
agreement] if you agree, then click
[Next].
8 Connect your camera to the computer
following the steps beluw.
(_) Cunnect the AC Adaptor tu the
camera and a wall outlet (wall
socket).
(_) Open the LCD panel to turn the
power OIL
@ Connect the _ (USB) jack uf the
camera to the computer using the
supplied USB cable.
(USB) jack
USB cable
9 When [Connecting...] appears on the
screen of the camera, click [Next] on the
connectiou coufirnlatiou screen of the
COluputer.
0 Notes
• E_enif ascreenpromptingyoutorcsmrl
your colnp/llcr apl)eal's, you do not need 1o
rcSlalr il at this lilne. Reshu't your colnputer
ariel"completing the installation.
• II irlay take sonic time lor the
authenticution.
1 0 Follow the un-screen instructions to
install the software.
One of the fullowing installation screens
appears, depending on the computer
environment. Check the screen md follow
the instructions disphucd to install the
required soflware.
Windows Media Fommt 9 Series Runlime
/Windows 201)0 only)
Soltwarc required to handle movies
Microsoft DirectX 9.(tcI_
Software required to handle movies
* Windows 2000, Windows XP only
1 1 Restart the computer if required to
complete the installation.
12 Remove the CD-ROM from the disc
drive of your cumputer.

IliOperating the "Picture Motion
Browser"
After _ou install tile sul't_ are, shortcut
icuns for "Picture Motion Browser" and
"Picture Motion Browser Guide" are
created on the desktup.
For the basic uperatiott uf "Picture Motion
Bruwsef'. see "Picture Motion Browser
Guide".
D()ttble-click to start "Picture
Motion Browser".
Picture Noliee
Double-click to start "Picture
Mutiou Browser Guide".
Picture Motion
Brow_er Guide
IIIOperating the "PMB Portable"
The steps to take when operating a
computer that is not installed with "Picture
Motion Browser" are explained here.
(_) Cuuuecl the computer with the
camera (page I8).
(_) Select [PMBPORTABLE] in the
autoRuu scrueu.
The "PMB Portable" will start up.
• If the AutoRun screen does not appear,
double-click [PM B Ponable.exe I.
[PMB Porlable.exel is within the canlera
which will be recognized by the compuler as
all external drive when COllnec[ed.
• For a computer wifll "Picture Molion
Browser*' installed, the screen to select
whether m upload the inlage on the Web or
load the image to conlpuler using "Picture
Molion Browser" will appeal.
• For details on how to operate "PMB
Portable", see lhe Hel I) wifllin "PMB
Portable".
• Tile License Agreement screen will appear
when you starl up "PMB Portable" lot tile
firsl time. Read the agreement camlully. If
you accept tile lerlns of tile aglcelllellL go
on to lbe nexl screen.
• To display tile License Agreement screen of
"PMB Portable', double-click [APP] toMer
in file external drive (PMBPORTABLE),
double-click [EULAI, and tben selecl tile
language of your cboice.
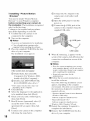
IIIRecommended USB cable
connection
Tu assure tile proper functiouitlg uf your
camera, connect your caumra tu a computer
as below.
• Connect the _ (USB)jack of the camera and a
compuler using the USB cable. Do not connecl
anything to olher USB ports of a compuler.
• When connecting to a computer with a USB
keyboard and USB mouse connected as standard
equipnlenl, connect lhe calnera to anotber USB
porl using the USB cable.
(J Notes
• Operations are not guaranteed when nnfltiple
USB devices are conllected to _1 colnp/iter.
• Be sure to connect the USB cable m a USB port.
lftbe USB cable is connected m a computer via
a USB keyboard or USB hub, operations arc nol
guaranteed.
IIITo disconnect the USB cable
1 Click tile [Uulflug (11"c.ject h:,l"d'_w{re]
icon ou the task tray ou the bottom right
of the dusk top.
2 (!lick [SaMy remove USB Mass
Storage Device].
5afely 1058 Mass Device - Drive(Q:)
remove
5to,rage
3 Click [OK]/Wiudows 2(X)0 only).
lg

2O
4 Touch [END] on tile screen of your
canlur_l.
5 Touch [YES] on the screen of your
camera.
6 Disconnect the USB cable from tile
camera and tile conlptlter.
O Notes
• Belore lurning off your camera, disconnect the
ldSB cable lollowing file proper procedures
described above.
• Disconnect lhe USB cable using the proper
procedures described above. Otherwi_, files
slored on the "Memo W Stick PRO Duo" may
nol be updaled cormclly. Also, disconnecting
lhe USB cable inlproperly may cau_ a
malfunction of the "Memory Stick PRO Duo".
UsingyourMacintoshcomputer
You can copy images to your Macintosh
computer.
• "Picture Motion Browser" is no[ colnpatible
with Macintosh conlptltcrs.
Recommendedcomputerenvironment
The following environment is
recommended for a computer connected to
the camera.
OS (pre-installed): Mac OS 9.1/9.21Mac
OS X(vlO.l to vlO.4)
USB jack: Providedas standard
CPU: iMac. eMac. iBook. PowerBook.
Power Mac G3/G4/G5 series. Mac mini
Memory:64 MB or more (128 MB or
more is recommended)
Nard Disk: Disk space required fi_r
installation: approximately 250 MB
0 Note
• Operations are not guaranteed 1or all tile
reconllllelK]ed COlllpuler envirolllnelllS
nlenlk)ned above.
• If you connect two or more USB devices to a
single compuler at lhe same lhlle_ some devices,
including your camera, may not operale
depending on tile types of USB devices you arc
using.
• Operations are not gtlaranleed when using a
USB hub.
• Connecting your camera using a USB interlhce
l]lal is compatible with Hi-Speed USB (USB 2.(1
compliam) allows advanced transler (lfigh speed
lransler) as this camera is compalible willl Hi-
Speed USB (USB 2.0 conlpliam).
• Them am three modes lot a USB connection
when connecting a computer, [PictBridgel,
[Web Cameral and [Mass Storage] (delault
setting) modes. This section describes the [Mass
Storage] as zmexample. For details on
[PictBridgel, see "Network Sllaring Camera
Handbook'L
• When your computer rcSllllles hOlll tile suspend
or sleep ilK)de, conllllUnication between your
calnera and your conlpuler may not recover at
file same Iillle,
Page is loading ...
Page is loading ...
Page is loading ...
Page is loading ...
Page is loading ...
Page is loading ...
Page is loading ...
Page is loading ...
Page is loading ...
Page is loading ...
Page is loading ...
Page is loading ...
-
 1
1
-
 2
2
-
 3
3
-
 4
4
-
 5
5
-
 6
6
-
 7
7
-
 8
8
-
 9
9
-
 10
10
-
 11
11
-
 12
12
-
 13
13
-
 14
14
-
 15
15
-
 16
16
-
 17
17
-
 18
18
-
 19
19
-
 20
20
-
 21
21
-
 22
22
-
 23
23
-
 24
24
-
 25
25
-
 26
26
-
 27
27
-
 28
28
-
 29
29
-
 30
30
-
 31
31
-
 32
32


Sony NSC-GC3 Owner's manual
- Type
- Owner's manual
- This manual is also suitable for
Ask a question and I''ll find the answer in the document
Finding information in a document is now easier with AI
Related papers
Other documents
-
Hasbro Bob the Builder Talking Bob Operating instructions
-
Sylvania 6419CTC Owner's manual
-
Yamaha DV-C6860 Owner's manual
-
JVC GR-DVM50 Owner's manual
-
Panasonic PT-L104P User manual
-
-
 iKEY-AUDIO MP3 Player iKEYplus User manual
-
Sylvania SST4324A Owner's manual
-
CVS RKL 160 Operating Instructions Manual
-
Zenit 3M User manual
