KitchenAid YKEMS307GW2 Owner's manual
- Category
- Ovens
- Type
- Owner's manual

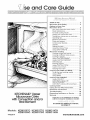
KITCHENA D®Upper
MicrowaveOven
w#h Convectionand/or
BroilElemenf
Microwave Oven Safety ................................. 3
Getting to Know Your
Microwave Oven ............................................. 6
How your microwave oven works ............. 6
Radio interference ..................................... G
For best cooking results ............................ 6
Testing your microwave oven .................... 6
Testing your dinnerware or cookware ....... 7
Operating tips ............................................. 7
Electrical connection .................................. 7
Parts and features ..................................... 8
Control panel features ............................... 9
Utensils ..................................................... 11
Setting the clock ...................................... 12
Using the Minute Timer ........................... 13
Using EASY MINUTE .............................. !3
Microwave Cooking ..................................... 14
Cooking at high cook power .................... 14
Cooking at different cook powers ............ 15
Cooking in stages .................................... !6
Using CUSTOM REHEAT ....................... 17
Using CUSTOM DEFROST .................... 20
Defrosting tips .......................................... 22
Popping popcorn ..................................... 23
Using CUSTOM COOK ........................... 23
Custom Cook Chart ................................. 24
Keeping food warm ................................. 25
Cooking with CRmSP and BROmL ................ 26
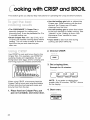
To get the best cooking results ............... 26
Using CRISP ............................................ 26
Using BROIL ............................................ 27
Cooking with CONVECT .............................. 28
Using CONVECT ..................................... 28
CONVECT cooking with
QUICK PREHEAT ................................... 28
CONVECT cooking without preheat .......29
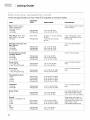
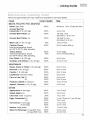
Cooking Guide .............................................. 30
Caring for Your Microwave Oven ............... 36
Questions and Answers .............................. 37
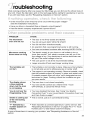
Troubleshooting ........................................... 39
Requesting Assistance or Service ............. 40
Warranty ........................................................ 44
mnthe U,&A. for assistance ar service,
cab the Consumer Assistance Center:
In Canada for assistance or service,
.... see page 41.
Models: KEMS307G KEMS377G KBMC147H
KEMS308G KEMS378G KBMC140H
4482614
www.kitchenaid.com

Note to You
Because your life is getting busier and more complicated, KitchenAid _ appliances are
easy to use, save time, and help you manage your home better. To ensure that you
enjoy many years of trouble-free operation, we developed this Use and Care Guide.
It contains valuable information concerning how to operate and maintain your new
appliance properly and safely. Please read it carefully. Also, please complete and
mail the enclosed Product Registration Card.
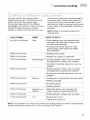
Whenever you call our Consumer
Assistance Center at 1-800-422-1230 (in
Canada, 1-800-461-5681) or request ser-
vice for your appliance, you need to know
your complete model number and serial
number. You can find this information on the
model and serial number plate (located on
the lower oven ).
Please also record the purchase
information.
Model Number
Serial Number
Purchase/
Installation Date
Builder/Dealer
Name
Address
Phone
NOTE: You must provide proof of purchase
or installation date for in-warranty service.
Keep this book and the sales slip together in a safe place for future reference.

....crowave Oven Safety
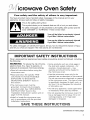
Your safety and the safety of others is very important.
We have provided many important safety messages in this manual and on your
appliance. Always read and obey all safety messages.
This is the safety alert symbol.
This symbol alerts you to hazards that can kill or hurt you and others.
All safety messages will be preceded by the safety alert symbol and the
word "DANGER" or "WARNING." These words mean:
You will be killed or seriously injured
if you don't follow instructions.
You can be killed or seriously injured
if you don't follow instructions.
All safety messages will identify the hazard, tell you how to reduce the chance of injury,
and tell you what can happen if the instructions are not followed.
IMPORTANT SAFETY INSTRUCTIONS
When using electrical appliances basic safety precautions should be followed, including
the following:
WARNING: To reduce the risk of burns,
electric shock, fire, injury to persons, or
exposure to excessive microwave energy:
o Read all instructions before using the
microwave oven.
®Read and follow the specific "PRE=
CAUTIONS TO AVOID POSSIBLE
EXPOSURE TO EXCESSIVE
MICROWAVE ENERGY" found in
this section.
®The microwave oven must be
grounded. Connect only to properly
grounded outlet. See *'GROUNDING
iNSTRUCTiONS" found in the
"installation Instructions" section and on
page 5 of this manual.
®Install or locate the microwave oven
only in accordance with the provided
Installation Instructions.
SAVE THESE
®Some products such as whole eggs in
the shelland sealed containers = for
example, closed glass jars - may
explode and should not be heated in
the microwave oven.
®Use the microwave oven only for its
intended use as described in this manual.
Do not use corrosive chemicals or vapors
in the microwave oven. This type of oven
is specifically designed to heat, cook, or
dry food. It is not designed for industrial
or laboratory use.
®As with any appliance, close supervision
is necessary when used by children.
®Do not operate the microwave oven if it
has a damaged cord or plug, if it is not
working properly, or if it has been
damaged or dropped.
iNSTRUCTiONS
continued on next page

:_ icrowave Oven Safety
iMPORTANT SAFETY iNSTRUCTiONS
®The microwave oven should be serviced = Remove wire twist=ties from paper
only by qualified service personnel.
Call an authorized service company for
examination, repair, or adjustment.
®See door surface cleaning instructions
in the "Caring for Your Microwave
Oven" section.
®To reduce the risk of fire in the
oven cavity:
= Do not overcook food. Carefully
attend the microwave oven if paper+
plastic+ or other combustible materials
are placed inside the oven to facilitate
cooking.
or plastic bags before placing bags
in oven.
+fmaterials inside the oven should
ignite, keep oven door closed, turn oven
off+and disconnect the power cord+ or
shut off power at the fuse or circuit
breaker panel+
Do not use the cavity for storage
purposes. Do not leave paper products,
cooking utensils, or food in the cavity
when not in use+
SAVE THESE INSTRUCTIONS
PRECAUTIONS TO AVOID POSSIBLE
EXPOSURE TO EXCESSIVE MICROWAVE
ENERGY...
(a) Do not attempt to operate this oven
with the door open since open-door
operation can result in harmful
exposure to microwave energy. It is
important not to defeat or tamper with
the safety interlocks.
(b) Do not place any object between the
oven front face and the door or allow
soil or cleaner residue to accumulate
on sealing surfaces.
(c) Do not operate the oven if it is
damaged. It is particularly important
that the oven door close properly and
that there is no damage to the:
(1) Door (bent),
(2) Hinges and Hatches (broken
or Hoosened),
(3) Door seaHsand seaHingsurfaces+
(d) The oven shouHd not be adjusted or
repaired by anyone except properly
quaHified service personnel

icrowave Oven Safety
GROUNDING INSTRUCTIONS
• For all cord connected appliances:
The microwave oven must be grounded.
In the event of an electrical short circuit,
grounding reduces the risk of electric
shock by providing an escape wire for
the electric current. The microwave
oven is equipped with a cord having a
grounding wire with a grounding plug.
The plug must be plugged into an outlet
that is properly installed and grounded.
WARNING: Improper use of the
grounding plug can result in a risk of
electric shock.
Consult a qualified electrician or
serviceman if the grounding instructions
are not completely understood, or if
doubt exists as to whether the
microwave oven is properly grounded.
Do not use an extension cord. If the power
supply cord is too short, have a qualified
electrician or serviceman install an outlet
near the microwave oven.
• For a permanently connected
appliance:
The microwave oven must be
connected to a grounded, metallic,
permanent wiring system, or an
equipment grounding conductor should
be run with the circuit conductors and
connected to the equipment grounding
terminal or lead on the microwave oven.
SAVE THESE INSTRUCTIONS

• to Know Your
Microwave Oven
This section discusses the concepts behind microwave cooking. It also shows you the
basics you need to know to operate your microwave oven. Please read this information
before you use your oven.
Microwave ovens are safe. Microwave
energy is not hot. It causes food to make its
own heat, and it's this heat that cooks the food.
Microwaves are like TV waves, radio waves
or light waves. You cannot see them, but you
can see what they do.
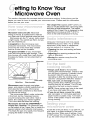
A magnetron in the microwave oven
produces microwaves. The microwaves
move into the oven where they contact
food as it turns on the turntable.
The glass turntable of !our microwave
oven lets microwaves pass through. Then
they bounce off a metal floor, back through
the glass turntable, and are absorbed by
the food.
The Crisper Pan reaches 436°F (210°C) in
about 2 minutes (faster than a browning dish)
and stays at that temperature. The bottom
coating of the Crisper Pan is designed to stop
absorbing microwaves at 436°F (210°C),
which is the best temperature for frying.
i!:i;ii!!CiiiCiiiiiiiO iiiiiii ' 'iiiii i!i!ii!i! !ii' ii!i!ii!C ,¸
Using your microwave oven may cause
interference to your radio, TV, or similar
equipment. When there is interference,
you can reduce it or remove it by:
• Cleaning the door and sealing surfaces
of the oven.
• Adjusting the receiving antenna of the
radio or television.
• Moving the receiver away from the
microwave oven.
Magnetron
Oven cavity
Metalfloor Glassturntable
Microwaves pass through most glass,
paper, and plastics without heating them so
food absorbs the energy. Microwaves
bounce off metal containers so food does
not absorb the energy.
The microwaves disturb water molecules
in the food. As the molecules bounce
around bumping into each other, heat is
made, like rubbing your hands together.
This is the heat that does the cooking.
Microwaves do heat the CRISPWARE TM
Crisper Pan, however. The rubberized pad
on the bottom of the Crisper Pan is made of a
special material which absorbs microwaves.
This heats the pan very rapidly, browning and
crisping the bottom of the food.
6
• Always cook food for the shortest
cooking time recommended. Check to see
how the food is cooking. If needed, touch
the EASY MINUTE while the oven is
operating or after the cooking cycle is over
(see the "Using EASY MINUTE" section).
• Stir, turn over, or rearrange the food
being cooked about halfway through the
cooking time for all recipes. This will help
make sure the food is evenly cooked.
NOTE: Some cycles may have to be reset
if you have interrupted the cycle.
• If you do not have a cover for a dish,
use wax paper, or microwave-approved
paper towels or plastic wrap. Turn back a
corner of the plastic wrap to vent steam
during cooking.
To test the oven put about 1 cup (250 mL) of
cold water in a glass container in the oven.
Close the door. Make sure it latches. Cook
at 100% power for 2 minutes. When the time
is up, the water should be heated.

: etting to Know Your Microwave Oven
I! !'::: i =iiiii
Test dinnerware or cookware before
using. To test a dish for safe use, put it into
the oven with 1 cup (250 mL) of water beside
it. Cook at 100% cook power for one minute.
If the dish gets hot and water stays cool,
do not use it. Some dishes (melamine,
some ceramic dinnerware, etc.) absorb
microwave energy, becoming too hot to
handle and slowing cooking times. Cooking
in metal containers not designed for
microwave use could damage the oven, as
could containers with hidden metal (twist-ties,
foil lining, staples, metallic glaze or trim).
,i i iii !;! ii
• Never lean on the door or allow a child to
swing on it when the door is open.
• Use hot pads. Microwave energy does not
heat containers, but heat from the food can
make the container hot.
NOTE: Heat from the broil element will
cause container and oven parts to become
hot. Also, the Crisper Pan always
becomes very hot when used. Use oven
mitts when touching containers, oven parts,
and pan after broiling.
• Do not use newspaper or other printed
paper in the oven.
• Do not dry flowers, fruit, herbs,wood, paper,
gourds, or clothes in the oven.
• Do not start a microwave oven when it is
empty. Product life may be shortened. If
you practice programming the oven, put a
container of water in the oven. It is normal
for the oven door to look wavy after the
oven has been running for a while.
• Do not try to melt paraffin wax in the oven.
Paraffin wax will not melt in a microwave
oven because it allows microwaves to pass
through it.
• When you use a browning dish, the
browning dish bottom must be at least
_0in (5 mm) above the turntable. Follow the
directions supplied with the browning dish.
• Never cook or reheat a whole egg inside
the shell. Steam buildup in whole eggs may
cause them to burst and burn you, and
possibly damage the oven. Slice hard-
boiled eggs before heating. In rare cases,
poached eggs have been known to
explode. Cover poached eggs and allow a
standing time of one minute before cutting
into them.
• For best results, stir any liquid several
times during heating or reheating.
Liquids heated in certain containers
(especially containers shaped like cylinders)
may become overheated. The liquid may
splash out with a loud noise during or after
heating or when adding ingredients (coffee
granules, tea bags, etc.).
• Microwaves may not reach the center of a
roast. The heat spreads to the center from
the outer, cooked areas just as in regular
oven cooking. This is one of the reasons
for letting some foods (for example, roasts
or baked potatoes) stand for a while after
cooking, or for stirring some foods during
the cooking time.
• Do not deep fry in the oven. Microwavable
cookware is not suitable and it is difficult to
maintain appropriate deep frying
temperatures.
• Do not overcook potatoes. At the end of
the recommended cooking time, potatoes
should be slightly firm because they will
continue cooking during standing time.
After microwaving, let stand for 5 minutes
to finish cooking.
• Do not operate the microwave oven
unless the glass turntable is securely in
place and can rotate freely. The turntable
can rotate in either direction. Make sure
the turntable is correct-side up in the oven.
Make sure support base is all the way on
the shaft in oven cavity floor. Handle your
turntable with care when removing it from
the oven to avoid possibly breaking it. If
your turntable cracks or breaks, contact
your appliance dealer for a replacement.
Your microwave is connected to a 110-volt
side of the 240-volt circuit required for the
lower oven. If the incoming voltage to the
microwave is less than 110 volts, cooking
times may be longer. Have a qualified elec-
trician check your electrical system.

_; etting to Know Your Microwave Oven
i!_:_'_¸',_Ciiii_iiiiJ_'!ii'_¸_:!i_,C!iiiii"_CII!I!I!_i_,_,_i!ii_!'_,_¸_i,;i_iiii_'iiii'¸L/!ii',_i:i!i!__ii!!i_
®
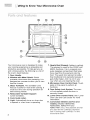
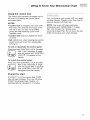
Your microwave oven is designed to make
your cooking experience as enjoyable and
productive as possible. To help get you up
and running quickly, the following is a list of
the oven's basic features:
1. Door Handle.
2. Window with Metal Shield. Shield
prevents microwaves from escaping, tt is
designed as a screen to allow you to view
food as it cooks.
3. Glass Turntable. This turntable turns
food as it cooks for more even cooking, tt
must be in the oven during operation for
best cooking results.
4. Removable Turntable Support
(under turntable).
5. Cook Guide Label.
6. Light. Automatically turns on when door
is opened or when oven is operating.
7. Quartz Broil Element (hidden in ceiling).
This element is used for the CRISP and
BROIL functions. It is in a special com-
puter-designed compartment that helps
focus heat from the element onto the
food. The quartz broil element is better
than traditional broil elements because it
gets hotter faster. And it is not in your
way when you are cleaning the oven.
8. Microwave Oven Control Panel. Touch
pads on this panel to perform all
functions.
9. Door Safety Lock System. The oven
will not operate unless the door is
securely closed.
10. Lower Oven Control Panel. See "Lower
Oven Use and Care Guide" for more
information.
11. Convection Element and Fan (not
visible). (Models KEMS378G,
KEMS308G, KBMC147H and
KBMC140H only.) This element and fan
are used for the CONVECT function.
See "Cooking with CONVECT in the
microwave oven".

letting to Know Your Microwave Oven
@1 OR,SP
®
®
®
CLOCKSET-START 1 @
_i---I r=R0wAv.vE.l
® ®
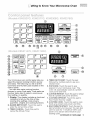
Your microwave oven control panel lets you
select the desired cooking function quickly
and easily. The following is a list of all the
Command and Number pads located on the
control panel.
You can also make cooking function
choices by using Code pads. Code pads are
Number pads used to select a cook power,
food setting, or quantity.
1. Display. This display includes a clock and
indicators to tell you the time of day,
cooking time settings, cook powers,
quantities, weights and cooking functions.
2. CLOCK SET,START. Touch this pad to
enter the correct time of day.
3. TIMER CANCEL. Touch this pad to
cancel the Minute Timer.
4. TIMER SET,START. Touch this pad
followed by number pads to use as a
kitchen timer
5. POPCORN. Touch this pad to pop
popcorn in your microwave oven. The
oven will automatically cook at a preset
cook power and time.
6. CUSTOM REHEAT. Touch this pad to reheat
food at a preset cook power and time.
7. CUSTOM DEFROST. Touch this pad to
thaw frozen food by weight.
8. CUSTOM COOK, Touch this pad to cook
foods at a preset cook power and time.
9. EASY MINUTE/START. Touch this pad to
start a function you have set. You can also
use it to cook for 1 minute at 100% cook
power or to add an extra minute to your
cooking cycle.
continued on next page 9

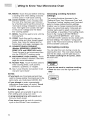
etting to Know Your Microwave Oven
10A. MICRO. Touch this pad before entering
a cooking time when setting a second
or third cycle in multi-cycle cooking.
10B. COOK POWER. Touch this pad, after
the cook time has been set, followed
by a Number pad to set the amount of
microwave energy released to cook the
food. The higher the number, the high-
er the power wattage and the faster
the "cooking speed."
11. BROIL. Touch this pad to broil with the
broil element.
12. CRISP. Touch this pad to crisp pre-
cooked pizza and other dough-based
foods. Use it also for baking and for
frying bacon and eggs, sausages, etc.
13. CONVECT/QUlCK PREHEAT.
(Models KEMS308G, KEMS378G,
KBMC147H and KBMC140H only)
Touch this pad to put microwave oven
into the CONVECT cooking mode.
14. MICROWAVE OVEN CANCEL. Touch
this pad to cancel a function. See next
page for more information.
15. Number Pads. Touch Number pads to
enter cooking times, cook powers,
selection, quantities, or weights.
16. See "Lower Electric Convection Oven
Use and Care Guide".
NOTES:
• If you touch one Command pad and then
want to choose another Command pad in the
same cycle, you must press CANCEL first.
• If you attempt to enter unacceptable
instructions three tones will sound. Touch
CANCEL and re-enter the instructions.
Audible signals
Audible signals are available to guide you
when setting and using your oven:
• A programming tone will sound each
time you touch a pad.
• Four tones signal the end of a cooking
cycle or the Minute Timer countdown.
Choosing cooking function
settings
The cooking functions discussed in the
"Getting to Know Your Microwave Oven" and
"Microwave Cooking" sections use Command
pads to choose cooking function settings.
Another way to choose cooking function set-
tings is by using Code pads. Code pads are
Number pads used to select a cook power,
food settings, or quantities. Food setting charts
found in the "Using CUSTOM REHEAT,"
"Using CUSTOM DEFROST," and "Using
CUSTOM COOK" sections list only Code pads
for food settings. The charts in "Using code
pads" in the "Microwave Cooking" section list
all the available Code pads.
Interrupting cooking
You can stop the oven during a cycle by
opening the door. The oven stops heating
and the fan stops, but the light stays on.
To restart cooking for all cycles, close
the door and
W¸¸_UC_
If you do not want to continue cooking:
• Close the door and the light goes off
AND
• ©
10

etting to Know Your Microwave Oven
Using the control lock
The control lock prevents unwanted use of
the oven by disabling the control panel
command pads.
NOTES:
• Control lock is available only when both
the lower oven and the microwave oven
are not in use. It is also not available
during the Self-Cleaning cycle or the
Sabbath mode.
• Control lock does not disable the Timer
or Clock.
• Set control lock when cleaning the control
panel to prevent oven from accidentally
turning on.
To lock or deactivate the control panel:
Press and hold CONTROL LOCK (Number
Pad 3) for 5 seconds. A single
tone will sound and "CONTROL
LOCK i_l'will appear on the
display.
To unlock the control panel:
Press and hold CONTROL LOCK (Number
Pad 3) for 5 seconds. A single
tone will sound after 5 seconds
and "CONTROL LOCK I_" will
disappear from the display.
Prompt for start
If "START?" is lit, this means that START
has not been pressed. If you do not press
START, the programmed function will
automatically be canceled in 5 minutes.
Your microwave oven comes with two useful
cooking utensils. Please review this chart to
become familiar with their use.
NOTE: Use oven mitt when removing
broiling grid and CRISPWARE TM Crisper
Pan. Use Crisper Pan handle when
removing Crisper Pan. Do not touch the top
of the microwave oven when broiling.
11

_Jetting to Know Your Microwave Oven
UTENSIL
Convection Grid CRISPWARE TM Crisper Pan Handle
(Short Legs) Crisper Pan
browning of small
amounts of food.
Place the broiling
grid securely on the
turntable. Using the
broiling grid will put
food close to the
broil element.
cooking in the
microwave oven.
Place the grid
securely on the
turntable. Using the
convection grid,
position the food or
baking dish in the best
location for necessary
(or required) air
circulation during
CONVECT cooking.
crisp, brown bottom surface. Do not place any
other utensils on the Crisper Pan since the pan
quickly becomes very hot and can cause dam-
age to the utensil. Always use the turntable as
support for the Crisper Pan.
The Crisper Pan is designed specifically for
use with the patented Double Emission System
in this oven. Do not use Crisper Pan in any
other microwave oven or in a thermal oven.
The Crisper Pan is dishwasher safe.
NOTE: Only use wooden or plastic cooking
utensils on the Crisper Pan to prevent scratches.
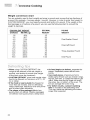
Pan order chart
12X" x 1" (31 cm x 2.54 cm) Crisper Pan
P.N. 4375191
11_" x 1" (29 cm x 2.54 cm) Crisper Pan
P.N. 4378131
11" x 1_" (28 cm x 3.5 cm) Baking Pan
RN. 4378132
To order additional Crisper or Baking
Pans, see the chart at left. Then call
1-800-422-1230 and follow the instructions
and telephone prompts you hear.
OR
Use the CRISPWARE TM order card
included with your Use and Care Guide.
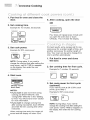
When your microwave oven is first plugged
in or after a power failure, the colon and time
of day will flash for 5 minutes. "PF" will show
on the lower oven Temperature Display until
any pad is touched.
NOTES:
• You can only set the clock when the lower
oven and the microwave oven are not
cooking food and when the Minute Timer is
not counting down.
• You can clear the time of day from the
Display by touching and holding CLOCK
SET.START for 5 seconds. Touch CLOCK
To set time:
1. Choose the clock.
f CLOCK1
2. Enter time of day.
Example for 5:30:
SET,START to see the time of day again.
12

erring to Know Your Microwave Oven
3. Complete entry.
OR
cLocK1
NOTE: You can use other Command pads
while the Minute Timer is counting down.
1. Choose the Minute Timer.
NOTE: The Timer does not start or stop
the microwave oven. It works like a
regular kitchen timer. It can be set in
hours and minutes up to 99 hours and 59
minutes, or in minutes and seconds up to
99 minutes and 59 seconds.
once for minutes
and seconds
OR
twice for hours
and minutes
2. Enter time to be counted down.
Example for 10 minutes:
3. Start countdown.
(display shows time
counting down)
When countdown ends, four tones will
sound and the display will show "End".
Four tones will sound and repeat every
minute until you touch TIMER CANCEL.
This will clear the Display.
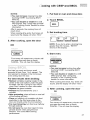
To cancel any time:
EASY MINUTE lets you cook food for 1
minute at 100% cook power or add an extra
minute to your cooking cycle. You can also
use it to extend cooking time in multiples of
1 minute, up to 99 minutes.
NOTES:
• To extend cooking time in multiples of 1
minute, touch EASY MINUTE during cooking.
• You can enter EASY MINUTE only after
closing the door.
• You can use EASY MINUTE with all timed
cooking.
• If the door has been opened during cook-
ing, you can restart cooking by closing the
door and touching EASY MINUTE/START.
1. Put the food in oven and close
the door.
2. Choose setting.
Example for one minute:
once
When cooking time ends, four tones will
sound and the display will show "End".
Four tones will repeat every minute until
you open the oven door or touch
CANCEL. This will clear the display.
13

icrowave Cooking
This section gives you instructions for operating each microwave function. Please read
these instructions carefully.
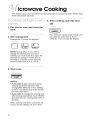
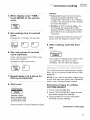
4. After cooking, open the door
1. Put food in oven and close the
door.
2. Set cooking time.
Example for 1 minute, 30 seconds:
OR
fMICR0WAVE OVEN1
0A"L2. tS_J
Four tones will repeat every minute until
you open the oven door or touch
CANCEL. This will clear the display.
NOTE: During setup, if you want to
change the cooking time you have
entered, you must touch four digits. For
example, to change 1 minute and 30
seconds to 1 minute and 45 seconds,
touch Number pads 0, 1,4, and 5.
3. Start oven.
NOTES:
• If you want to add more time during
cooking use EASY MINUTE. See
"Using EASY MINUTE" in the "Getting
to Know Your Microwave Oven" section
for more information.
• If you want to change the cooking time
after cooking has started, touch MICRO
and enter the new cooking time within 5
seconds.
When cooking time ends, four tones will
sound, and the display will show "End".
14

icrowave Cooking
,C':O0!iii,, : :iiiiiiiiiiiii, "iii !!!iiii iii!!!!!i,i: : iiii ¸¸¸CO0!iii , ,i :
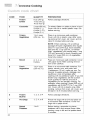
For best results, some recipes call for
different cook powers. The lower the cook
power, the slower the cooking. Each
Number pad also stands for a different
percentage of cook power. Many microwave
cookbook recipes tell you by number,
percent, or name which cook power to use.
The following chart gives the percentage of
cook power each Number pad stands for,
and the cook power name usually used. tt
also tells you when to use each cook power.
Follow recipe or food package instructions if
available.
NOTE: Refer to a reliable cookbook for
cooking times
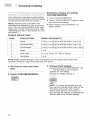
COOK POWER NAME WHEN TO USE IT
10=100% of full power High * Quick heating many convenience foods
and foods with high water content, such
as soups and beverages
• Cooking small tender pieces of meat,
ground meat, poultry pieces, fish fillets,
and vegetables
9=90% of full power • Heating cream soups
8=80% of full power • Heating rice, pasta, or casseroles
7=70% of full power Medium-High • Cooking sensitive foods such as cheese
and egg dishes, pudding, and custards
• Cooking non-stirrable casseroles, such as
lasagna
of ........................................................................................................................................................................................................................
and egg dishes, pudding, and custards
• Cooking non-stirrable casseroles, such as
lasagna
...........................................................Medium ...............................................................po _ an asts.........
• Melting chocolate
power .....................................................................................................................................................................................• Simmering stews .....................................................................................................................................................................................................................
.......................................................................................................................................................................................................................................................................................................................................t Heat!ng pastr!es..........................................................................................................................................................................................................
3=30% of full power Medium-Low, • Defrosting foods, such as bread, fish,
Defrost meats, poultry, and precooked foods
2=20% of full power • Softening butter, cheese, and ice cream
i =i 6°Yoof fuji power Cow • Keeping food warm
• Taking chill out of fruit
NOTE: For information on which cook powers and cooking times you need for specific foods,
see the "Microwave cooking chart" in the "Cooking Guide" section.
15

:_ icrowave Cooking
'¸¸ ¸¸¸¸ iilii
1. Put food in oven and close the .........................................................................................................................................................................................................................................................................................................................................................
door. 5. After cooking, open the door
.
Set cooking time.
Example for 10 minutes, 30 seconds:
0
.
Set cook power.
Example for 50% cook power:
NOTE: During setup, if you want to
change the cooking time after setting the
cook power, wait for TIME to reappear
on the display, then enter the new
cooking time.
OR
C
fMICROWAVE OVEN1
Four tones will repeat every minute until
you open the oven door or touch
CANCEL. This will clear the display.
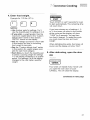
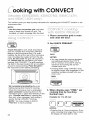
For best results, some recipes call for one
cook power for a certain length of time, and
another cook power for another length of
time. Your oven can be set to change from
one to another automatically.
1. Put food in oven and close
the door.
2. Set cooking time for first cycle.
Example for 7 minutes, 30 seconds:
.
16
Start oven.
(display counts
down time)
NOTES:
• If you want to add more time during
cooking use EASY MINUTE. See
"Using EASY MINUTE" in the "Getting
to Know Your Microwave Oven" section
for more information.
• If you want to change cooking time
after cooking has started, touch MICRO
and enter the new cooking time within
5 seconds.
When cooking time ends, four tones will
sound and the display will show "End".
3. Set cook power for first cycle
(optional).
If you want to cook at full (100%) cook
power, go to Step 5.
Example for 50% cook power:
NOTE: During setup, if you want to
change the cooking time after setting the
cook power, wait for TIME to reappear on
the display, then enter the new cooking
time.

_icrowave Cooking
4. When display says "TIME,"
touch MICRO to set second
cycle.
5. Set cooking time for second
cycle.
Example for 3 minutes, 25 seconds:
6. Set cook power for second
cycle (optional).
If you want to cook at full (100%) cook
power, go to Step 8.
Example for 60% cook power:
7. Repeat Steps 4 to 6 above for
third cycle (optional).
8. Start oven.
(display counts
down cooking time
in each cycle, start-
ing with first cycle)
One short tone will sound between cycles.
NOTES:
• If you want to add more time during
cooking use EASY MINUTE. See
"Using EASY MINUTE" in the "Getting
to Know Your Microwave Oven" section
for more information.
• During any Micro cooking stage, you
can change the cooking time after
touching START. Simply touch MICRO
and enter the new cooking time within
5 seconds.
When cooking time ends, four tones will
sound, and the display will show "End".
9. After cooking, open the door
OR
{MICROWAVE OVEN1
Four tones will repeat every minute until
you open the oven door or touch
CANCEL. This will clear the display.
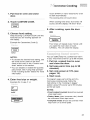
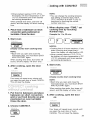
Your microwave oven automatically reheats
food. You do not have to enter times or tem-
peratures.
NOTE: tf you want to manually reheat using
a cook time and cook power see "Reheating
chart" in the "Cooking Guide" section.
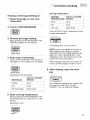
Summary of steps for setting
CUSTOM REHEAT
1. Touch CUSTOM REHEAT.
2. Touch CUSTOM REHEAT again to scan
and select reheat food settings.
3. Touch QUANTITY to scan and select
available quantity settings.
continued on next page
17

:_ icrowave Cooking
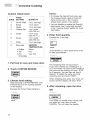
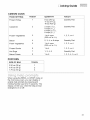
Custom reheat chart
FOOD
CODE SETTING QUANTITY
1 Dinner Plate 1 to 2 servings
2 Bread 1 to 6 slices
3 Meats 1 to 6 servings
4 Cheese Dip 1 to 3 cups
(250-750 mL)
5 Soups 1 to 4 cups
(250 mL-1 L)
6 Sauce 1 to 3 cups
(250-750 mL)
7 Pizza 1 to 2 servings
8 Beverage SERVING
TEMPERATURE
• Coffee Warm
• Tea Hot
• Hot Very Hot
Chocolate
NOTES:
• To choose the desired food code, see
the Cooking Guide Label on the front
frame of the oven or the "Custom
reheat chart" earlier in this section.
• You can disable or enable the Quantity
pad prompt. See "Using help prompts"
in the "Cooking Guide" section for more
information.
.
Enter food quantity.
Example for 2 servings:
twice
Touch START or wait 5 seconds for oven
to start automatically.
1. Put food in oven and close door.
2. Touch CUSTOM REHEAT.
.
Choose food setting.
Keep touching CUSTOM REHEAT until
the food that you are cooking appears
on the display.
Example for Dinner Plate (Setting 1):
orlce
The remaining time will count down.
If you have chosen any of settings 4, 5,
or 6, four tones will sound in the middle of
the cycle and the display will show "STIR"
for 5 seconds. You can then stir food if
desired. To restart the cycle you must
close the door and touch START.
When reheating time ends, four tones will
sound, and the display will show "End".
5. After reheating, open the door
OR
fMIOR0WAVE 0VEN1
Four tones will repeat every minute until
you open the oven door or touch
CANCEL. This will clear the display.
18

_icrowave Cooking
Heating a beverage (Setting 8)
1. Place beverage in oven and
close door.
2. Touch CUSTOM REHEAT.
3. Choose beverage setting.
Keep touching CUSTOM REHEAT until
"BEVRG" appears on the display.
eight times
4. Enter type of beverage.
Touch CUSTOM REHEAT until the type of
beverage you want appears on the display.
three times
Example for Hot Chocolate:
TOUCH CUSTOM
BEVERAGE REHEAT
Coffee once
Tea twice
Hot Chocolate three times
5. Enter serving temperature.
Keep touching CUSTOM REHEAT until
the temperature you want shows on the
display.
Example for Hot:
C,
twice
Serving temperatures:
Very Hot three times
Touch START or wait 5 seconds for oven
to start automatically.
The heating time will count down.
NOTE: Liquid may splash out during or
after heating while stirring or adding
ingredients such as coffee granules, tea
bags, etc. (See "Operating tips" in the
"Getting to Know Your Microwave Oven"
section for more information.)
When heating time ends, four tones will
sound, and the display will show "End".
6. After heating, open the door
OR
fMICROWAVE OVEN]
Four tones will repeat every minute until
you open the oven door or touch
CANCEL. This will clear the display.
19

:_ icrowave Cooking
Li! ,:,! iiii ih !!,iiiii D!iii! !!i!ii ::i!:iii!!!,Cii S"ii
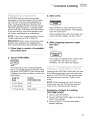
Your microwave oven uses a preset defrost
time and power according to the food setting
and the food quantity that you choose.
NOTE: Standing time is included in the
defrosting time selected by your microwave
oven. This may make defrosting times seem
longer than in other microwave ovens. (See
"Defrosting tips" later in this section for more
information.)
Custom defrost chart
Summary of steps for setting
CUSTOM DEFROST
1. Touch CUSTOM DEFROST.
2. Touch CUSTOM DEFROST again to scan
and select food settings.
3. Enter weight or touch QUANTITY to
select quantity.
NOTE: Bagel quantity settings 1 and 2 may appear to have longer defrost times than
necessary. However, longer times use less cook power.
1. Put food in oven and close
door.
2. Touch CUSTOM DEFROST.
.
Choose food setting.
Keep touching CUSTOM DEFROST until
the food that you are cooking
appears on the display.
Example for Meats (Setting 1):
once
NOTE: To choose the desired food set-
ting, see the Cooking Guide Label on the
front frame of the oven, the "Custom
defrost chart" earlier in this section, or
scan through the settings by pressing the
Quantity pad (once for each setting).
20
Page is loading ...
Page is loading ...
Page is loading ...
Page is loading ...
Page is loading ...
Page is loading ...
Page is loading ...
Page is loading ...
Page is loading ...
Page is loading ...
Page is loading ...
Page is loading ...
Page is loading ...
Page is loading ...
Page is loading ...
Page is loading ...
Page is loading ...
Page is loading ...
Page is loading ...
Page is loading ...
Page is loading ...
Page is loading ...
-
 1
1
-
 2
2
-
 3
3
-
 4
4
-
 5
5
-
 6
6
-
 7
7
-
 8
8
-
 9
9
-
 10
10
-
 11
11
-
 12
12
-
 13
13
-
 14
14
-
 15
15
-
 16
16
-
 17
17
-
 18
18
-
 19
19
-
 20
20
-
 21
21
-
 22
22
-
 23
23
-
 24
24
-
 25
25
-
 26
26
-
 27
27
-
 28
28
-
 29
29
-
 30
30
-
 31
31
-
 32
32
-
 33
33
-
 34
34
-
 35
35
-
 36
36
-
 37
37
-
 38
38
-
 39
39
-
 40
40
-
 41
41
-
 42
42


KitchenAid YKEMS307GW2 Owner's manual
- Category
- Ovens
- Type
- Owner's manual
Ask a question and I''ll find the answer in the document
Finding information in a document is now easier with AI
Related papers
-
KitchenAid KEMC308 User manual
-
-
KitchenAid KCMC155JBL0 Owner's manual
-
-
-
KitchenAid KEHC309JBL0 User manual
-
KitchenAid KEHC309JBL07 User manual
-
-
-
Other documents
-
Bosch HMC80251UC/01 Owner's manual
-
LG MT1110SKQ1 Owner's manual
-
-
Bosch HMC80252UC Owner's manual
-
Bosch HMC80242UC User manual
-
Bosch HMC87152UC/07 Owner's manual
-
Palsonic PMO585 User manual
-
-
PowerXL B0769Y1JVN Air Fryer Pro Plus User guide
-
Amana AMC7159TAB0 User manual